
Looking for a yarn?


Comments / Questions (68)
![]() Maraili wrote:
Maraili wrote:
Hej igen, det er i bunden af ryggen, lige inden ribben. 8 udtagninger fra vrangen jævnt fordelt. Det eneste sted man skal tage ud fra vrangen. Det giver huller. Mvh. Maraili
20.12.2022 - 16:57DROPS Design answered:
Hej Maraili, hvis du strikker omslaget drejet på næste pind, vil hullerne ikke kunne ses.... MEN du kan også tage ud ved at strikke 2 masker i én maske, hvis du synes det bliver finere :)
21.12.2022 - 14:42
![]() Maraili wrote:
Maraili wrote:
Hej strikkere, jeg har samme spørgsmål som Ch. Kristensen, da der opstår huller ved udtagningerne lavet på vrangen. Dem ser man ikke på billedet. Desuden forstår jeg ikke formålet med udtagningerne. Tak! Mvh. M
19.12.2022 - 21:37DROPS Design answered:
Hej Maraili, vi vil gerne hjælpe, men skriv hvor du er i opskriften? Hvilke huller og hvilke udtagninger?
20.12.2022 - 14:37
![]() Maraili wrote:
Maraili wrote:
Hej Drops, tak for en fin opskrift. vedr. bagstykket. Hvordan kan man tage ud på hver 4. pind, når det skal ske fra retsiden? Skal det så ikke være hver 5. pind? Måske har jeg misforstået noget. Mvh. Maraili
25.11.2022 - 22:29DROPS Design answered:
Hej Maraili, hvis din første pind er fra retsiden, så tager du ind på pind 1,5,9,13 osv (da bliver det hver 4.pind :)
30.11.2022 - 14:17
![]() Emma wrote:
Emma wrote:
When knitting the front piece, am I supposed to make the additions to both sides immediately after knitting the 8 cm shoulder pieces? The back piece required an additional 4 cm after the shoulder pieces that were 4 cm, so I am a bit concerned I might have made the front piece too long.
06.05.2022 - 06:49DROPS Design answered:
Dear Emma, yes correct, the neck on back piece is shorter, so that you join both shoulders together after 4 cm, while the neck on front piece will be deeper, reason why you join both shoulders together after 8 cm (in 3rd and 4th size). Happy knitting!
06.05.2022 - 07:50
![]() Jacqueline wrote:
Jacqueline wrote:
Vraag gaat over meerdering eind achterpand voordat het boord begint, 8 steken meerderen verdeel over 68 steken, zonder de kantsteken, zou inhouden tussen 8e en 9e steek zoals in het voorbeeld. Nu tel ik vanaf steek 2 en dan maak ik een lus tussen 8e en 9e steek maar het komt niet uit. Het moet ik het dan wel doen? Graag advies! Dank
27.02.2022 - 19:18DROPS Design answered:
Dag Jacqueline,
Als je 68 deelt door 8 dan kom je op 8,5, dus je zou om de 8,5 steken moeten meerderen. Dat kan natuurlijk niet, dus je meerdert afwisselt steeds na 8 en 9 steken.
28.02.2022 - 07:25
![]() María wrote:
María wrote:
El delantero pone trabajar como la espalda. Estoy haciendo una talla L y donde se explican los aumentos para la sisa pone: cuando la labor mida 17-14-8-12-10-7 cm desde el borde de montaje en los hombros, aumentar 1 punto a cada lado para las sisas. En este caso en el delantero para cuando se juntan los hombros con los puntos del medio ya mide más de 8cm desde el borde de montaje. Entonces ¿cómo y cuándo tengo que hacer los aumentos para las sisas en el delantero? Gracias!
06.12.2021 - 23:39DROPS Design answered:
Hola Maria, tienes razón, algo anda mal aquí. Enviaré una consulta al departamento de diseño. Mira en la pagina para una corrección. Saludos!
07.12.2021 - 09:18
![]() SAILLER Marie-Hélène wrote:
SAILLER Marie-Hélène wrote:
Bonjour. Pour terminer la manche, pouvez-vous me dire comment repartir les 51 mailles depuis l\'aiguille circulaire vers les aiguilles a double pointes pour tricoter en cotes 1maille endroit 2 mailles envers? Merci.
06.12.2021 - 15:59DROPS Design answered:
Bonjour Mme Sailler, tricotez simplement les mailles de l'aiguille circulaire avec les aiguilles doubles pointes, avec 5 aiguilles, répartissez les mailles par exemple à raison de 12 mailles sur 1 aiguille et 13 mailles sur les 3 autres ou bien avec 4 aiguilles, répartissez 17 mailles sur 3 aiguilles. Bon tricot!
07.12.2021 - 07:05
![]() Ainhoa wrote:
Ainhoa wrote:
En la espalda cuando pone aumentar 1 punto a cada lado para las sisas lo refiere al TIP 1 que dice: Aumentar dentro de 3 puntos orillo en punto musgo. Aumentar 1 punto haciendo 1 hebra. En la siguiente fila trabajar las hebras de revés retorcido para evitar que se formen agujeros. Después trabajar los puntos aumentados en punto jersey.” Si aumento entre los puntos de orillo nunca será luego punto jersey, seguirá siendo punto musgo. Es incongruente lo que dice el TIP1.
30.11.2021 - 20:47DROPS Design answered:
Hola Ainhoa, en la espalda, se trabajan 3 puntos en punto musgo, 1 aumento, los puntos de la espalda, 1 aumento y 3 puntos en punto musgo. El aumento se trabaja como se explica en el TIP-1 PARA LOS AUMENTOS. Este aumento se tiene que trabajar posteriormente en punto jersey, para que los puntos en punto musgo no aumenten en cantidad.
30.11.2021 - 22:30
![]() Ainhoa wrote:
Ainhoa wrote:
En la espalda cuando pone aumentar 1 punto a cada lado para las sisas lo refiere al TIP 1 que dice: Aumentar dentro de 3 puntos orillo en punto musgo. Aumentar 1 punto haciendo 1 hebra. En la siguiente fila trabajar las hebras de revés retorcido para evitar que se formen agujeros. Después trabajar los puntos aumentados en punto jersey.” Si aumento entre los puntos de orillo nunca será luego punto jersey, seguirá siendo punto musgo. Es incongruente lo que dice el TIP1.
30.11.2021 - 20:44
![]() Cem wrote:
Cem wrote:
Ik heb deze trui met 2 draden brushed Apalca Silk gebreid Met een mooi resultaat! Ik heb de trui bijna klaar, moet nog 11/2 mouw en mijn wol is op. Kunt u me vertellen hoeveel bolletjes ik nog moet bestellen voor 1 mouw in maat S ?
16.11.2021 - 20:32DROPS Design answered:
Dag Cem,
Hiervoor zou je de mouw die al gebreid hebt kunnen wegen, zodat je weet hoeveel wol je voor 1 mouw nodig hebt.
17.11.2021 - 16:18
|
|
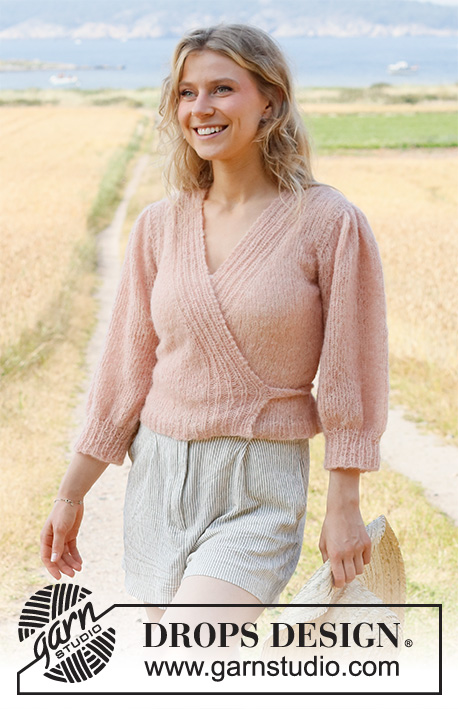
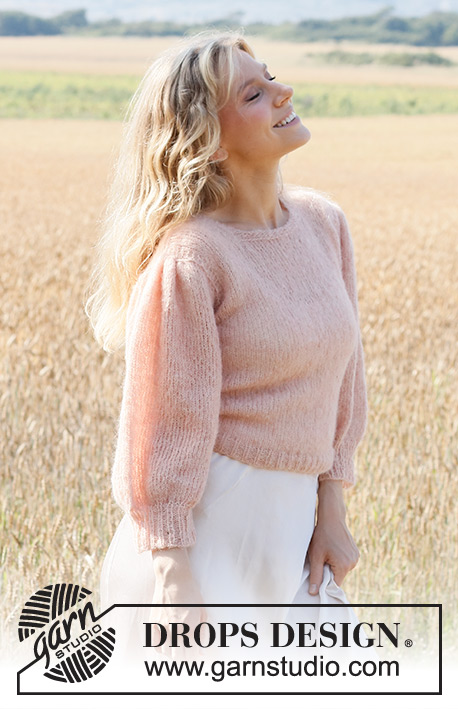
Peaches and Cream#peachesandcreamsweater |
|
 |
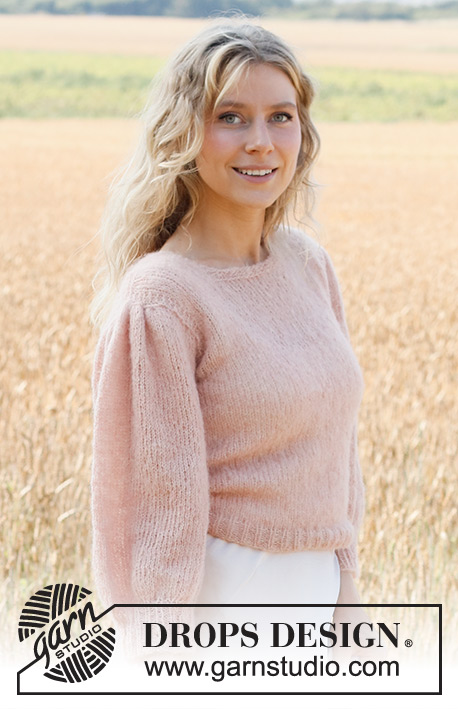 |
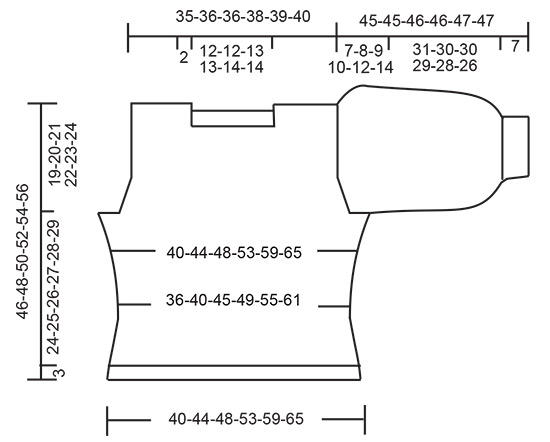
Knitted jumper in DROPS Brushed Alpaca Silk. Piece is knitted top down with ¾ pouffe sleeves. Size: S - XXXL
DROPS 223-1 |
|
|
------------------------------------------------------- EXPLANATION FOR THE PATTERN: ------------------------------------------------------- GARTER STITCH (back and forth): Knit all rows. 1 ridge vertically = knit 2 rows. INCREASE TIP-1 (applies to armholes): All increases are done from the right side. Increase inside 3 edge stitches in garter stitch. Increase 1 stitch by making 1 yarn over. On next row (wrong side) purl yarn overs twisted to avoid holes. Then work the increased stitches in stocking stitch. INCREASE TIP-2 (applies to sides of body): Increase 1 stitch inside 1 edge stitch in garter stitch in the side by making 1 yarn over. On next row (wrong side) purl yarn overs twisted to avoid holes. INCREASE/DECREASE TIP (evenly): To calculate how to increase/decrease evenly, use the total number of stitches on row (e.g. 70 stitches) minus edge stitches (e.g. 2 stitches), and divide the remaining stitches by number of increases/decreases to be done (e.g. 8) = 8,5. In this example increase by making 1 yarn over after alternately every 8th and 9th stitch, do not increase over edge stitches. On next row work yarn overs twisted to avoid holes If decreasing knit in this example alternately every 7th and 8th stitch and every 8th and 9th stitch together. DECREASE TIP-1 (applies to sides of body): All decreases are done from the right side! Decrease inside 1 edge stitch in garter stitch. Decrease as follows after 1 edge stitch in garter stitch: Slip 1 stitch knitwise, knit 1, pass slipped stitch over stitch worked (= 1 stitch decreased). Decrease as follows before 1 edge stitch in garter stitch: Work until 2 stitches remain before edge stitch, knit 2 together(= 1 stitch decreased). DECREASE TIP-2 (applies to mid under sleeves): Work until 3 stitches remain before marker thread, knit 2 together, knit 2 stitches (marker thread is between these 2 stitches), slip 1 stitch knitwise, knit 1, pass slipped stitch over stitch worked (= 2 stitches decreased). CAST-OFF TIP: To avoid a tight cast-off edge you may use a larger needle size. If this also is too tight, work a 1 yarn over after approx. every 3rd stitch while casting off (cast off yarn overs as regular stitches). ------------------------------------------------------- START THE PIECE HERE: ------------------------------------------------------- JUMPER - SHORT OVERVIEW OF THE PIECE: Work front pieces and back piece back and forth on circular needle separately, top down. Sleeve cap is worked back and forth on circular needle, top down. Then work the rest of sleeve in the round on circular needle/double pointed needles. RIGHT SHOULDER BACK (when garment is worn): Cast on 20-21-20-21-21-22 stitches on circular needle size 4 mm. Work 1 ridge in GARTER STITCH - read explanation above, over all stitches. Switch to circular needle size 5 mm. Then work the outermost 3 stitches in each side of piece in garter stitch and work the remaining stitches in stocking stitch. When piece measures 4 cm, work, next row from wrong side as follows: Work as before over all stitches and cast on 20-20-22-22-24-24 new stitches at the end of row for neck = 40-41-42-43-45-46 stitches. Cut the yarn. Put piece aside and work the left shoulder at the back. LEFT SHOULDER BACK (when garment is worn): Cast on 20-21-20-21-21-22 stitches on circular needle size 4 mm. Work 1 ridge over all stitches. Switch to circular needle size 5 mm. Then work the outermost 3 stitches in each side of piece in garter stitch and work the remaining stitches in stocking stitch. Continue like this until piece measures 4 cm– adjust to finish with last row from wrong side. Then work back piece as explained below. BACK PIECE: Now slip left and right shoulder on to same circular needle so that the 20-20-22-22-24-24 new stitches cast on for neck are in the middle of needle = 60-62-62-64-66-68 stitches. READ ALL OF THE FOLLOWING SECTION BEFORE CONTINUING! Work pattern from the right side as follows: 3 stitches in garter stitch, stocking over the next 14-15-14-15-15-16 stitches, garter stitch over the next 26-26-28-28-30-30 stitches, stocking stitch over the next 14-15-14-15-15-16 stitches, 3 stitches in garter stitch. Continue back and forth like this until 3 ridges have been worked over stitches for neck. Then work in stocking stitch with 3 edge stitches in garter stitch in each side towards armholes. AT THE SAME TIME when piece measures 17-14-8-12-10-7 cm from cast-on edge on shoulders, increase 1 stitch in each side for armholes – read INCREASE TIP-1. Increase like this every 4th-4th-4th-2nd-2nd-2nd row, 2-4-8-11-15-19 times in total in each side= 64-70-78-86-96-106 stitches. Piece measures approx. 19-20-21-22-23-24 cm. REMEMBER THE KNITTING TENSION. Now cast on 3 new stitches for armholes at the end of the next 2 rows = 70-76-84-92-102-112 stitches. NOW MEASURE PIECE FROM HERE! Work 4 rows in stocking stitch with 6 stitches in garter stitch in each side. Then work in stocking stitch with 1 edge stitch in garter stitch in each side. When piece measures 4 cm from armhole, decrease 1 stitch in each side - read DECREASE TIP-1 (= 2 stitches decreased). Repeat decrease when piece measures 8-8-9-9-10-10 cm and 12-13-14-15-16-17 cm = 64-70-78-86-96-106 stitches. When piece measures 15-16-17-18-19-20 cm, increase 1 stitch inside 1 edge stitch in garter stitch in each side - READ INCREASE TIP-2 (= 2 stitches increased). Repeat increase when piece measures 19-20-21-22-23-24 cm and 23-24-25-26-27-28 cm = 70-76-84-92-102-112 stitches. Continue until piece measures 24-25-26-27-28-29 cm from armhole and increase 8-8-9-10-12-14 stitches evenly on last row from wrong side - read INCREASE/DECREASE TIP = 78-84-93-102-114-126 stitches. Switch to circular needle size 4 mm and work next row from right side as follows: 1 edge stitch in garter stitch, * knit 1, purl 2 *, repeat from *-* until 2 stitches remain on needle, knit 1, 1 edge stitch in garter stitch. Continue rib like this for 3 cm. Cast off with knit over knit and purl over purl - read CAST-OFF TIP. Back piece measures approx. 46-48-50-52-54-56 cm from shoulder and down. LEFT SHOULDER FRONT (when garment is worn): Cast on 20-21-20-21-21-22 stitches on circular needle size 4 mm. Work 1 ridge over all stitches. Switch to circular needle size 5 mm. Then work the outermost 3 stitches in each side of piece in garter stitch and work the remaining stitches in stocking stitch. When piece measures 7-7-8-8-9-9 cm, work next row from wrong side as follows: Work as before over all stitches and cast on 20-20-22-22-24-24 new stitches at the end of row for neck = 40-41-42-43-45-46 stitches. Cut the yarn. Put piece aside and work the right front shoulder. RIGHT SHOULDER FRONT (when garment is worn): Cast on 20-21-20-21-21-22 stitches on circular needle size 4 mm. Work 1 ridge over all stitches. Switch to circular needle size 5 mm. Then work the outermost 3 stitches in each side of piece in garter stitch and work the remaining stitches in stocking stitch. Continue until piece measures 7-7-8-8-9-9 cm, adjust so that last row is worked from wrong side. FRONT PIECE: Work as on back piece. SLEEVE: Cast on 20-20-20-22-22-22 stitches on circular needle size 5 mm. Knit 1 row from right side while increasing 7-8-9-8-8-8 stitches evenly - read INCREASE/DECREASE TIP = 27-28-29-30-30-30 stitches. Purl 1 row from wrong side. Work next row as follows from right side: Knit 1, work 2 stitches in each of the next 25-26-27-28-28-28 stitches (i.e. work in front and back loop of stitch), knit 1 = 52-54-56-58-58-58 stitches. Work stocking stitch back and forth to sleeve cap, and cast at the same time on new stitches at the end of every row in each side as follows: Cast on 3 stitches 1-1-1-1-1-1 time in each side, 2 stitches 3-3-3-3-3-3 times in each side, 1 stitch 0-1-2-3-5-6 times in each side, 2 stitches 3-3-3-3-3-4 times in each side, and then 3 stitches 1 time in each side = 88-92-96-100-104-110 stitches. Put piece together and continue in the round on circular needle. Insert 1 marker thread where piece is put together (= mid under sleeve). Work in stocking stitch in the round. When piece measures 4 cm from where it was put together, decrease 2 stitches mid under sleeve - read DECREASE TIP-2. Decrease like this every 4-4-3-3-2-2 cm 3-3-4-4-5-6 times in total = 82-86-88-92-94-98 stitches. Work until piece measures 38-38-39-39-40-40 cm from cast-on edge. Knit 1 round while decreasing 14-14-12-12-14-14 stitches evenly = 68-72-76-80-80-84 stitches. Work next round as follows: * Knit 2, knit 2 together(= 1 stitch decreased) *, work from *-* the entire round= 51-54-57-60-60-63 stitches. Switch to double pointed needles size 4 mm and work rib in the round = knit 1/purl 2 for 7 cm. Loosely cast off with knit over knit and purl over purl – remember CAST-OFF TIP. Sleeve measures approx. 45-45-46-46-47-47 cm from cast-on edge and down. Work another sleeve the same way. ASSEMBLY: Sew shoulder seams inside cast-on edges. Sew side seams inside 1 edge stitch in garter stitch. Now sew sleeves to body by placing sleeves under edge in garter stitch along armholes and sewing small stitches from right side (there should not be a loose edge when sewing, and sew in outermost stitch in garter stitch from right side, so that the edge in garter stitch lies nicely outside sleeve). |
|
 |
|
Have you finished this pattern?Tag your pictures with #dropspattern #peachesandcreamsweater or submit them to the #dropsfan gallery. Do you need help with this pattern?You'll find 30 tutorial videos, a Comments/Questions area and more by visiting the pattern on garnstudio.com. © 1982-2025 DROPS Design A/S. We reserve all rights. This document, including all its sub-sections, has copyrights. Read more about what you can do with our patterns at the bottom of each pattern on our site. |
|


With over 40 years in knitting and crochet design, DROPS Design offers one of the most extensive collections of free patterns on the internet - translated to 17 languages. As of today we count 320 catalogues and 12092 patterns translated into English (UK/cm). 12092
We work hard to bring you the best knitting and crochet have to offer, inspiration and advice as well as great quality yarns at incredible prices! Would you like to use our patterns for other than personal use? You can read what you are allowed to do in the Copyright text at the bottom of all our patterns. Happy crafting!
Post a comment to pattern DROPS 223-1
We would love to hear what you have to say about this pattern!
If you want to leave a question, please make sure you select the correct category in the form below, to speed up the answering process. Required fields are marked *.