
Popularne kategorie
Szukasz włóczki?


Komentarze / Pytania (70)
![]() Misia napisała::
Misia napisała::
Hei, haluan varmistaa: "kun olet neulonut piirrokset A.1 ja A.2 loppuun, jatka mallineuletta ja lisäyksiä kuten aiemmin" tarkoittaa siis, että pitsineuletta jatketaan niin, että joka toinen kerros lisätään silmukka A1a:n alkuun, A1c:n loppuun ja A2:n alkuun ja loppuun? Kuinka monta kerrosta tätä tulee yhteensä?
04.03.2021 - 15:19Odpowiedź DROPS Design :
Kyllä, lisäyksiä jatketaan kuten aiemmin, eli työhön lisätään joka 2. kerroksella 8 silmukkaa. Tämä tehdään yhteensä 22-25-28-32-35-38 kertaa.
24.03.2021 - 16:41
![]() Elisabeth Burrell napisała::
Elisabeth Burrell napisała::
Trying to get the diagram into my head and already stuck on this question: does every other round begin with a YARN OVER as per your symbol description??
25.02.2021 - 03:13Odpowiedź DROPS Design :
Hi Elizabeth, No, each round begins with knit 1, then you start the pattern, The same at the end of the round, you finish with knit 1. Happy knitting!
25.02.2021 - 07:29
![]() Thérèse Champagne napisała::
Thérèse Champagne napisała::
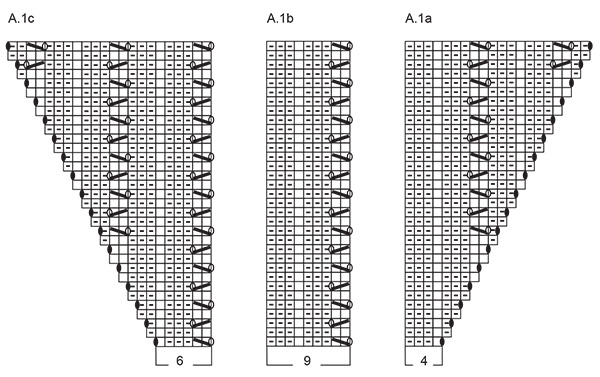
C'est la première fois que j'essaie un modèle de haut en bas, que veut dire en A.1b au-dessus des mailles? Est-ce que je dois monter 27 mailles? Merci beaucoup, j'aimerais tellement faire ce modèle.
19.02.2021 - 23:32Odpowiedź DROPS Design :
Bonjour Mme Champagne, quand il est indiqué de tricoter A.1b au-dessus des 27 mailles suivantes, ceci veut dire que vous devez tricoter les 27 mailles suivantes en suivant le diagramme A.1b, autrement dit répétez 3 fois les 9 mailles du diagramme. Bon tricot!
22.02.2021 - 07:32
![]() Lena napisała::
Lena napisała::
Jeg har strikket denne toppen og den ble veldig fin, bortsett fra at avfellingskanten ruller seg utover. Jeg har sett videoen om å felle og felte av veldig løst, så jeg tror ikke at det er for stramt. Da burde kanten dessuten ha rullet innover. Jeg lurer på om jeg må ta opp og felle av strammere. Det er kanskje nok å presse ned kantene, men jeg vil ikke prøve fordi det da vil bli vanskeligere å ta opp hvis jeg må strikke om. Har dere et godt råd?
11.02.2021 - 11:20Odpowiedź DROPS Design :
Hej Lena, ja det er muligt at du kan have felt af for løst. De 2 riller skal være med til at gøre så kanten ikke ruller, men prøv at felle lidt strammere. God fornøjelse!
16.02.2021 - 14:09
![]() Judy napisała::
Judy napisała::
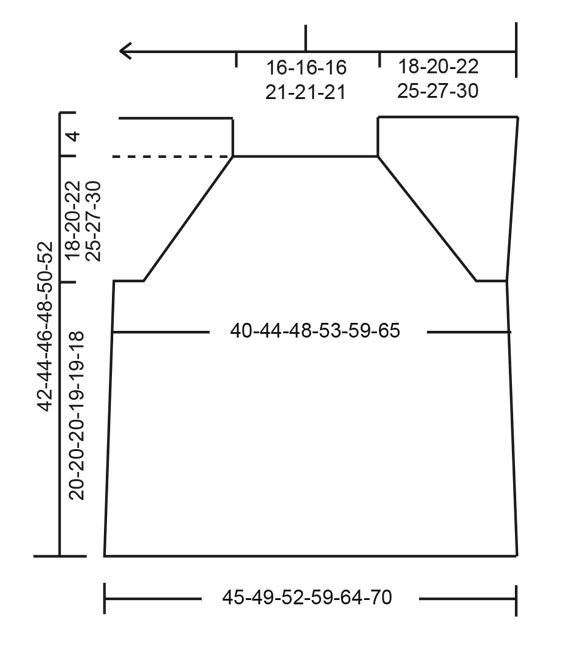
What are the measurements for the different sizes please?
05.02.2021 - 17:26Odpowiedź DROPS Design :
Hi Judy, you will find the schematic drawing for each garment below the pattern. how to read it you will find HERE . Happy knitting!
05.02.2021 - 17:35
![]() Karyn McLean napisała::
Karyn McLean napisała::
Hi, I\'m making XL total 376. I only have 5 more rows and after meticulously increasing 8 STS every other round not missing those sneaky yarn overs I only have a total count of only 232 STS on row 28. What rows do you suggest that I continue increasing every other row to get to 376 after I finish row 33.
28.01.2021 - 23:07Odpowiedź DROPS Design :
Dear Mrs McLean, increasing 8 sts on every other round a total of 32 times means you will have worked 64 rows in total and increased (8x32=) 256 sts in total (+ 120 sts cast on = 376 sts). If you have only worked to row 28, this means you have increased 14 times 8 sts = 112 sts + 120= 232 sts. Continue increasing as shown in diagram and as you made before with 1 yarn over and working the yarn over twisted either k or p. Happy knitting!
29.01.2021 - 08:08
![]() Susan Senerth napisała::
Susan Senerth napisała::
Hello- When working the pattern according to the diagram - there are 17 increase rows . (8 stitches each increase row) Which would give you 136 additional stitches added to 102 starting stitches =238 total not the 278 that I need. In the pattern It states that there are 22 increase rows ( not 17) where are the additional increase rows outside the diagram? Please let me know when you get a chance. I appreciate the help- Sue
03.11.2020 - 15:36Odpowiedź DROPS Design :
Dear Sue, after you have worked the diagrams one time in height, increases are not done, in size S you are supposed to increase a total of 22 times this means you have to work 5 more increase round (= 10 rounds in total). Continue pattern as before increasing the same way as before. 102 sts + (8 sts inc x 22 times) = 278 sts. Happy knitting!
03.11.2020 - 16:04
![]() Kaya napisała::
Kaya napisała::
Hadde planer om å strikke denne, men er tydelig noe feil i oppskrifta så den her dropper jeg. Synd, for toppen er utrolig fin!
01.11.2020 - 23:50
![]() Jutta napisała::
Jutta napisała::
Ich verstehe auch nicht, wie die passe gestrickt wird. Da steht : „ Die nächste Runde wie folgt stricken: Die ersten 78-86-92-105-115-125 Maschen wie zuvor stricken (ohne Zunahmen), kraus rechts über die nächsten 61-65-71-83-85-87 Maschen stricken, die nächsten 78-86-92-105-115-125 Maschen wie zuvor stricken (ohne Zunahmen), .... „. Wie Muss ich da Stricken? Was bedeutet“ohne Zunahmen“sind die raglanzunahnen im Diagramm enthalten?
29.06.2020 - 19:29Odpowiedź DROPS Design :
Liebe Jutta, die Zunahmen sind jetzt fertig, stricken Sie die Maschen vom Vorder- und Rückenteil im Muster wie zuvor (mit den Umschlägen vom Lochmuster) und die Maschen von den Ärmeln stricken Sie krausrechts. Viel Spaß beim stricken!
30.06.2020 - 11:06
![]() Jutta napisała::
Jutta napisała::
Hallo, wo kommen denn in der passe die Markierungsfäden hin? Wo muss ich die Raglanzunahmen machen? Habe grade ein top mit anderer Anleitung von Ihnen fertig. Da war alles gut erklärt. Hier verstehe ich die passe leider nicht. In der kurzerklärung steht was von Einteilung mit markierungsfäden. Aber nicht mehr in der Anleitung.
29.06.2020 - 10:57Odpowiedź DROPS Design :
Liebe Jutta, bei der Passe legen wird in der Anleitung keine Markierungsfäden ein, die Raglanline sind die 2 rechte Maschen die zwischen A.1a-b-c und A.2 gestrickt sind. Wenn Sie Markierungsfäden gerne einsetzen möchten, dann können Sie einen zwischen den jeweiligen 2 Maschen recht für den Raglan- die Raglanzunahmen entstehen auf beiden Seiten den 2 rechten Maschen - siehe Diagramme. Viel Spaß beim stricken!
29.06.2020 - 14:07
|
|||||||||||||||||||
Sweet Impressions#sweetimpressionstop |
|||||||||||||||||||
 |
 |
||||||||||||||||||
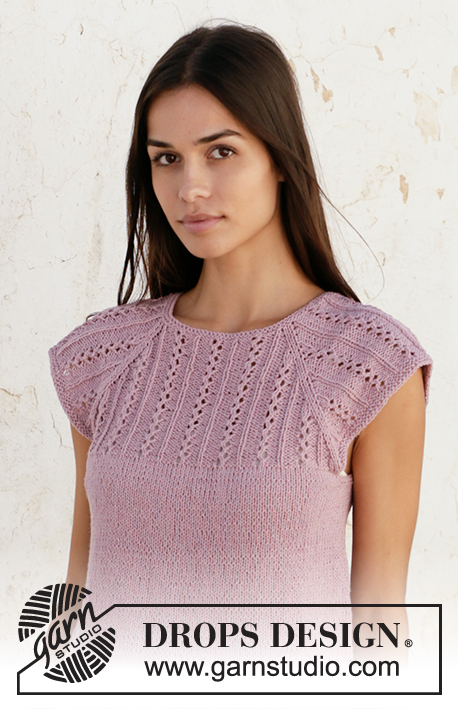
Top na drutach przerabiany od góry do dołu, z włóczki DROPS Belle, z reglanowymi rękawami i ściegiem ażurowym. Od S do XXXL
DROPS 211-12 |
|||||||||||||||||||
|
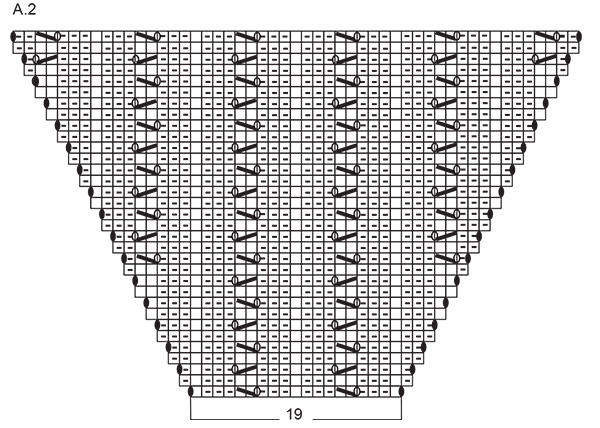
WYKORZYSTYWANE TECHNIKI: ---------------------------------------------------------- ŚCIEG FRANCUSKI (na okrągło): 1 ściągacz francuski = 2 okrążenia, tj. przerobić 1 okrążenie na prawo i 1 okrążenie na lewo. ŚCIEG FANTAZYJNY: Parz schematy A.1 i A.2. DODAWANIE OCZEK (boki topu): Przerabiać aż zostaje 2 oczka przed nitką markerem, 1 narzut, 4 oczka prawe (nitka marker znajduje się na środku tych oczek), 1 narzut. W następnym okrążeniu przerobić oczka przekręcone w miejscu narzutów na prawo, aby uniknąć dziur. Dalej przerabiać nowe oczka dżersejem. WSKAZÓWKA DO ZAMYKANIA OCZEK: Aby zamykane oczka nie ściągały robótki, do zamykania można użyć grubszych drutów. Jeżeli mimo to brzeg jest nadal zbyt ścisły, wykonać 1 narzut za ok. każdym 4-tym oczkiem, zamykać narzuty jak zwykłe oczka. ---------------------------------------------------------- ROBÓTKĘ ROZPOCZYNAMY TUTAJ: ---------------------------------------------------------- TOP – SKRÓCONY OPIS ROBÓTKI: Wykończenie dekoltu i karczek są przerabiane od góry do dołu, na okrągło na drutach z żyłką. Następnie podzielić karczek na tył/przód i rękawy. Tył/przód są przerabiane na okrągło na drutach z żyłką, od góry do dołu. WYKOŃCZENIE DEKOLTU: Na drutach z żyłką nr 3 nabrać 102-102-102-120-120-120 oczek włóczką Belle. Przerobić 2 ściągacze ściegiem francuskim – patrz powyżej. Dalej przerabiać na drutach z żyłką nr 4. KARCZEK: Zaczynając okrążenie w przejściu między lewym ramieniem i tyłem, przerabiać następująco: *1 oczko prawe, schemat A.1a (= 4 oczka), A.1b ponad 18-18-18-27-27-27 następnymi oczkami (2-2-2-3-3-3 motywy po 9 oczek), A.1c (= 6 oczek), 2 oczka prawe, A.2 (= 19 oczek), 1 oczko prawe*, powtórzyć od *-* 2 razy. Przerabiać i dodawać oczka zgodnie ze schematami. Gdy schematy A.1 i A.2 zostaną przerobione jeden raz na wysokość, dalej przerabiać ścieg fantazyjny i dodawać oczka w taki sam sposób. Dodajemy 8 oczek co 2 okrążenia, dodawane oczka są przerabiane ściegiem fantazyjnym w miarę postępu robótki. Dodawać w sumie 22-25-28-32-35-38 razy co 2 okrążenia. Po dodaniu wszystkich oczek jest 278-302-326-376-400-424 oczka. ZACHOWAĆ TAKIE SAMO NAPRĘŻENIE NICI JAK W PRZYPADKU PRÓBKI! Przerabiać kolejne okrążenie następująco (zacząć to okrążenie 2-3-3-1-3-5 oczek przed końcem poprzedniego okrążenia): przerobić 78-86-92-105-115-125 pierwszych oczek jak wcześniej (bez dodawania), przerobić 61-65-71-83-85-87 następnych oczek ściegiem francuskim, przerobić 78-86-92-105-115-125 następnych oczek jak wcześniej (bez dodawania), przerobić 61-65-71-83-85-87 ostatnich oczek ściegiem francuskim. Dalej przerabiać tak samo, aż zostaną przerobione 2 ściągacze francuskie (= 4 okrążenia). Przerobić kolejne okrążenie następująco: przerobić na prawo 78-86-92-105-115-125 pierwszych oczek (= tył), zamknąć 61-65-71-83-85-87 następnych oczek, przerobić na prawo 78-86-92-105-115-125 następnych oczek (= przód), zamknąć 61-65-71-83-85-87 ostatnich oczek. OD TEGO MOMENTU MIERZYĆ STĄD! TYŁ & PRZÓD: Przerobić 78-86-92-105-115-125 pierwszych oczek dżersejem, nabrać 6-6-8-8-10-12 oczek, przerobić 78-86-92-105-115-125 oczek dżersejem, nabrać 6-6-8-8-10-12 oczek i przerabiać na okrągło = 168-184-200-226-250-274 oczka. Przerabiać dżersejem, ale przerobić 2 ściągacze francuskie ponad 6-6-8-8-10-12 nowymi oczkami z każdej strony. Dalej przerabiać dżersejem ponad wszystkimi oczkami. Umieścić 1 nitkę marker z każdej strony, na środku nowych nabranych oczek. Gdy długość robótki wynosi 4 cm, dodać 1 oczko z każdej strony nitek markerów z każdej strony - patrz DODAWANIE OCZEK. Powtarzać dodawanie oczek w sumie 5 razy co 3 cm = 188-204-220-246-270-294 oczka. Gdy długość robótki od jej podziału wynosi 19-19-19-18-18-17 cm, przerobić 2 ściągacze francuskie ponad wszystkimi oczkami i zakończyć – PATRZ WSKAZÓWKA DO ZAMYKANIA OCZEK. |
|||||||||||||||||||
Objaśnienia do schematu |
|||||||||||||||||||
|
|||||||||||||||||||
 |
|||||||||||||||||||
 |
|||||||||||||||||||
 |
|||||||||||||||||||
Skończyłaś ten wzór?Otaguj swoje zdjęcia #dropspattern #sweetimpressionstop lub prześlij je do #dropsfan gallery. Potrzebujesz pomocy w związku z tym wzorem?Zobacz 23 instrukcje video, sekcję Komentarze/Pytania i jeszcze więcej, wchodząc na stronę wzoru na garnstudio.com © 1982-2026 DROPS Design A/S. Wszelkie prawa zastrzeżone. Ten dokument, w całości, jest chroniony prawem. Zobacz co możesz robić z naszymi wzorami na dole każdego wzoru na naszej stronie. |
|||||||||||||||||||


Posiadając 40 lat doświadczenia w projektowaniu wzorów na druty i szydełko, DROPS Design oferuje jedną z największych kolekcji bezpłatnych wzorów w internecie – przetłumaczonych na 17 języków. Obecnie jest dostępnych 324 katalogów i 12290 wzorów w języku polskim.
Dokładamy wszelkich starań, aby oferować Wam druty i szydełka, inspiracje, fachowe porady oraz doskonałej jakości włóczki w najlepszych cenach! Zamierzasz wykorzystać nasze wzory inaczej niż tylko do osobistego użytku? Przeczytaj jakie masz prawa w Copyright, który znajdziesz na końcu każdego wzoru. Miłej pracy!
Dodaj komentarz do modelu DROPS 211-12
Chcielibyśmy się dowiedzieć co masz do powiedzenia o tym wzorze!
Jeśli chcesz zadać pytanie i szybko uzyskać odpowiedź, upewnij się, że została wybrana właściwa kategoria w formularzu poniżej. Pola obowiązkowe są oznaczone *.