
Popularne kategorie
Szukasz włóczki?


Komentarze / Pytania (57)
![]() Michelle napisała::
Michelle napisała::
Bonjour. Ce modèle m interesse... j aimerais savoir si dans le dos vu qu il n y a pas de photo du dos. il y a de la dentelle ou est ce du jersey? merci 😁😁
25.09.2020 - 13:13Odpowiedź DROPS Design :
Bonjour Michelle, le point fantaisie ajouré est le même dans le dos que devant. Bon tricot!
25.09.2020 - 14:38
![]() Richard napisała::
Richard napisała::
HELP! I am in need of 3 x 50g balls of 'Drops Cotton Merino' - Colour 17- Dye Lot 52848. Any help or suggestions, gratefully received. Also, If I make a hat using Cotton Merino, but the pattern calls for 'Fingering Merino' will it make much difference?? Thank you. Richard.
27.01.2020 - 13:12Odpowiedź DROPS Design :
Dear Richard, please contact your DROPS store (and more stores if necessary) or even our DROPS Workshop - CottonMerino is a 8 ply/Dk/Worsted yarn - see shadecard - see here all patterns you can use for Cotton Merino. Happy knitting!
27.01.2020 - 14:24
![]() Richard napisała::
Richard napisała::
Sorry, the last comment should read with "I placed the marker to the side (on my RIGHT)!" Thanks.
24.01.2020 - 15:28
![]() Richard napisała::
Richard napisała::
Hi, Thanks for your replies & I've mastered the difficult start - as you say, with double-pointed needles. The raglan decreasing is another matter. As I look at the sleeve (to my left), I have placed a marker on the stitch nearest to the side. I have then placed another marker on the 1st stitch of the side (which is to my left). Now, you say to start 3 stitches before this marker- yes? Where to I start on the sleeve decrease, please.
24.01.2020 - 15:25Odpowiedź DROPS Design :
Dear Richard, you should have 1 marker between each piece; so if you look at the sleeve, there is 1 marker at the end of body (either back or front piece) = before the first stitch on sleeve and 1 marker at the end of sleeve, after the last stitch on sleeve = before the first stitch on front/back piece. Start 3 sts before the first of these 2 markers, K2 tog, = 1 stitch remain before marker, work this stitch + the next st (= first after marker) and dec = there are 2 sts decreased at the marker and K2 between the dec (with marker in the middle of these K2). Repeat at each marker. Happy knitting!
24.01.2020 - 16:04
![]() Richard napisała::
Richard napisała::
Hi, once more. I've placed markers at the sleeves & sides & now trying to knit the raglan decreases! I understand the pattern for instructions for the sides, but starting 3 stitches before the marker (does this include the marker), I end up, after the decrease, taking the first stitch of the sleeve. Your assistance once again would be very much appreciated. Thank you. Richard.
24.01.2020 - 12:29Odpowiedź DROPS Design :
Dear Richard, there should be 1 stitch on each side of marker on each piece between the raglan decreases, ie you will work at each transition: K2 tog (1 dec), K2 (= Knit the stitch before marker + the stitch after marker), slip 1 as if to K, K1, psso. So starting at the transition between back and one sleeve, you will start (and end) round with K1, Hope it helps, Happy knitting!
24.01.2020 - 14:23
![]() Richard napisała::
Richard napisała::
Good morning. I have completed the body & both sleeves. But now that I have joined them on one needle, I find that when trying to knit the sleeves, the stitches are stretched (almost impossible to do)! I've had to use double-pointed needles to help me out! I don't remember having this trouble when I made the first one of this pattern (in size medium). Please can you help. Thanks. Richard.
24.01.2020 - 10:15Odpowiedź DROPS Design :
Dear Richard, that's right, the first few rounds at the beginning of yoke can be somewhat tricky, you can use the double pointed needles or circular needles if you like to, after few rounds, all stitches will have enough place on the circular needle to work them on the round. Happy knitting!
24.01.2020 - 14:08
![]() Richard napisała::
Richard napisała::
Thank you for the reply to my question. I sent a sketch via email, showing how I was knitting the round. So, from what you are saying, I have to knit A1 (1st row), (only for the complete round)! Then for the next round, I have to knit A1 (2nd row), for the complete round! Then 3rd row, 4th row & so on.... This makes sense. Please can you confirm this for me.. Thanks a million. Richard.
13.01.2020 - 20:17Odpowiedź DROPS Design :
Dear Richard, that's how you should work the diagrams (row 1 in A.1 on all diagrams, then row 2 in A.1 on all diagrams and so on). Happy knitting!
14.01.2020 - 07:50
![]() Richard napisała::
Richard napisała::
Good morning, again. Continuing from the two Ridge rows, I began the round, as per your instructions. But, I find that the *A1* pattern, repeats 3 times (2 with odd row numbers, 1 even row number. in the first half, up to 124 stitches. But for the continuing *A1* pattern, there is only 1 odd number row! But, there are 2 even row numbers! Is this so? Please. Richard. I have made a drawing which explains better. If I may upload it.
13.01.2020 - 11:03Odpowiedź DROPS Design :
Dear Richard, not sure I'm getting this properly, when working A.1 in the round, you should work same round in each diagram all the round = round 1 A.1 when working round 1 on yoke, then work round 2 in A.1 and so on. What do I misunderstand?
13.01.2020 - 11:34
![]() Richard napisała::
Richard napisała::
Sadly, (Hi again). I'm still struggling after completing the two ridges! It is written that I knit 20, purl 3 (23 stitches), then *A1 (22 stitches, purl 6! (A1 = 10 rows @22 stitches) = 220 stitches. But adding the first 23 stitches to the 220 stitches = 243 stitches? Yet it is written, that I then purl 6! Doing this gives a total of 249 stitches! What am I doing wrong please? Forgive me, I am nearly 78 years old. Have a good day.
09.01.2020 - 12:22Odpowiedź DROPS Design :
Dear Richard, you should work the 248 sts in size L as follows: knit 20, purl 3, *A.1 (= 22 sts), purl 6*, repeat from *-* a total of 2 times (= 28 sts x 2= 56 sts), A.1 (= 22 sts), purl 3, knit 40 , purl 3, repeat from *-* (= 56 sts), A.1 (= 22 sts), purl 3, knit 20 = 20+3 + 56+22 + 3+40+3 + 56+22 +3+20=248 sts. Try to add markers between each section, it can help you to check the number of stitches. Happy knitting!
09.01.2020 - 14:07
![]() Richard napisała::
Richard napisała::
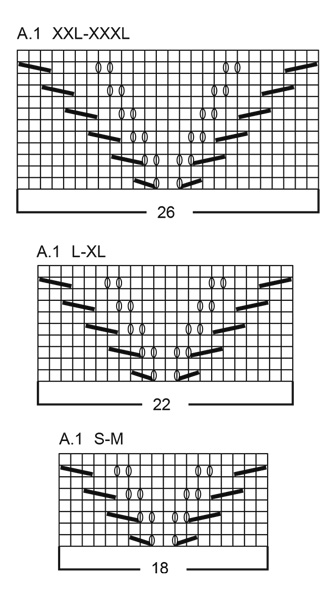
Hi (once again). This should be the last for awhile. I understand the A1 block now, working from the bottom up! But, please tell me: Do I follow the pattern from left to right or right to left?? I ask this, because, I am reading the block from right to left! I don't believe it makes much difference (but, there again, you are the Expert). Thank you. Richard.
07.01.2020 - 22:07Odpowiedź DROPS Design :
Dear Richard, diagrams are read bottom up starting from the right corner to the left, ie you will read every row in diagrams from the right towards the left (since you are working in the round) - read more about diagrams here (link is now working). Happy knitting!
08.01.2020 - 09:04
|
|||||||||||||||||||
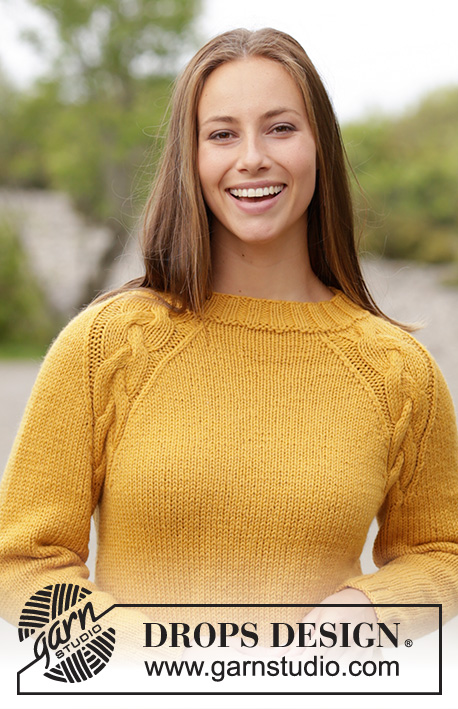
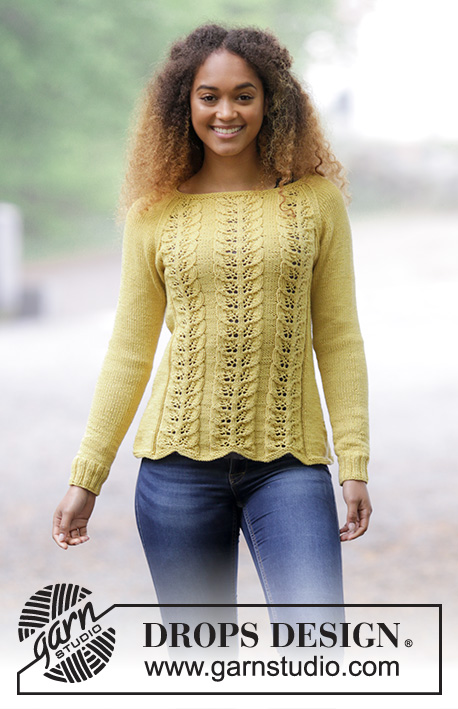
Lemon Parfait#lemonparfaitsweater |
|||||||||||||||||||
 |
 |
||||||||||||||||||
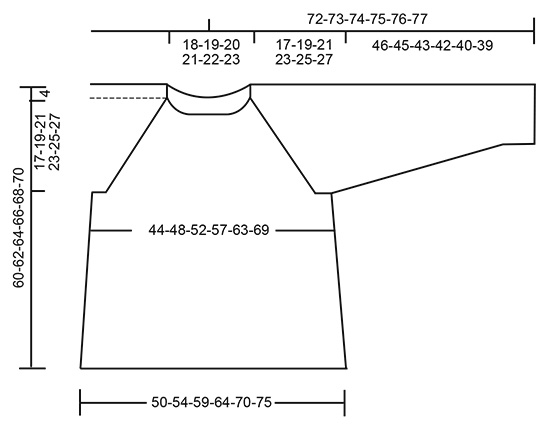
Sweter z reglanem, z wzorem liści. Od S do XXXL. Z włóczki DROPS Cotton Merino.
DROPS 180-1 |
|||||||||||||||||||
|
ZASTOSOWANE TECHNIKI: ŚCIEG FRANCUSKI (na okrągło): 1 ściągacz francuski = 2 okrążenia. Przerobić 1 okrążenie na prawo i 1 okrążenie na lewo. ŚCIEG FANTAZYJNY: Patrz schemat A.1. Patrz schemat właściwy dla rozmiaru. ZAMYKANIE OCZEK (boki): Zaczynając 3 oczka przed nitką markerem z boku, przerobić 2 oczka razem na prawo, 2 oczka prawe (nitka marker znajduje się między tymi 2 oczkami), zdjąć 1 oczko jak do przerobienia na prawo, 1 oczko prawe, przełożyć oczko zdjęte nad przerobionym oczkiem. DODAWANIE OCZEK: Dodawać na środku pod rękawem następująco – zaczynając 1 oczko przed nitką markerem: wykonać 1 narzut, przerobić 2 oczka prawe (nitka marker znajduje się między tymi 2 oczkami), 1 narzut. W następnym okrążeniu przerobić oczka przekręcone w miejscu narzutów na prawo, aby uniknąć dziur. REGLAN: Będziemy zamykać 2 oczka w miejscu każdego przejścia między tyłem/przodem a rękawami. Zaczynając 3 oczka przed nitką markerem: przerobić 2 oczka razem na prawo, 2 oczka prawe (nitka marker znajduje się między tymi 2 oczkami), zdjąć 1 oczko jak do przerobienia na prawo, 1 oczko prawe, przełożyć oczko zdjęte nad przerobionym oczkiem. WSKAZÓWKA: Jeżeli próbka nie jest zgodna na wysokość, a robótka zbyt ścisła, karczek będzie zbyt krótki, a podkroje rękawów za wąskie. Można tego uniknąć wykonując równomiernie jedno dodatkowe okrążenie bez zamykania oczek między okrążeniami, gdzie są zamykane oczka. ---------------------------------------------------------- TYŁ & PRZÓD: Przerabiane na okrągło na drutach z żyłką, od dołu do góry. Na drutach z żyłką nr 4 nabrać 212-228-248-268-292-316 oczek włóczką Cotton Merino. Przerobić 2 ŚCIĄGACZE FRANCUSKIE – patrz powyżej. Dalej przerabiać następująco: 17-21-20-25-25-31 oczek prawych, 3 oczka lewe, *schemat A.1 (= 18-18-22-22-26-26 oczek), 6 oczek lewych*, powtórzyć od *-* w sumie 2 razy, A.1, 3 oczka lewe, 34-42-40-50-50-62 oczka prawe, 3 oczka lewe, *A.1, 6 oczek lewych*, powtórzyć od *-* w sumie 2 razy, A.1, 3 oczka lewe, 17-21-20-25-25-31 oczek prawych. Umieścić 1 nitkę marker na początku okrążenia i kolejną za 106-114-124-134-146-158 oczkami = boki. Dalej przerabiać tak samo. ZACHOWAĆ TAKIE SAMO NAPRĘŻENIE NICI JAK W PRZYPADKU PRÓBKI! Gdy dł. robótki wynosi 8 cm, zamknąć 1 oczko z każdej strony nitek markerów na bokach (= zamknięte 4 oczka) – PATRZ ZAMYKANIE OCZEK! Zamykać w sumie 7 razy co 4½ cm we wszystkich rozmiarach = 184-200-220-240-264-288 oczek. Gdy dł. robótki wynosi 39-39-39-39-39-39 cm, zamknąć 8-8-10-10-12-14 oczek z każdej strony (= 4-4-5-5-6-7 oczek z każdej strony nitek markerów). Jest teraz 84-92-100-110-120-130 oczek na tył i na przód. Odłożyć i wykonać rękawy. RĘKAWY: Przerabiane na okrągło na drutach pończoszniczych, dalej przerabiać na krótkich drutach z żyłką, gdy jest za dużo oczek na druty pończosznicze. Na drutach pończoszniczych nr 3,5 nabrać 48-52-56-56-60-64 oczka włóczką Cotton Merino. Przerobić 1 okrążenie na prawo, dalej przerabiać ściągaczem 2 oczka prawe/ 2 oczka lewe. Gdy dł. robótki wynosi 6 cm zacząć przerabiać na drutach pończoszniczych nr 4 i przerobić 1 okrążenie na prawo, równomiernie zamykając 4-6-8-6-8-10 oczek = 44-46-48-50-52-54 oczka. Umieścić 1 marker na początku okrążenia (= środek pod rękawem). Dalej przerabiać dżersejem. Gdy dł. robótki wynosi 10-7-7-10-7-7 cm dodać 2 oczka na środku pod rękawem – PATRZ DODAWANIE OCZEK. Dodawać oczka w sumie 12-15-18-19-20-21 razy co 3-2½-2-1½-1½-1½ cm = 68-76-84-88-92-96 oczek. Gdy dł. robótki wynosi 46-45-43-42-40-39 cm (krócej dla większych rozmiarów gdyż karczek jest dłuższy) zamknąć 8-8-10-10-12-14 oczek na środku pod rękawem = 60-68-74-78-80-82 oczka. Odłożyć i wykonać drugi rękaw. KARCZEK: Umieścić oczka rękawów na tych samych drutach z żyłką co tył i przód, ponad oczkami zamkniętymi na podkroje rękawów = 288-320-348-376-400-424 oczka. Umieścić nitki markery w miejscach każdego przejścia między tyłem, przodem i rękawami (= 4 nitki markery). Dalej przerabiać jak wcześniej i zamykać oczka na REGLAN – patrz powyżej. Zamykać oczka 5-5-6-6-6-7 razy co 4 okrążenia, dalej 14-16-18-21-23-24 razy co 2 okrążenia = w sumie 19-21-24-27-29-31 razy. Przerabiać dżersejem oczka schematu A.1, które nie mogą być przerabiane ściegiem fantazyjnym. Po zamknięciu wszystkich oczek zostaje 136-152-156-160-168-176 oczek. Przerobić 2 ściągacze francuskie ponad wszystkimi oczkami, ale w pierwszym okrążeniu przerobić każde 2 kolejne oczka z 22-26-26-24-22-20 oczek każdego rękawa razem na prawo, i dodatkowo równomiernie zamknąć 18-28-26-28-34-40 oczek = 96-98-104-108-112-116 oczek. Zakończyć. WYKOŃCZENIE: Zszyć otwory pod rękawami. |
|||||||||||||||||||
Objaśnienia do schematu |
|||||||||||||||||||
|
|||||||||||||||||||
 |
|||||||||||||||||||
 |
|||||||||||||||||||
Skończyłaś ten wzór?Otaguj swoje zdjęcia #dropspattern #lemonparfaitsweater lub prześlij je do #dropsfan gallery. Potrzebujesz pomocy w związku z tym wzorem?Zobacz 27 instrukcje video, sekcję Komentarze/Pytania i jeszcze więcej, wchodząc na stronę wzoru na garnstudio.com © 1982-2026 DROPS Design A/S. Wszelkie prawa zastrzeżone. Ten dokument, w całości, jest chroniony prawem. Zobacz co możesz robić z naszymi wzorami na dole każdego wzoru na naszej stronie. |
|||||||||||||||||||


Posiadając 40 lat doświadczenia w projektowaniu wzorów na druty i szydełko, DROPS Design oferuje jedną z największych kolekcji bezpłatnych wzorów w internecie – przetłumaczonych na 17 języków. Obecnie jest dostępnych 324 katalogów i 12290 wzorów w języku polskim.
Dokładamy wszelkich starań, aby oferować Wam druty i szydełka, inspiracje, fachowe porady oraz doskonałej jakości włóczki w najlepszych cenach! Zamierzasz wykorzystać nasze wzory inaczej niż tylko do osobistego użytku? Przeczytaj jakie masz prawa w Copyright, który znajdziesz na końcu każdego wzoru. Miłej pracy!
Dodaj komentarz do modelu DROPS 180-1
Chcielibyśmy się dowiedzieć co masz do powiedzenia o tym wzorze!
Jeśli chcesz zadać pytanie i szybko uzyskać odpowiedź, upewnij się, że została wybrana właściwa kategoria w formularzu poniżej. Pola obowiązkowe są oznaczone *.