
Popularne kategorie
Szukasz włóczki?


Komentarze / Pytania (99)
![]() Shay napisała::
Shay napisała::
Just starting. When I increase front/back piece, is that the "Raglan" increase? Where does the "Increase as follows after marker thread' start?
06.03.2018 - 14:56Odpowiedź DROPS Design :
Dear Shay, the raglan inc on next round after inserting marking thread. You will inc for raglan on front/back piece after the marking thread at the beg of piece and before the marking thread at the end of piece. You will increase for raglan at the beg of sleeve after marking thread and at the end of sleeve before the marking thread. Happy knitting!
06.03.2018 - 16:08Sue napisała::
Arrr yes that makes perfect sense. I asked the question about which the row to start the increases on on Oct 2nd and was told to increase on even rows after the ridges. That's row 6,8,10, 12. (Row12 is row 2 of A2). But I should inc on row 5,7,9,11 (row 11 is row 1 of A2) . That is what I thought should happen. Thank you. So much. Confusion over :-).
30.10.2017 - 11:54Sue napisała::
Starting with 18 sleeve stitches. Marker, knit1, YO (raglan inc). Knit 2 tog, Yarn over (8times - A2). Then you need to do a YO, knit 1 for last raglan inc to make 20 stitches. That makes 2 YO's next to each other. If you don't do 2 yo's next to each oth r you end up with 19 stitches!!!
30.10.2017 - 08:49Odpowiedź DROPS Design :
Dear Sue, the row with K2tog, YO, is not a row with increase for raglan, you should have increased on row before, then work row 2 in diagram as explained in previous answer (repeating K2 tog/YO the number of sts required as number of sts will inc). Happy knitting!
30.10.2017 - 10:37Sue napisała::
Im sorry I just don't understand how this can occur. The increase occurs on the 2nd row of the A2 pattern. The row with all knit 2 tog followed by Yarn over. If you follow the pattern as per the chart as well as with the Raglan increase instructions then it should go like this..see above
30.10.2017 - 08:38Odpowiedź DROPS Design :
Dear Sue, you inc 1 st on first row in A.2, so that you will work the 12 sts between markers for sleeve as follows: marker, K1, YO, K10, YO, K1 (= 14 sts between markers). On row 2 in A.2 work: K2 (the first K1 + YO), (K2 tog, YO) x 6, K2 (the YO + last K1). Happy knitting!
30.10.2017 - 10:34Sue napisała::
Also I note that doing 2 Yarn overs next to each other just creates one big hole instead of 2 holes next to each other which I can't imagine is ideal. I'm stumped.
30.10.2017 - 00:53Odpowiedź DROPS Design :
Hi Sue, The pattern does not have 2 yarn overs next to each other. They are either between 2 stitches, with 2 stitches either side or have 1 knitted stitch either side. I hope this helps and happy knitting!
30.10.2017 - 08:04Sue napisała::
Just to add the the last comment. I tried knitting the last 'knit 2 tog followed by Yarn over' (the 8th one - on the 2nd line A2) then just knitting the last s titch but that leaves you with an odd number of stitches, which I note is the same problem another person had. I think the difficulty with this pattern is that the increases aren't so straight forward when they fall on the patterned round for the sleeves, and the instructions don't seem to account for this.
29.10.2017 - 14:07Odpowiedź DROPS Design :
Dear Sue, you are starting sleeves with 12 sts less 2 sts for raglan line (1 st at the beg + 1 st at the end of sleeve) and you will increase 2 sts so that you should always get an even number of sts for sleeve. Happy knitting!
30.10.2017 - 09:52Sue napisała::
Hi I'm having trouble trying to figure out the increases on the sleeve pattern A2. As per raglan instructions I knit 1 Yarn over after the marker. Then knit 2 tog, Yarn over 8 times then I'm left with 1 stitch. How do I get the last Yarn over in before the last stitch.....do I do 2 Yarn overs next to each other ??
29.10.2017 - 07:34Odpowiedź DROPS Design :
Dear Sue, knit the last st in this case, ie when the number of sts do not match the diagram, finish pattern with K1 to avoid double yarn overs next to each other. Happy knitting!
30.10.2017 - 09:22Sue napisała::
Secondly with the increases for the Raglan the pattern states that the increases are to be done every 2nd row, but it doesn't indicate which row to start the raglan increases on. Is it row 5 or row 6? I am assuming the first round of increases is on row 5 then 7,9 etc as this means the increases are done on the knit rows of the sleeve pattern and are not getting mixed up in the lace patterning rows. Is this correct?
01.10.2017 - 03:37Odpowiedź DROPS Design :
Dear Sue, you will inc on round 6, ie after ridges, work 1 round in pattern as explained, then start to inc on next round. Happy knitting!
02.10.2017 - 09:50Sue napisała::
Sorry, typos on he last question. Hello, I am trying to work out this pattern before I start. The pattern states to increase 20 stitches on the last ROUND of the ridges. Does this mean it can be done on either row 3 or 4 which both make up the last round of ridges. I wound prefer to increase on the knit row which is row 3 with a kfb. Or do the increases have to be on the 4th and last row of the ridges which is a purl row.
01.10.2017 - 03:35Odpowiedź DROPS Design :
Hi Sue, The last round of the ridges is round 4, the purl round. So you increase on this 4th round. Happy knitting!
01.10.2017 - 12:25Sue napisała::
Hello, I am trying to work out this pattern before I start. The pattern states to increase 20 stitches on the last ROUND of the ridges. Does this mean it can be one I thee row 3 or 4 which both make up the last round of ridges. I wound prefer to increase on the knit row which is row 3 with a kfb. Or do the increase have to be on the 4th and last row of the ridges which is a purl row.
01.10.2017 - 03:33Odpowiedź DROPS Design :
Dear Sue, you will increase on the last round of ridges, ie on 4th round, you can increase also with kfb on last round of ridges (= P round). Happy knitting!
02.10.2017 - 09:48
|
|||||||||||||
Petronella Top#petronellatop |
|||||||||||||
|
|
|||||||||||||
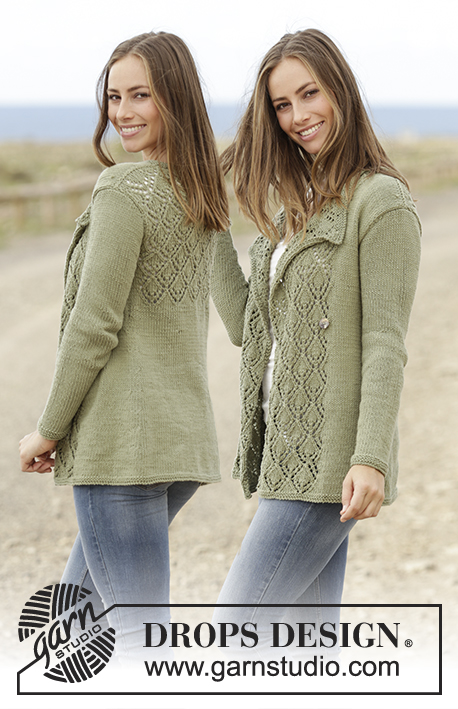
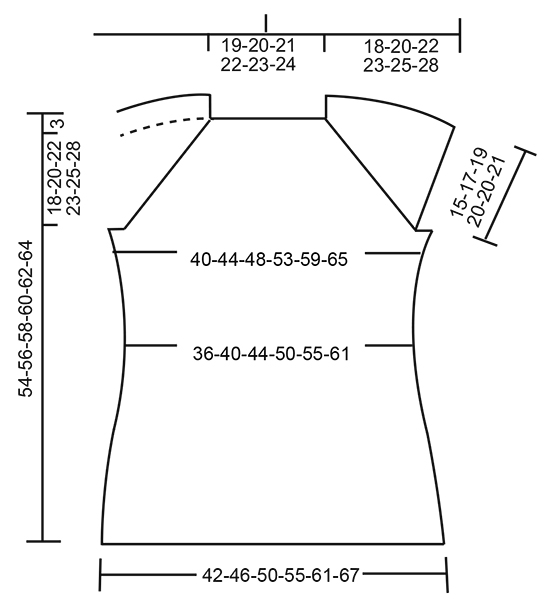
Top przerabiany od góry do dołu, z raglanem i ściegiem ażurowym, z włóczki DROPS Muskat. Od S do XXXL.
DROPS 175-32 |
|||||||||||||
|
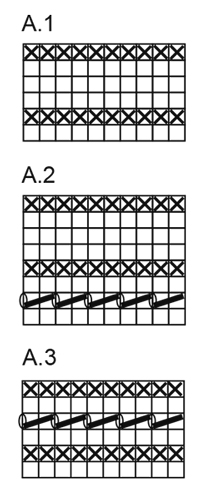
ŚCIEG FRANCUSKI (na okrągło): 1 ściągacz francuski = 2 okrążenia. Przerobić 1 okrążenie na prawo i 1 okrążenie na lewo. ŚCIEG FANTAZYJNY: Patrz schematy A.1, A.2 i A.3. Schematy przedstawiają wszystkie rzędy motywu, widok na prawej stronie robótki. REGLAN: Dodawać co 2 okrążenia następująco: Dodawać oczka przed nitką markerem następująco: Zaczynając 1 oczko przed nitką markerem: wykonać 1 narzut, 1 oczko prawe, nitka marker. Dodawać oczka za nitką markerem następująco: nitka marker, 1 oczko prawe, wykonać 1 narzut. W następnym okrążeniu przerabiać narzuty na prawo, powstaną otwory/dziurki. Dodawać co 4 okrążenia następująco: Dodawać oczka przed nitką markerem następująco: OKRĄŻENIE 1: zaczynając 1 oczko przed nitką markerem: wykonać 1 narzut, 1 oczko prawe, nitka marker. OKRĄŻENIE 2: przerabiać narzuty na prawo, powstaną otwory/dziurki. OKRĄŻENIE 3: zaczynając 3 oczka przed nitką markerem, przerobić: 2 oczka razem na prawo, wykonać 1 narzut, 1 oczko prawe, nitka marker. Oczka nie są dodawane, ale ażurowy motyw biegnie jak wcześniej. OKRĄŻENIE 4: przerabiać narzuty na prawo, powstaną otwory/dziurki. Dodawać za nitką markerem następująco: OKRĄŻENIE 1: nitka marker, 1 oczko prawe, wykonać 1 narzut. OKRĄŻENIE 2: przerabiać narzuty na prawo, powstaną otwory/dziurki. OKRĄŻENIE 3: nitka marker, 1 oczko prawe, wykonać 1 narzut, zdjąć 1 oczko jak do przerobienia na prawo, 1 oczko prawe, przełożyć oczko zdjęte nad przerobionym oczkiem. Oczka nie są dodawane, ale ażurowy rząd biegnie jak wcześniej. OKRĄŻENIE 4: przerabiać narzuty na prawo, powstaną otwory/dziurki. ZAMYKANIE OCZEK: Zaczynając 3 oczka przed nitką markerem przerobić: 2 oczka razem na prawo, 2 oczka prawe (nitka marker znajduje się między tymi 2 oczkami), zdjąć 1 oczko jak do przerobienia na prawo, 1 oczko prawe, przełożyć oczko zdjęte nad przerobionym oczkiem = 2 zamknięte oczka. DODAWANIE OCZEK: Przerabiać aż zostaje 1 oczko przed nitką markerem. Wykonać 1 narzut, przerobić 2 oczka prawe (nitka marker znajduje się między tymi 2 oczkami) i wykonać 1 narzut. W następnym okrążeniu przerobić oczka przekręcone w miejscu narzutów na prawo, aby uniknąć dziur (dodawane oczka są przerabiane dżersejem). --------------------------------------------------------- TOP: Przerabiany na okrągło, na drutach z żyłką, zaczynając od środka tyłu, od góry do dołu. KARCZEK: Na drutach z żyłką nr 4 nabrać 80-84-88-92-96-100 oczek włóczką Muskat. Przerobić 2 ŚCIĄGACZE FRANCUSKIE – patrz powyżej, w ostatnim okrążeniu ściągaczy francuskich równomiernie dodając 20 oczek = 100-104-108-112-116-120 oczek. Umieścić 4 nitki markery następująco: 1-sza nitka marker za 19-20-21-22-23-24 oczkami (= połowa tyłu), 2-ga nitka marker za 12 oczkami (= rękaw), 3-cia nitka marker za 38-40-42-44-46-48 oczkami (= przód), 4-ta nitka marker za 12 oczkami (= rękaw), zostaje 19-20-21-22-23-24 oczka za ostatnią nitką markerem (= połowa tyłu). Zacząć dodawanie oczek na REGLAN jak w opisie powyżej i przerabiać oczka tyłu i przodu dżersejem, a oczka rękawów wg schematu A.1. PRZED DALSZĄ PRACĄ NAD ROBÓTKĄ UWAŻNIE PRZECZYTAĆ DALSZĄ CZĘŚĆ OPISU! Oczka są dodawane inaczej na przodzie i tyle, a inaczej na rękawach następująco: PRZÓD/TYŁ: Dodawać oczka 12-15-17-25-30-35 razy co 2 okrążenia i 7-7-7-4-3-2 razy co 4 okrążenia. RĘKAWY: Dodawać oczka 18-23-27-29-26-25 razy co 2 okrążenia i 4-3-2-2-5-7 razy co 4 okrążenia. Gdy schemat A.1 zostanie przerobiony 1 raz na wysokość, powtórzyć schemat A.2 na wysokość. Dodawane oczka na rękawach są stopniowo przerabiane ściegiem fantazyjnym. Po tym jak dodawanie oczek na rękawy zostanie wykonane przedostatni raz (zostaje jeszcze 4 okrążenia) przerobić oczka rękawów ściegiem francuskim, dalej przerabiać oczka przodu/tyłu dżersejem jak wcześniej. ZACHOWAĆ TAKIE SAMO NAPRĘŻENIE NICI JAK W PRZYPADKU PRÓBKI! Gdy dodawanie oczek na reglan jest zakończone, jest 264-296-320-352-372-396 oczek. Przerobić kolejne okrążenie następująco: 38-42-45-51-56-61 oczek (= połowa tyłu), zamknąć 56-64-70-74-74-76 następnych oczek, przerobić 76-84-90-102-112-122 następne oczka (= przód), zamknąć 56-64-70-74-74-76 następnych oczek, przerobić 38-42-45-51-56-61 następnych oczek (= połowa tyłu). TYŁ & PRZÓD: Dalej przerabiać następująco: przerobić połowę tyłu, nabrać 8-8-10-10-12-14 oczek, przerobić przód, nabrać 8-8-10-10-12-14 oczek, przerobić połowę tyłu. Jest teraz 168-184-200-224-248-272 oczka. Umieścić nitkę marker z każdej strony, na środku nowych nabranych oczek. OD TEGO MOMENTU MIERZYĆ STĄD! Dalej przerabiać dżersejem, ale przerobić 2 ściągacze francuskie ponad 8-8-10-10-12-14 nowymi oczkami na bokach i dalej przerabiać dżersejem ponad wszystkimi oczkami. Gdy dł. robótki wynosi 4 cm zamknąć 1 oczko z każdej strony nitek markerów (= 4 zamknięte oczka), zamykać w sumie 4 razy co 3 cm – PATRZ ZAMYKANIE OCZEK = 152-168-184-208-232-256 oczek. Gdy dł. robótki wynosi 19-19-19-18-18-19 cm dodać 1 oczko z każdej strony nitek markerów (= 4 dodane oczka), dodawać w sumie 6 razy co 2 cm – PATRZ DODAWANIE OCZEK = 176-192-208-232-256-280 oczek. Gdy dł. robótki wynosi 32-32-32-33-33-32 cm przerobić schemat A.3 ponad wszystkimi oczkami. Następnie zamykać oczka na prawo, dł. robótki od ramienia wynosi ok. 54-56-58-60-62-64 cm. |
|||||||||||||
Objaśnienia do schematu |
|||||||||||||
|
|||||||||||||
 |
|||||||||||||
 |
|||||||||||||
Skończyłaś ten wzór?Otaguj swoje zdjęcia #dropspattern #petronellatop lub prześlij je do #dropsfan gallery. Potrzebujesz pomocy w związku z tym wzorem?Zobacz 24 instrukcje video, sekcję Komentarze/Pytania i jeszcze więcej, wchodząc na stronę wzoru na garnstudio.com © 1982-2026 DROPS Design A/S. Wszelkie prawa zastrzeżone. Ten dokument, w całości, jest chroniony prawem. Zobacz co możesz robić z naszymi wzorami na dole każdego wzoru na naszej stronie. |
|||||||||||||


Posiadając 40 lat doświadczenia w projektowaniu wzorów na druty i szydełko, DROPS Design oferuje jedną z największych kolekcji bezpłatnych wzorów w internecie – przetłumaczonych na 17 języków. Obecnie jest dostępnych 324 katalogów i 12290 wzorów w języku polskim.
Dokładamy wszelkich starań, aby oferować Wam druty i szydełka, inspiracje, fachowe porady oraz doskonałej jakości włóczki w najlepszych cenach! Zamierzasz wykorzystać nasze wzory inaczej niż tylko do osobistego użytku? Przeczytaj jakie masz prawa w Copyright, który znajdziesz na końcu każdego wzoru. Miłej pracy!
Dodaj komentarz do modelu DROPS 175-32
Chcielibyśmy się dowiedzieć co masz do powiedzenia o tym wzorze!
Jeśli chcesz zadać pytanie i szybko uzyskać odpowiedź, upewnij się, że została wybrana właściwa kategoria w formularzu poniżej. Pola obowiązkowe są oznaczone *.