
Popularne kategorie
Szukasz włóczki?


Komentarze / Pytania (28)
![]() R N napisała::
R N napisała::
Hei! Teen XL kokoa. Ohjeissa on virhe kun kainaloista lähdetään jatkamaan alaspäin. Kuviot eivät täsmää. Voitteko auttaa?
05.07.2024 - 10:56Odpowiedź DROPS Design :
Hei, etu-/takakappaleessa neulotaan mallineuletta piirroksen A.4 mukaisesti ja mallineule jatkuu siitä, mihin se kaarrokkeessa jäi. Mikäli neuletiheys täsmää, kaarroke on valmis, kun olet neulonut ylös piirrokseen kokosi nuolella merkittyyn kerrokseen.
05.07.2024 - 17:08
![]() Mary napisała::
Mary napisała::
But that’s precisely the problem! If I start the third line A4 from the underarm (the first stitch of the new round is basically the third stitch from the underarm) I get the mismatch because the triangle will be stitched earlier: I can’t understand where I am going wrong
09.04.2023 - 14:12Odpowiedź DROPS Design :
Dear Mary, you need to adjust the stitches before starting the triangle. In this case, you need to simply knit stitches (not just the amount indicated in the pattern) so that the triangle won't be mismatched. The pattern under the arm may get slightly mismatched initially but that isn't important, since it will later on match correctly. Happy knitting!
10.04.2023 - 13:34
![]() Mary napisała::
Mary napisała::
Yes, I can see that the pattern is the same. But if I follow the instructions from A4 third line, I should start the "triangle" after 3 stitches of the body, while according to the stitches I have after the line with the arrow, A1, I should start the triangle after 5 stitches but this means that it will be "anticipated" hence the mismatch. Does it mean that I have not divided the garment accordingly? Many thanks and Happy Easter!
09.04.2023 - 11:09Odpowiedź DROPS Design :
Dear Mary, take into account that you should have adjusted the start of the round in the body; you adjust so that the beginning of the round is in the middle stitch cast on under the sleeve. This should help adjust the pattern so that the triangle in A.4 won't get mismatched with the pattern in the yoke in A.1. Happy knitting!
09.04.2023 - 13:30
![]() Mary napisała::
Mary napisała::
Thanks! But I am still confused: the instructions say that the yoke is finished when I have 168 stitches (S size). If I had not knit the last row (the one with the arrow), I would not have got 168 stitches. In any case, once I have knit the row with the arrow, if I then start A4 from the third line I still get a mismatch in the pattern and I do not know where I get it wrong. Well, I know that I do something wrong while shifting from the yoke to the body but I can't figure out what.
07.04.2023 - 10:25Odpowiedź DROPS Design :
Dear Mary, after having worked the row with the arrow, you should have knitted round, where you separated the stitches for each part of the garment. Then, you should start the body with the third row of A.4. There shouldn't be a mismatch there. You can check that the third row of A.4 is exactly like the third row in A.1 after the row with the arrow, so they should be matching. Hope this helps!
08.04.2023 - 20:58
![]() Mary napisała::
Mary napisała::
Thanks! But I am still confused: the instructions say that the yoke is finished when I have 168 stitches (S size). If I had not knit the last row (the one with the arrow), I would not have got 168 stitches. In any case, once I have knit the row with the arrow, if I then start A4 from the third line I still get a mismatch in the pattern and I do not know where I get it wrong. Well, I know that I do something wrong while shifting from the yoke to the body but I can't figure out what.
07.04.2023 - 10:20Odpowiedź DROPS Design :
Dear Mary, after having worked the row with the arrow, you should have knitted round, where you separated the stitches for each part of the garment. Then, you should start the body with the third row of A.4. There shouldn't be a mismatch there. You can check that the third row of A.4 is exactly like the third row in A.1 after the row with the arrow, so they should be matching. Hope this helps!
08.04.2023 - 20:59
![]() Mary napisała::
Mary napisała::
Sorry, I am still unclear: I have finished the yoke knitting the A1-A3-A5 line with the arrow. Then I divided the work and I went for a knitted round. Now which line should I knit first and from which diagram?
05.04.2023 - 09:04Odpowiedź DROPS Design :
Dear Mary, the arrows in the chart mean that, if the gauge is correct, you should finish the raglan/yoke when you reach the arrow for your size (before working it). If you have worked this row, then you will need to start the new part by working the third row of the new chart (A.4). Happy knitting!
06.04.2023 - 23:29
![]() Mary napisała::
Mary napisała::
Hi! "Continue the pattern from yoke on body – making sure to continue with the correct row in the diagram after the yoke. " Does this mean that if I finish A1 (S size) with the line with the arrow, the next line for the body in A4 is in fact the thirs one of the diagram?
04.04.2023 - 08:59Odpowiedź DROPS Design :
Hi Mary, Yes, if you finished the diagram before separating for the body and sleeves, you continue with the first row in the diagram. Happy Easter!
05.04.2023 - 07:01
![]() Mary napisała::
Mary napisała::
"Knit as far as the middle stitch cast on under the sleeve. The round now starts here." Does it mean that the round starts after the second or after the third stitch under the sleeve? Many thanks!
08.03.2023 - 16:03Odpowiedź DROPS Design :
Dear Mary, yes correct: work the first 2 of the 5 stitches cast on under 1st sleeve, the rounds will now start here, before the middle of the new stitches. Happy knitting!
08.03.2023 - 16:08
![]() Mary napisała::
Mary napisała::
Following from your last answer: "...you will start the next round 1 stitch eariler. So, you need to not work the last stitch of the previous round". I interpret this as moving the stitch marker one stitch behind and working that stitch as the first one of the next round rather than the last one of the previous round. Is this correct? So it is basically just a matter of moving the stitch marker?
07.03.2023 - 12:16Odpowiedź DROPS Design :
Dear Mary, you will now work the dividing round, this means you don't need the markers anymore, you start working the dividing round when the last stitch on previous round remain on left needle, slip the next 39 sts (starting with the last stitch previous round + the first 38 sts next round). Happy knitting!
07.03.2023 - 14:37
![]() Mary napisała::
Mary napisała::
Hi, I have just finished all the increases on the raglan and I have 168 stitches (S size). I'll go now go for a knitted round but what does it mean " adjust so the round now starts 1 stitch earlier"? Plus, the 39 stitches I habe to put aside, correspond to the stiches that are within the first and the second marker?
04.03.2023 - 10:25Odpowiedź DROPS Design :
Dear Mary, after finishing the increases and reaching the indicated length (21cm from the marker), you will start the next round 1 stitch eariler. So, you need to not work the last stitch of the previous round. On the other hand, the first marker was inserted in the transition between the back and the sleeve and the second marker between the sleeve and the front. Since you have to put aside the stitches which correspond to the sleeve, these stitches are all in between the first and 2nd marker. Happy knitting!
05.03.2023 - 20:45
|
|||||||||||||||||||
Diamonds in the Sky#diamondsintheskysweater |
|||||||||||||||||||
 |
 |
||||||||||||||||||
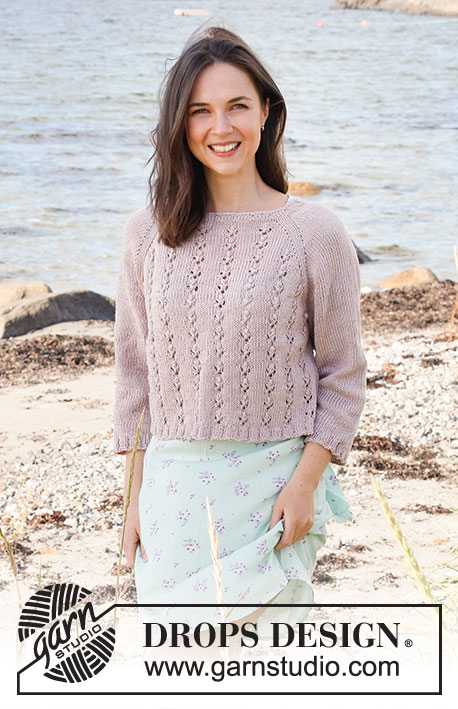
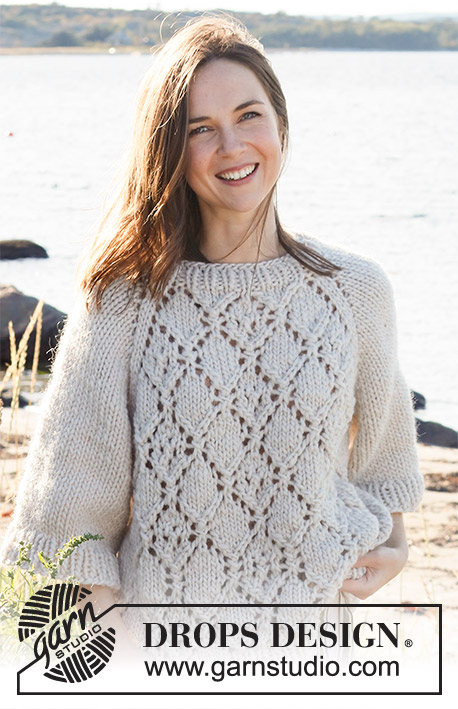
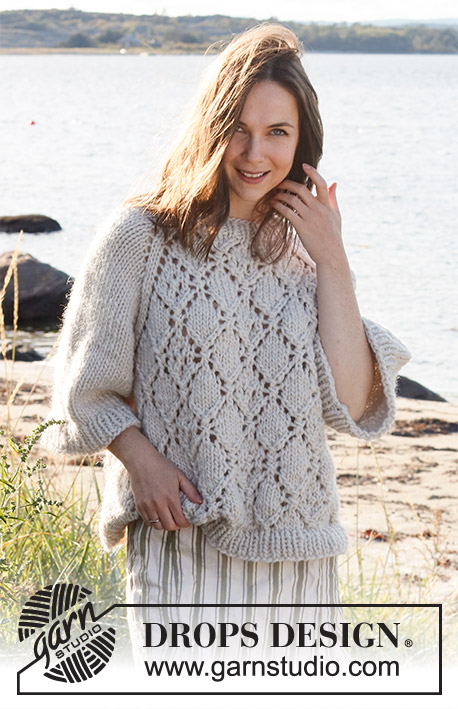
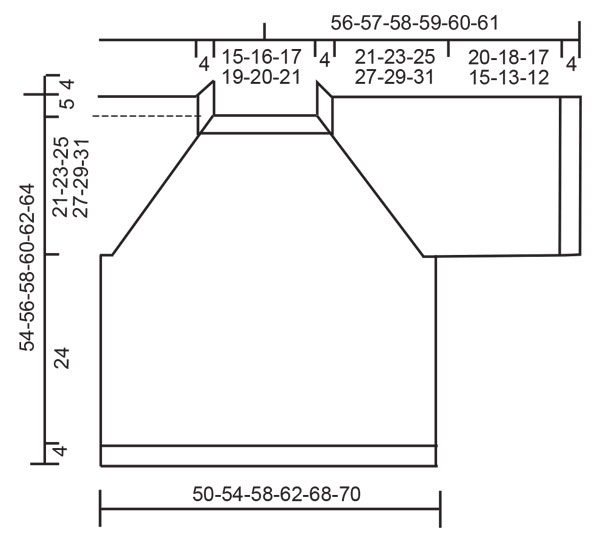
Sweter na drutach, przerabiany od góry do dołu, z reglanowymi rękawami ¾ i ściegiem ażurowym, z włóczki DROPS Snow lub DROPS Wish. Od S do XXXL.
DROPS 221-29 |
|||||||||||||||||||
|
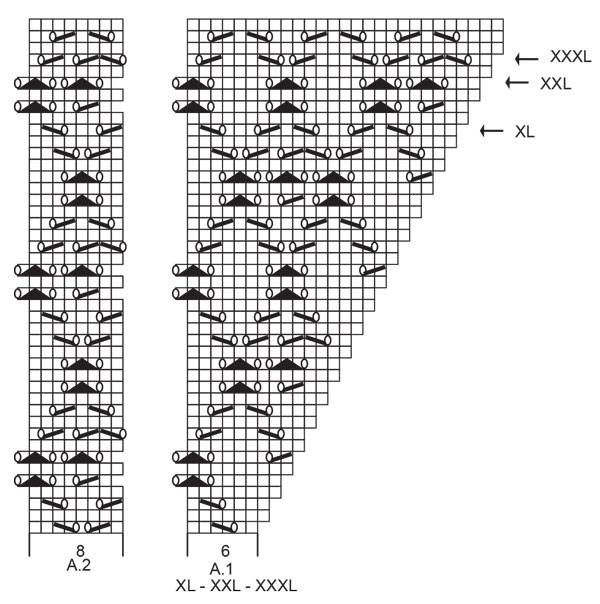
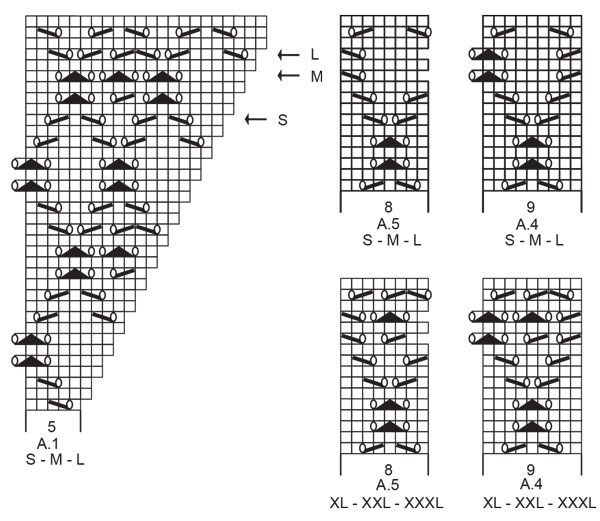
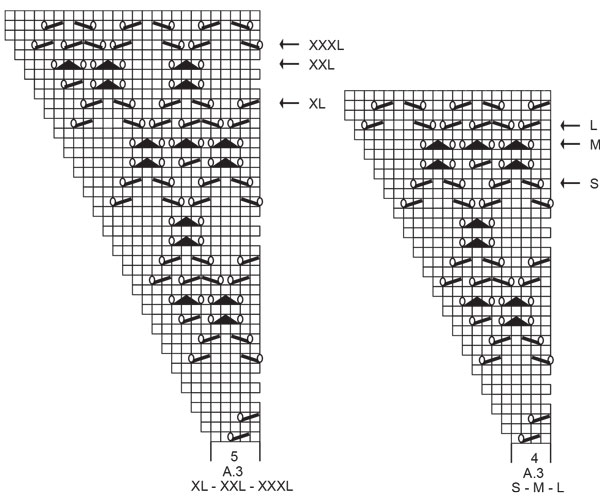
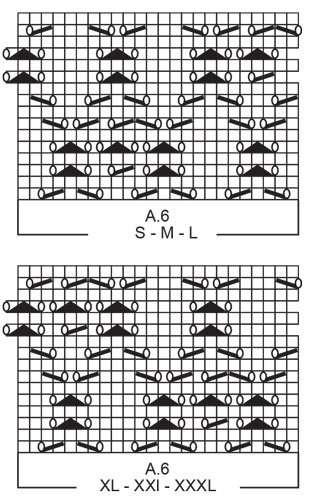
------------------------------------------------------- WYKORZYSTYWANE TECHNIKI: ------------------------------------------------------- ŚCIEG FANTAZYJNY: Patrz schematy A.1 - A.6 odpowiednie dla rozmiaru. DODAWANIE OCZEK (w regularnych odstępach/równomiernie): Aby obliczyć gdzie dodawać oczka, należy wziąć ogólną liczbę oczek (np. 46 oczek) i podzielić ją przez liczbę oczek jaka ma być dodana (np. 10) = 4,6. W tym przykładzie, aby dodać oczka będziemy wykonywać 1 narzut na przemian za każdym 4-tym i 5-tym oczkiem. W następnym okrążeniu przerobić oczka przekręcone w miejscu narzutów, aby uniknąć dziur. REGLAN: Dodawać oczka na REGLAN wykonując 1 narzut z każdej strony 2 oczek prawych (marker jest między tymi 2 oczkami), w miejscu każdego przejścia między tyłem/przodem i rękawami (dodanych w sumie 8 oczek). Aby dodać 1 oczko należy wykonać 1 narzut. W następnym okrążeniu przerobić narzuty na prawo; powstaną otwory/dziurki. Dalej przerabiać nowe oczka przodu i tyłu ściegiem fantazyjnym, a rękawy dżersejem. WSKAZÓWKA DO ZAMYKANIA OCZEK: Aby zamykane oczka nie ściągały robótki, do zamykania można użyć drutów o jeden rozmiar większych. Jeżeli mimo to brzeg jest nadal zbyt ścisły, zamykając wykonywać 1 narzut za ok. każdym 4-tym oczkiem; zamykać narzuty jak zwykłe oczka. ------------------------------------------------------- ROBÓTKĘ ROZPOCZYNAMY TUTAJ: ------------------------------------------------------- SWETER – SKRÓCONY OPIS ROBÓTKI: Wykończenie dekoltu i karczek są przerabiane od góry do dołu, na okrągło na drutach z żyłką. Następnie dzielimy karczek i dalej przerabiamy tył/przód i rękawy oddzielnie na okrągło, na drutach z żyłką, od góry do dołu. WYKOŃCZENIE DEKOLTU: Na krótkich drutach z żyłką nr 8 nabrać 46-48-50-54-56-58 oczek włóczką Snow lub Wish. Przerobić 1 okrążenie na prawo. Dalej przerabiać ściągaczem (1 oczko prawe, 1 oczko lewe) na okrągło przez 4 cm. Przerobić 1 okrążenie na prawo, równomiernie dodając 10-8-6-6-4-2 oczka – patrz DODAWANIE OCZEK = 56-56-56-60-60-60 oczek. Przerobić 1 okrążenie na prawo. Wziąć teraz druty z żyłką nr 9. Umieścić 1 marker 20-20-20-21-21-21 oczek dalej (= ok. na środku przodu), długość karczku będzie mierzona od tego markera! KARCZEK: Teraz przerabiać i umieścić 4 markery następująco: umieścić 1 marker na początku okrążenia (= przejście między tyłem i prawym rękawem), 1 oczko prawe, 1 narzut, 7 oczek prawych, 1 narzut, 1 oczko prawe, umieścić 1 marker tutaj (przejście między prawym rękawem i przodem), 1 oczko prawe, 1 narzut, schemat A.1 ponad 5-5-5-6-6-6 następnymi oczkami, A.2 ponad 8 następnymi oczkami, A.3 ponad 4-4-4-5-5-5 następnymi oczkami, 1 narzut, 1 oczko prawe, umieścić 1 marker tutaj (przejście między przodem i lewym rękawem), 1 oczko prawe, 1 narzut, 7 oczek prawych, 1 narzut, 1 oczko prawe, umieścić 1 marker tutaj (przejście między lewym rękawem i tyłem), 1 oczko prawe, 1 narzut, A.1 ponad 5-5-5-6-6-6 następnymi oczkami, A.2 ponad 8 następnymi oczkami, A.3 ponad 4-4-4-5-5-5 następnymi oczkami, 1 narzut, 1 oczko prawe. ZACHOWAĆ TAKIE SAMO NAPRĘŻENIE NICI JAK W PRZYPADKU PRÓBKI! Pierwsze dodawanie oczek na REGLAN – patrz powyżej, jest gotowe. Dalej przerabiać tak samo i dodawać oczka na REGLAN w sumie 14-16-17-18-20-21 razy co 2 okrążenia = 168-184-192-204-220-228 oczek. Po dodaniu wszystkich oczek, długość robótki od markera na wykończeniu dekoltu wynosi ok. 20-23-24-26-29-30 cm. Dalej przerabiać bez dodawania oczek, aż długość robótki od markera wynosi 21-23-25-27-29-31 cm (przerabiać tyle oczek ściegiem fantazyjnym, ile jest oczek od strony reglanu, pamiętają, aby było tyle samo narzutów co zamykanych oczek, aby liczba oczek pozostała taka sama – pozostałe oczka są przerabiane dżersejem). W następnym okrążeniu (okrążenie na prawo) – dopasować, aby kolejne okrążenie zaczynało się teraz o 1 oczko wcześniej, przerabiać następująco: umieścić 39-43-45-47-51-53 pierwsze oczka na nitce na rękaw, nabrać 5-5-7-7-9-9 oczek (= bok, pod rękawem), przerobić 45-49-51-55-59-61 następnych oczek jak wcześniej (= przód), zdjąć 39-43-45-47-51-53 następne oczka na nitkę na rękaw, nabrać 5-5-7-7-9-9 oczek (= bok, pod rękawem), przerobić 45-49-51-55-59-61 ostatnich oczek jak wcześniej (= tył). Kończyć tył/przód i rękawy oddzielnie. OD TEGO MOMENTU MIERZYĆ STĄD! TYŁ & PRZÓD: = 100-108-116-124-136-140 oczek. Przerabiać na prawo do oczka na środku oczek nabranych pod rękawem. Okrążenie zaczyna się teraz tutaj. Dalej przerabiać ścieg fantazyjny karczku – przerabiać od odpowiedniego rzędu schematu. Przerabiać ściegiem fantazyjnym i dżersejem na bokach następująco: *1-3-5-3-6-7 oczek prawych, schemat A.4 ponad 9 następnymi oczkami (patrz schemat odpowiedni dla rozmiaru), A.6 ponad 24 następnymi oczkami (patrz schemat odpowiedni dla rozmiaru), przerobić 8-8-8-16-16-16 pierwszych oczek schematu A.6, A.5 ponad 8 następnymi oczkami (patrz schemat odpowiedni dla rozmiaru), 0-2-4-2-5-6 oczek prawych*, powtarzać od *-* jeszcze 1 raz. Gdy długość robótki wynosi 24 cm, przerobić 1 okrążenie na prawo, równomiernie dodając 10-10-12-12-14-14 oczek = 110-118-128-136-150-154 oczka. Wziąć teraz druty z żyłką nr 8 i przerabiać ściągaczem (1 oczko prawe, 1 oczko lewe) przez 4 cm. Zamknąć oczka tak jak schodzą z drutu. Całkowita długość swetra od ramienia wynosi ok. 54-56-58-60-52-64 cm. RĘKAWY: Wziąć z powrotem 39-43-45-47-51-53 oczka z nitki z jednej strony robótki i przełożyć je na krótkie druty z żyłką nr 9 i nabrać 1 oczko w każde z 5-5-7-7-9-9 oczek nabranych pod rękawem = 44-48-52-54-60-62 oczka. Przerabiać na okrągło, dżersejem. Gdy dł. rękawa wynosi 20-18-17-15-13-12 cm, równomiernie dodać 4-4-4-4-6-6 oczek = 48-52-56-58-70-68 oczek. Wziąć teraz druty z żyłką nr 8. Przerabiać ściągaczem (1 oczko prawe, 1 oczko lewe) przez 4 cm. Zamknąć oczka tak jak schodzą z drutu. Długość rękawa od podziału robótki wynosi ok. 24-22-21-19-17-16 cm. Drugi rękaw wykonać tak samo. |
|||||||||||||||||||
Objaśnienia do schematu |
|||||||||||||||||||
|
|||||||||||||||||||
 |
|||||||||||||||||||
 |
|||||||||||||||||||
 |
|||||||||||||||||||
 |
|||||||||||||||||||
 |
|||||||||||||||||||
Skończyłaś ten wzór?Otaguj swoje zdjęcia #dropspattern #diamondsintheskysweater lub prześlij je do #dropsfan gallery. Potrzebujesz pomocy w związku z tym wzorem?Zobacz 25 instrukcje video, sekcję Komentarze/Pytania i jeszcze więcej, wchodząc na stronę wzoru na garnstudio.com © 1982-2026 DROPS Design A/S. Wszelkie prawa zastrzeżone. Ten dokument, w całości, jest chroniony prawem. Zobacz co możesz robić z naszymi wzorami na dole każdego wzoru na naszej stronie. |
|||||||||||||||||||


Posiadając 40 lat doświadczenia w projektowaniu wzorów na druty i szydełko, DROPS Design oferuje jedną z największych kolekcji bezpłatnych wzorów w internecie – przetłumaczonych na 17 języków. Obecnie jest dostępnych 325 katalogów i 12298 wzorów w języku polskim.
Dokładamy wszelkich starań, aby oferować Wam druty i szydełka, inspiracje, fachowe porady oraz doskonałej jakości włóczki w najlepszych cenach! Zamierzasz wykorzystać nasze wzory inaczej niż tylko do osobistego użytku? Przeczytaj jakie masz prawa w Copyright, który znajdziesz na końcu każdego wzoru. Miłej pracy!
Dodaj komentarz do modelu DROPS 221-29
Chcielibyśmy się dowiedzieć co masz do powiedzenia o tym wzorze!
Jeśli chcesz zadać pytanie i szybko uzyskać odpowiedź, upewnij się, że została wybrana właściwa kategoria w formularzu poniżej. Pola obowiązkowe są oznaczone *.