
Popular categories
Looking for a yarn?


Comments / Questions (70)
![]() Doris wrote:
Doris wrote:
Frage von gestern, 02.01.2026, ist gelöst: Nach der 1. Raglanzunahme hat man tatsächlich 192 M, aber da im Muster A3 in der 3. Reihe wieder eine M abgenommen wird, sind am Schluss trotz Raglanzunahmen wieder 192 M übrig. Am besten nach dem Muster arbeiten und nicht jedes Mal zählen, das verwirrt nur.
03.01.2026 - 14:43
![]() Doris wrote:
Doris wrote:
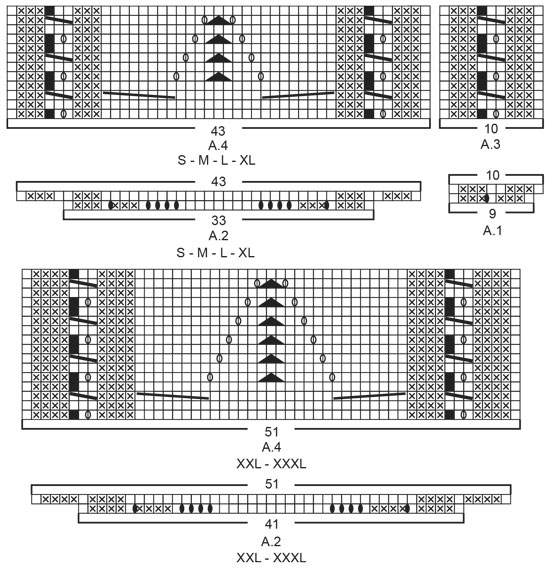
Bei A3 steht 10 Maschen, aber es sind 11, auch wenn man das schwarze Feld nicht zählt. Es haben schon andere gefragt, aber es wird immer geantwortet, dass es nur 10 Maschen sind. Ich habe dann nach der ersten Raglanzunahme (Grösse M) bereits 192 M statt 184 (176 + 8 sollte 184 M geben). Danke für die Rückmeldung.
02.01.2026 - 21:11DROPS Design answered:
Liebe Doris, die Maschenanzahl bei der 1. Reihe A.3 ist 10 Maschen, bei der 1. Reihe (sowie bei der 5. und der 9. Reihe) sind es ja 11 Maschen aber die Maschenanzahl wird immer ohne der Umschlag (gleichfalls mit A.4). Viel Spaß beim Stricken!
05.01.2026 - 10:38
![]() Elisabeth wrote:
Elisabeth wrote:
Ang. Tidigare fråga så har jag hittat problemet jag hade ! Tack !
03.11.2025 - 08:32DROPS Design answered:
:) så flott
03.11.2025 - 13:26
![]() Elisabeth wrote:
Elisabeth wrote:
På mönster A4 i mitten 🔼 förstår inte jag hur jag får 🔼 så den blir centrerad ? När jag ska göra den 3:e 🔼 har jag 6 maskor det stämmer ju inte det går ju åt 3 maskor till 🔼 då blir det ju ojämnt på var sida ?
01.11.2025 - 21:52DROPS Design answered:
Hei Elisabeth. Så bra at du fant ut av det selv. Da håper jeg du fikk strikket i helgen. mvh DROPS Design
03.11.2025 - 13:26
![]() Mia wrote:
Mia wrote:
Dzień dobry, proszę o pomoc w odczytaniu schematu A2 (XXL). W pierwszym rzędzie schematu są narzuty. Nie rozumiem drugiego rzędu, w którym nie widzę pierwszego narzutu. W pierwszym rzędzie jest oczko prawe, 4 oczka lewe, oczko prawe, narzut.... . W drugim rzędzie jest oczko prawe, 4 oczka lewe, oczko prawe i tu powinien być narzut do przerobienia, a są 4 oczka lewe. Nie rozumiem tego.
30.10.2025 - 08:50DROPS Design answered:
Witaj Mio, pytanie: nie widzisz narzutu w swojej robótce jak przerabiasz 2-gi rząd, może zsunął się z drutu? Początek 2 pierwszych rzędów schematu A.2 wygląda następująco: 1-szy rząd: 1 oczko prawe, 4 oczka lewe, oczko prawe, 1 narzut.... . W drugim rzędzie jest oczko prawe, 4 oczka lewe, 1 oczko prawe i 4 oczka lewe (z których pierwsze - narzut poprzedniego okrążenia- powinno być przerobione przekręcone na lewo).... W razie pytań pisz śmiało. Pozdrawiamy!
30.10.2025 - 09:10
![]() Inger Ksrin Dybvik wrote:
Inger Ksrin Dybvik wrote:
Under kap. HALSKANT. skal en ha 160 m ( str M) ok. BÆRESTYKKE,skal det være 176 m. når ein e ferdig med første avsnitt. Får ikke det til å stemme🤔. Og finn ikkje ut av det. Er det feil på oppskrifta?
11.10.2025 - 16:39DROPS Design answered:
Hei Inger Karin, Du øker 1 maske i hver rapport av A.1 (6 økte masker) og øker 10 masker i A.2 for din størrelse, slik at du øker 16 masker totalt på første omgangen etter halsen. Da har du 176 masker på pinnen. Hilsen Drops Team.
17.10.2025 - 07:20
![]() Annet Beckers wrote:
Annet Beckers wrote:
Dit gratis patroon kan ik niet downloaden drops 213-4. Graag uw reactie
23.09.2025 - 09:27DROPS Design answered:
Dag Annet,
Al onze patronen zijn gratis af te drukken via het print pictogram rechts boven bij het patroon. Klik op het print pictogram en dan op 'Patroon afdrukken'. Bij het afdrukken kun je vaak (afhankelijk van de instellingen op je computer) ook kiezen voor bewaren als pdf.
27.09.2025 - 20:07
![]() Cousin wrote:
Cousin wrote:
Bonjour Je ne comprends pas j ai pas encore fini mes augmentations du raglan que j ai une dizaine de mailles en trop . J'ai vérifié le nombre de mailles est bon au niveau des augmentations du raglan pourriez vous m'expliquer svp Merci
16.05.2025 - 15:13DROPS Design answered:
Bonjour Mme Cousin, notez que le nombre de mailles des petites torsades doit être compté sur 2 mailles (même si vous en avez 3 par moment), autrement dit, vous devez comptez 10 m dans A.3, et 43 ou 51 m dans A.4 = ne comptez pas les jetés au milieu de A.3 et de chaque côté du point ajouré de A.4. En espérant que ceci puisse vous aider. Bon tricot!
16.05.2025 - 17:37
![]() Marita wrote:
Marita wrote:
På rad 5, 7, 9 og 11 er det to kast med felling av 1 maske i midten. Allikevel er skjemaet slik at det teller 43 masker. Hvordan kan dette stemme, skjemaet og mønsteret må da øke med totalt 4 masker i høyden?
18.04.2025 - 08:38DROPS Design answered:
Hej Marita, de 2 masker du feller i midten udlignes af kasten på hver side af fellingerne. De små fellinger i hver side (hvor du feller 1 maske) udlignes af omslaget på rad 1, 5,9 for hver felling :)
30.04.2025 - 11:09
![]() Marita wrote:
Marita wrote:
Hei jeg strikker str. L. Når man bytter til pinne 3 og skal strikke A1, 59 masker, A1, osv.. så skal man ende samme sted, men det er jo ikke nok masker til det på 1 omgang? Og hvordan kan man komme fra 164 til 180 masker når det er totalt 30 flere masker fra 3xA2 og 8 fra 8xA1?
17.04.2025 - 19:27DROPS Design answered:
Hej Marita, du har 164 masker, strikker 9-59-9-5-9-4-9-33-9-4-9-5, så imellem hver A.1 har du 59 masker på bagstykket og 59 masker på forstykket og 5 masker på ærmerne = 164 masker hvor du tager ud på første pind ifølge A.1 1x6 og A.2=10 164+6+10=180 masker
30.04.2025 - 10:40
|
||||||||||||||||||||||||||||
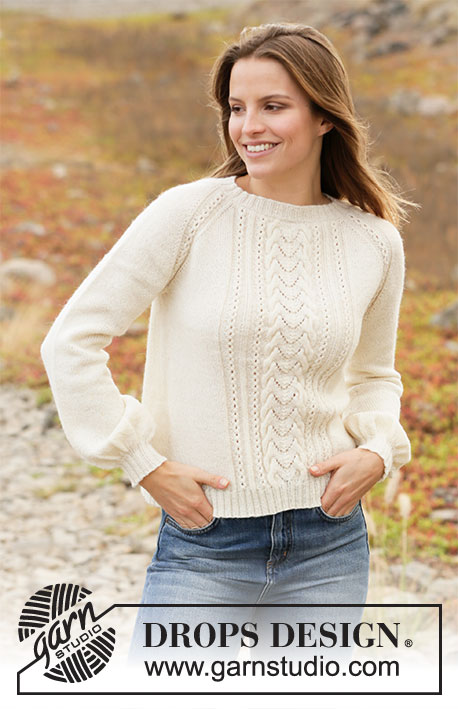
Signs of Spring#signsofspringsweater |
||||||||||||||||||||||||||||
 |
 |
|||||||||||||||||||||||||||
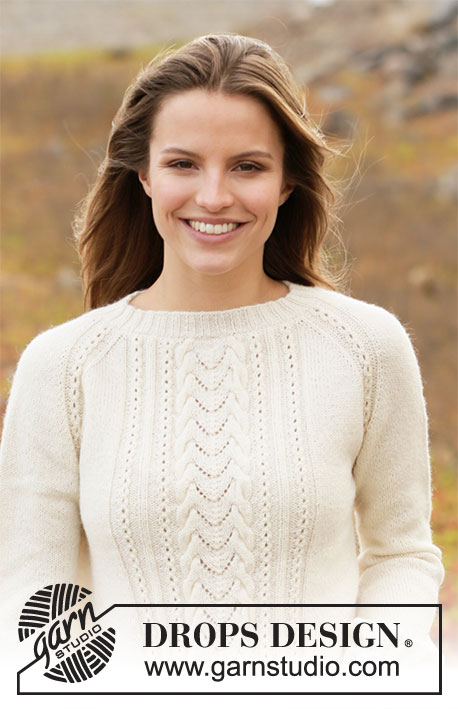
Knitted jumper in DROPS BabyMerino. The piece is worked top down with raglan, cables and lace pattern. Sizes S - XXXL.
DROPS 213-4 |
||||||||||||||||||||||||||||
|
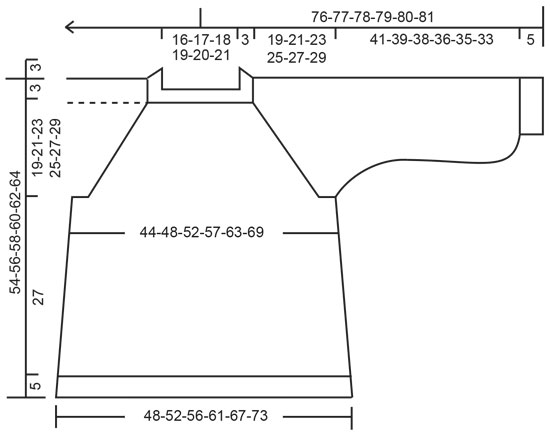
------------------------------------------------------- EXPLANATIONS FOR THE PATTERN: ------------------------------------------------------- INCREASE TIP-1 (evenly spaced): To work out how to increase evenly, count the total number of stitches on the needle (e.g. 116 stitches) and divide by the number of increases to be made (e.g. 36) = 3.2. In this example, increase by making 1 yarn over after approx. each 3rd stitch. On the next round work the yarn overs twisted to avoid holes. PATTERN: See diagrams A.1 to A.4. Choose diagram for your size (applies to A.2 and A.4). RAGLAN: Increase 1 stitch on each side of the pattern-band along each raglan-line, i.e. on each side of A.3 (= 8 stitches increased on the round). Increase 1 stitch by making 1 yarn over. On the next round knit the yarn overs twisted to avoid holes. Then work the new stitches in stocking stitch. INCREASE TIP-2 (for sides of body and mid under sleeves): Work until there are 2 stitches left before the marker thread, make 1 yarn over, knit 4 (marker thread sits between these 4 stitches) make 1 yarn over (= 2 stitches increased at each marker thread). On the next round knit the yarn overs twisted to avoid holes. Then work the new stitches in stocking stitch. DECREASE TIP (for mid under sleeves): Work until there are 3 stitches left before the marker thread, knit 2 together, knit 2 (marker thread sits between these 2 stitches), slip 1 stitch as if to knit, knit 1 and pass the slipped stitch over the knitted stitch (= 2 stitches decreased). CASTING-OFF TIP: To avoid the cast-off edge being tight you can cast off with a larger size needle. If the edge is still tight, make 1 yarn over after approx. each 4th stitch at the same time as casting off and the yarn overs are cast off as normal stitches. ------------------------------------------------------- START THE PIECE HERE: ------------------------------------------------------- JUMPER – SHORT OVERVIEW OF THE PIECE: The neck and yoke are worked in the round with circular needle, top down. The yoke is divided for body and sleeves and the body continued in the round with circular needle. The sleeves are worked in the round with short circular needle/double pointed needles, top down. NECK: Cast on 116-120-124-128-136-140 stitches with circular needle size 2.5 mm and Baby Merino. Knit 1 round. Then work rib in the round (= knit 2 / purl 2) for 3 cm. Knit 1 round where you increase 36-40-40-36-40-40 stitches evenly spaced – read INCREASE TIP-1 = 152-160-164-164-176-180 stitches. Knit 1 round without increasing and insert 1 marker in this round. Then work the yoke as described below. The yoke is measured from the marker. REMEMBER THE KNITTING TENSION! YOKE: Change to circular needle size 3 mm and work the first round as follows (from the left back raglan-line when the garment is worn): Work A.1 (= 9 stitches), then 53-57-59-59-65-67 stitches in stocking stitch (= back piece), A.1 (= 9 stitches), 5 stitches in stocking stitch (= top of sleeve), A.1 (= 9 stitches), 1-3-4-4-3-4 stitches in stocking stitch, A.1 (= 9 stitches), A.2 (= 33-33-33-33-41-41 stitches mid front), A.1 (= 9 stitches), 1-3-4-4-3-4 stitches in stocking stitch, A.1 (= 9 stitches) and finish with 5 stitches in stocking stitch on top of sleeve. There are 168-176-180-180-192-196 stitches on the needle. Work the next round in the same way following the diagrams. On the next round work as described below, AT THE SAME TIME increase to RAGLAN – read description above: Work A.3 (= 10 stitches), increase 1 stitch to raglan, work 53-57-59-59-65-67 stitches in stocking stitch (= back piece) and increase 1 stitch to raglan, work A.3 (= 10 stitches), increase 1 stitch to raglan, 5 stitches in stocking stitch (= top of sleeve), increase 1 stitch to raglan, A.3 (= 10 stitches), increase 1 stitch to raglan, 1-3-4-4-3-4 stitches in stocking stitch, A.3 (= 10 stitches), A.4 (= 43-43-43-43-51-51 stitches mid-front), A.3 (= 10 stitches), 1-3-4-4-3-4 stitches in stocking stitch, increase 1 stitch to raglan, work A.3 (= 10 stitches), increase 1 stitch to raglan, 5 stitches in stocking stitch (= top of sleeve) and increase 1 stitch to raglan (= 8 stitches increased on the round). Continue this pattern and increase to raglan every 2nd round a total of 13-16-19-24-28-31 times (including the round described above) and then every 4th round a total of 8-8-8-8-7-7 times. After the last increase to raglan there are 336-368-396-436-472-500 stitches on the needle. Continue the same pattern but without further increases until the yoke measures 19-21-23-25-27-29 cm from the marker on the neck. Cut the strand. Now divide the yoke for the body and sleeves on the next round as follows: Place the first 10-10-11-10-9-7 stitches on 1 thread for the sleeve (without working these stitches), work stocking stitch over the next 95-105-111-123-137-149 stitches (= back piece), place the next 67-73-81-89-93-95 stitches on 1 thread for the sleeve, cast on 10-10-12-12-14-16 new stitches on the needle (= in side), continue with stocking stitch and pattern over the next 107-117-123-135-149-161 stitches (= front piece), place the remaining 57-63-70-79-84-88 stitches on the same thread as the first part of the sleeve at the beginning of the round and cast on 10-10-12-12-14-16 new stitches under the sleeve (= in side). BODY: = 222-242-258-282-314-342 stitches. Insert 1 marker thread on each side of the body in the middle of the 10-10-12-12-14-16 stitches cast on under each sleeve. Allow the threads to follow your work onwards; they will be used when increasing in the sides. Work stocking stitch over the back piece as far as the first marker thread. The round now starts here. Continue with stocking stitch in the round and A.3 and A.4 over the middle 63-63-63-63-71-71 stitches mid front as before. When the piece measures 3 cm from the division, increase 1 stitch on each side of both marker threads – read INCREASE TIP-2 (= 4 stitches increased). Increase like this every 5 cm a total of 5 times on each side of the body = 242-262-278-302-334-362 stitches. Continue working until the body measures 27 cm from the division (there is 5 cm left to finished length; try the jumper on and continue to desired length). On the next round decrease 12 stitches over the cables in A.3 and A.4 (decrease 4 stitches over each of the 2 large cables and 1 stitch over each of the small cables by knitting 2 together) = 230-250-266-290-322-350 stitches left on the needle. Knit 1 round over all stitches and increase 70-74-78-86-98-106 stitches evenly spaced = 300-324-344-376-420-456 stitches. Change to circular needle size 2.5 mm and work rib (= knit 2 / purl 2) for 5 cm. Loosely cast off with knit over knit and purl over purl – read CASTING-OFF TIP! The jumper measures approx. 54-56-58-60-62-64 cm from the shoulder down. SLEEVES: Place the 67-73-81-89-93-95 stitches from the thread on the one side of the piece on double pointed needles or short circular needle size 3 mm and knit up 1 stitch in each of the 10-10-12-12-14-16 stitches cast on under the sleeve = 77-83-93-101-107-111 stitches. Insert a marker thread in the middle of the 10-10-12-12-14-16 stitches under the sleeve. Allow the thread to follow your work onwards; it will be used when decreasing under the sleeve. Start the round at the marker thread and work stocking stitch in the round. When the piece measures 2 cm from the division decrease 2 stitches mid under the sleeve – read DECREASE TIP. Decrease like this 1½-1½.1½-1½-1½-2 cm a total of 7-7-8-8-7-5 times = 63-69-77-85-93-101 stitches. When the piece measures 16 cm from the division, increase 2 stitches mid under the sleeve – read INCREASE TIP-2. Increase like this every 1 cm a total of 21-18-18-14-14-14 times = 105-105-113-113-121-129 stitches. Continue working until the sleeve measures 41-39-38-36-35-33 cm from the division (there is 5 cm left to finished length; try the jumper on and continue to desired length). NOTE: Shorter measurements in larger sizes due to wider neck and longer yoke. Knit 1 round where you decrease 1 stitch = 104-104-112-112-120-128 stitches. On the next round knit all stitches together 2 and 2 = 52-52-56-56-60-64 stitches. Change to double pointed needles size 2.5 mm and work rib (= knit 2 / purl 2) for 5 cm. Loosely cast off with knit over knit and purl over purl. The sleeve measures approx. 46-44-43-41-40-38 cm from the division. Work the other sleeve in the same way. |
||||||||||||||||||||||||||||
Diagram explanations |
||||||||||||||||||||||||||||
|
||||||||||||||||||||||||||||
 |
||||||||||||||||||||||||||||
 |
||||||||||||||||||||||||||||
Have you finished this pattern?Tag your pictures with #dropspattern #signsofspringsweater or submit them to the #dropsfan gallery. Do you need help with this pattern?You'll find 27 tutorial videos, a Comments/Questions area and more by visiting the pattern on garnstudio.com. © 1982-2026 DROPS Design A/S. We reserve all rights. This document, including all its sub-sections, has copyrights. Read more about what you can do with our patterns at the bottom of each pattern on our site. |
||||||||||||||||||||||||||||


With over 40 years in knitting and crochet design, DROPS Design offers one of the most extensive collections of free patterns on the internet - translated to 17 languages. As of today we count 324 catalogues and 12290 patterns translated into English (UK/cm). 12290
We work hard to bring you the best knitting and crochet have to offer, inspiration and advice as well as great quality yarns at incredible prices! Would you like to use our patterns for other than personal use? You can read what you are allowed to do in the Copyright text at the bottom of all our patterns. Happy crafting!
Post a comment to pattern DROPS 213-4
We would love to hear what you have to say about this pattern!
If you want to leave a question, please make sure you select the correct category in the form below, to speed up the answering process. Required fields are marked *.