
Popular categories
Looking for a yarn?


Comments / Questions (55)
![]() Sofia Moraes wrote:
Sofia Moraes wrote:
In first short row when it says work as before , does that mean you need to do A1 whilst doing the short rows
12.06.2020 - 12:50DROPS Design answered:
Dear Mrs Moraes, you work the short rows working A.1 /A.2 at the same time, so just continue following diagram. Happy knitting!
12.06.2020 - 15:18
![]() Dumet wrote:
Dumet wrote:
Bonjour, pouvez vous svp me donner plus d'explications sur ceci: Décaler les transitions entre le dos/les devants et les manches pour que les 2-1-1-1-1-1 mailles de chaque côté de chacune des manches soient maintenant sur les devants et sur le dos. Merci beaucoup
28.05.2020 - 09:56DROPS Design answered:
Bonjour Mme Dumet, en tricotant le rang suivant pour diviser l'ouvrage, 2 ou 1 maille du début de la manche sera tricotée pour le devant, 2 ou 1 m de la fin de la manche sera tricotée pour le dos, idem pour la 2ème manche: le dos se termine par les 2-1 premières m de la manche et le devant commence par les 2-1 dernières m de la manche. Bon tricot!
28.05.2020 - 14:13
![]() Dumet wrote:
Dumet wrote:
Bonjour est ce que l'encolure se trouve juste après les 7 mailles du col droit ou gauche. Est il possible d'avoir le détail en mailles du commencement de l'empiècement? Merci beaucoup
26.05.2020 - 08:48DROPS Design answered:
Bonjour Mme Dumet, en fonction de votre taille vous avez 58 à 73 mailles au début de l'empiècement, y compris les 7 mailles de la bordure de A.1 de chaque côté. Vous augmentez de chaque côté pour l'encolure à 8 m des bords - cf ENCOLURE-V soit les 7 m de la bordure devant + 1 m end. Bon tricot!
26.05.2020 - 09:02
![]() Dumet wrote:
Dumet wrote:
Bonjour je suis complètement bloqué à partir de l'empiecement. je ne comprends pas est-ce que je dois commencer par le raglan ou par l'encolure V
25.05.2020 - 18:55DROPS Design answered:
Bonjour Mme Dumet, vous commencez à augmenter en même temps pour l'encolure V et pour le raglan, en fonction de votre taille, vous allez augmenter 6 à 9 fois tous les 2 rangs pour l'encolure en même temps que pour le raglan, puis vous augmenterez tous les 2 rangs pour le raglan mais encore 1 fois 6 rangs après la dernière augmentation pour l'encolure. Bon tricot!
26.05.2020 - 08:40
![]() Corinne Dumet wrote:
Corinne Dumet wrote:
Bonjour, j'ai reçu ma laine et je l'a trouve très fine pour tricoter avec des aiguilles N° 6 et 8. je voudrai savoir si c'est normal. l'échantillon doit être fait avec quelles aiguilles? MERCI
19.05.2020 - 19:48DROPS Design answered:
Bonjour Mme Dumet, on utilise ici volontairement des aiguilles un peu plus grosses pour obtenir l'effet voulu, vous devez avoir un échantillon de 12 m x 14 rangs jersey = 10 x 10 cm - vous trouverez plus d'infos ici sur les aiguilles, l'échantillon et la tension en général. Bon tricot!
20.05.2020 - 07:06
![]() LiloM wrote:
LiloM wrote:
Das Video habe ich schon gesehen und ich frage mich, wie es DANACH weitergeht! Danke für die Antwort und Erklärung.
28.04.2020 - 12:33DROPS Design answered:
Liebe LiloM, nach dem Video stricken Sie die Passe wie beschrieben: die neuen Maschen dazwischen sind für den Halsauschnitt (Rückenteil), die 4 Markierer einsetzen und die Zunahmen für RAGLAN (bei den Markierern) und für den Halsausschnitt - siehe V-AUSSCHNITT: - stricken. Viel Spaß beims tricken!
28.04.2020 - 13:55
![]() LiloM wrote:
LiloM wrote:
Guten Tag, ich habe Probleme zu verstehen, wie nach den Blenden (links, rechts) und der Verbindung mit den neuen Maschenweitergearbeitet wird. Wo setze ich dann wieder an und wie stricke ich die Blende dann bis zum unteren Ende zu Ende? Gibt es dazu auch noch Videos oder Zeichnungen? Ich finde das Prinzip der RVO Jacke mit V-Ausschnitt sehr schwer zu verstehen und brauche dringend Starthilfe, bitte!
27.04.2020 - 16:34DROPS Design answered:
Liebe LiloM, könnte Ihnen dieses Video weiterhelfen? Viel Spaß beim stricken!
28.04.2020 - 09:56
![]() Kristina wrote:
Kristina wrote:
Jag förstår inte riktigt en sak i beskrivningen av oket. Man ökar på två olika sätt, till raglan resp till v-hals. Till raglan 14 ggr i stl small, till v-hals 7 gggr. När man ökat klart vartannat varv ska man öka ”på vart 6:e varv 1 gång”- NÄR ska den göras (efter att jag är klar med de sju v-hals-ökningarna eller först när jag är klar med de 14 raglanökningarna? Och ska den sista ökningen göras BARA till v-hals eller även till raglan?
12.04.2020 - 22:39DROPS Design answered:
Hej Ökningen på "vart 6:e varv 1 gång" gör du efter att de sju v-halsökningarna är gjorda och gäller endast v-halsen. Lycka till!
14.04.2020 - 10:38
![]() Andrea Ambech Nedenskov wrote:
Andrea Ambech Nedenskov wrote:
Hejsa, vil det være muligt at strikke den i dobbelt tråd melody hvis der ønskes en ekstra tyk og vamset cardigan? :D
30.03.2020 - 18:34DROPS Design answered:
Hej Om du stickar den i dubbel tråd så kommer det inte stämma med stickfastheten i oppskriften så det fungerar dessvärre inte eftersom måtten kommer bli felaktiga. Mvh DROPS Design
31.03.2020 - 07:25
![]() Michèle wrote:
Michèle wrote:
Mon style ....j'aime
11.01.2020 - 18:03
|
|||||||
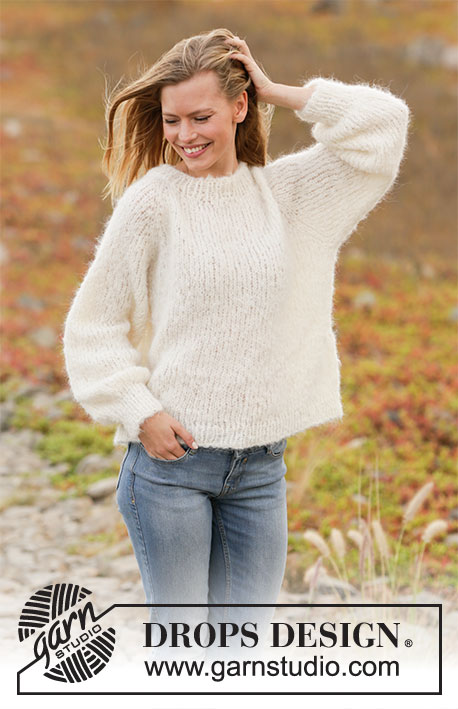
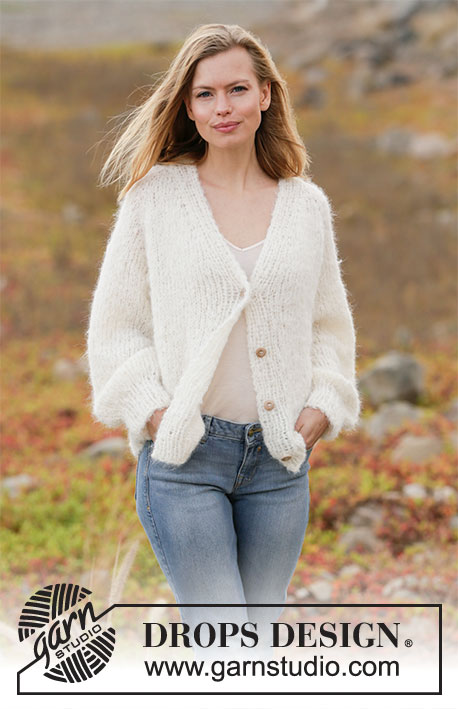
Spring Fuzz Jacket#springfuzzjacket |
|||||||
 |
 |
||||||
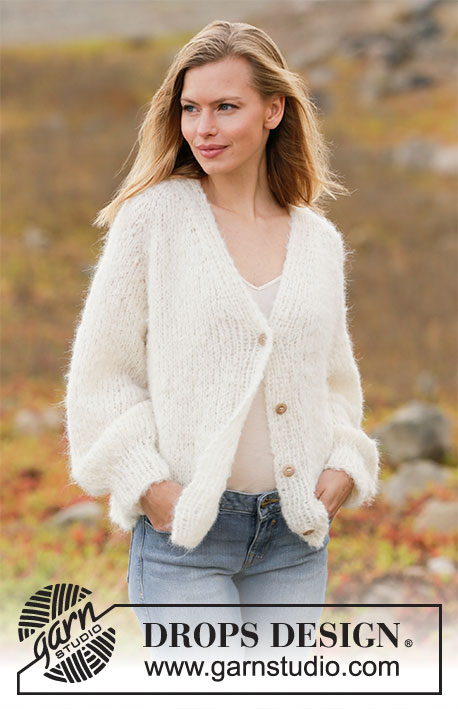
Knitted jacket with raglan in DROPS Melody. The piece is worked top down with v-neck. Sizes XS - XXL.
DROPS 213-27 |
|||||||
|
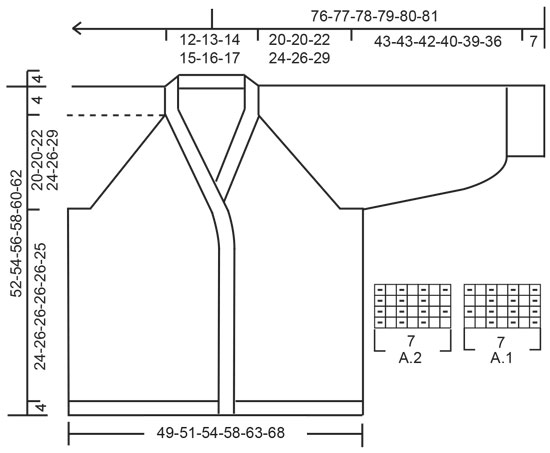
------------------------------------------------------- EXPLANATIONS FOR THE PATTERN: ------------------------------------------------------- PATTERN: See diagrams A.1 and A.2. The diagrams show all rows in the pattern seen from the right side. SHORT ROWS-1 (for the first neck-piece worked, i.e. right neck): Start from the right side and work as follows: * Work back and forth as before over the first 5 stitches, then work as before, back and forth over all 7 stitches *, work from *-* a total of 2 times. SHORT ROWS-2 (for the second neck-piece worked, i.e. left neck): Start from the wrong side and work as follows: * Work back and forth as before over the first 5 stitches, then work as before back and forth over all 7 stitches *, work from *-* a total of 2 times, then work 1 row back from the wrong side over all 7 stitches. INCREASE/DECREASE TIP (evenly spaced): To work out how to increase/decrease evenly, count the total number of stitches on needle (e.g. 54 stitches), minus band stitches (e.g. 14 stitches) and divide the remaining stitches with number of increases/decreases to be made (e.g. 4) = 10. In this example, increase by making 1 yarn over after each 10th stitch. On the next row work the yarn overs twisted to avoid holes. When decreasing, knit together each 9th and 10th stitch. KNITTING TIP: To keep the bands even and neat it is important to tighten the strand slightly when working the outermost 7 stitches on each side. V-NECK: All increases are worked from the right side! Increase 1 stitch on the inside of 7 band stitches + 1 knit stitch (= 8 stitches). Increase by making 1 yarn over after the 8 stitches on the beginning of the row and before the 8 stitches at the end of the row. On the next row (wrong side) purl the yarn overs twisted to avoid holes. Then work the new stitches in stocking stitch. RAGLAN: All increases are worked from the right side! Increase 1 stitch on each side of the 4 markers in each transition between body and sleeves as follows: Work until there is 1 stitch left before marker thread, 1 yarn over, knit 2 (marker sits between these 2 stitches), 1 yarn over (= 2 stitches increased). Repeat at all the markers On the next row (wrong side) purl the yarn overs twisted to avoid holes. Then work the new stitches in stocking stitch. DECREASE TIP (for sleeves): Decrease 1 stitch on each side of the marker thread as follows: Work until there are 3 stitches left before the marker thread, knit 2 together, knit 2 (marker thread sits between these 2 stitches), slip 1 stitch as if to knit, knit 1 and pass the slipped stitch over the knitted stitch. BUTTONHOLE: Work buttonholes on the right band (when the garment is worn). Work from the right side when there are 5 stitches left on the row as follows: Make 1 yarn over, knit 2 together and knit the last stitches. On the next row (wrong side), knit the yarn over to leave a hole. The first buttonhole is worked on the first row on the body. Then work the other 3 buttonholes with approx. 8-8½-8½-8½-8½-8½cm between each one. CASTING-OFF TIP: To avoid the cast-off edge being tight you can cast off with a larger size needle. ------------------------------------------------------- START THE PIECE HERE: ------------------------------------------------------- JACKET – SHORT OVERVIEW OF THE PIECE: First work 2 loose neck-pieces. These are placed on the circular needle when casting on stitches for the neck as described in the text (the neck-edges are sewn together mid back to finish and then sewn to the neck-line at the back). Then the whole piece is continued top down. The yoke is worked back and forth with circular needle from mid front, while increasing for the v-neck and raglan. The yoke is divided for body and sleeves. The body is continued back and forth from mid front. The sleeves are worked in the round with double pointed needles/short circular needle. NECK: Right neck: Cast on 7 stitches with needle size 6 mm and Melody and work A.1 (= 7 stitches) back and forth (row 1 = right side). When the neck-piece measures 4-4-5-5-6-6 cm, work SHORT ROWS-1 – read description above. When the short rows are finished continue with A.1 over all stitches until the piece measures approx. 12-12-13-13-14-14 cm outermost on the neck (i.e. on the long-side) – adjust so you finish after a row from the wrong side. Cut the strand and lay the piece to one side. Left neck: Cast on 7 stitches with needle size 6 mm and Melody and work A.2 (= 7 stitches) back and forth. When the neck-piece measures 4-4-5-5-6-6 cm, work SHORT ROWS-2 – read description above. When the short rows are finished continue with A.2 over all stitches until the piece measures approx 12-12-13-13-14-14 cm outermost on the neck (i.e. on the long-side) – adjust so you finish after a row from the wrong side. Now continue as follows: ROW 1 (right side): Do not cut the strand but work the left neck-piece (from the right side), cast on 40-42-43-44-45-46 stitches with the same circular needle, straight after the neck-piece, and then work as before over the 7 stitches on the right neck-piece = 54-56-57-58-59-60 stitches on the needle. ROW 2: Purl 1 row from the wrong side (band stitches worked as before). ROW 3: Knit 1 row from the right side (band stitches worked as before) where you increase 4-8-10-10-11-13 stitches evenly spaced – read INCREASE/DECREASE TIP = 58-64-67-68-70-73 stitches. ROW 4: Purl 1 row from the wrong side (band stitches worked as before). Insert a marker inside the 7 stitches on the edge of A.1. The piece will be measured from this marker. Change to circular needle size 8 mm and work the yoke as described below. YOKE: Insert 4 marker threads in the piece as follows (without working the stitches): Insert a marker thread 10 stitches in from each side (= in the transition between sleeves and front pieces), place the next 2 marker threads 10 stitches further in from both the first marker threads (= in transitions between sleeves and back piece). There are now 18-24-27-28-30-33 stitches on the back piece between the last 2 marker threads. Work stocking stitch and band stitches as before – read KNITTING TIP. AT THE SAME TIME on the first row from the right side increase for V-NECK and RAGLAN – read description above. REMEMBER THE KNITTING TENSION! Increase to raglan every 2nd row a total of 14-14-15-16-18-20 times and increase for the v-neck every 2nd row 1-3-2-3-3-1 times in total, then on every 4th row 5-4-5-5-6-8 times then on every 6th row 1 time in all sizes. When all the increases to raglan and v-neck are finished there are 184-192-203-214-234-253 stitches on the row. Continue with stocking stitch and work the 7 band stitches on each side as before until the piece measures 20-20-22-24-26-29 cm from the marker. Now divide the piece for body and sleeves. The transitions between body and sleeves are displaced so the 2-1-1-1-1-1 stitches on each side of both sleeves are now worked on the front and back pieces. The next row from the wrong side is worked as follows: Work the first 33-33-34-36-39-41 stitches as before, place the next 34-36-38-40-44-48 stitches on a thread for sleeve, cast on 8-8-8-10-10-10 new stitches on the needle (= in side under sleeve), work the next 50-54-59-62-68-75 stitches (= back piece), place the next 34-36-38-40-44-48 stitches on a thread for sleeve, cast on 8-8-8-10-10-10 new stitches on the needle (= in side under sleeve), work the remaining 33-33-34-36-39-41 stitches as before. Body and sleeves are finished separately. THE PIECE IS NOW MEASURED FROM HERE. BODY: = 132-136-143-154-166-177 stitches. Continue with stocking stitch and A.1/A.2 over the 7 band stitches on each side as before – remember BUTTONHOLES – read description above. When the piece measures 24-26-26-26-26-25 cm from the division increase 19-19-20-23-25-26 stitches evenly spaced = 151-155-163-177-191-203 stitches. Change to circular needle size 6 mm and work rib as follows: A.2 as before over the first 7 stitches, work rib (= knit 1 / purl 1) until there are 8 stitches left on the row, knit 1, and work A.1 over the last 7 stitches. When the rib measures 4 cm, cast off with knit over knit and purl over purl – read CASTING-OFF TIP. The jacket measures approx. 52-54-56-58-60-62 cm from the shoulder down. SLEEVES: Place the 34-36-38-40-44-48 stitches from the thread on the one side of the piece on short circular needle/double pointed needles size 8 mm and knit up 1 stitch in each of the 8-8-8-10-10-10 stitches cast on under the sleeve = 42-44-46-50-54-58 stitches. Work the different sizes as follows: Sizes XS, S and M: Work stocking stitch in the round until the piece measures 43-43-42 cm. Continue as described below. Sizes L, XL and XXL: Insert a marker thread in the middle of the 10-10-10 stitches under the sleeve. Allow the thread to follow your work onwards. When the sleeve measures 5 cm, decrease 1 stitch on each side of the marker thread – read DECREASE TIP. Repeat the decrease when the sleeve measures 12 cm = 46-50-54 stitches. Continue working stocking stitch until the sleeve measures 40-39-36 cm. Continue as described below. All sizes: Knit 1 round where you decrease 14-14-14-14-14-16 stitches evenly spaced = 28-30-32-32-36-38 stitches. Change to double pointed needles size 6 mm and work rib (= knit 1 / purl 1) in the round for 7 cm. Cast off with knit over knit and purl over purl – remember CASTING-OFF TIP. The sleeve measures approx 50-50-49-47-46-43 cm. Work the other sleeve in the same way. ASSEMBLY: Sew the neck-pieces together mid-back with the seam turning inwards. Stretch the neck slightly and sew it to the neck-line at the back. Sew the buttons onto the left band. |
|||||||
Diagram explanations |
|||||||
|
|||||||
 |
|||||||
Have you finished this pattern?Tag your pictures with #dropspattern #springfuzzjacket or submit them to the #dropsfan gallery. Do you need help with this pattern?You'll find 26 tutorial videos, a Comments/Questions area and more by visiting the pattern on garnstudio.com. © 1982-2026 DROPS Design A/S. We reserve all rights. This document, including all its sub-sections, has copyrights. Read more about what you can do with our patterns at the bottom of each pattern on our site. |
|||||||


With over 40 years in knitting and crochet design, DROPS Design offers one of the most extensive collections of free patterns on the internet - translated to 17 languages. As of today we count 324 catalogues and 12290 patterns translated into English (UK/cm). 12290
We work hard to bring you the best knitting and crochet have to offer, inspiration and advice as well as great quality yarns at incredible prices! Would you like to use our patterns for other than personal use? You can read what you are allowed to do in the Copyright text at the bottom of all our patterns. Happy crafting!
Post a comment to pattern DROPS 213-27
We would love to hear what you have to say about this pattern!
If you want to leave a question, please make sure you select the correct category in the form below, to speed up the answering process. Required fields are marked *.