
Popular categories
Looking for a yarn?


Comments / Questions (27)
![]() Nachisale wrote:
Nachisale wrote:
Like to knit my blouse. This site seems to be the best to learn how to knit
07.01.2020 - 15:49
![]() Jenny wrote:
Jenny wrote:
Hallo liebes DROPS-Team, ich bin beim Voderteil und soll die Schultern einzeln fertig stricken. Meine Frage: ist es richtig, dass bei der einen Schulter die 12 Zopfmaschen am Anfang der Schulter zusammengestrickt werden (auf Höhe der stillgelegten Maschen) und die 12 Maschen der anderen Schulter ganz am Ende kurz vor dem Abketten? Liebe Grüße, Jenny
13.12.2019 - 21:50DROPS Design answered:
Liebe Jenny, beide Schulter sollten ebenso gestrickt werden, nur spiegelverkehr. Viel Spaß beim stricken!
16.12.2019 - 07:47
![]() Nochmal Tanja wrote:
Nochmal Tanja wrote:
Hallo zurück-bei A3 und A4 nehme ich ja Maschen ab-aber ich kann im Text nirgendwo Zunahmen finden. Wird der Pullover immer enger-aber dann sind die Zöpfe auch nicht mehr übereinander. Liebe Grüße
24.11.2019 - 00:05DROPS Design answered:
Liebe Tanja, die Zunahmen werden je in A.1 und A.2 gestrickt werden (=siehe beide Diagramme), dann haben Sie die richtige Maschenanzahl für A.3 und A.4 nach A.1 und A.2. Viel Spaß beim stricken!
25.11.2019 - 08:43
![]() Tanja wrote:
Tanja wrote:
Liebes Drops-Team, wenn ich in Runden stricken soll , aber das Diagramm, wie hier z.B. A1 von Rückrunde spricht, ist dann die 2. Runde die Rückrunde, das heißt, ich stricke die Sternchen in der ersten Runde rechts und in der 2. Runde links herum? Liebe Grüße und Danke
23.11.2019 - 17:33DROPS Design answered:
Liebe Tanja, wenn Sie die Diagramme in Runden stricken, dann stricken Sie alle Maschen wie sie von der Vorderseite aussehen sollen, dh die Sternchen sollen Sie bei jeder Runde links stricken (wenn Sie dann in Hin- und Rückreihen stricken, stricken Sie die Sternchen rechts bei den Rückreihen). Hier lesen Sie mehr über Diagramme. Viel Spaß beim stricken!
25.11.2019 - 08:25
![]() Sylvie wrote:
Sylvie wrote:
Merci de votre response rapide et d’avoir changer le diagrame A2. Moi j’aime beaucoup vos model. Les design son formidable.
17.09.2019 - 02:54
![]() Sylvie wrote:
Sylvie wrote:
A2 se fait sur 10 maille, on ajoute 4 jete torse. Sa fait 14 maille au deusieme rang pas 16 maille. Se qui veux dire qu’il y a 184 maille total Mais pas 186. Sa vas tu etre un probleme pour le prochain diagrame.
09.09.2019 - 01:01DROPS Design answered:
Bonjour Sylvie, votre retour a été transmis à nos stylistes, il faut augmenter 6 mailles (et non 4) dans A.2. Merci, bon tricot! Edit 10/09 Le diagramme A.2 a été corrigé.
09.09.2019 - 11:40
![]() Britt wrote:
Britt wrote:
Heel mooi ...mijn dochters houden van dat soort mouwen
24.08.2019 - 23:36
![]() Lene wrote:
Lene wrote:
Er det 2 kast for lite på A2 (str M)? 4 kast blir 14 for meg, men skal være 16 over til A4??
16.08.2019 - 16:31DROPS Design answered:
Hei Lene. Her hart det vært en rettelse A.2 (diagrammet skal nå være riktig). God Fornøyelse!
23.09.2019 - 10:13
![]() Rosy wrote:
Rosy wrote:
Modèle très sympa, les teen-ager vont adorer, à porter sur un pantalon taille haute du plus bel effet
29.07.2019 - 08:45
![]() Marie Louise Hebert wrote:
Marie Louise Hebert wrote:
Wow magnifique ce tricot
15.07.2019 - 15:46
|
||||||||||||||||||||||||||||
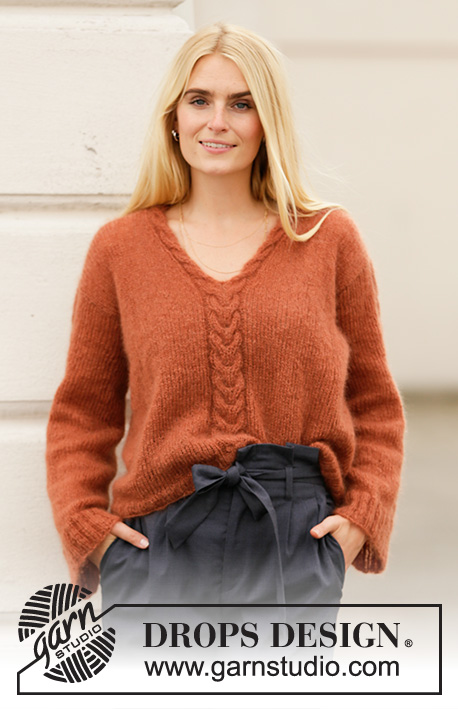
Autumn Trails#autumntrailssweater |
||||||||||||||||||||||||||||
 |
 |
|||||||||||||||||||||||||||
Knitted jumper in 2 strands DROPS Kid-Silk or 1 strand DROPS Brushed Alpaca Silk. The piece is worked with cables. Sizes S - XXXL.
DROPS 205-8 |
||||||||||||||||||||||||||||
|
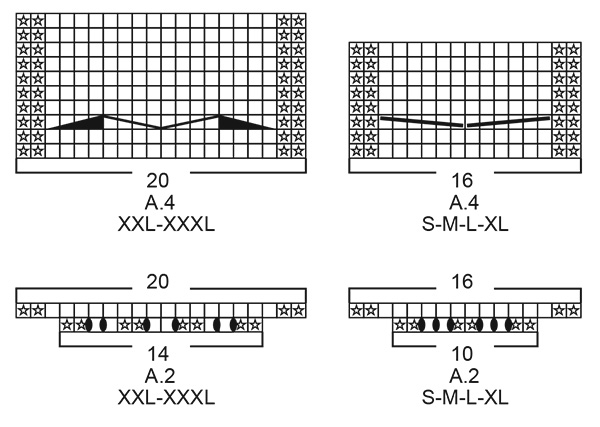
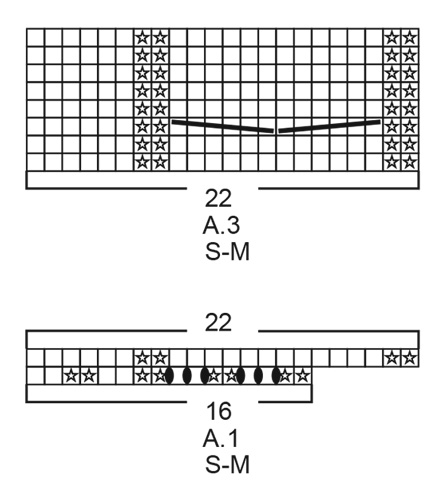
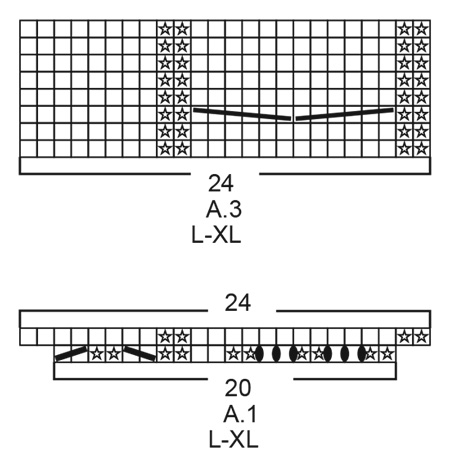
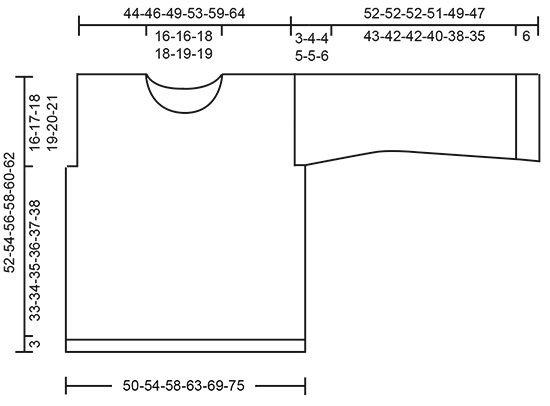
------------------------------------------------------- EXPLANATIONS FOR THE PATTERN: ------------------------------------------------------- PATTERN: See diagrams A.1 to A.4. Choose diagram for your size. The diagrams show all rows in the pattern seen from the right side. DECREASE TIP-1 (evenly spaced): To work out how to decrease evenly, count the total number of stitches over which you are decreasing (e.g. 26 stitches) and divide by number of decreases to be made (e.g. 5) = 5.2. In this example, decrease by knitting approx each 4th and 5th stitch together. CASTING OFF TIP: To avoid the cast-off edge being tight you can cast off with a ½ size larger needle. DECREASE TIP-2 (for sleeves): Decrease 1 stitch on each side of the marker thread as follows: Work until there are 3 stitches left before the marker thread, knit 2 together, knit 2 (marker thread sits between these 2 stitches), slip 1 stitch as if to knit, knit 1 and pass the slipped stitch over the knitted stitch. INCREASE TIP (for sleeves): Work until there is 1 stitch left before the marker thread, 1 yarn over, knit 2 (marker thread sits between these 2 stitches), 1 yarn over. On the next round knit the yarn overs twisted to avoid holes. Then work the new stitches in stocking stitch. ------------------------------------------------------- START THE PIECE HERE: ------------------------------------------------------- JUMPER – SHORT OVERVIEW OF THE PIECE: The piece is worked in the round with circular needle, bottom up as far as the armholes, then the front and back pieces are finished separately. The sleeves are worked in the round with double pointed needles/short circular needle. BODY: Cast on 192-212-228-252-276-300 stitches with circular needle size 4 mm and 2 strands Kid-Silk or 1 strand Brushed Alpaca Silk. Knit 1 round, then work rib (= knit 2 / purl 2) for 3 cm. Change to circular needle size 5 mm and work the next round as follows: Work stocking stitch over the first 26-30-30-38-38-42 stitches – decrease 5-5-4-7-7-6 stitches evenly over these stitches – read DECREASE TIP-1, * A.1 over 16-16-20-20-24-24 stitches *, work from *-* a total of 2 times, work A.2 over the next 10-10-10-10-14-14 stitches, work the remaining 124-140-148-164-176-196 stitches in stocking stitch – decrease 19-23-24-25-27-32 stitches evenly over these stitches. When A.1 and A.2 have been completed there are 186-202-214-234-260-280 stitches on the needle. The next round is worked as follows: Work 21-25-26-31-31-36 stitches in stocking stitch, * A.3 over 22-22-24-24-30-30 stitches *, work from *-* a total of 2 times, work A.4 over the next 16-16-16-16-20-20 stitches, work the remaining 105-117-124-139-149-164 stitches in stocking stitch. Continue this pattern. A.3 and A.4 are repeated in height. REMEMBER THE KNITTING TENSION! Work until the piece measures 36-37-38-39-40-41 cm – adjust to after an odd-numbered round. The next round is worked as follows: Cast off the first 5-7-7-9-9-10 stitches for the armhole, work the next 92-96-102-108-124-132 stitches as before (= front piece), cast off the next 10-14-14-18-18-20 stitches for the armhole, work the next 74-78-84-90-100-108 stitches as before (= back piece) and cast off the last 5-7-7-9-9-10 stitches for the armhole. Then finish front and back pieces separately as described below. BACK PIECE: = 74-78-84-90-100-108 stitches. Continue with stocking stitch back and forth. When the piece measures 50-52-54-56-58-60 cm, cast off the middle 24-24-28-28-30-30 stitches for neck and each shoulder is finished separately. Cast off 1 stitch on the next row from the neck = 24-26-27-30-34-38 stitches left on shoulder. Continue working until the piece measures 52-54-56-58-60-62 cm, cast off– read CASTING OFF TIP. Work the other shoulder in the same way. FRONT PIECE: = 92-96-102-108-124-132 stitches. Start from the right side and continue with pattern and stocking stitch back and forth. Work until the piece measures 43-45-46-48-49-51 cm. On the next row from the right side knit the 12-12-12-12-16-16 cable stitches mid front together 2 and 2 (= 6-6-6-6-8-8 stitches decreased) = 86-90-96-102-116-124 stitches. On the next row place these 10-10-12-12-12-12 stitches on 1 thread for the neck and each shoulder is finished separately. Continue casting off at the beginning of each row from the neck as follows: Cast off 3 stitches 1 time, 2 stitches 2 times and then 1 stitch 1-1-2-2-3-3 times = 30-32-33-36-42-46 stitches left on shoulder. Continue working until the piece measures 51-53-55-57-59-61 cm. On the next row from the right side knit the 12-12-12-12-16-16 cable stitches together 2 and 2 (= 6-6-6-6-8-8 stitches decreased) = 24-26-27-30-34-38 stitches. Cast off. Work the other shoulder in the same way. SLEEVE: Cast on 68-76-84-84-88-96 stitches with short circular needle/double pointed needles size 4 mm and 2 strands Kid-Silk or 1 strand Brushed Alpaca Silk. Knit 1 round, then work rib (= knit 2 / purl 2) for 6 cm. Insert 1 marker thread at the beginning of the round; it will be used when decreasing and increasing mid under sleeve. Change to short circular needle size 5 mm and work the next round as follows: Work stocking stitch over the first 30-34-38-38-38-42 stitches – decrease 8-10-12-11-10-12 stitches evenly over these stitches, work A.2 over the next 10-10-10-10-14-14 stitches, work stocking stitch over the remaining 28-32-36-36-36-40 stitches – decrease 6-8-10-9-8-10 stitches evenly over these stitches. When A.2 has been completed there are 60-64-68-70-76-80 stitches on the needle. The next round is worked as follows: Work 22-24-26-27-28-30 stitches in stocking stitch, A.4 over the next 16-16-16-16-20-20 stitches, work the remaining 22-24-26-27-28-30 stitches in stocking stitch. Continue this pattern. A.4 is repeated in height. When the piece measures 14 cm, decrease 2 stitches mid under sleeve – read DECREASE TIP-2. Repeat the decrease when the sleeve measures 38 cm = 56-60-64-66-72-76 stitches. Continue working until the piece measures 42-42-42-41-39-37 cm. Now increase 2 stitches mid under sleeve – read INCREASE TIP. Increase like this every 3 cm a total of 2 times = 60-64-68-70-76-80 stitches. Continue working until the piece measures 49-48-48-46-44-41 cm – adjust to after an even-numbered round. Now work back and forth over all stitches until the piece measures 52-52-52-51-49-47 cm. On the next row from the right side knit the 12-12-12-12-16-16 cable stitches together 2 and 2 (= 6-6-6-6-8-8 stitches decreased) = 54-58-62-64-68-72 stitches left on needle. Cast off. Work the other sleeve in the same way. NECK: Knit up from the right side approx. 72-72-88-88-92-92 stitches around the neck (including the stitches from the thread in front) with short circular needle size 4 mm and 2 strands Kid-Silk or 1 strand Brushed Alpaca Silk – the number of stitches must be divisible by 4. Work rib in the round (= knit 2 / purl 2) for 3 cm. Loosely cast off with knit over knit and purl over purl. ASSEMBLY: Sew the shoulder seams inside the cast-off edge. Sew in the sleeves – sew the cast-off edge on the sleeve to the armhole and sew the opening under the sleeve to where stitches were cast off on the body. |
||||||||||||||||||||||||||||
Diagram explanations |
||||||||||||||||||||||||||||
|
||||||||||||||||||||||||||||
 |
||||||||||||||||||||||||||||
 |
||||||||||||||||||||||||||||
 |
||||||||||||||||||||||||||||
 |
||||||||||||||||||||||||||||
 |
||||||||||||||||||||||||||||
Have you finished this pattern?Tag your pictures with #dropspattern #autumntrailssweater or submit them to the #dropsfan gallery. Do you need help with this pattern?You'll find 29 tutorial videos, a Comments/Questions area and more by visiting the pattern on garnstudio.com. © 1982-2026 DROPS Design A/S. We reserve all rights. This document, including all its sub-sections, has copyrights. Read more about what you can do with our patterns at the bottom of each pattern on our site. |
||||||||||||||||||||||||||||


With over 40 years in knitting and crochet design, DROPS Design offers one of the most extensive collections of free patterns on the internet - translated to 17 languages. As of today we count 324 catalogues and 12290 patterns translated into English (UK/cm). 12290
We work hard to bring you the best knitting and crochet have to offer, inspiration and advice as well as great quality yarns at incredible prices! Would you like to use our patterns for other than personal use? You can read what you are allowed to do in the Copyright text at the bottom of all our patterns. Happy crafting!
Post a comment to pattern DROPS 205-8
We would love to hear what you have to say about this pattern!
If you want to leave a question, please make sure you select the correct category in the form below, to speed up the answering process. Required fields are marked *.