
Popular categories
Looking for a yarn?


Comments / Questions (10)
![]() Carina wrote:
Carina wrote:
Hola Se puede hacer elevación del escote? Y en ese caso cuándo se haría, después de terminar con el punto inglés? Gracias
29.02.2024 - 14:13DROPS Design answered:
Hola Carina, sí, puedes trabajar una elevación después de la cenefa del cuello, antes de empezar el canesú.
29.02.2024 - 23:01
![]() La TricotAnne wrote:
La TricotAnne wrote:
Bonjour 👋 Dans l’empiètement, quand on a 5m entre les côtes anglaises et que l’on arrive à 9cm, on nous dit de tricoter A.2B mais c’est pareil 🤨 Doit-on faire des augmentations? On passe de 311 à 507 m comment ?
08.09.2022 - 12:35DROPS Design answered:
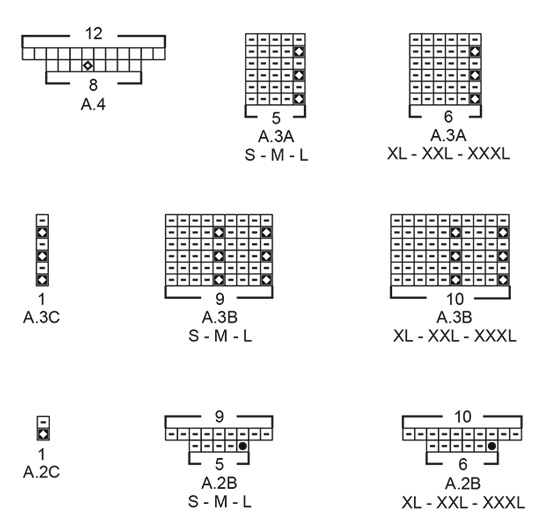
Bonjour La TricotAnne, dans chaque A.2B vous allez augmenterr 4 mailles, autrement dit, en XXXL: 5 m point mousse, A.2A (= 6 m), 49 x A.2B (= 6 m), A.2C (= 1 m), 5 m point mousse = 5+6+(49*6)+1+5=311 m - quand A.2B est terminé, vous avez 5 m point mousse, A.2A (= 6 m), 49 x A.2B (= 10 m), A.2C (= 1 m), 5 m point mousse =5+6+(49*10)+1+5= 507 mailles. Vous tricote ensuite A.3 (on a maintenant alternativement 3 m envers et 5 m envers entre chaque maille en côtes anglaises). bon tricot!
08.09.2022 - 13:01
![]() Anette wrote:
Anette wrote:
Ska ökningarna i A2B också stickas vridna el dylikt på avig varvet efter ökningarna?
20.12.2021 - 18:28DROPS Design answered:
Hei Anette. Nei, ikke vridd. Du øker med 4 masker hver gang A.2B strikkes (den sorte prikken). På neste rad strikkes disse maskene rett fra vrangen (se 2.rad i diagrammet og diagramteksten til ikonet firkant med en strik i (-). mvh DROPS Design
21.12.2021 - 12:54
![]() Delrieu Bernadette wrote:
Delrieu Bernadette wrote:
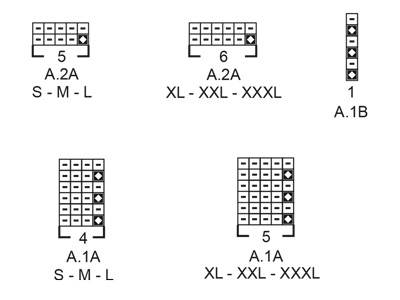
Je fais le modèle 201-36 cardigan je ne comprends pas comment ce tricote le diagramme A1A quand vous dite que le dessin represente l endroit du travail je comprends bien le 1 rang mais de 2eme represente t il l\'envers du travail ?le tuto montre un modèle en ron merci avance j ai regardé le tuto mais celui ci montre un modèle en rond
28.09.2020 - 10:12DROPS Design answered:
Bonjour Mme Delrieu, les diagrammes montrent tous les rangs: sur l'endroit, vous lisez de droite à gauche et sur l'envers de gauche à droite. 1 case blanche = jersey endroit et 1 case avec un tiret = jersey envers - cf légende. Bon tricot!
28.09.2020 - 11:06
![]() Rosario wrote:
Rosario wrote:
Thanks!
17.02.2020 - 22:50
![]() Rosario wrote:
Rosario wrote:
Hi, I am having problems with diagram A3B. If I understood the cardigan right, this is meant to ‘split’ the knit in two to expand the pattern. But if I follow the diagram, the opening is not centred, that is, the two new stitches do no branch from the previous knit. Am I doing something wrong?
16.02.2020 - 22:12DROPS Design answered:
Dear Rosario, didn't you forget to increase 1 purl stitch in each p-section in A.1, ie before working A.2? Then, when working A.2 you will increase 4 sts in each repeat and these new 9-10 stitches will be worked as in A.3B. Hapy knitting!
17.02.2020 - 10:23
![]() Bente Bønke wrote:
Bente Bønke wrote:
En diagramforklaring mangler i model 201-36. A2B str. S-M-L symbol "tyk sort klat", hvad står den for?
28.11.2019 - 13:39DROPS Design answered:
Hei Bente! Forklaringen på den sorte prikken kan du finne på fjerde ikon i diagramforklaringen. Lykke til!
28.11.2019 - 14:14
![]() Sofie Jonsson wrote:
Sofie Jonsson wrote:
Äntligen! Letat länge efter denna modell. Hoppas den kommer snart så att jag kan börja sticka. Tycker den ska heta Princess cake. Den är så söt och läcker!😊
18.01.2019 - 22:50
![]() Michaela wrote:
Michaela wrote:
Wunderschöne Jacke! Möchte am liebsten gleich loslegen mit stricken. Ich hoffe sehr,dass die Anleitungen bald freigeschaltet werden und diese Jacke auch dabei ist 😥
05.01.2019 - 12:26
![]() Sylvia wrote:
Sylvia wrote:
Such a beautiful Cardigan, love it, but it seems to be, I am lonely with it. Sad about it, if this Cardigan doesn't make it. ;-(
16.12.2018 - 11:42
|
||||||||||||||||
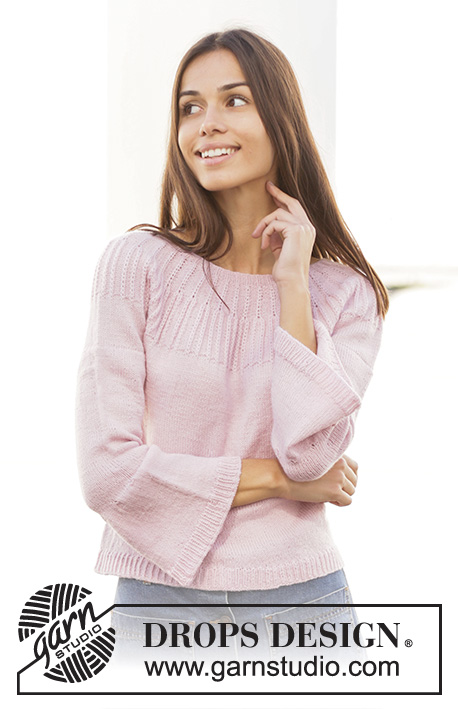
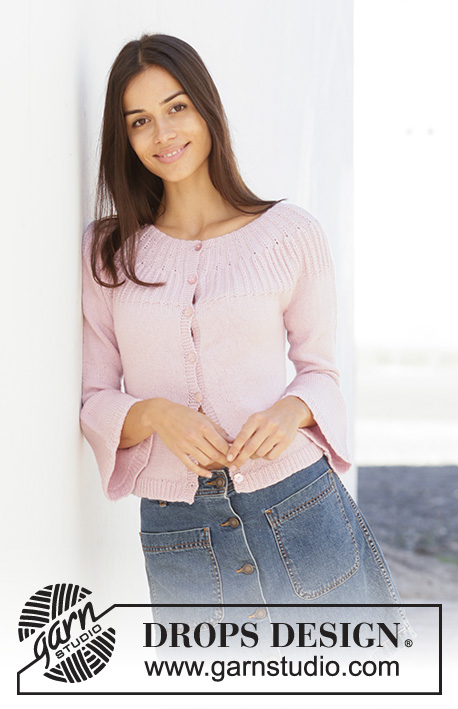
Life With Flair#lifewithflairjacket |
||||||||||||||||
 |
 |
|||||||||||||||
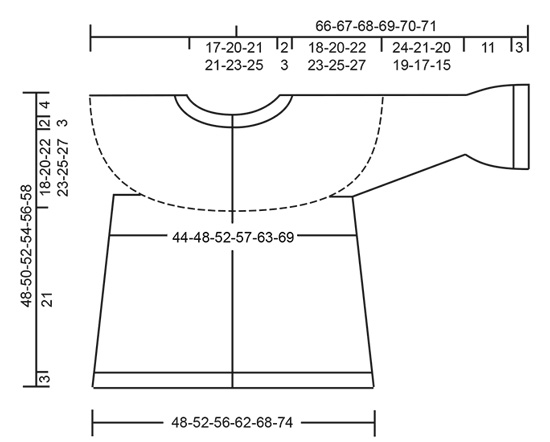
Knitted jacket in DROPS Alpaca. Piece is knitted top down with round yoke, English rib stitches on yoke and ¾ flounce sleeves. Size: S - XXXL
DROPS 201-36 |
||||||||||||||||
|
---------------------------------------------------------- EXPLANATION FOR THE PATTERN: ---------------------------------------------------------- GARTER STITCH (back and forth): Knit all rows. 1 ridge vertically = knit 2 rows. PATTERN: See diagrams A.1 to A.4. Choose diagram for your size (applies to A.1, A.2 and A.3). Diagrams show all rows in pattern seen from the right side. INCREASE TIP -1 (applies to increases in A.1): All increase are done from the right side. Increase 1 stitch in every purl section by making 1 yarn over after every English rib stitch (do not increase between English rib stitch and band). On next row (wrong side) knit yarn overs twisted to avoid hole. INCREASE TIP-2 (applies to sides of body): All increases are done from the right side. Work until 3 stitches remain before marker, make 1 yarn over, work 6 stitches in stocking stitch (marker thread is in the middle of these 6 stitches), make 1 yarn over (= 2 stitches increased). Increase the same way at the other marker thread. On next row (wrong side) purl yarn overs twisted to avoid holes. Then work the new stitches in stocking stitch. INCREASE TIP-3 (evenly): To calculate how to increase evenly, use the total number of stitches on row (e.g. 258 stitches), minus bands (e.g. 10 stitches) and divide the remaining 248 stitches by number of increases to be done (e.g. 71) = 3.5. In this example increase by making 1 yarn over after alternately every 3rd and 4th stitch. Do not increase over bands. On next row (wrong side) work yarn overs twisted to avoid holes. DECREASE TIP (applies to mid under sleeves): Begin 3 stitches before marker thread and knit 2 together, knit 2 (marker thread is between these 2 stitches), slip 1 stitch knitwise, knit 1, pass slipped stitch over stitch worked (= 2 stitches decreased). BUTTONHOLES: Decrease for buttonholes on right band (when garment is worn). Decrease from right side when 3 stitches remain on row as follows: Make 1 yarn over, knit the next 2 stitches together, knit last stitch. On next row (wrong side) knit the yarn over to make a hole. Decrease first buttonhole when rib in neck measures approx. 1½-2 cm. Then decrease the next 6 buttonholes, approx. 6½-7-7½-7½-8-8½ cm between each. ---------------------------------------------------------- START THE PIECE HERE: ---------------------------------------------------------- JACKET - SHORT OVERVIEW OF THE PIECE: Work neck edge and yoke back and forth on circular needle from mid front, work top down. Now divide yoke for body and sleeves. Work body back and forth on circular needle from mid front, work top down. Work sleeves in the round on double pointed needles/short circular needle, top down. NECK EDGE: Cast on 122-134-140-140-149-161 stitches (including 5 band stitches in each side towards mid front) on circular needle size 2.5 mm with Alpaca. Purl 1 row (= wrong side). Work next row as follows from right side: 5 band stitches in GARTER STITCH - read explanation above - * knit 1, purl 2 *, repeat from *-* until 6 stitches remain, knit 1 and finish with 5 band stitches on needle in garter stitch. Continue rib like this for 2-2-2-3-3-3 cm. Remember BUTTONHOLES on right band - read explanation above. Work next row as follows from right side: SIZE S, M and L: 5 band stitches in garter stitch, * knit 1, purl 1, 1 yarn over, purl 1 *, repeat from *-* until 6 stitches remain on needle, knit 1 and finish with 5 band stitches in garter stitch = 159-175-183 stitches. SIZE XL, XXL and XXXL: 5 band stitches in garter stitch, * knit 1, purl 1, 1 yarn over, purl 1, 1 yarn over *, repeat from *-* until 6 stitches remain on needle, knit 1 and finish with 5 band stitches in garter stitch = 226-241-261 stitches. ALL SIZES: Work back from wrong side with garter stitch over garter stitch, purl over purl and knit over knit (knit yarn overs twisted to avoid holes). Then work yoke as explained below. YOKE: Switch to circular needle size 3 mm. Work first row as follows from right side: 5 band stitches in garter stitch, work A.1A until 6 stitches remain on row (= 37-41-43-43-46-50 repetitions of 4-4-4-5-5-5 stitches), work A.1B (= 1 stitch) and finish with 5 band stitches in garter stitch. Continue pattern like this. REMEMBER THE KNITTING TENSION! When piece measures 4-4-4-5-6-6 cm from cast-on edge, increase 1 stitch in every purl section (seen from right side) – read INCREASE TIP-1 = 196-216-226-269-287-311 stitches. Continue pattern as before with 4-4-4-5-5-5 purl (seen from right side) between every English rib stitch. When piece measures 7-7-8-8-9-9 cm from cast-on edge mid front, work next row as follows from right side: 5 band stitches in garter stitch, work A.2A (= 5-5-5-6-6-6 stitches), work A.2B until 6 stitches remain on row (= 36-40-42-42-45-49 repetitions of 5-5-5-6-6-6 stitches), work A.2C (= 1 stitch) and finish with 5 band stitches in garter stitch. When A.2 has been worked, there are 340-376-394-437-467-507 stitches on needle. Work next row as follows from right side: 5 band stitches in garter stitch, work A.3A (= 5-5-5-6-6-6 stitches), work A.3B until 6 stitches remain on row (= 36-40-42-42-45-49 repetitions of 9-9-9-10-10-10 stitches), work A.3C (= 1 stitch) and finish with 5 band stitches in garter stitch. Continue pattern like this until piece measures approx. 16-17-19-21-23-25 cm from cast-on edge mid front. Now work 4 rows in stocking stitch with 5 band stitches in garter stitch in each side towards mid front, BUT on every row from right side continue English rib stitches as before (i.e. work English rib stitches as before but work stocking stitch between English rib stitches - NOTE: The English rib stitches will not be very visible on these 4 rounds but they give a softer transition between texture and stocking stitch). Then work stocking stitch back and forth over all stitches with 5 band stitches in garter stitches in each side towards mid front – AT THE SAME TIME on first row from right side increase 0-0-4-1-1-1 stitch evenly = 340-376-398-438-468-508 stitches. When piece measures 20-22-24-26-28-30 cm from cast-on edge mid front, divide yoke for body and sleeves. I.e. work next row from wrong side as follows: Work 55-59-62-68-75-82 stitches in garter stitch and stocking stitch as before (= front piece), slip the next 65-75-80-88-89-95 stitches on 1 stitch holder for sleeve, cast on 6-8-10-10-12-12 new stitches on row (= in the side under sleeve), work 100-108-114-126-140-154 stitches in stocking stitch as before (= back piece), slip the next 65-75-80-88-89-95 stitches on 1 stitch holder for sleeve, cast on 6-8-10-10-12-12 new stitches on row (= in the side under sleeve) and work the remaining 55-59-62-68-75-82 stitches in stocking stitch and garter stitch as before (= front piece). Finish body and sleeves separately. NOW MEASURE THE PIECE FROM HERE! BODY: = 222-242-258-282-314-342 stitches. Insert 1 marker thread in each side, in the middle of the 6-8-10-10-12-12 stitches that were cast on under sleeves. Move the marker threads upwards when working; they should be used for increase later in the sides. Work in stocking stitch back and forth with 5 band stitches in garter stitch in each side - remember buttonholes on right band. When piece measures 4-4-4-3-3-3 cm from division, increase 1 stitch on each side of both marker threads - read INCREASE TIP-2 (= 4 stitches increased). Increase like this every 5-5-3½-3-3-3 cm a total of 4-4-5-6-6-6 times in each side = 238-258-278-306-338-366 stitches. Work until piece measures 21 cm from division (or desired length, approx. 3 cm remain until finished measurements). Knit 1 row from right side while increasing 67-71-78-83-93-101 stitches evenly - read INCREASE TIP-3 = 305-329-356-389-431-467 stitches. This is done to avoid the rib to be worked, from contracting. Switch to circular needle size 2.5 mm. Work next row as follows from wrong side: 5 band stitches in garter stitch, * purl 1, knit 2 *, repeat from *-* until 6 stitches remain on needle, purl 1 and finish with 5 band stitches in garter stitch. Continue rib like this for 3 cm. Loosely cast off by knitting from right side. Jacket measures approx. 48-50-52-54-56-58 cm from shoulder and down. SLEEVE: Slip the 65-75-80-88-89-95 stitches from stitch holder in one side of piece on a short circular needle or double pointed needles size 3 mm and pick in addition up 1 stitch in each of the 6-8-10-10-12-12 stitches cast on under sleeve = 71-83-90-98-101-107 stitches. Insert 1 marker thread in the middle of the 6-8-10-10-12-12 stitches under sleeve. Move the marker thread upwards when working; it should be used for decrease mid under sleeve. Begin round at the marker thread and work stocking stitch in the round. AT THE SAME TIME when piece measures 2 cm from division, decrease 2 stitches mid under sleeve - read DECREASE TIP. Decrease as follows 8-11-14-17-17-19 times in total in the different sizes: S: On every 8th round, M: On every 5th round, L: On every 4th round, XL: On every 3rd round, XXL: Alternately on every 2nd and 3rd round, XXXL: On every other round = 55-61-62-64-67-69 stitches. Continue until piece measures 24-21-20-19-17-15 cm from division (shorter measurements in the larger sizes because of wider neck and longer yoke). Knit 1 round while increasing 1-3-2-0-5-3 stitches evenly = 56-64-64-64-72-72 stitches. Work A.4 in the round (= 7-8-8-8-9-9 repetitions of 8 stitches). When A.4 has been worked, there are 84-96-96-96-108-108 stitches on needle. Work stocking stitch in the round until piece measures 35-32-31-30-28-26 cm from division. Knit 1 round while increasing 24-27-27-27-30-30 stitches evenly = 108-123-123-123-138-138 stitches. This is done to avoid the rib to be worked, from contracting. Switch to double pointed needles size 2.5 mm. Work rib in the round = knit 1/purl 2 for 3 cm. Then loosely cast off by knitting. Sleeve measures approx. 38-35-34-33-31-29 cm from division. Work the other sleeve the same way. ASSEMBLY: Sew the buttons on to the left band. |
||||||||||||||||
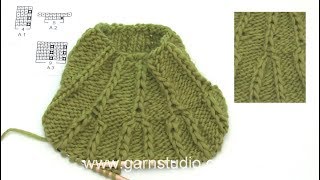
Diagram explanations |
||||||||||||||||
|
||||||||||||||||
 |
||||||||||||||||
 |
||||||||||||||||
 |
||||||||||||||||
Have you finished this pattern?Tag your pictures with #dropspattern #lifewithflairjacket or submit them to the #dropsfan gallery. Do you need help with this pattern?You'll find 26 tutorial videos, a Comments/Questions area and more by visiting the pattern on garnstudio.com. © 1982-2026 DROPS Design A/S. We reserve all rights. This document, including all its sub-sections, has copyrights. Read more about what you can do with our patterns at the bottom of each pattern on our site. |
||||||||||||||||


With over 40 years in knitting and crochet design, DROPS Design offers one of the most extensive collections of free patterns on the internet - translated to 17 languages. As of today we count 324 catalogues and 12290 patterns translated into English (UK/cm). 12290
We work hard to bring you the best knitting and crochet have to offer, inspiration and advice as well as great quality yarns at incredible prices! Would you like to use our patterns for other than personal use? You can read what you are allowed to do in the Copyright text at the bottom of all our patterns. Happy crafting!
Post a comment to pattern DROPS 201-36
We would love to hear what you have to say about this pattern!
If you want to leave a question, please make sure you select the correct category in the form below, to speed up the answering process. Required fields are marked *.