
Popular categories
Looking for a yarn?


Comments / Questions (46)
![]() Mirana Razafindrakoto wrote:
Mirana Razafindrakoto wrote:
Bonjour, sur les explications des points, quand vous dites une maille endroit sur endroit, le second endroit s'agit il d'une maille ou de l'endroit du travail. Merci
22.03.2021 - 09:20DROPS Design answered:
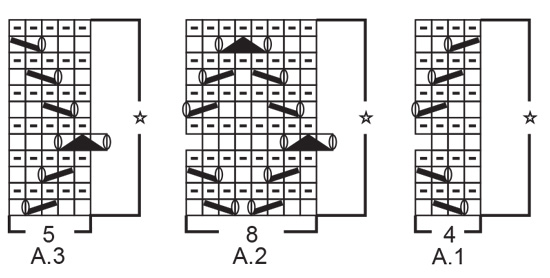
Bonjour Mme Razafindrakoto, je ne suis pas sûre de comprendre ce que vous entendez par "second endroit". Les diagrammes se tricotent au point mousse (= à l'endroit sur l'endroit et à l'endroit sur l'envers) avec des diminutions et des jetés sur les rangs tricotés sur l'endroit pour former le point ajouré. Bon tricot!
22.03.2021 - 09:42
![]() Amie wrote:
Amie wrote:
Hi, I'm new to knitting charts and wanted to clarify how to read these ones properly. I was told the charts are usually done from bottom right to left. Is this the case for these charts? The only ones I've used so far have had the rows numbered, so I don't want to get it wrong.
19.03.2021 - 12:04DROPS Design answered:
Dear Amie, correct, you will read the diagram from the bottom up - you'll find more informations about diagrams here. Happy knitting!
19.03.2021 - 12:14
![]() Anna wrote:
Anna wrote:
Az ujja fogyasztas forditasa teljesen rossz. Az angol verzioban 3-4-6-7-9 alkalommal fogyaszt 1 szemet ehelyett a magyar forditasban ennyi szem marad a tün. Mivel utana meg jocskan fogyasztani kell, a magyar leiras szerint tobbet kell fogyasztani mint amennyi osszesen van.
10.03.2021 - 22:48
![]() Anne wrote:
Anne wrote:
Bonjour, Je suis étonnée d'avoir A1 à gauche et A3 à droite; dois-je lire le diagramme de gauche à droite? D'autre part j'ai l'habitude de mettre un anneau marqueur après chaque A2 par sécurité; mais au rang 5 le surjet double dépasse la grille, je dois donc les enlever, je suppose que c'est normal... Je vous remercie de vos réponses
21.02.2021 - 18:19DROPS Design answered:
Bonjour Anne, on commence les diagrammes sur l'endroit par A.1, autrement dit, A.1 va se trouver sur le devant droit, juste après la bordure devant et vous terminerez le devant gauche sur l'endroit par A.3, juste la bordure devant. Effectivement, au 5ème rang, la dernière maille de A.3 (et de chaque A.2) va se tricoter avec les 2 premières m du A.2 suivant (de A.3). Bon tricot!
22.02.2021 - 08:55
![]() Doc wrote:
Doc wrote:
Hello, I’m at the part to bind-off for the armholes (size S). I worked 48 stitches and need to bind off 6 stitches, 3 on each side of the marker. My problem is I can bind off 2 stitches but I’m left with 1 stitch before the marker and I don’t know how to drop the third stitch. I’m using a stitch marker. Could you please explain what I need to do. Thank you.
11.08.2020 - 05:02DROPS Design answered:
Dear Doc, work the first 48 sts (= 3 sts remain before marker), cast off the next 3 sts (you should have now passed the marker), cast off the 3 sts after marker = you have cast off a total of 6 sts, then work the next 87 sts; cast off the next 6 sts = 48 sts should remain on needle. Happy knitting!
11.08.2020 - 08:55
![]() Ingrid wrote:
Ingrid wrote:
Bonjour j aimerai avoir une explication pour le motif à répéter 3 fois. Merci beaucoup
26.04.2020 - 13:21DROPS Design answered:
Bonjour Ingrid, de quelle explications avez-vous besoin? Les diagrammes doivent se tricoter 3 fois en hauteur au total, autrement dit, quand vous les avez tricoté une fois (= 12 rangs) vous les reprenez au 1er rang et tricotez ces 12 rangs encore 1 fois, puis encore 1 autre fois, vous avez donc un total de 36 rangs tricotés dans le point ajouré. Bon tricot!
27.04.2020 - 09:13
![]() Carina wrote:
Carina wrote:
Wat bedoelt u in de beschrijving met: als het kledingstuk gedragen wordt?
17.08.2019 - 10:34DROPS Design answered:
Dag Carina,
Hiermee wordt de positie bedoeld gezien zoals het kledingstuk gedragen wordt. Dus bijvoorbeeld bij de knopen zitten de knoopsgaten op de rechter voorbies als je het vest aan hebt.
01.09.2019 - 13:13
![]() Joanna wrote:
Joanna wrote:
Witam, czy zamykanie oczek na zaokrąglenie rękawa odbywa się na każdej stronie robótki, bez względu na to czy to lewa czy prawa strona? Pozdrawiam
20.07.2019 - 17:38DROPS Design answered:
Witaj Joanno! Zamykasz oczka z każdej strony (z prawej i lewej strony robótki) zawsze na początku rzędu, np. ‘zamknąć 1 raz 3 oczka z każdej strony’ oznacza zamknąć 3 o. na początku rzędu na prawej stronie robótki, a następnie zamknąć 3 o. na początku rzędu w kolejnym rzędzie (na lewej stronie robótki). Pozdrawiamy i życzmy miłej pracy!
21.07.2019 - 21:51
![]() Kjersti wrote:
Kjersti wrote:
Hva betyr trekant over tre ruter i mønsterrapporten?
05.07.2019 - 14:12DROPS Design answered:
Hej Kjersti, du finder symbolforklaringen nederst i opskriften. = ta 1 maske løs av pinnen som om den skulle strikkes rett, strikk 2 rett sammen, løft den løse masken over maskene som ble strikket sammen
05.07.2019 - 14:33
![]() Eline wrote:
Eline wrote:
Jeg leser at jeg skal legge opp med to tråder og deretter «ta bort» den ene tråden. Betyr det at jeg skal trekke ut den ene tråden igjen etterpå (går det i det hele tatt?) eller at jeg skal strikke videre kun med den ene og bare feste enden av den tråden jeg ikke bruker videre?
14.05.2019 - 19:11DROPS Design answered:
Hei Eline, Du skal bare avslutte med dobbeltråd (feste enden) og fortsette med enkel tråd. Å bruke dobbeltråd når man legger opp gjør at kanten blir mer elastisk. God fornøyelse!
15.05.2019 - 07:21
|
||||||||||||||||||||||
Jolina#jolinacardigan |
||||||||||||||||||||||
 |
 |
|||||||||||||||||||||
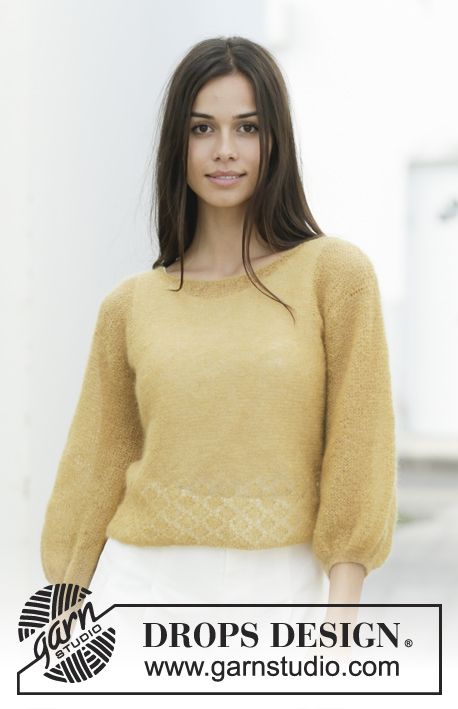
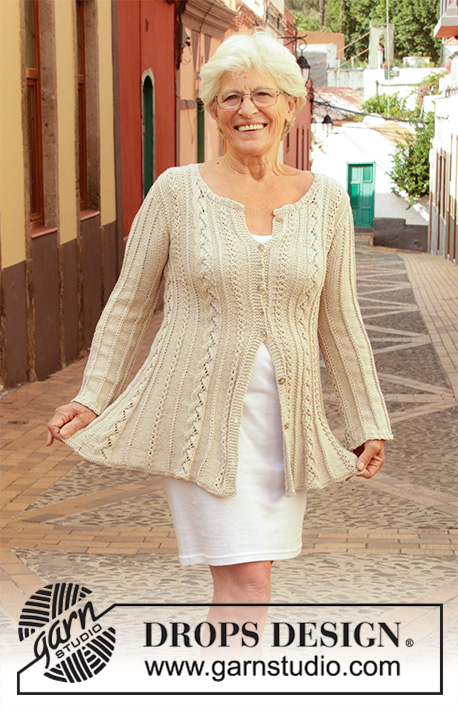
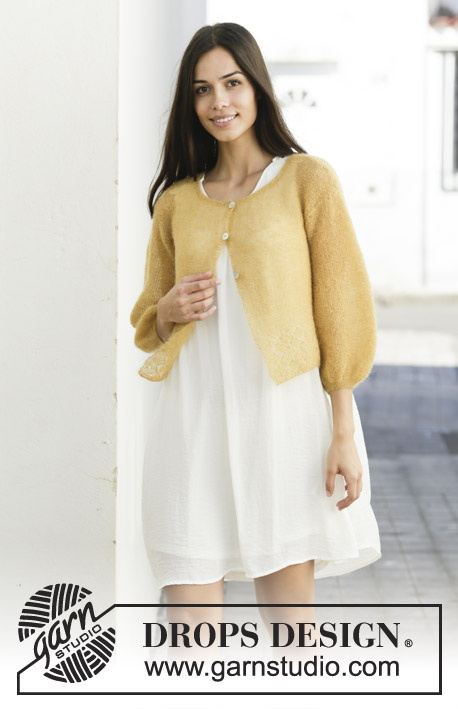
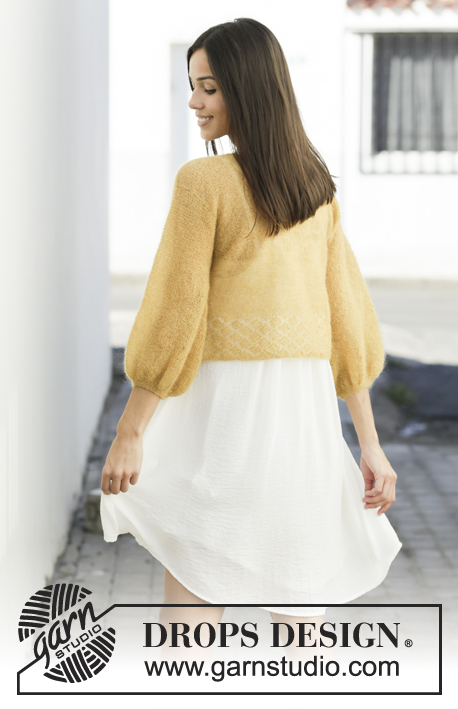
Knitted jacket in DROPS Kid-Silk. The piece is worked in garter stitch with lace pattern and ¾-length balloon sleeves. Sizes S - XXXL.
DROPS 200-23 |
||||||||||||||||||||||
|
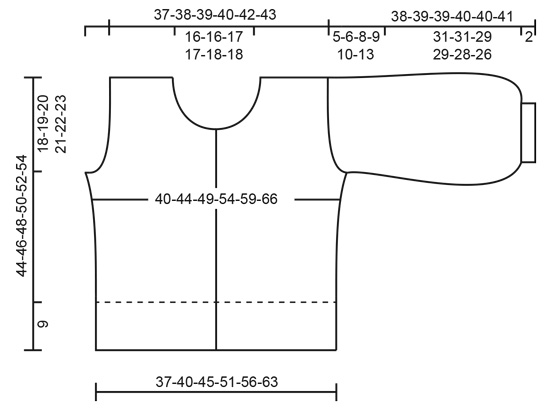
------------------------------------------------------- EXPLANATIONS FOR THE PATTERN: ------------------------------------------------------- RIDGE/GARTER STITCH (worked back and forth): Knit all rows. 1 ridge in height = Knit 2 rows. PATTERN: See diagrams A.1 to A.3. The diagrams show all the rows in the pattern seen from the right side. INCREASE TIP: Increase 1 stitch on each side of the marker thread as follows: Work until there is 1 stitch left before the marker thread, make 1 yarn over, knit 2 (marker thread sits in between these 2 stitches), 1 yarn over (= 2 stitches increased at each marker thread and 4 stitches increased on row). On the next row knit the yarn overs twisted to avoid holes. DECREASE TIP (for sides of sleeves): All decreases are made from the right side! Decrease after the 1 edge stitch in garter stitch as follows: Knit 2 twisted together. Decrease before the 1 edge stitch in garter stitch as follows: Work until there are 2 stitches left before the edge stitch and knit 2 together. BUTTONHOLES: Work buttonholes from the right side on the right band (when the garment is worn). 1 BUTTONHOLE = Purl third and fourth stitch from the edge together and make 1 yarn over. On the next row (wrong side) purl the yarn over to leave a hole. Work buttonholes when the piece measures: S: 18, 25 and 32 cm M: 18, 26 and 34 cm L: 19, 27 and 35 cm XL: 19, 25, 31 and 37 cm XXL: 20, 26, 32 and 38 cm XXXL: 22, 28, 34 and 40 cm NOTE: The last of these 3-3-3-4-4-4 buttonholes is worked on the first row when knitting up stitches for the neck. ------------------------------------------------------- START THE PIECE HERE: ------------------------------------------------------- JACKET - SHORT OVERVIEW OF THE PIECE: The piece is worked back and forth with circular needle from mid front, bottom up as far as the armholes. Then cast off for armholes and the front and back pieces are continued separately back and forth on needle. The sleeves are worked back and forth with circular needle, bottom up. The garment is sewn together to finish. BODY: Cast on 179-195-219-243-267-299 stitches (including 5 band stitches on each side towards mid front) with circular needle size 3.5 mm and 2 strands Kid-Silk (this is done to avoid the cast-on edge being tight). Remove 1 strand and continue with just 1 strand Kid-Silk as follows: Work 2 RIDGES – read description above, but the outermost 5 stitches on each side are purled on all rows to finished length (= bands – when the bands are purled on each row they will be distinct from the rest of the garment). After the 2 ridges, work the next row from the right side as follows: 5 purled band stitches, work A.1 (= 4 stitches), work A.2 until there are 10 stitches left on row (= 20-22-25-28-31-35 repeats of 8 stitches), work A.3 (= 5 stitches) and finish with 5 purled band stitches. Continue this pattern until you have worked 3 repeats in height. REMEMBER THE KNITTING TENSION! The piece now measures approx. 9 cm from the cast-on edge. Insert 1 marker thread 47-51-57-63-69-77 stitches in from each side (= 85-93-105-117-129-145 stitches between marker threads on back piece). Allow the threads to follow your work onwards; they will be used when increasing in the sides. Work garter stitch back and forth over all stitches; the bands are purled on each row as before. When the piece measures 10 cm, increase 1 stitch on each side of both marker threads – read INCREASE TIP (= 4 stitches increased). Increase like this every 4-4-5-5-5-6 cm a total of 4 times on each side = 195-211-235-259-283-315 stitches. Remember BUTTONHOLES on right band – read description above! Continue working until the piece measures 26-27-28-29-30-31 cm. Now cast off for the armholes; i.e. the next row is worked as follows from the wrong side: Work 48-52-56-61-67-74 stitches as before (= left front piece), cast off 6-6-10-12-12-14 stitches for armhole (i.e. cast off 3-3-5-6-6-7 stitches on each side of the marker thread), knit 87-95-103-113-125-139 stitches (= back piece), cast off 6-6-10-12-12-14 stitches for armhole (e. cast off 3-3-5-6-6-7 stitches on each side of the marker thread) and work the remaining 48-52-56-61-67-74 stitches as before (= right front piece). Front and back pieces are continued separately. RIGHT FRONT PIECE (when garment is worn): = 48-52-56-61-67-74 stitches. Continue back and forth with garter stitch and 5 purled band stitches towards mid front. AT THE SAME TIME cast off for the armhole at the beginning of each row from the side as follows: Cast off 2 stitches 0-1-1-2-2-3 times and then 1 stitch 1-2-5-6-10-14 times = 47-48-49-51-53-54 stitches left on front piece. Continue working until the piece measures 32-34-35-37-38-40 cm. Now place the outermost 8-8-9-9-10-10 stitches towards mid front on 1 thread for neck, but to avoid having to cut the strand you are working with, work the stitches before putting them on the thread. Then cast off for the neck at the beginning of the each row from the neck as follows: Cast off 3 stitches 1 time, 2 stitches 4 times and 1 stitch 4 times = 24-25-25-27-28-29 stitches left on shoulder. Continue working until the piece measures 44-46-48-50-52-54 cm. Loosely cast off with knit from the right side and 2 strands Kid-Silk (this is done to avoid the cast-off edge being tight). LEFT FRONT PIECE (when garment is worn): = 48-52-56-61-67-74 stitches. Continue back and forth with garter stitch and 5 purled band stitches towards mid front. AT THE SAME TIME cast off for the armhole at the beginning of each row from the side as follows: Cast off 2 stitches 0-1-1-2-2-3 times and then 1 stitch 1-2-5-6-10-14 times = 47-48-49-51-53-54 stitches left on front piece. Continue working until the piece measures 32-34-35-37-38-40 cm. Now place the outermost 8-8-9-9-10-10 stitches towards mid front on 1 thread for neck, but to avoid having to cut the strand you are working with, work the stitches before putting them on the thread. Then cast off for the neck at the beginning of the each row from the neck as follows: Cast off 3 stitches 1 time, 2 stitches 4 times and 1 stitch 4 times = 24-25-25-27-28-29 stitches left on shoulder. Continue working until the piece measures 44-46-48-50-52-54 cm. Loosely cast off with knit from the right side and 2 strands Kid-Silk. BACK PIECE: = 87-95-103-113-125-139 stitches. Continue back and forth with garter stitch over all stitches. AT THE SAME TIME cast off for the armholes at the beginning of each row on each side as follows: Cast off 2 stitches 0-1-1-2-2-3 times and then 1 stitch 1-2-5-6-10-14 times = 85-87-89-93-97-99 stitches. Continue working until the piece measures 42-44-46-48-50-52 cm. Now cast off the middle 33-33-35-35-37-37 stitches for neck and each shoulder is finished separately. Continue back and forth with garter stitch and cast off 2 stitches on the next row from the neck = 24-25-25-27-28-29 stitches left. Continue working until the piece measures 44-46-48-50-52-54 cm. Loosely cast off with knit from the right side and 2 strands Kid-Silk. Work the other shoulder in the same way. SLEEVE: Cast on 56-58-60-62-64-66 stitches (including 1 edge stitch on each side) with circular needle size 3 mm and 2 strands Kid-Silk. Remove the one strand and continue with just 1 strand Kid-Silk as follows: Work 5 ridges back and forth over all stitches. On the next row increase 1 stitch in each stitch by knitting in both the front and back loops in all stitches on the row = 112-116-120-124-128-132 stitches. Change to circular needle size 3.5 mm and work garter stitch back and forth over all stitches. When the piece measures 5 cm, decrease 1 stitch on each side – read DECREASE TIP (= 2 stitches decreased). Decrease like this every 1½ cm a total of 18-17-16-15-14-14 times on each side = 76-82-88-94-100-104 stitches. Continue working until the piece measures 33-33-31-31-30-28 cm. Now cast off stitches on each side for sleeve cap at the beginning of each row on each side as follows: Cast off 3 stitches 1 time on each side, 2 stitches 3-3-5-6-6-6 times on each side and 1 stitch 3-4-6-7-9-16 times on each side. Then cast off 2 stitches on each side until the piece measures approx. 37-38-38-39-39-40 cm. Cast off 3 stitches 1 time on each side and then cast off the remaining stitches with knit from the right side and 2 strands Kid-Silk. The sleeve measures approx. 38-39-39-40-40-41 cm from the top down. Work the other sleeve in the same way. ASSEMBLY: Sew shoulder seams inside the cast-off edge. Sew sleeve seams inside the 1 edge stitch on each side. Sew in sleeves - sew in outermost loop of outermost stitch along the armhole. Sew buttons onto left band. NECK: Knit up from the right side approx. 114 to 130 stitches around the neck (including the stitches on the threads at front) with circular needle size 3 mm and 1 strand Kid-Silk remember to work the last buttonhole on the right band AT THE SAME TIME. Knit 1 row from the wrong side, knit 1 row from the right side, knit 1 row from the wrong side, knit 1 row from the right side and knit 1 row from the wrong side. Loosely cast off with knit from the right side and 2 strands Kid-Silk. |
||||||||||||||||||||||
Diagram explanations |
||||||||||||||||||||||
|
||||||||||||||||||||||
 |
||||||||||||||||||||||
 |
||||||||||||||||||||||
Have you finished this pattern?Tag your pictures with #dropspattern #jolinacardigan or submit them to the #dropsfan gallery. Do you need help with this pattern?You'll find 27 tutorial videos, a Comments/Questions area and more by visiting the pattern on garnstudio.com. © 1982-2026 DROPS Design A/S. We reserve all rights. This document, including all its sub-sections, has copyrights. Read more about what you can do with our patterns at the bottom of each pattern on our site. |
||||||||||||||||||||||


With over 40 years in knitting and crochet design, DROPS Design offers one of the most extensive collections of free patterns on the internet - translated to 17 languages. As of today we count 324 catalogues and 12290 patterns translated into English (UK/cm). 12290
We work hard to bring you the best knitting and crochet have to offer, inspiration and advice as well as great quality yarns at incredible prices! Would you like to use our patterns for other than personal use? You can read what you are allowed to do in the Copyright text at the bottom of all our patterns. Happy crafting!
Post a comment to pattern DROPS 200-23
We would love to hear what you have to say about this pattern!
If you want to leave a question, please make sure you select the correct category in the form below, to speed up the answering process. Required fields are marked *.