
Popular categories
Looking for a yarn?


Comments / Questions (68)
![]() Ragnhild Brudevik wrote:
Ragnhild Brudevik wrote:
Modell ai-197 Hvilket garn/farge er denne strikket i? Stemmer det at det er Drops air orange, og at dette er utsolgt? Når kommer det ev inn igjen? Anbefalt pinne 5 med det garnet - men modell/oppskrift sier pinne 6, hva gjør jeg da?
05.10.2022 - 08:47DROPS Design answered:
Hei Ragnhild. Genseren er strikket i DROPS Air, farge nr 13, orange. Om fargen er utsolgt i din butikk, kan andre ha fargen inne. Til denne genseren er det strikket litt løst / luftig genser, og da brukt pinne 6. Du må bruke den pinnestr du trenger for å få den oppgitte strikkefastheten i denne oppskriften. mvh DROPS Design
09.10.2022 - 13:41
![]() Maria wrote:
Maria wrote:
È possibile lavorare questo modello con i Ferri dritti? Come posso fare? Grazie per la vostra gentilezza
08.07.2022 - 10:38DROPS Design answered:
Buonasera Maria, questo modello è lavorato in piano, quindi può lavorarlo anche con i ferri dritti. Buon lavoro!
08.07.2022 - 17:43
![]() Marit Mouridsen wrote:
Marit Mouridsen wrote:
Strikker genseren Robin Song og lurer på om delene skal sys sammen fra retten eller vrangen. Det narturlige er jo å sy sammen fra vrangen, men syns noe av vitsen med kantmaske i rillestrikk fallet bort da
20.06.2022 - 15:18DROPS Design answered:
Hej Marit, ja du syr blusen sammen fra retsiden :)
21.06.2022 - 14:34
![]() Odilie Pineau wrote:
Odilie Pineau wrote:
Bonjour, j'en suis au diagramme A3, je ne comprends pas comment reprendre le rang envers après avoir fini le rang endroit par 2 mailles ensemble et un jeté. Cela veut dire que je dois finir le rang par un jeté (et donc sans autre maille derrière )? Mais comment débuter le rang suivant? Merci !
16.03.2022 - 18:41DROPS Design answered:
Bonjour Mme Pineau, on tricote A.3 sur le devant gauche (quand quand il est posé à plat), autrement dit, sur l'endroit, tricotez A.3 en début de rang (= 2 m point mousse, 1 m end, 1 dim, 1 jeté) et sur l'envers terminez par A.3 en fin de rang (= 3 m env, 2 m point mousse). Les diminutions de l'encolure sont terminées maintenant, mais vous continuez les jours comme avant, avec 2 m point mousse côté encolure. Bon tricot!
17.03.2022 - 09:43
![]() Angela Pattinasarany wrote:
Angela Pattinasarany wrote:
Meestal moet je meerderen na ee boordsteek. Nu moet ik minderen.. klopt dit? En waarom is dit?
09.08.2021 - 17:54
![]() Florence wrote:
Florence wrote:
Je veux bien des explications concernant le col en V ( devant du pull )et le nombre de maille à diminuer pour former le V et le nombre de fois que l on répète A2 Merci pour nous votre reponse
02.06.2021 - 21:29DROPS Design answered:
Bonjour Florence, A.2 fait la liaison entre A.1 tricoté avant et le début de l'encolure V = jusqu'au rang avec l'étoile, vous tricotez toutes les mailles du devant, après ce rang avec l'étoile, vous continuez chaque devant séparément (les 9 m de gauche pour le devant droit; les 9 m de droite pour le devant gauche). Quand A.2 est fini, diminuez comme dans les 3 derniers rangs sur l'endroit de A.2 jusqu'à ce que vous ayez diminué pour l'encolure 8, 9 ou 10 fois (cf taille) au total. En même temps, vous rabattrez les mailles de l'emmanchure sur le côté et il vous restera 31-33-35-37-40-44 m lorsque toutes les diminutions sont faites. Bon tricot!
03.06.2021 - 08:26
![]() Florence Taquoi wrote:
Florence Taquoi wrote:
Bonjour Je ne comprends pas votre réponse suivant mon modèle j ai 45 m pour faire le col en V il faut diminuer 24 maille ( A2 répété 8 fois) plus 4 maille pour la Manche je n arrive pas à 33 mailles ai je mal compris qq chose merci pour votre réponse
02.06.2021 - 09:20DROPS Design answered:
Bonjour Mme Taquoi, je ne trouve pas d'indication de 45 mailles pour le devant et l'encolure V - quelle taille tricotez-vous et à quel niveau en êtes vous précisément? Au devant? À la manche? Merci pour vos informations complémentaires!
02.06.2021 - 13:24
![]() Florence wrote:
Florence wrote:
Bonjour je ne comprends pas bien concernant le devant et les diminution pour le col vous dites qu il doit rester 34 mailles pour l épaule mais comme on en diminue 28 m et que l on en a 44 au départ j ai un problème ! Merci pour votre réponse
29.05.2021 - 22:57DROPS Design answered:
Bonjour Florence, en M vous devez avoir 45 m pour chaque devant (= 44 m avant A.1 + 1 m de A.1), vous diminuez un total de 8 m pour l'encolure et vous rabattez 4 m pour l'emmanchure = 45-8-4= il reste 33 mailles pour l'épaule. Bon tricot!
31.05.2021 - 07:51
![]() Vittoria wrote:
Vittoria wrote:
Buongiorno, sto eseguendo il diagramma A2 ma ho fatto ripetutamente lo stesso errore su più ferri e me ne sono accorta solo ora. Come faccio a disfare il lavoro? Ho paura di rovinare la treccia traforata...
10.05.2021 - 08:58DROPS Design answered:
Buonasera Vittoria, l'unica soluzione per avere un lavoro corretto, è disfare punto per punto fino ad arrivare al primo errore e poi ripartire. Buon lavoro!
10.05.2021 - 22:15
![]() Louison wrote:
Louison wrote:
Si je comprends bien, le diagramme A 2 n'est pas complet, en taille S, on doit le continuer jusqu'à avoir fait 8 diminutions, ce qui veut dire qu'on fait encore 14 rangs?
02.04.2021 - 17:27DROPS Design answered:
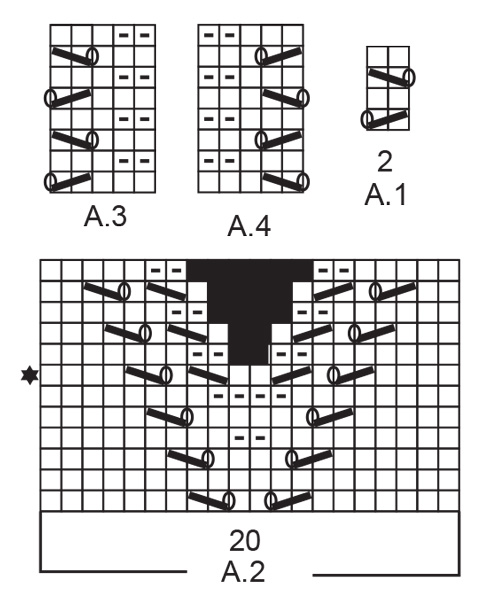
Bonjour Louison, vous tricotez A.2 comme dans le diagramme, mais à partir du rang avec l'étoile, vous le continuez en rangs: les cases noires au milieu sont les mailles diminuées pour l'encolure et vous continuez à diminuer pou l'encolure en début et en fin de rang comme le montre le diagramme. Mais effectivement, A.2 ne montre pas toutes les diminutions de l'encolure. Bon tricot!
06.04.2021 - 12:05
|
||||||||||||||||||||||
Robin Song#robinsongsweater |
||||||||||||||||||||||
 |
 |
|||||||||||||||||||||
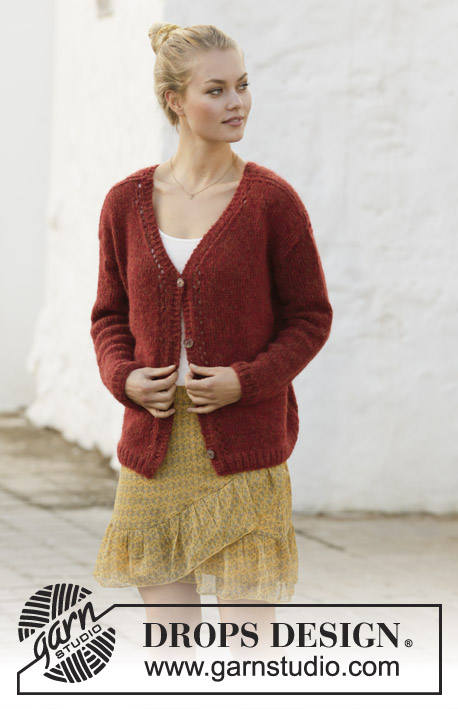
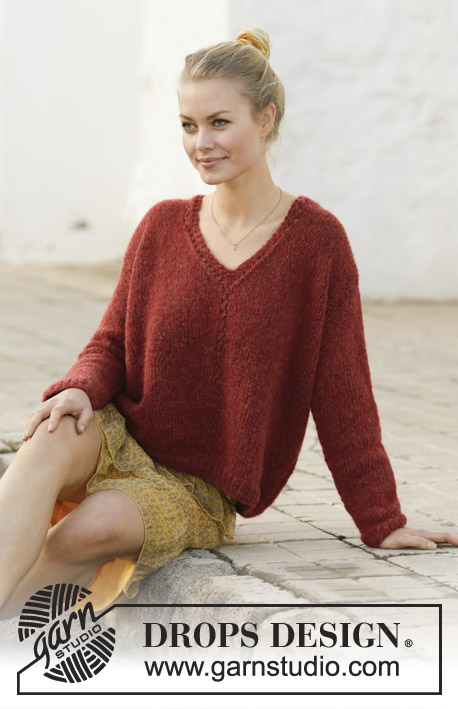
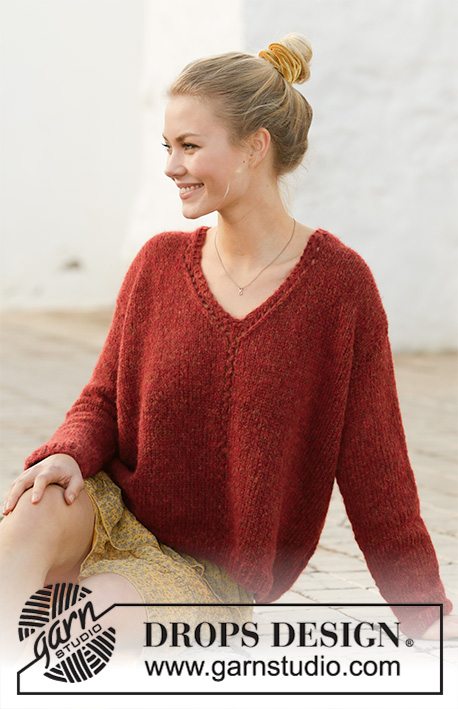
Knitted jumper with V-neck in DROPS Air. The piece is worked with lace pattern. Sizes S - XXXL.
DROPS 202-27 |
||||||||||||||||||||||
|
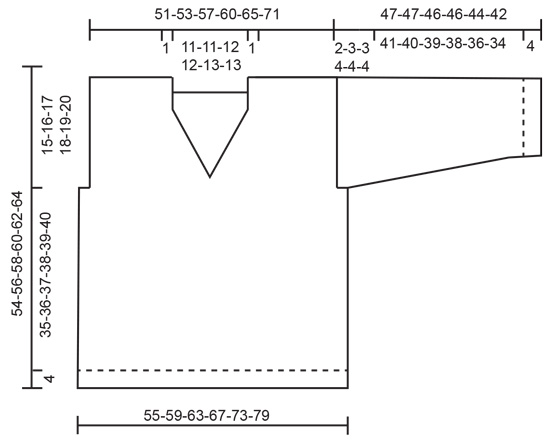
------------------------------------------------------- EXPLANATIONS FOR THE PATTERN: ------------------------------------------------------- RIDGE/GARTER STITCH (worked back and forth): Knit all rows. 1 ridge in height = Knit 2 rows. PATTERN: See diagrams A.1 to A.4. Diagrams show all rows in pattern seen from the right side. DECREASE TIP-1 (evenly spaced): To work out how to decrease evenly, count the total number of stitches on needle (e.g. 105 stitches) minus edge stitches (= 2 stitches) and divide the remaining stitches by number of decreases to be made (e.g. 21) = 4.9. In this example, decrease by knitting together approx. each 4th and 5th stitch DECREASE TIP-2 (for neck on back piece): All decreases worked from right side. Decrease 1 stitch after the 2 stitches in garter stitch from the neck as follows: Slip 1 stitch as if to knit, knit 1 and pass the slipped stitch over the knitted stitch. Decrease 1 stitch before the 2 stitches in garter stitch towards the neck as follows: Knit 2 together. INCREASE TIP (for sleeves): Work until there are 2 stitches left before A.1 under the sleeve, make 1 yarn over, knit 2, A.1, knit 2, make 1 yarn over. On the next round knit yarn overs twisted to avoid holes. Then work new stitches in stocking stitch ------------------------------------------------------- START THE PIECE HERE: ------------------------------------------------------- JUMPER - SHORT OVERVIEW OF THE PIECE: The piece is worked back and forth with circular needle in sections and sewn together to finish. The sleeves are worked in the round with double pointed needles. BACK PIECE: Cast on 105-111-117-129-141-153 stitches (including 1 edge stitch on each side) with circular needle size 5 mm and Air. Purl 1 row from the wrong side. Then work rib as follows: 1 edge stitch in GARTER STITCH – read description above, (knit 1, purl 2) until there are 2 stitches left on row, knit 1 and 1 edge stitch in garter stitch. Continue like this back and forth for 4 cm. Now knit 1 row from the right side where you decrease 21-21-21-27-29-33 stitches evenly spaced – read DECREASE TIP-1 = 84-90-96-102-112-120 STITCHES. Change to circular needle size 6 mm. Work stocking stitch with 1 edge stitch in garter stitch on each side until the piece measures 39-40-41-42-43-44 cm. REMEMBER THE KNITTING TENSION! At the beginning of the next 2 rows cast off 3-4-4-5-6-6 stitches for armholes = 78-82-88-92-100-108 stitches. Continue with stocking stitch and 1 edge stitch in garter stitch on each side. When the piece measures 50-52-54-56-58-60 cm, work garter stitch over the middle 18-18-20-20-22-22 stitches on the row. When you have worked 2 ridges over these stitches work the next row from the right side as follows: Work the first 32-34-36-38-41-45 stitches and place on 1 thread for right shoulder, cast off the next 14-14-16-16-18-18 stitches for neck and work the remaining 32-34-36-38-41-45 stitches. Then finish the shoulders separately. Work 1 edge stitch in garter stitch towards the armhole, 2 stitches in garter stitch towards the neck and stocking stitch over the remaining stitches. On the next row from the right side decrease 1 stitch inside the 2 stitches in garter stitch towards neck – read DECREASE TIP-2 = 31-33-35-37-40-44 stitches. Continue working until the armhole measures 15-16-17-18-19-20 cm. Cast off. The piece measures approx. 54-56-58-60-62-64 cm from the shoulder down. Work the other shoulder in the same way. FRONT PIECE: Cast on 105-111-117-129-141-153 stitches (including 1 edge stitch on each side) with circular needle size 5 mm and Air. Purl 1 row from the wrong side then work rib as follows: 1 edge stitch in garter stitch, (knit 1, purl 2) until there are 2 stitches left on row, knit 1 and 1 edge stitch in garter stitch. Continue back and forth like this until the piece measures 4 cm. Now work as follows: Work the first 51-54-57-63-68-75 stitches and decrease at the same time 10-10-10-13-14-16 stitches evenly spaced, work A.1 (= 2 stitches), work the remaining stitches on the row and decrease at the same time 11-11-11-14-15-17 stitches evenly spaced = 84-90-96-102-112-120 stitches. Change to circular needle size 6 mm. Continue back and forth with A.1 over the middle 2 stitches, stocking stitch and 1 edge stitch in garter stitch on each side. When the piece measures 34-36-37-39-40-42 cm work A.2 over the middle 20 stitches on the row. The 2 middle stitches in A.2 should match the 2 stitches in A.1. When you have worked the row with the star, you have decreased 2 stitches in A.2 and the piece is now divided in the middle. Place the first half of the stitches (seen from the right side) on a thread (= right front piece/shoulder) and continue back and forth over the left front piece/shoulder. Continue with stocking stitch, 1 edge stitch in garter stitch towards the armhole and A.2 towards the neck; i.e. you decrease for neck as shown in the last 6 rows of the diagram (3 decreases are shown in diagram) until you have decreased a total of 8-8-9-9-10-10 times. AT THE SAME TIME when the piece measures 39-40-41-42-43-44 cm cast off 3-4-4-5-6-6 stitches at the beginning of the row from the armhole. When all the decreases are finished, work as shown in A.3 over the outermost 5 stitches on the left front piece (towards the neck) to finished length. When all the decreases to neck and armhole are finished there are 31-33-35-37-40-44 stitches on shoulder. Continue working until the armhole measures approx. 15-16-17-18-19-20 cm - adjust to match the back piece. Cast off. The piece measures approx. 54-56-58-60-62-64 cm from the shoulder down. Place the stitches from the thread back on the circular needle and work right front piece/shoulder in the same way as the left, but reversed; i.e. start from the wrong side, at the neck on the row after the star in A.2 and work as follows: Work the 9 stitches in A.2, stocking stitch until there is 1 stitch left and 1 edge stitch in garter stitch. Continue back and forth like this and decrease for neck and armhole in the same way as on the left front piece. When the 8-8-9-9-10-10 decreases for neck are finished work A.4 over the outermost 5 stitches towards the neck to finished length. Adjust the length to match left front piece/shoulder and back piece. SLEEVE: The sleeve is worked in the round with double pointed needles. Cast on 42-42-45-48-48-51 stitches with double pointed needles size 5 mm. Knit 1 round. Then work rib (knit 1, purl 2) for 4 cm. Change to double pointed needles size 6 mm. The next round is worked as follows: Knit 2, work A.1 over the next 2 stitches (= purl 1 and knit 1), knit to end of round at the same time as you decrease 9-8-8-10-9-11 stitches evenly spaced = 33-34-37-38-39-40 stitches. Continue in the round with stocking stitch and A.1 mid under sleeve. AT THE SAME TIME when the piece measures 8-9-9-9-8-8 cm, increase 1 stitch on each side – read INCREASE TIP. Increase in the different sizes as follows: Size S: Increase alternately every 6 and 7 cm a total of 6 times. Size M: Increase every 5 cm a total of 7 times. Size L: Increase every 5 cm a total of 7 times. Size XL: Increase every 4 cm a total of 8 times. Size XXL: Increase alternately every 3 and 4 cm a total of 9 times. Size XXXL: Increase every 3 cm a total of 10 times. When all the increases are finished there are 45-48-51-54-57-60 stitches on the round. Continue working until the piece measures 45-44-43-42-40-38 cm (shorter measurements in larger sizes due to wider shoulders). Finish the round in the middle of diagram A.1 (= mid under sleeve). Now continue back and forth with stocking stitch over all stitches (to allow you to sew the sleeve to the armhole). When you have worked back and forth for 2-3-3-4-4-4 cm the sleeve measures a total of 47-47-46-46-44-42 cm. Cast off. Work the other sleeve in the same way. ASSEMBLY: Sew shoulder seams with grafting stitches inside the cast-off edge. Sew sleeves to body. Sew side seams inside the 1 edge stitch in garter stitch on each side. |
||||||||||||||||||||||
Diagram explanations |
||||||||||||||||||||||
|
||||||||||||||||||||||
 |
||||||||||||||||||||||
 |
||||||||||||||||||||||
Have you finished this pattern?Tag your pictures with #dropspattern #robinsongsweater or submit them to the #dropsfan gallery. Do you need help with this pattern?You'll find 27 tutorial videos, a Comments/Questions area and more by visiting the pattern on garnstudio.com. © 1982-2026 DROPS Design A/S. We reserve all rights. This document, including all its sub-sections, has copyrights. Read more about what you can do with our patterns at the bottom of each pattern on our site. |
||||||||||||||||||||||


With over 40 years in knitting and crochet design, DROPS Design offers one of the most extensive collections of free patterns on the internet - translated to 17 languages. As of today we count 324 catalogues and 12290 patterns translated into English (UK/cm). 12290
We work hard to bring you the best knitting and crochet have to offer, inspiration and advice as well as great quality yarns at incredible prices! Would you like to use our patterns for other than personal use? You can read what you are allowed to do in the Copyright text at the bottom of all our patterns. Happy crafting!
Post a comment to pattern DROPS 202-27
We would love to hear what you have to say about this pattern!
If you want to leave a question, please make sure you select the correct category in the form below, to speed up the answering process. Required fields are marked *.