
Popular categories
Looking for a yarn?


Comments / Questions (39)
![]() Huong wrote:
Huong wrote:
"When A.1 has been worked 1 time in height there are 128-128-132-144-144-152 stitches on the needle". I don't understand this pattern. I knitting size M and 104 stitches on the needle. Where are there 24 stitches ?
10.09.2019 - 08:58DROPS Design answered:
Dear Mrs Huong, you will increase 6 stitches on first row in A.1 - you are working A.1 a total of 4 times in width (= raglan lines) so that you will have increased 6 sts 4 times = 24 sts; you had 104 sts + 24 sts inc = there are 128 sts on needle after you have worked A.1. Happy knitting!
10.09.2019 - 09:32
![]() Silvana Cruz wrote:
Silvana Cruz wrote:
Gracias!!!!
25.08.2019 - 21:00
![]() Françoise Lelarge wrote:
Françoise Lelarge wrote:
Bonjour, puis-je faire se modèle en sky. merci
19.04.2019 - 11:43DROPS Design answered:
Bonjour Mme Lelarge, si la tension en Kid-Silk est assez similaire à celle de Sky, la texture de l'ouvrage terminée sera relativement différente si vous obtenez le même échantillon, elle sera plus dense et moins aérienne, car Kid-silk est ici tricotée très souplement, alors que Sky sera tricotée "normalement". Votre magasin DROPS saura vous conseiller, même par mail ou téléphone. Bon tricot!
24.04.2019 - 08:26
![]() Lauraine wrote:
Lauraine wrote:
J'aime beaucoup vos modèles récents mais plusieurs chandails sont tricotés " top down" et je ne connais pas cette manière. Peut-on prendre le même modèle et le tricoter de façon standard du bas en haut en commençant par les instructions de la fin et en changeant les augmentations par des diminutions ? Merci de me dire.
15.02.2019 - 21:21DROPS Design answered:
Bonjour Lauraine, tricoter un modèle de haut en bas permet de pouvoir ajuster la longueur en la personnalisant si besoin. Pour refaire ce modèle de bas en haut, il vous faudra effectivement tout recalculer en commençant par la fin pour terminer par le début. Bon tricot!
18.02.2019 - 08:54
![]() Tiziana wrote:
Tiziana wrote:
Il modello è lavorato con un solo capo di filato? Perché il kid silk è molto sottile, e mi sembra strano che si possa lavorare con i ferri del 4. Grazie mille per la risposta
01.02.2019 - 08:24DROPS Design answered:
Buongiorno Tiziana. Il capo è lavorato con un solo capo di Kid Silk. Buon lavoro!
01.02.2019 - 09:03
![]() Susanne Schultchen wrote:
Susanne Schultchen wrote:
Hallo! Ich wüßte gerne, was damit genau gemeint ist, bzw. wo genau ich abnehmen soll: In der nächsten Runde 3 Maschen über jedem Zopf abnehmen (d.h. 6 Maschen in jedem A.2 = insgesamt 24 Maschen abgenommen) = 288-320-348-376-400-432 Maschen. Vielen Dank!
22.01.2019 - 19:20DROPS Design answered:
Liebe Frau Schultchen, man braucht mehr Maschen für die Zöpfen, um die richtige Breite zu behalten, wird man 3 Maschen über jedem Zopf abnehmen = 6 Maschen in jedem Zopf x 4 Zöpfe = es sind 24 Abnahme. Viel Spaß beim stricken!
23.01.2019 - 09:19
![]() Saara Väänänen wrote:
Saara Väänänen wrote:
Miten teille voi lähettää kysymyksiä? Tämä ohjelma ei hyväksy laatimaan kysymystä.
22.01.2019 - 17:10Mary Barakat wrote:
Only from 125 to 200 g to make this pull??? I think at least 400g
03.01.2019 - 21:16DROPS Design answered:
Dear Mrs Barakat, if your tension is correct, you should require 125 to 200 g DROPS Kid-Silk to knit this jumper - 1 ball Kid-Silk = 25 g / approx. 210 m - see shadecard. Happy Knitting!
04.01.2019 - 12:16
![]() Hanne wrote:
Hanne wrote:
Hei! Er det feil i oppskriften på cm lengde på ermene? Nå står det at full ermlengde er 40 cm for str s og 33 cm i str xxxl. Hanne
07.12.2018 - 01:12DROPS Design answered:
Hei Hanne. Ja, det stemmer at de større størrelsene har kortere ermer fordi de har videre skulder og ermkuppel. Så den totale ermlengden vil være lenger i de større størrelsene. Det er selvfølgelig ikke noe i veien for at du tilpasser ermlengden selv, om du måtte ønske det. God fornøyelse.
07.12.2018 - 07:48
![]() Trine wrote:
Trine wrote:
Hvordan skal det felles under ermene? Skal det strikkes to m sammen, eller felle helt av 3 masker over hver flette..?
27.11.2018 - 15:37DROPS Design answered:
Hei Trine. Når du feller over flettene når raglanen er ferdig kan du strikke 2 og 2 masker rett sammen. God fornøyelse
28.11.2018 - 09:33
|
|||||||||||||||||||
Way to Go#waytogosweater |
|||||||||||||||||||
 |
 |
||||||||||||||||||
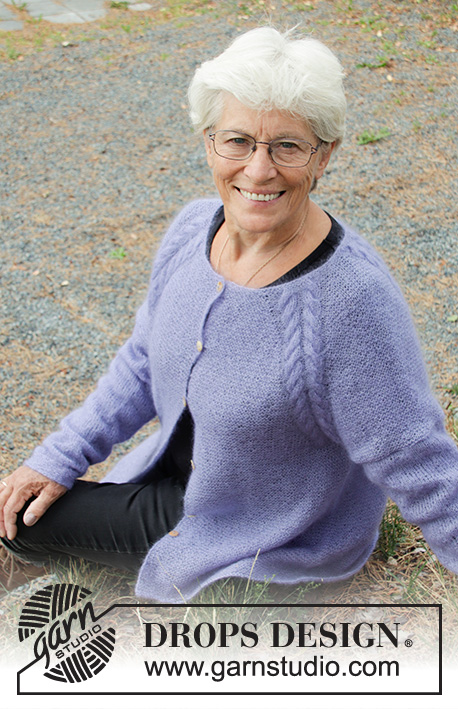
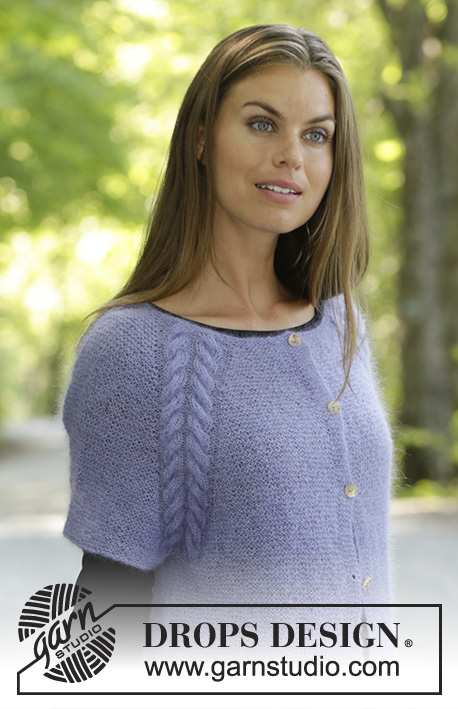
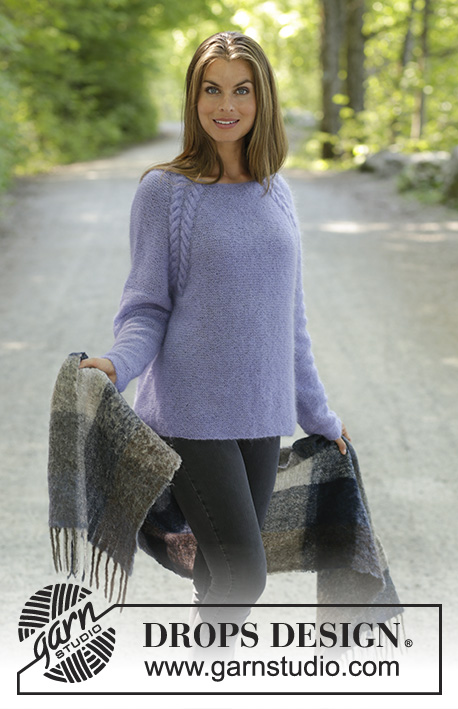
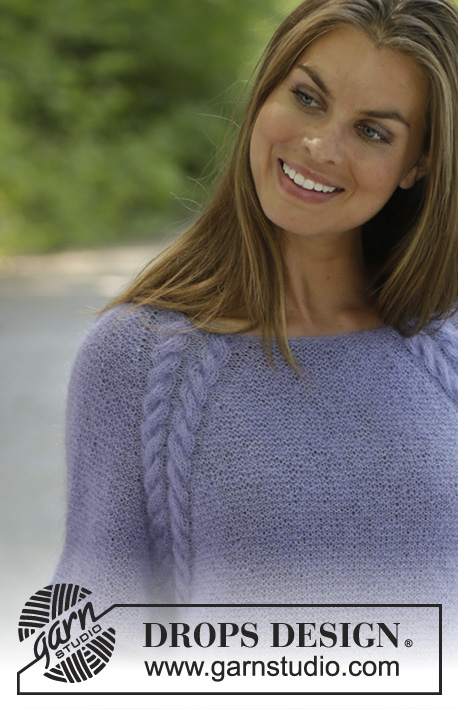
Knitted jumper with raglan in DROPS Kid-Silk. The piece is worked top down with cables, garter stitch and A-shape. Sizes S - XXXL.
DROPS 194-29 |
|||||||||||||||||||
|
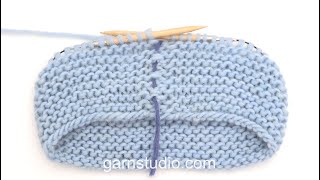
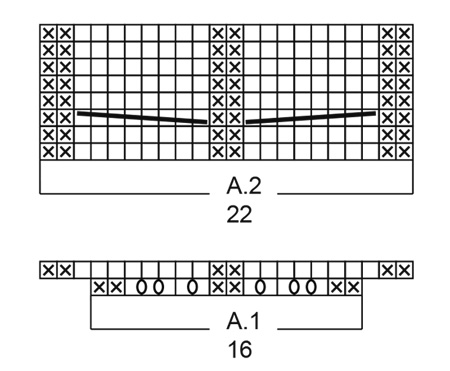
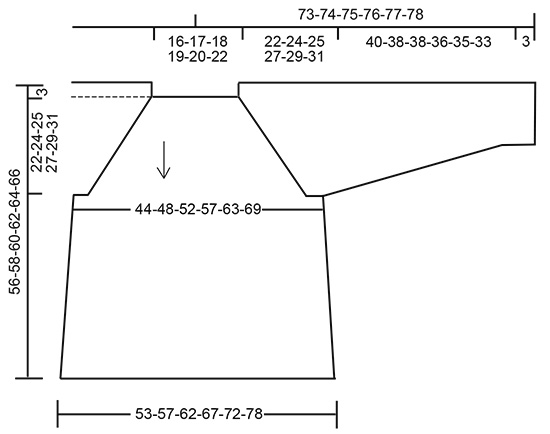
EXPLANATIONS FOR THE PATTERN: ------------------------------------------------------- RIDGE/GARTER STITCH (worked in the round): 1 ridge = 2 rounds. Knit 1 round and purl 1 round. PATTERN: See diagrams A.1 and A.2. INCREASE TIP-1 (evenly spaced): To work out how to increase evenly, count the total number of stitches on the needle (e.g. 92 stitches) and divide these stitches by the number of increases to be made (e.g. 12) = 7.66. In this example, increase by making 1 yarn over after alternately each 7th and 8th stitch (approx.). On the next round, knit the yarn overs twisted to avoid holes. INCREASE TIP-2 (for sides of body): Work until there are 2 stitches left before the marker, 1 yarn over, work 4 stitches in garter stitch (the marker sits in the middle of these 4 stitches), 1 yarn over. Increase like this at both marker threads (= a total of 4 stitches increased). On the next round work the yarn overs twisted to avoid holes. Then work the new stitches in garter stitch. DECREASE TIP (for sleeves): Decrease 1 stitch on each side of the marker as follows: Work until there are 3 stitches left before the marker, knit 2 together, knit 2 (the marker sits in the middle of these 2 stitches), slip 1 stitch as if to knit, knit 1, pass the slipped stitch over the knitted stitch (= 2 stitches decreased). ------------------------------------------------------- START THE PIECE HERE: ------------------------------------------------------- JUMPER - SHORT OVERVIEW OF THE PIECE: The piece is worked top down. The yoke is worked in the round and then is divided for body and sleeves. The body is continued in the round in garter stitch. The sleeves are worked in the round with double pointed needles in stocking stitch from the wrong side. YOKE: Cast on 92-96-100-106-110-118 stitches with circular needle size 3 mm and Kid-Silk. Work 2 RIDGES – read description above. Change to circular needle size 4 mm. Knit 1 round and increase 12-8-8-14-10-10 stitches evenly on round - read INCREASE TIP-1 = 104-104-108-120-120-128 stitches. Purl 1 round. Then work as follows (the round starts mid back): Work 8-8-9-12-12-14 stitches in garter stitch, A.1 (= 16 stitches), 4 stitches in garter stitch, A.1 over the next 16 stitches, 16-16-18-24-24-28 stitches in garter stitch, A.1 over the next 16 stitches, 4 stitches in garter stitch, A.1 over the next 16 stitches and finish with 8-8-9-12-12-14 stitches in garter stitch. REMEMBER THE KNITTING TENSION! When A.1 has been worked 1 time in height there are 128-128-132-144-144-152 stitches on the needle. Now work A.2 (= 22 stitches) over A.1 AT THE SAME TIME as you increase to raglan on the first round in A.2 as follows: Increase with 1 yarn over on each side of each A.2 (= 8 stitches increased). The yarn overs are worked twisted on the next round and then in garter stitch. Increase like this every 2nd round a total of 10-13-17-18-20-22 times, then every 4th round a total of 13-14-13-14-15-16 times (i.e. you increase a total of 23-27-30-32-35-38 times) = 312-344-372-400-424-456 stitches. Continue with pattern and garter stitch until the piece measures 22-24-25-27-29-31 cm from the cast-on edge. On the next round decrease 3 stitches over each cable (i.e. 6 stitches in each A.2 = a total of 24 stitches decreased) = 288-320-348-376-400-432 stitches. Now divide the piece for body and sleeves as follows: Work 42-46-50-55-60-66 stitches in garter stitch, place the next 60-68-74-78-80-84 stitches on a thread for sleeve and cast on 8-8-10-10-12-12 stitches under the sleeve, work 84-92-100-110-120-132 stitches in garter stitch, place the next 60-68-74-78-80-84 stitches on a thread for sleeve and cast on 8-8-10-10-12-12 stitches under the sleeve and finish with 42-46-50-55-60-66 stitches in garter stitch = 184-200-220-240-264-288 stitches. BODY: Insert 1 marker in the middle of the 8-8-10-10-12-12 new stitches under each sleeve (= 92-100-110-120-132-144 stitches on both front and back pieces). Continue with garter stitch. When the body measures 2 cm from where it was divided from the sleeves, increase 1 stitch on each side of each marker - read INCREASE TIP-2 above. Increase like this every 2½ cm a total of 10 times = 224-240-260-280-304-328 stitches. Continue with garter stitch until the body measures 31-31-32-32-32-32 cm from where it was divided from the sleeves. Cast off. The piece measures 56-58-60-62-64-66 cm from the shoulder. SLEEVE: Place the 60-68-74-78-80-84 stitches from the thread on the one side of the piece onto double pointed needles size 4 mm and knit up 1 stitch in each of the 8-8-10-10-12-12 stitches cast on under the sleeve = 68-76-84-88-92-96 stitches. Insert 1 marker in the middle of the 8-8-10-10-12-12 stitches under the sleeve. Continue with knit in the round from the wrong side, i.e. the piece is turned and you work from the wrong side to finished length (the sleeves are this way shown as purl from the right side). When the piece measures 2 cm, decrease 1 stitch on each side of the marker – read DECREASE TIP above. Decrease like this every 3-2-1½-1½-1½-1 cm a total of 12-15-18-19-20-21 times = 44-46-48-50-52-54 stitches. Continue with knit from the wrong side until the piece measures 40-38-38-36-35-33 cm. Change to double pointed needles size 3 mm and work garter stitch in the round for 3 cm. Cast off with 2 strands. Work the other sleeve in the same way. |
|||||||||||||||||||
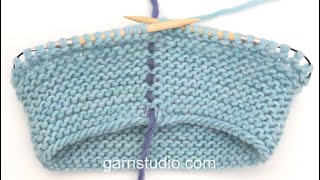
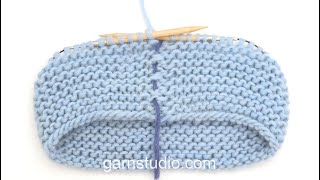
Diagram explanations |
|||||||||||||||||||
|
|||||||||||||||||||
 |
|||||||||||||||||||
 |
|||||||||||||||||||
Have you finished this pattern?Tag your pictures with #dropspattern #waytogosweater or submit them to the #dropsfan gallery. Do you need help with this pattern?You'll find 31 tutorial videos, a Comments/Questions area and more by visiting the pattern on garnstudio.com. © 1982-2026 DROPS Design A/S. We reserve all rights. This document, including all its sub-sections, has copyrights. Read more about what you can do with our patterns at the bottom of each pattern on our site. |
|||||||||||||||||||


With over 40 years in knitting and crochet design, DROPS Design offers one of the most extensive collections of free patterns on the internet - translated to 17 languages. As of today we count 324 catalogues and 12290 patterns translated into English (UK/cm). 12290
We work hard to bring you the best knitting and crochet have to offer, inspiration and advice as well as great quality yarns at incredible prices! Would you like to use our patterns for other than personal use? You can read what you are allowed to do in the Copyright text at the bottom of all our patterns. Happy crafting!
Post a comment to pattern DROPS 194-29
We would love to hear what you have to say about this pattern!
If you want to leave a question, please make sure you select the correct category in the form below, to speed up the answering process. Required fields are marked *.