
Popular categories
Looking for a yarn?


Comments / Questions (35)
![]() Lisbeth Frimer wrote:
Lisbeth Frimer wrote:
Hej Der står øverst under materialer, at man kun skal bruge rundpinde længde 80 cm. Skal man ikke bruge en længde 40 cm til ærmerne?
21.03.2019 - 15:53DROPS Design answered:
Hei Lisbeth. Ermene strikkes frem og tilbake, derfor er ikke rundpinne 40 oppgitt. God fornøyelse
26.03.2019 - 14:29
![]() Jocelyne wrote:
Jocelyne wrote:
Merci besucoup pour la réponse. Est-ce que je tricote un côté à la fois ou les 36 mailles à la fois.
18.03.2019 - 13:07DROPS Design answered:
Bonjour Jocelyne, vous tricotez un seul col à la fois, donc d'abord celui du devant droit, puis vous tricoterez le col du devant gauche à la fin, comme celui du devant droit, mais en commençant les rangs raccourcis sur l'envers. Bon tricot!
18.03.2019 - 14:04
![]() Jocelyne wrote:
Jocelyne wrote:
Bonjour, je suis rendue à tricoter le col châle. J’ai 36 mailles pour le col châle (18 de chaque côté). Le patron dit au milieu devant sur les 12 premières mailles pour la taille S. Pourriez vous me donner plus d’explications car c’est la première fois que je tricote un col châle...est ce que je tricote toutes les mailles?
16.03.2019 - 22:48DROPS Design answered:
Bonjour Jocelyne! Vous tricotez les rangs raccourcis ici. Vous *tricotez seulement 12 mailles (S), tournez l'ouvrage et revenez sur ces 12 mailles (2 rangs sur 12 mailles), ensuite vous tricotez 2 rangs sur toutes les mailles*, repetez cela (de * a *) jusqu'à ce que l'ouvrage mesure environ 7 cm du cote le plus court (mesurer côté épaule). L'autre cote du col sera plus arrondi et plus large. Comment faire les rangs raccourcis vous troverez ICI. Bon travail!
18.03.2019 - 08:51
![]() Kalinchen wrote:
Kalinchen wrote:
Huhu, ich verstehe nicht, wie ich die Größe berechne - also ob ich eine L oder XL brauche. Kann mir da bitte jemand auf die Sprünge helfen? Danke :-) Jane
06.12.2018 - 12:39DROPS Design answered:
Liebe Kalinchen, ja gerne: messen Sie eine ähnliche Jacke, die Sie gerne haben, dann vergleichen Sie die Massen für jede Grösse in der Maßskizze um die passende Größe zu finden. Hier lesen Sie mehr über die Größen. Viel Spaß beim stricken!
06.12.2018 - 12:47
![]() Barbry wrote:
Barbry wrote:
Bonjour Je voudrais savoir ce que ca veut dire .... A.1 (= 2 mailles) au-dessus des 18-18-18-20-20-20 premières mailles ))le terme au dessus je comprend pas trop merci pour plus de precisions cordialement
03.12.2018 - 20:44DROPS Design answered:
Bonjour Mme Barbry, vous répétez les 2 mailles de A.1 9-9-9-10-10-10 fois (= vous aurez un total de 18-18-18-20-20-20 mailles tricotées en A.2). Bon tricot!
04.12.2018 - 07:37
![]() Anne Peeters wrote:
Anne Peeters wrote:
Waar vind ik in dit patroon de gerstekorrel terug? Op de tekening lijkt het voorpand te verbreden, terwijl dat bij mij gewoon 20 steken blijven. Als ik patroon A1 volg, heb ik toch gewoon rijtjes van averechts en rechten?
22.10.2018 - 08:57DROPS Design answered:
Dag Anne,
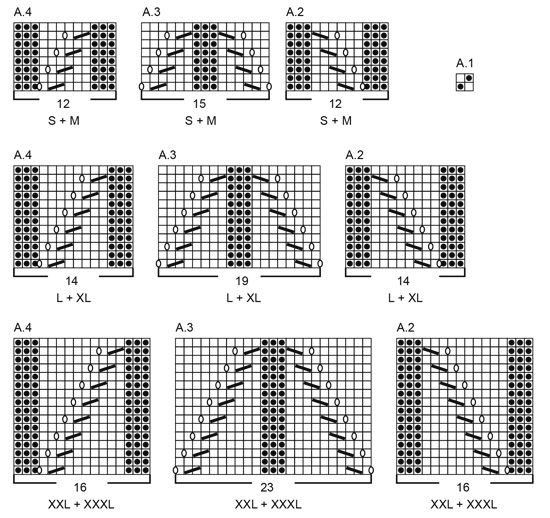
De gerstekorrel vind je terug in telpatroon A.1. Dit telpatroon is wat kleiner afgebeeld, waardoor je hem makkelijk over het hoofd ziet, maar het is het vierde telpatroontje in de bovenste rij telpatronen, en staat zeg maar een beetje los van de anderen afgebeeld.
Op het eind wordt er een sjaalkraag op het voorpand gebreid, waardoor hij bij de hals wat breder is.
23.10.2018 - 19:33
![]() Karin wrote:
Karin wrote:
Het proeflapje heb ik gemaakt met naalden 7 en heeft hiermee de juiste afmeting. Moet ik na 'het boord' van 3 cm dan wel verder met naalden 8? Of wordt het dan te groot?
22.09.2018 - 10:04DROPS Design answered:
Dag Karin, Voor de boord of rand in ribbelsteek brei je in een dunnere naald dan de rest van het breiwerk. Als je een proeflapje hebt gemaakt in tricotsteek en de afmetingen komen overeen in naald 7 dan brei je het werk in naald 7 en de boordsteek met naald 6.
23.09.2018 - 20:30
![]() Tricy wrote:
Tricy wrote:
Bonjour les boutiques ne vendent plus vos catalogues et j'aimerai savoir comment se procurer les derniers sortis? merci
15.09.2018 - 13:10DROPS Design answered:
Bonjour Tricy, nous ne proposons désormais plus de catalogue avec les explications imprimées, mais nos modèles restent disponibles gratuitement sur notre site. Bon tricot!
17.09.2018 - 08:22
![]() Birgitte Larsen wrote:
Birgitte Larsen wrote:
Hej med jer. Skulle til at starte på denne, men på billedet ser det ud som om forstykkerne er \\\"rundede\\\" og at stykket med perlestrik, A1, bliver bredere op over, men det fremgår da ikke af opskriften. Er der noget jeg har misforstået eller har i glemt noget?
07.08.2018 - 09:50DROPS Design answered:
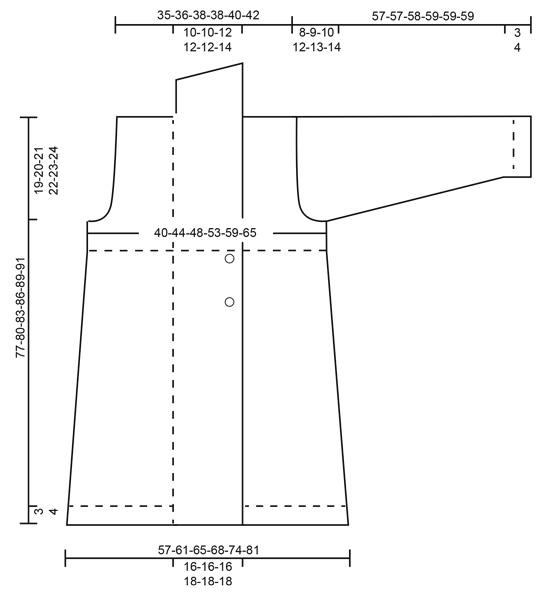
Hej Birgitte, opskriften stemmer, det er det nederste af jakken som blæser lidt ud, derfor kan den se lidt afrundet ud foran. Du ser form og mål i måleskitsen nederst i opskriften. God fornøjelse!
14.08.2018 - 14:07
![]() Bente wrote:
Bente wrote:
Hoe kan ik berekenen hoeveel bollen wol ik nodig heb?
06.08.2018 - 21:03DROPS Design answered:
Dag Bente, Aan het begin van het patroon, bij 'materialen' staat voor elke maat aangegeven hoeveel gram wol je nodig hebt. Een bol Eskimo weegt 50 gram. Dus je deelt de benodigde hoeveelheid door 50 en dan kom je op het aantal bollen.
07.08.2018 - 09:10
|
||||||||||||||||
Trondheim#trondheimjacket |
||||||||||||||||
 |
 |
|||||||||||||||
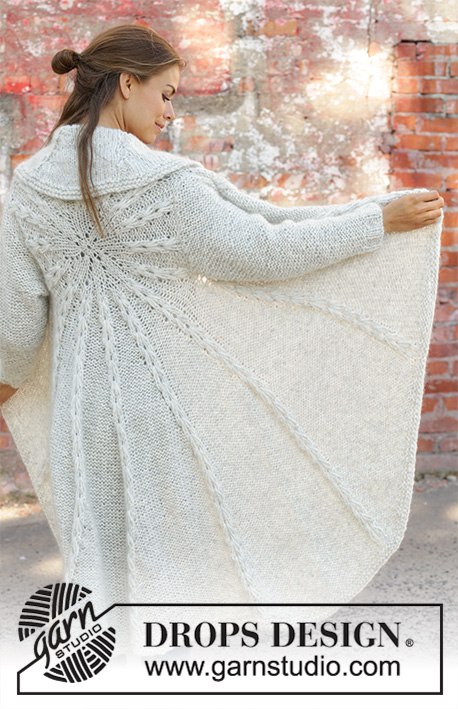
Knitted jacket with shawl collar in DROPS Snow. Piece is knitted in lace pattern and moss stitch. Size: S - XXXL
DROPS 194-12 |
||||||||||||||||
|
EXPLANATION FOR THE PATTERN: ---------------------------------------------------------- GARTER STITCH (back and forth): 1 ridge = knit 2 rows. PATTERN: See diagrams A.1 to A.4. Choose diagram for your size. Diagrams show all rows in pattern seen from the right side. DECREASE TIP (applies to sides of body): After 1st and 3rd marker thread: Slip 1 stitch knitwise, knit 1, pass slipped stitch over stitch worked Before 2nd and 4th marker thread: Work until 2 stitches remain before marker thread, knit 2 together. MEASURING TIP: To get the right proportions on jacket length measurements are done when piece is flat. Because of the weight of the yarn and moss stitch on yoke the piece will be approx. 5 cm longer than measurements in chart. INCREASE TIP (applies to sleeves): All increases are done from right side. Increase in each side inside 1 edge stitch in garter stitch and 1 knit by making 1 yarn over. On next row purl yarn over twisted to avoid hole. BUTTONHOLES: Decrease for buttonholes on right band. 1 BUTTONHOLE = knit third and fourth stitch from edge together and make 1 yarn over. On next row knit yarn over = hole. Decrease for buttonholes when piece measures: S: 44 and 53 cm M: 46 and 55 cm L: 48 and 57 cm XL: 50 and 59 cm XXL: 52 and 61 cm XXXL: 54 and 63 cm NOTE: Approx. 1 cm remains after last buttonhole before working moss stitch over all stitches. ---------------------------------------------------------- START THE PIECE HERE: ---------------------------------------------------------- JACKET - SHORT OVERVIEW OF THE PIECE: Work back and forth on circular needle from mid front, bottom up to armholes. Then work front pieces and back piece back and forth on circular needle separately. Work sleeves back and forth on circular needle. BODY: Cast on 151-159-165-177-189-203 stitches (including 18-18-18-20-20-20 band stitches in each side of piece) on circular needle size 7 mm with Snow. Work first row as follows from right side: Work A.1 (= 2 stitches) over the first 18-18-18-20-20-20 stitches (= band), work 115-123-129-137-149-163 stitches in GARTER STITCH – read explanation above, and finish with A.1 (= 2 stitches) over the last 18-18-18-20-20-20 stitches (= band). Continue this pattern like this until piece measures 3-3-3-4-4-4 cm. REMEMBER THE KNITTING TENSION! Switch to circular needle size 8 mm and insert 4 marker threads (= for decrease in the side) at the same time work as follows – from right side: A.1 (= 2 stitches) over the first 18-18-18-20-20-20 stitches as before, A.2 (= 12-12-14-14-16-16 stitches), insert 1st marker thread, work in stocking stitch over the next 26-30-27-31-31-38 stitches, insert 2nd marker thread, A.4 (= 12-12-14-14-16-16 stitches), A.3 (= 15-15-19-19-23-23 stitches), A.2 (= 12-12-14-14-16-16 stitches), insert 3rd marker thread, work stocking stitch over the next 26-30-27-31-31-38 stitches, insert 4th marker thread, A.4 (= 12-12-14-14-16-16 stitches) finish with A.1 (= 2 stitches) over the last 18-18-18-20-20-20 stitches as before. Continue this pattern. Decrease in the sides, in pattern and for buttonholes as follows: SIDES: When piece measures 8 cm, decrease 1 stitch at each marker thread (= 4 stitches decreased) - read DECREASE TIP and MEASURING TIP! Decrease like this every 7-7½-8-10-10½-11 cm 7-7-7-6-6-6 times in total (= 28-28-28-24-24-24 stitches decreased) - AT THE SAME TIME when piece measures 44-46-48-50-52-54 cm begin decrease for BUTTONHOLES – read explanation above. IN PATTERN: When piece measures approx. 28-29-30-31-32-33 cm decrease 1 stitch in every purl section in A.2/A.3/A.4, decrease by purling 2 stitches together in every purl section (= 9 stitches decreased). When all decreases are done there are 114-122-128-144-156-170 stitches on row. Work until piece measures 54-56-58-60-62-64 cm, adjust according to row worked from right side. Purl 1 row from wrong side, continue with A.1 (= 2 stitches) over all stitches until finished measurements. When piece measures 58-60-62-64-66-68 cm, work next row as follows: Work the first 32-34-35-40-43-46 stitches, cast off the next 6 stitches for armhole, work the next 38-42-46-52-58-66 stitches, cast off the next 6 stitches for armhole, work the last 32-34-35-40-43-46 stitches. Finish each part separately. BACK PIECE: = 38-42-46-52-58-66 stitches. Continue A.1 as before and cast off for armhole at the beginning of every row in each side as follows: 2 stitches 0-0-1-2-3-4 times and 1 stitch 0-1-0-1-1-2 times = 38-40-42-42-44-46 stitches. When piece measures 75-78-81-84-87-89 cm, cast off the middle 8-8-10-10-10-12 stitches for neck and finish each shoulder separately = 15-16-16-16-17-17 stitches. Cast off 1 stitch on next row from neck = 14-15-15-15-16-16 stitches. Continue until piece measures 77-80-83-86-89-91 cm and cast off. Work the other shoulder the same way. RIGHT FRONT PIECE: = 32-34-35-40-43-46 stitches. Continue A.1 as before and cast off for armhole as on back piece = 32-33-33-35-36-36 stitches. Continue to work until piece measures 77-80-83-86-89-91 cm. Cast off the first 14-15-15-15-16-16 stitches for shoulder on next row from wrong side = 18-18-18-20-20-20 stitches for shawl collar. SHAWL COLLAR: Work ridges, beginning from mid front: * Work 2 rows over the first 12-12-12-14-14-14 stitches, 2 rows over all stitches *, work from *-* until piece measures approx. 7-7-8-8-8-9 cm on the shortest (measured closest to the shoulder). Cast off. LEFT FRONT PIECE: Work as right front piece but reversed. Cast off for shoulder from right side. SLEEVE: Cast on 26-28-30-30-34-34 stitches (including 1 edge stitch in each side) on circular needle size 7 mm with Snow. Work 2 ridges. Switch to circular needle size 8 mm and work in stocking stitch with 1 edge stitch in garter stitch in each side. When piece measures 8 cm, increase 1 stitch in each side - read INCREASE TIP. Increase like this approx. every 7½-6-6-5-5-4 cm 6-7-7-8-8-9 times in total = 38-42-44-46-50-52 stitches. When piece measures 49-48-48-47-46-45 cm (NOTE: Shorter measurements in the larger sizes because of longer sleeve cap and wider shoulders), cast off for sleeve cap at beginning of every row in each side as follows: Cast off 3 stitches 1 time, 2 stitches 1-2-2-2-2-2 times and 1 stitch 2-2-3-3-3-3 times. Then cast off 2 stitches at beginning of every row in each side until piece measures approx. 56-56-57-58-58-58 cm, then cast off 3 stitches 1 time in each side. Cast off the remaining stitches, piece measures approx. 57-57-58-59-59-59 cm. Work the other sleeve the same way. ASSEMBLY: Sew the shoulder seams. Sew shawl collar together mid back and make sure that seam is in towards wrong side when collar is folded down. Sew shawl collar to neck line in the back of neck. Sew in sleeves inside 1 edge stitch. Sew underarm seams in one inside 1 edge stitch. Sew buttons on to left front piece. |
||||||||||||||||
Diagram explanations |
||||||||||||||||
|
||||||||||||||||
 |
||||||||||||||||
 |
||||||||||||||||
Have you finished this pattern?Tag your pictures with #dropspattern #trondheimjacket or submit them to the #dropsfan gallery. Do you need help with this pattern?You'll find 30 tutorial videos, a Comments/Questions area and more by visiting the pattern on garnstudio.com. © 1982-2026 DROPS Design A/S. We reserve all rights. This document, including all its sub-sections, has copyrights. Read more about what you can do with our patterns at the bottom of each pattern on our site. |
||||||||||||||||


With over 40 years in knitting and crochet design, DROPS Design offers one of the most extensive collections of free patterns on the internet - translated to 17 languages. As of today we count 324 catalogues and 12290 patterns translated into English (UK/cm). 12290
We work hard to bring you the best knitting and crochet have to offer, inspiration and advice as well as great quality yarns at incredible prices! Would you like to use our patterns for other than personal use? You can read what you are allowed to do in the Copyright text at the bottom of all our patterns. Happy crafting!
Post a comment to pattern DROPS 194-12
We would love to hear what you have to say about this pattern!
If you want to leave a question, please make sure you select the correct category in the form below, to speed up the answering process. Required fields are marked *.