
Popular categories
Looking for a yarn?


Comments / Questions (249)
![]() Giusy wrote:
Giusy wrote:
Buonasera un altro dubbio . Dopo aver fatto gli aumenti sotto la manica ed essere raggiunta alla freccia corrispondente alla mia taglia e avendo raggiunto la lunghezza di 46 cm si deve sempre lavorare il diagramma A3 x 6 volte in larghezza ed eventualmente tutto il giro a diritto?
25.04.2026 - 20:22DROPS Design answered:
Buonasera Giusy, alla fine delle maniche, dopo aver intrecciato le maglie si uniscono tutte le parti sullo stesso ferro circolare. Buon lavoro!
26.04.2026 - 13:16
![]() Giusy wrote:
Giusy wrote:
Buonasera ho finito di fare gli aumenti sotto la manica lavorando fino alla freccia del diagramma A3 e ora dovrei intrecciare 4 maglie iniziali e le 3 maglie finali. Non capisco dove dice: lavorare le 65 maglie successive come prima. Cioè dovrei lavorarle tutte a diritto? Grazie x la risposta.
25.04.2026 - 20:14DROPS Design answered:
Buongiorno Giusy, deve continuare il motivo. Buon lavoro!
26.04.2026 - 13:14
![]() Marion wrote:
Marion wrote:
Hallo. Ik heb de Valdres trui al 4x gebreid, met Muskat voor het voorjaar en Karisma voor de winter. Nu heb ik nog genoeg Muskat over voor het effen deel, hoeveel heb ik dan nodig voor de randen, die ik allemaal van dezelfde kleur wil maken. Hartelijk dank.
25.04.2026 - 10:25DROPS Design answered:
Dag Marion,
Je zou de totale trui kunnen wegen en het deel in naturel eraf halen. Dat weet je precies hoeveel je voor de gekleurde randen nodig hebt.
25.04.2026 - 19:27
![]() Giusy wrote:
Giusy wrote:
Buongiorno, ho letto la vostra risposta e cioè che devo rivolgermi al mio rivenditore di fiducia per una assistenza più personalizzata. Ma io bon ho un mio rivenditore drops di fiducia, xche ordino la lana on line. Tranne se mi date voi un indirizzo email o un n. Di telefono a cui posso rivolgermi. In fondo chiedevo un consiglio su come lavorare le maglie a4a e a4c nelle maniche. Comunque grazie
14.04.2026 - 07:32DROPS Design answered:
Buonasera Giusy, in questa sede ci è difficile fornire un'assistenza così personalizzata. Quando si iniziano gli aumenti le maglie di A.4a e A.4c si lavorano con A.4b. Buon lavoro!
15.04.2026 - 22:29
![]() Giusy wrote:
Giusy wrote:
Buonasera, finalmente forse ho capito come inserire gli aumenti del diagramma A2 nelle maniche. Il problema è che mi ritrovo le maglie di A4b che ripeto 3 volte, quindi sono 36 più le prime due maglie aumentate e diventano 38. Siccome sto lavorando una S, mi restano le 4 maglie di A4a e di A4c. Come li lavoro con il colore quercia? Ma se faccio così, si forma una striscia colore quercia x tutta la manica. Come posso fare?
12.04.2026 - 20:55DROPS Design answered:
Buonasera Giusy, può rivolgersi al suo rivenditore DROPS di fiducia per un'assistenza più personalizzata. Buon lavoro!
13.04.2026 - 20:14
![]() Giusy wrote:
Giusy wrote:
Buongiorno, scusate se insisto. Ho comprato tutta la lana e rischio,dopo aver lavorato il davanti/dietro, di disfare tutto. Ho iniziato le maniche e ho smesso di lavorarle xche non capisco come inserire gli aumenti quando devo lavorare il diagramma A2. Potrei avere delle istruzioni più dettagliate? Grazie
10.04.2026 - 09:29DROPS Design answered:
Buonasera Giusy, non ci sono istruzioni più dettagliate, deve lavorare gli aumenti con il diagramma A.2. Buon lavoro!
13.04.2026 - 20:08
![]() Giusy wrote:
Giusy wrote:
Buonasera, mi potete spiegare per favore come inserire gli aumenti nel diagramma A.2 e come lavorarci? Sto facendo le maniche e sono ferma . Grazie
02.04.2026 - 17:15DROPS Design answered:
Buonasera Giusy, deve lavorare le maglie con il motivo A.2. Buon lavoro!
04.04.2026 - 17:56
![]() Giusy wrote:
Giusy wrote:
Buonasera sto lavorando alle maniche, e sto lavorando una S, il pattern dice: dopo aver lavorato il diagramma A2, lavorare il diagramma A3. Finiti gli aumenti lavorare A3 in tutto 6 volte. Mi potete spiegare: lavorare A3 6 volte in larghezza? Grazie
01.04.2026 - 20:09DROPS Design answered:
Buonasera Giusy, in quel punto si intende che dopo aver aumentato le maniche, ci sono abbastanza maglie per 6 ripetizioni del motivo A.3 in larghezza. Buon lavoro!
04.04.2026 - 17:59
![]() Giusy wrote:
Giusy wrote:
Sempre riferito alle maniche: Dopo aver lavorato il diagramma A.4 1 volta in verticale, lavorare il diagramma A.2 (= 12 maglie) su tutte le maglie – il diagramma A.2 viene lavorato sul diagramma A.4b e si aggiusta ai lati; lavorare le maglie aumentate seguendo il diagramma man mano che si procede con il lavoro. Che significa "si aggiusta ai lati"?Forse è riferito ai 4a e 4c?
29.03.2026 - 10:00DROPS Design answered:
Buonasera Giusy, per un'assistenza così personalizzata può rivolgersi al suo rivenditore DROPS di fiducia. Buon lavoro!
29.03.2026 - 23:30
![]() Giusy wrote:
Giusy wrote:
Sempre riferendomi alle maniche, Ho finito il davanti/dietro. Dopo 10cm ho fatto il primo aumento,e mi sono fermata xche' non capisco come inserire il motivo A2 . A inizio giro dopo il gettato lavoro leggendo lo schema da destra a sinistra? Alla fine mi ritrovo con l'altro gettato prima del marcapunti . Come lo lavoro? E A4 a e A4c come li lavoro. Sono ferma . Aiuto!!!!
29.03.2026 - 08:03DROPS Design answered:
Buonasera Giusy, a inizio giro deve leggere il diagramma da sinistra a destra e a fine giro da destra a sinistra. Buon lavoro!
29.03.2026 - 23:29
|
||||||||||||||||
Valdres#valdressweater |
||||||||||||||||
 |
 |
|||||||||||||||
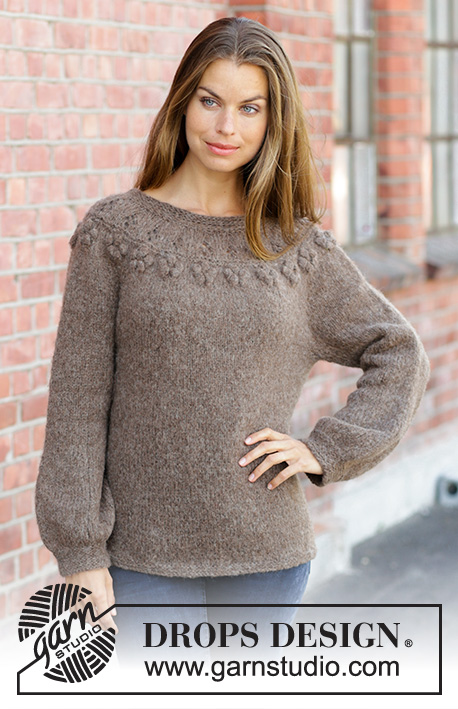
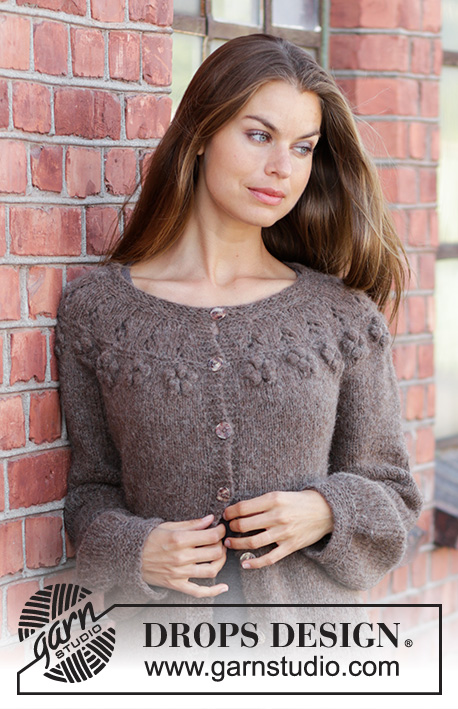
Knitted jumper with raglan in DROPS Karisma. The piece is worked bottom up with Nordic pattern and textured pattern in stripes. Sizes S - XXXL.
DROPS 197-1 |
||||||||||||||||
|
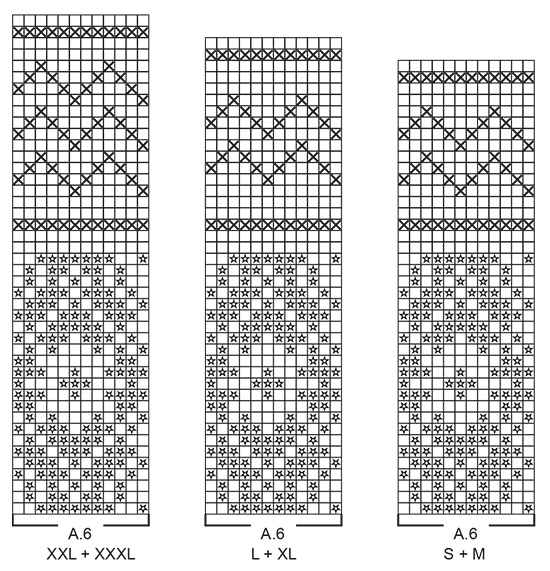
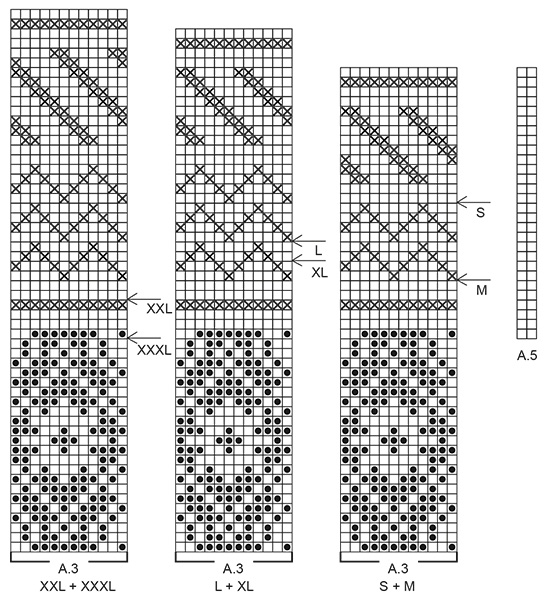
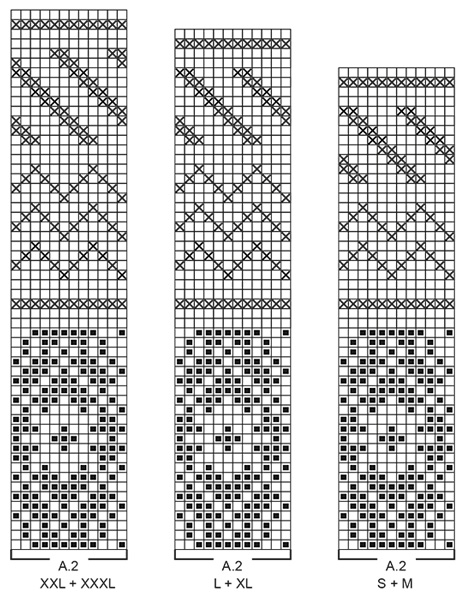
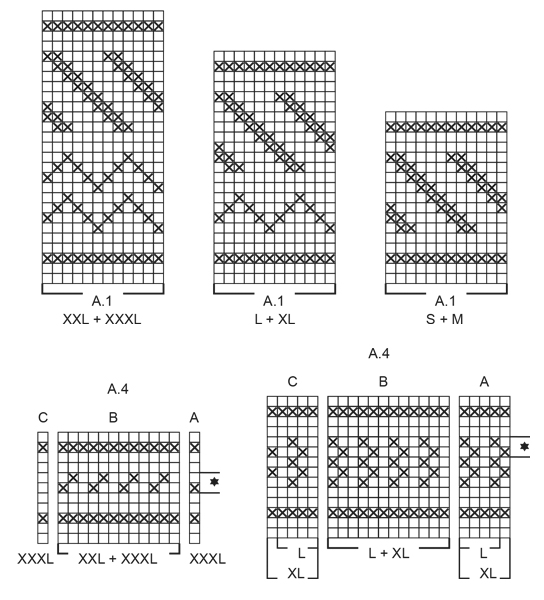
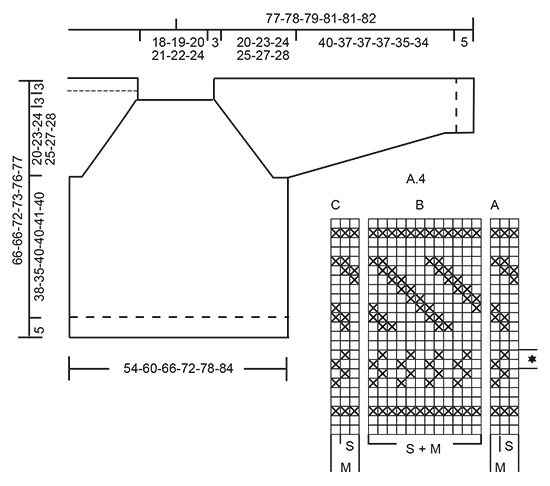
------------------------------------------------------- EXPLANATIONS FOR THE PATTERN: ------------------------------------------------------- PATTERN: See diagrams A.1 to A.6. Choose diagram for your size. DECREASE TIP (evenly spaced): To work out how to decrease evenly, count the total number of stitches on the needle (e.g. 260 stitches) and divide by the number of decreases to be made (e.g. 44) = 5.9. In this example, work together approx. each 5th and 6th stitch. KNITTING TIP-1: To avoid the knitting tension becoming tighter when working Nordic pattern, it is important that the strands at the back of the piece are not tight. You can use a size larger needle when working pattern if this is a problem. KNITTING TIP-2 (for yoke): If the knitting tension is not right in height and you work more rows on 10 cm than described in the text, the yoke will be too short and the armholes too small. This can be adjusted for by working 1 extra row of stocking stitch regularly on the yoke. INCREASE TIP (for sleeves): Work until there are 2 stitches left before the marker thread, make 1 yarn over (= 1 stitch increased), knit 4 (the marker thread sits in the middle of these 4 stitches), make 1 yarn over (= 1 stitch increased). On the next round knit the yarn overs twisted to avoid holes. RAGLAN: Decrease to raglan on each side of each A.5 as follows: Decrease 1 stitch after A.5 as follows: Slip the last stitch in A.5, knit 1, pass the slipped stitch over the knitted stitch (= 1 stitch decreased). Decrease 1 stitch before A.5 as follows: Work until there is 1 stitch left before A.5, knit the next 2 stitches together (= 1 stitch decreased). In other words you decrease 2 stitches by each A.5 and a total of 8 stitches on the round. ------------------------------------------------------- START THE PIECE HERE: ------------------------------------------------------- JUMPER - SHORT OVERVIEW OF THE PIECE: The piece is worked in the round with circular needle, bottom up. The sleeves are worked with short circular needle/double pointed needles. The pieces are placed together and the yoke is worked in the round. BODY: Cast on 260-288-316-344-376-400 stitches with circular needle size 3.5 mm and light oak. Work rib (= knit 2 / purl 2) for 5 cm. Change to circular needle size 4.5 mm and knit 1 round where you decrease 44-48-52-56-64-64 stitches evenly on round – read DECREASE TIP = 216-240-264-288-312-336 stitches. Knit 1 round as follows: Insert 1 marker in the first stitch, knit 107-119-131-143-155-167 stitches, insert 1 marker in the next stitch, knit to end of round. The markers mark the sides of the piece. Then work A.1 over all stitches (= 18-20-22-24-26-28 repeats of 12 stitches). REMEMBER THE KNITTING TENSION! When A.1 has been worked 1 time in height, insert 1 marker in the middle of the round (you will measure from this marker later). Then work A.2 over A.1- read KNITTING TIP-1. When A.2 has been worked 1 time in height, work A.3 over A.2. When you have worked as far as the arrow in A.3 (see arrow for your size) work the next round in A.3 as follows: Cast off 4 stitches, work the next 101-113-125-137-149-161 stitches as before, cast off the next 7 stitches, work the next 101-113-125-137-149-161 stitches as before, cast off the last 3 stitches. The piece measures approx. 32-29-32-32-31-30 cm from the marker (approx. 43-40-45-45-46-45 cm whole length). Lay the piece to one side and work the sleeves. SLEEVES: The piece is worked in the round with double pointed needles; change to short circular needle when necessary. Cast on 48-52-52-56-56-60 stitches with double pointed needles size 3.5 mm and light oak. Work rib (= knit 2 / purl 2) for 5 cm. Change to double pointed needles size 4.5 mm and knit 1 round where you decrease 8-10-8-10-8-10 stitches evenly on round = 40-42-44-46-48-50 stitches. READ THE WHOLE SECTION BEFORE CONTINUING: You work a pattern of approx. 8-8-5-5-4-4 cm, if you wish to adjust the length of the sleeve, do it now – see below. Then work the same pattern stripe as on the body (from the marker to the armhole = approx. 32-29-32-32-31-30 cm), i.e. the whole sleeve should measure approx. 45-42-42-42-40-39 cm. Work as follows: Insert 1 marker thread at the beginning of the round (= mid under sleeve). Work 1 round in stocking stitch, then work the next round as follows: Work A.4a (= 2-3-4-5-0-1 stitches), A.4b (= 12 stitches) a total of 3-3-3-3-4-4 times in width, A.4c (= 2-3-4-5-0-1 stitches). Continue until A.4 has been worked 1 time in height – NOTE: if you would like a longer sleeve, repeat the 2 rows marked with a star to desired length before continuing with the next round in A.4. If you would like a shorter sleeve, just work the desired number of rounds of A.4, but work a minimum of 1 of the purled rounds. – AT THE SAME TIME when the piece measures 10-9-9-10-12-12 cm increase 1 stitch on each side of the marker thread (= 2 stitches increased) – read INCREASE TIP! Increase like this every 2-1½-1½-1½-1-1 cm a total of 16-21-20-19-24-23 times = 72-84-84-84-96-96 stitches. The stitches in A.4a and A.4c and the increased stitches are worked into pattern A.4b as you go. When A.4 has been worked 1 time in height, work A.2 (= 12 stitches) over all stitches – A.2 is worked over A.4b and is adjusted out to each side; the increased stitches are worked into the pattern as you go. When A.2 has been worked 1 time in height, work A.3 (= 12 stitches) over A.2. When all the stitches under the sleeve are increased, work A.3 a total of 6-7-7-7-8-8 times in width. When you have worked as far as the arrow in A.3, work the next round as follows: Cast off 4 stitches, work the next 65-77-77-77-89-89 stitches as before, cast off the last 3 stitches. The sleeve measures approx. 45-42-42-42-40-39 cm. Work 1 more sleeve in the same way. YOKE: Place the sleeves on the same circular needle as the body, where you cast off stitches for the armholes = 332-380-404-428-476-500 stitches. Start the round in the transition between right sleeve and back piece. Work as follows: * A.5 (= 2 stitches, raglan line), continue with A.3 as before over the next 97-109-121-133-145-157 stitches (= front/back piece), A.5 (= 2 stitches, raglan line), work pattern A.3 as before over the next 65-77-77-77-89-89 stitches (= sleeve) *, work from *-* a total of 2 times – read KNITTING TIP-2. Continue this pattern and decrease to RAGLAN – read description above, every 2nd round a total of 27-31-32-33-37-39 times. When A.3 has been completed in height, work A.6 (= 12 stitches) over A.3. After the last decrease to raglan there are 116-132-148-164-180-188 stitches on the round. Continue until A.6 has been completed. The yoke measures approx. 20-23-24-25-27-28 cm. You can now work an elevation in the back of the neck so that the yoke is slightly higher at the back. This elevation can be left out; the neck is then the same both front and back. Work elevation in back of neck or go straight to working neck if you do not want an elevation. ELEVATION IN BACK OF NECK: Skip this section if you do not want an elevation. Insert 1 marker at the beginning of the round (this marks the start of the round after the elevation has been worked). Continue with light oak and knit to mid back, insert 1 marker. Start from the right side and knit as far as 30-30-34-34-40-40 stitches past the marker, turn, tighten the strand and purl 60-60-68-68-80-80 stitches back. Turn, tighten the strand and knit 54-54-61-61-72-72 stitches, turn, tighten the strand and purl 48-48-54-54-64-64 stitches back. Turn, tighten the strand and knit 42-42-48-48-56-56 stitches, turn, tighten the strand and purl 36-36-42-42-48-48 stitches back. Turn, tighten the strand and knit 30-30-35-35-40-40 stitches, turn, tighten the strand and purl 24-24-28-28-32-32 stitches, turn, tighten the strand and knit to mid back. Cut the strand. The round now starts at the marker, i.e. the transition between right sleeve and back piece. NECK: Continue with light oak and work the next round with decreases as follows: Knit * 40-46-54-58-66-70 stitches and decrease 0-6-12-13-19-22 stitches evenly over these stitches – remember DECREASE TIP, knit together the next 18-20-20-24-24-24 stitches 2 and 2 (= 9-10-10-12-12-12 stitches decreased) *, work from *-* a total of 2 times = 98-100-104-114-118-120 stitches. Change to circular needle size 3.5 mm and work the next round as follows: * Knit 2, purl 2, knit 1, 1 yarn over (= 1 stitch increased), purl 2, knit 2, 1 yarn over (= 1 stitch increased), purl 1 *, work from *-* until there are 8-0-4-4-8-0 stitches left, work rib (= knit 2 / purl 2) over the remaining stitches = 116-120-124-136-140-144 stitches. The yarn overs are worked twisted in rib (i.e. knit 2 / purl 2) on the next round to avoid holes. Cast off with knit over knit and purl over purl when the rib measures 3 cm. ASSEMBLY: Sew the openings under the sleeves in the outermost loop of the outermost stitch. |
||||||||||||||||
Diagram explanations |
||||||||||||||||
|
||||||||||||||||
 |
||||||||||||||||
 |
||||||||||||||||
 |
||||||||||||||||
 |
||||||||||||||||
 |
||||||||||||||||
Have you finished this pattern?Tag your pictures with #dropspattern #valdressweater or submit them to the #dropsfan gallery. Do you need help with this pattern?You'll find 31 tutorial videos, a Comments/Questions area and more by visiting the pattern on garnstudio.com. © 1982-2026 DROPS Design A/S. We reserve all rights. This document, including all its sub-sections, has copyrights. Read more about what you can do with our patterns at the bottom of each pattern on our site. |
||||||||||||||||


With over 40 years in knitting and crochet design, DROPS Design offers one of the most extensive collections of free patterns on the internet - translated to 17 languages. As of today we count 324 catalogues and 12290 patterns translated into English (UK/cm). 12290
We work hard to bring you the best knitting and crochet have to offer, inspiration and advice as well as great quality yarns at incredible prices! Would you like to use our patterns for other than personal use? You can read what you are allowed to do in the Copyright text at the bottom of all our patterns. Happy crafting!
Post a comment to pattern DROPS 197-1
We would love to hear what you have to say about this pattern!
If you want to leave a question, please make sure you select the correct category in the form below, to speed up the answering process. Required fields are marked *.