
Popular categories
Looking for a yarn?


Comments / Questions (19)
![]() Hannah wrote:
Hannah wrote:
I am having trouble seeing where the measurements for each size are. I only see the amount of yarn needed and then immediately how to start the project.
19.03.2026 - 11:35
![]() Lieve wrote:
Lieve wrote:
Momenteel brei ik het rechtervoorpand van “Sandy Wrap”. Ik heb een probleem met het breien van patroon A1, het patroon wordt gebreid aan de goede kant, hoe brei ik de volgende naald, is dat lijn 2 op het patroon. Ik kom er niet uit.
03.02.2026 - 19:43DROPS Design answered:
Dag Lieve,
Je leest het patroon van onder naar boven. De oneven naalden brei je aan de goede kant en lees je van rechts naar links. Op de teruggaande naalden lees je het patroon a.h.w. terug van links naar rechts. De even naalden in het patroon brei je aan de verkeerde kant.
03.02.2026 - 21:04
![]() Sanne wrote:
Sanne wrote:
Leider ist die Anleitung sehr fehlerhaft. Maschenanzahl stimmt beim Ärmel nicht. Auch cm Angaben der Zunahmen gehen über die Gesamtlänge hinaus. In der Anleitung sind es 13 cm Armausschnitt, auf der Skizze 18 cm, was beides sehr eng ist
31.12.2025 - 19:12
![]() Mónica wrote:
Mónica wrote:
¿Cómo se unen las piezas? ¿Cómo es el montaje?
23.08.2023 - 01:48DROPS Design answered:
Hola Mónica, había un error en el patrón colgado en español, puedes ver ahora la terminación en el patrón en español. Hacer las costuras de los hombros dentro del borde de montaje. Coser las mangas al cuerpo. Hacer la costura bajo las mangas y coser hacia abajo por la costura lateral. Coser un botón en la costura del lado izquierdo (por el lado derecho de la labor) directamente sobre el elástico. Coser otro botón en la costura derecha (dentro de la prenda) directamente sobre el elástico. La prenda se cierra abrochando en los ojales del patrón A.1/A.2 en la parte de abajo de la prenda junto al elástico.
27.08.2023 - 23:55
![]() An Drea wrote:
An Drea wrote:
Selten eine so gut beschriebene Anleitung gehabt👍 Das vorgeschlagene Garn ist ein Traum,es macht echt einfach Spaß dieses Modell nachzuarbeiten. Ich liebe es❤️
05.08.2023 - 17:45
![]() Laurence wrote:
Laurence wrote:
Bonjour je tricote le devant droit en taille S : qd l ouvrage mesure 4 cm depuis les dernières montées pour l emmanchure augmenter une maille à une maille lisière au point mousse du bord sur le côté » l augmentation se fait elle sur l endroit ou l’envers ? au début du rang après la maille lisière ou à la fin du rang entre deux mailles lisières ? merci d avance
25.04.2023 - 12:37DROPS Design answered:
Bonjour Laurence, par "côté", on entend ici le côté cousu au dos (côté du gilet); autrement dit, pour le devant droit, vous augmenterez en fin de rang sur l'endroit, avant la maille lisière de la fin du rang (= à 1 maille lisière du bord). Bon tricot!
25.04.2023 - 14:46
![]() Marjolaine Cormerais wrote:
Marjolaine Cormerais wrote:
J'adore ce modèle mais j'ai bien suivi maille à maille l'explication de l'augmentation du croisé devant droit et je n'obtiens pas le même rendu que sur la photo. Si je comprends bien l'augmentation (jeté) doit se faire avant le diagramme donc : n mailles jersey- 1 jeté - diagramme A1 sur 13 mailles - 2 m mousse. D'autre part vous dites de tricoter les jetés torses à l'envers pour éviter les trous, or les trous sont très apparents ! et c'est le but il me semble. Merci
12.05.2022 - 17:38DROPS Design answered:
Bonjour Mme Cormerais, effectivement, vous augmentez pour l'encolure 1 maille avant A.1 + les 2 m point mousse autrement dit, sur l'endroit tricotez jusqu'à ce qu'il reste 1 m avant A.1, faites 1 jeté, tricotez 1 m endroit, terminez par A.1 et 2 m point mousse. Si vous voulez créer des jours, tricotez le jeté normalement, sinon tricotez-le torse à l'envers. Augmentez ainsi tous les 2 rangs. Vous devriez avoir le même rendu. Bon tricot!
13.05.2022 - 08:01
![]() Birgitta Johansson wrote:
Birgitta Johansson wrote:
Kära Drops, jag har hittat ett fel i mönstret. Det står att den ökade maskan längs med framkanterna ska stickas vridna men då blir det ju inga snygga hål. Sedan står det att man ska öka maskan innan A1 respektive A2 , men enligt bilden är det direkt innan o efter de 2 aviga. Med vänlig hälsning,
10.01.2021 - 23:53
![]() Barb Hilton wrote:
Barb Hilton wrote:
What is the gauge for this pattern? I don't see it listed...
22.10.2019 - 14:34DROPS Design answered:
Dear Mrs Hilton, you will find the gauge for both needle sizes under the header. Happy knitting!
22.10.2019 - 14:37
![]() Carine Nuyts wrote:
Carine Nuyts wrote:
Ik zou deze trui graag breien met Drops Alpaca Silk (cat.C). Hoeveel gram heb ik hiervoor nodig?
15.09.2019 - 20:22DROPS Design answered:
Dag Carine,
Dat kan ik niet met zekerheid zeggen, omdat er geen berekening van is, maar dit zal naar schatting ongeveer 200-200-225-250-275-275 zijn. Koop evt. een bol extra en vraag je verkooppunt op welke termijn je overgebleven bollen in kunt leveren.
17.09.2019 - 08:12
|
||||||||||||||||
Sandy Wrap#sandywrap |
||||||||||||||||
 |
 |
|||||||||||||||
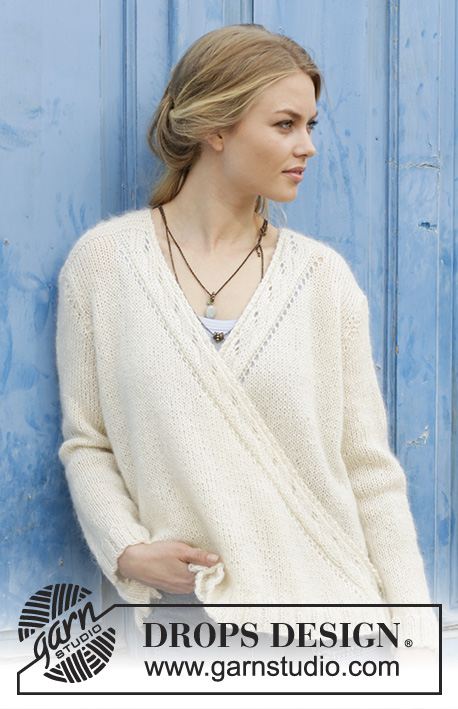
Wrap-around jacket with lace pattern, knitted top down. Size: S - XXXL Piece is knitted in DROPS Alpaca and DROPS Kid-Silk.
DROPS 186-24 |
||||||||||||||||
|
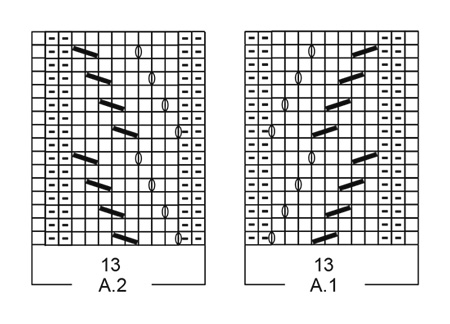
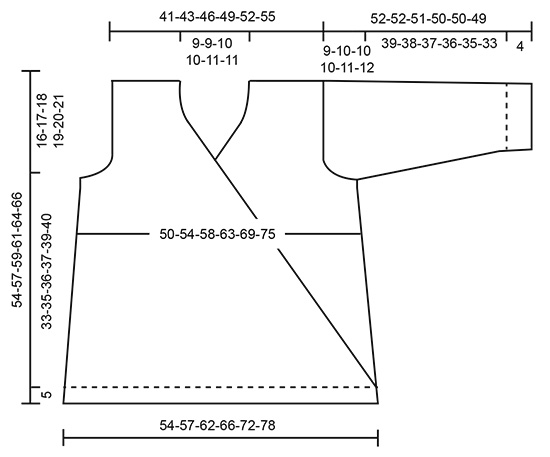
INFORMATION FOR PATTERN: GARTER STITCH (back and forth): 1 ridge = knit 2 rows. PATTERN: See diagrams A.1 and A.2. Diagrams show all rows in pattern seen from the right side. INCREASE TIP-1: All increases are done from the right side. Increase 1 stitch by making a yarn over. On next row purl yarn over twisted to avoid hole. Work the new stitches in stocking stitch. INCREASE TIP-2 (evenly): To calculate how to increase evenly, use the total number of stitches on row (e.g. 93 stitches), minus edge stitches in garter stitch (e.g. 2 stitches) and divide the remaining stitches by number of increases to be done (e.g. 17) = 5.3. In this example increase after approx. every 5th stitch and do not increase over stitches in garter stitch. Increase 1 stitch by making a yarn over. On next row purl yarn over twisted to avoid hole. DECREASE TIP (evenly): To calculate how to decrease evenly, use the total number of stitches on row (e.g. 45 stitches) and divide stitches by number of decreases to be done (e.g. 7) = 6.4. In this example knit approx. every 5th and 6th stitch together. ---------------------------------------------------------- JACKET: Piece is worked back and forth on circular needle, top down, in several parts and sewn tog when finished. The sleeves are worked back and forth on circular needle, bottom up. BACK PIECE: Work right shoulder as follows: Cast on 28-30-32-34-36-38 stitches on circular needle size 5 mm with 1 strand Alpaca + 1 strand Kid-Silk (= 2 strands). Work 1 ridge in GARTER STITCH - see explanation above. Then work as follows: ROW 1 (= right side): Work 2 edge stitches in garter stitch (= towards the neck), knit until 1 stitch remains, 1 edge stitch in garter stitch (= towards armhole). ROW 2 (= wrong side): Work 1 edge stitch in garter stitch, purl until 2 stitches remain, 2 edge stitches in garter stitch. Cut the yarn and put piece aside. Work left shoulder as follows: Cast on 28-30-32-34-36-38 stitches on circular needle size 5 mm with 1 strand Alpaca + 1 strand Kid-Silk (= 2 strands). Work 1 ridge. Then work as follows: ROW 1 (= right side): Work 1 edge stitch in garter stitch (= towards armhole), knit until 2 stitches remain, 2 edge stitches in garter stitch (= towards the neck). ROW 2 (= wrong side): Work 2 edge stitches in garter stitch, purl until 1 stitch remains, 1 edge stitch in garter stitch. Now work right and left shoulder together as follows: Turn piece (= left shoulder) and work as before over the 28-30-32-34-36-38 stitches, cast on 15-15-17-17-19-19 new stitches at the end of row (= neck), then work the 28-30-32-34-36-38 stitches on right shoulder on to needle = 71-75-81-85-91-95 stitches for back piece. REMEMBER THE KNITTING TENSION! Work the new stitches cast on for neck mid back in garter stitch, work the other stitches on back piece in stocking stitch and in garter stitch as before (i.e. work the middle 19-19-21-21-23-23 stitches + 1 edge stitch in each side in garter stitch, work the remaining stitches in stocking stitch). When 2 ridges have been worked over the new stitches, continue in stocking stitch and 1 edge stitch in garter stitch in each side. When piece measures 12-13-13-14-14-13 cm from cast-on edge, cast on new stitches at the end of every row in each side for armhole as follows: Cast on 1 stitch 2-1-2-2-2-3 times, 2 stitches 1-2-2-3-4-5 times and 4 stitches 1 time = 87-93-101-109-119-129 stitches. Continue in stocking stitch with 1 edge stitch in garter stitch in each side. When piece measures 4 cm from the last stitches cast on for armhole, increase 1 stitch inside 1 edge stitch in garter stitch in each side - read INCREASE TIP-1. Increase like this every 14-15-15-16-17-17 cm 3 times in total = 93-99-107-115-125-135 stitches. Continue until piece measures 49-52-54-56-59-61 cm from shoulder and down. Now increase 17-16-18-20-20-25 stitches evenly – read INCREASE TIP-2 (evenly) = 110-115-125-135-145-160 stitches. Switch to circular needle size 4 mm. Work rib from right side as follows: 1 edge stitch in garter stitch, (knit 3/purl 2) until 4 stitches remain on row, knit 3, 1 edge stitch in garter stitch. When rib measures 5 cm, cast off with knit over knit and purl over purl. Piece measures approx. 54-57-59-61-64-66 cm from shoulder and down. RIGHT FRONT PIECE: Cast on 28-30-32-34-36-38 stitches on circular needle size 5 mm with 1 strand Alpaca + 1 strand Kid-Silk (= 2 strands). Work 1 ridge. Now work pattern from right side as follows: 1 edge stitch in garter stitch, 12-14-16-18-20-22 stitches in stocking stitch, A.1 (= 13 stitches), 2 edge stitches in garter stitch. Continue back and forth like this, AT THE SAME TIME increase for the front piece and armhole as follows: When piece measures 2 cm from cast-on edge, begin increase for the front piece. Increase 1 stitch before A.1 + 2 stitches in garter stitch - remember INCREASE TIP-1. Increase like this every other row 52-55-57-59-63-65 times in total, AT THE SAME TIME when piece measures 12-13-13-14-14-13 cm from cast-on edge, cast on new stitches for armholes at the end of every row from wrong side as follows: Cast on 1 stitch 2-1-2-2-2-3 times, 2 stitches 1-2-2-3-4-5 times and 4 stitches 1 time (= 8-9-10-12-14-17 new stitches in total for armhole). Work the new stitches for armhole in stocking stitch. When piece measures 4 cm from the last stitches cast on for armhole, increase 1 stitch inside 1 edge stitch in garter stitch towards the side. Increase like this every 14-15-15-16-17-17 cm 3 times in total. When all increases are done there are 91-97-102-108-116-123 stitches. Piece measures approx. 49-52-54-56-59-61 cm from shoulder and down. Now increase 20-19-24-28-30-38 stitches evenly = 111-116-126-136-146-161 stitches. Switch to circular needle size 4 mm. Work rib from right side as follows: 1 edge stitch in garter stitch, (knit 3/purl 2) until 5 stitches remain, knit 3, 2 edge stitches in garter stitch. When rib measures 5 cm, cast off with knit over knit and purl over purl. Piece measures approx. 54-57-59-61-64-66 cm from shoulder and down. LEFT FRONT PIECE: Cast on 28-30-32-34-36-38 stitches on circular needle size 5 mm with 1 strand Alpaca + 1 strand Kid-Silk (= 2 strands). Work 1 ridge in GARTER STITCH - see explanation above. Now work pattern from right side as follows: 2 edge stitches in garter stitch, A.2 (= 13 stitches), knit 12-14-16-18-20-22, 1 edge stitch in garter stitch. Continue back and forth like this, AT THE SAME TIME increase for the front piece and armhole as follows: When piece measures 2 cm from cast-on edge, begin increase for the front piece. Increase 1 stitch after 2 edge stitches in garter stitch + A.2 - remember INCREASE TIP. Increase like this every other row 52-55-57-59-63-65 times in total, AT THE SAME TIME when piece measures 12-13-13-14-14-13 cm from cast-on edge, cast on new stitches for armholes at the end of every row from right side as follows: Cast on 1 stitch 2-1-2-2-2-3 times, 2 stitches 1-2-2-3-4-5 times and 4 stitches 1 time (= 8-9-10-12-14-17 new stitches in total for armhole). Work the new stitches for armhole in stocking stitch. When piece measures 4 cm from the last stitches cast on for armhole, increase 1 stitch inside 1 edge stitch in garter stitch towards the side. Increase like this every 14-15-15-16-17-17 cm 3 times in total. When all increases are done there are 91-97-102-108-116-123 stitches. Piece measures approx. 49-52-54-56-59-61 cm from shoulder and down. Now increase 20-19-24-28-30-38 stitches evenly = 111-116-126-136-146-161 stitches. Switch to circular needle size 4 mm. Work rib from right side as follows: 2 edge stitches in garter stitch, (knit 3/purl 2) until 4 stitches remain, knit 3, 1 edge stitch in garter stitch. When rib measures 5 cm, cast off with knit over knit and purl over purl. Piece measures approx. 54-57-59-61-64-66 cm from shoulder and down. SLEEVE: Cast on 45-50-50-55-55-60 stitches on circular needle size 4 mm. Work rib from right side as follows: 1 edge stitch in garter stitch, (knit 3/purl 2) until 4 stitches remain, knit 3, 1 edge stitch in garter stitch. When rib measures 4 cm, switch to circular needle size 5 mm. Knit 1 row while decreasing 7-11-8-13-10-14 stitches evenly - read DECREASE TIP (evenly) = 38-39-42-42-45-46 stitches. Continue in stocking stitch with 1 edge stitch in garter stitch in each side. When piece measures 9-8-9-9-5-11 cm, increase 1 stitch inside 1 edge stitch in garter stitch in each side. Increase like this approx. every 6-5-4-3-3-2 cm 6-7-8-10-11-12 times in total = 50-53-58-62-67-70 stitches. When sleeve measures 43-42-41-40-39-37 cm, cast off for sleeve cap at beginning of every row in each side as follows: Cast off 4 stitches 1 time, 2 stitches 2-2-3-3-3-4 times, 1 stitch 3-4-4-4-4-4 times, 2 stitches 2-2-2-2-3-3 times and 4 stitches 1 time = 12-13-14-18-19-18 stitches. Work 1 row. Cast off. Sleeve measures approx. 52-52-51-50-50-49. Work the other sleeve the same way. ASSEMBLY: Sew shoulder seams inside cast-on edges. Sew sleeves in body. Sew seam under sleeves and then down the side seam. Sew a button on left side seam (on right side of garment) directly over rib. Sew the other button on right side seam (on inside of garment) directly over rib. Garment is closed by buttoning through a hole in pattern A.1/A.2 at the bottom by rib. |
||||||||||||||||
Diagram explanations |
||||||||||||||||
|
||||||||||||||||
 |
||||||||||||||||
 |
||||||||||||||||
Have you finished this pattern?Tag your pictures with #dropspattern #sandywrap or submit them to the #dropsfan gallery. Do you need help with this pattern?You'll find 22 tutorial videos, a Comments/Questions area and more by visiting the pattern on garnstudio.com. © 1982-2026 DROPS Design A/S. We reserve all rights. This document, including all its sub-sections, has copyrights. Read more about what you can do with our patterns at the bottom of each pattern on our site. |
||||||||||||||||


With over 40 years in knitting and crochet design, DROPS Design offers one of the most extensive collections of free patterns on the internet - translated to 17 languages. As of today we count 324 catalogues and 12290 patterns translated into English (UK/cm). 12290
We work hard to bring you the best knitting and crochet have to offer, inspiration and advice as well as great quality yarns at incredible prices! Would you like to use our patterns for other than personal use? You can read what you are allowed to do in the Copyright text at the bottom of all our patterns. Happy crafting!
Post a comment to pattern DROPS 186-24
We would love to hear what you have to say about this pattern!
If you want to leave a question, please make sure you select the correct category in the form below, to speed up the answering process. Required fields are marked *.