
Popular categories
Looking for a yarn?


Comments / Questions (49)
![]() FAU wrote:
FAU wrote:
Tres mauvaise traduction des explications - impossible à suivre pour les diminutions - on nous dit de diminuer trois mailles de chaque côté alors que si on regarde le modèle la bande de six mailles et les dessins restent identiques tout au long du pull - diminution de l'encolure incompréhensible je me débrouille pour essayer de faire qqc de correct!!!!!
07.12.2019 - 19:09DROPS Design answered:
Bonjour Mme Fau, nous sommes désolés que vous ayez des problèmes à comprendre les explications, pensez à vérifier le modèle original si besoin; Si vous parlez ici des 3 mailles que l'on rabat de chaque côté pour les emmanchures, on diminue bien le nombre de mailles au point mousse de chaque côté mais en rabattant les mailles, pas en les diminuant. Sauf erreur de ma part, je ne vois pas de 3 mailles à diminuer, corrigez-moi si besoin. Bon tricot!
09.12.2019 - 10:08
![]() Jeanette Schultz wrote:
Jeanette Schultz wrote:
How many balls of Brushed Alpaca Silk, or Air, do I need to make this pattern in a size Large using 2 strands??
04.10.2019 - 19:59DROPS Design answered:
Dear Jeanette, if you want to knit this in a different DROPS yarn, please use the yarn converter here . Happy Knitting!
06.10.2019 - 11:08
![]() Heidi wrote:
Heidi wrote:
Finnes det noen fremgangsmåte for å strikke denne på rundpinne/både for og bakstykke samtidig?
16.07.2019 - 12:07
![]() Ida wrote:
Ida wrote:
Takk for svar. Men etter at man har felt av tre masker i hver side til erme, er det kun to masker igjen i rille på hver side, så jeg får det fortsatt ikke til å stemme
26.11.2018 - 21:37DROPS Design answered:
Hei Ida. Genseren på bilder er nok strikket i str M, og da sitter du igjen med 3 rillemasker etter å ha felt av 3 masker til erme. Det er 3 rillemasker du kan se på bildet i tillegg til sømmen for ermet. God fornøyelse.
30.11.2018 - 14:02
![]() Ida Sofie Bergen wrote:
Ida Sofie Bergen wrote:
På bildet er det en type struktur øverst på ermet som ikke er glattstrikk/mønster. Men hvis man følger oppskriften, ser det ikke ut til at man får slik struktur som på bildet, er det riktig?
24.11.2018 - 22:59DROPS Design answered:
Hei Ida. Det strikkes riller i hver ende av forstykke og bakstykket oppover og det er nok disse du sikter til. God fornøyelse
26.11.2018 - 09:16
![]() Evelyne wrote:
Evelyne wrote:
Je voudrais faire ce modèle avec un seul fil car je n'aime pas les pull épais. Comment adapter le modèle?
31.10.2018 - 17:09DROPS Design answered:
Bonjour Evelyne, vous pouvez tricoter ce pull avec 2 fils Air (= groupe C) ou 1 fil du groupe E (voir alternatives - mais sur la base du même échantillon, soit 10 m x 14 rangs = 10 x 10 cm en jersey. Nous ne sommes malheureusement pas en mesure de pouvoir ajuster ce modèle pour une autre tension, il vous faudra recalculer en fonction de votre échantillon si besoin, ou bien rechercher parmi les modèles correspondant à la tension souhaitée à l'aide de notre moteur de recherches. Bon tricot!
01.11.2018 - 13:56
![]() Mette Kragh wrote:
Mette Kragh wrote:
Når jeg strikker blusen i Drops Brushed Alpha sink, skal jeg vel kun bruge én tråd?
30.10.2018 - 13:01DROPS Design answered:
Hei Mette, For å få riktige strikkefasthet må du bruke 2 tråder av garn som hører til gruppe C eller en tråd av garn som hører til gruppe E. Drops Brushed Alpaca Silk er gruppe C så du må derfor bruke 2 tråder. God fornøyelse!
30.10.2018 - 15:58
![]() Marianne wrote:
Marianne wrote:
Jeg strikker trøjen i str L og Jeg bliver lidt i tvivl når der i opskriften under afsnittet om bagstykket står i slutningen af det første afsnit at jeg "skal fortsætte mønstret således" jeg skal vel ikke fortsætte med at tage en maske ind i hver side men nu i stedet strikke 5 retmasker 3*mønster og afslutte med 5 retmasker. Det jeg spørg om er om jeg ikke skal fortsætte med at have 51 masker?
27.10.2018 - 22:49DROPS Design answered:
Hei Marianne. Ja, det var en litt uheldig formulering. Du skal fortsette med mønsteret som forklart, men du skal felle masker kun den første gangen. God fornøyelse.
05.11.2018 - 08:48
![]() Eva Hansen wrote:
Eva Hansen wrote:
Hei! Jeg lurer på hva som menes med " 2 kantmasker i rille mot hals "
27.09.2018 - 15:26DROPS Design answered:
Hej Eva, de 2 yderste masker mod halsen strikkes i rille/ret på hver pind, du kan også se det på billedet. God fornøjelse!
28.09.2018 - 15:09
![]() Ann-Mari Rasmuson wrote:
Ann-Mari Rasmuson wrote:
I want to knit this jumper in a uk size 12 for my granddaughter. Is that size M?
21.08.2018 - 08:46DROPS Design answered:
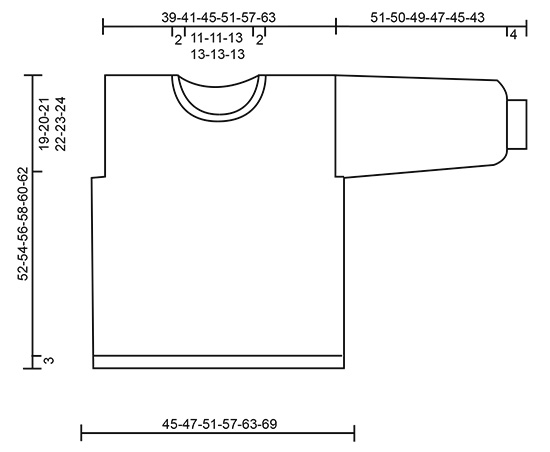
Dear Mrs Ann-Mari. You can check measurements for each size in the diagram at the bottom of the pattern. Measurements are given in cm. Happy knitting!
21.08.2018 - 08:59
|
||||||||||
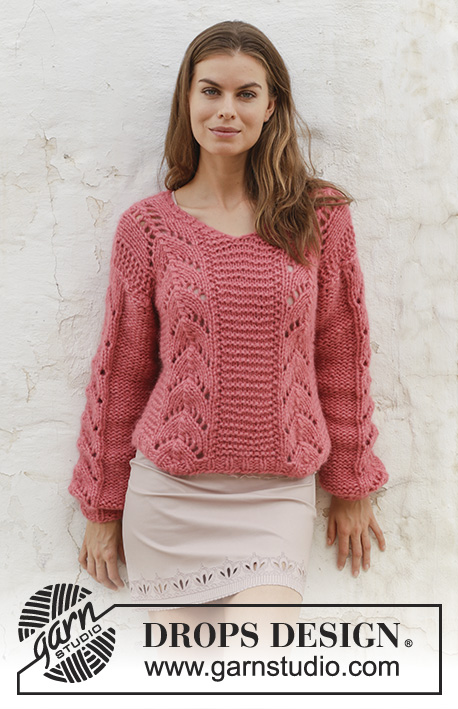
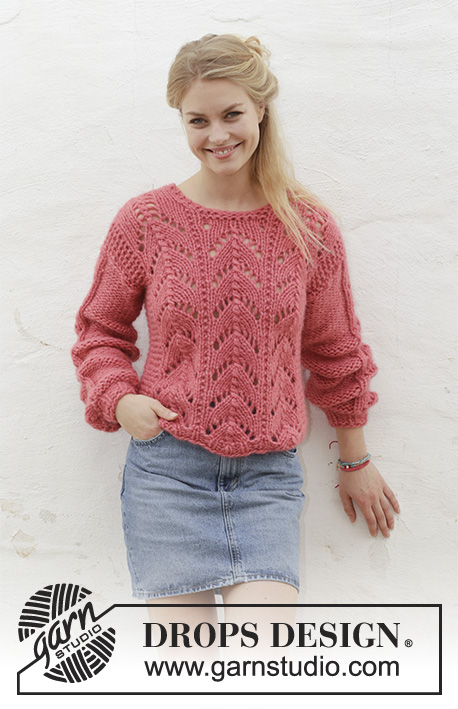
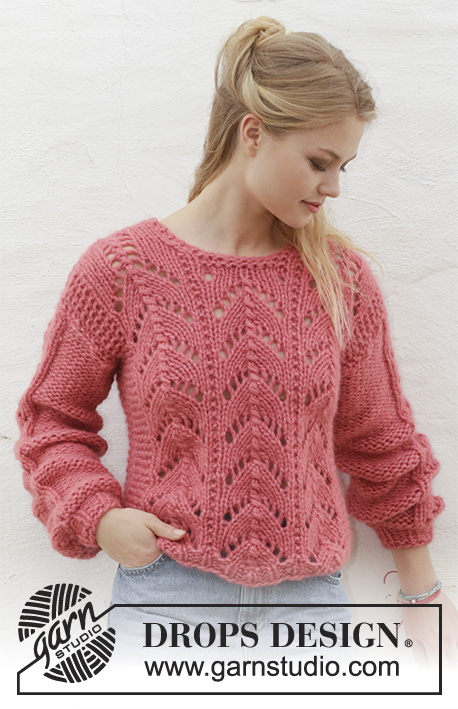
Blushing Beauty#blushingbeautysweater |
||||||||||
 |
 |
|||||||||
Knitted jumper with lace pattern. Sizes S - XXXL. The piece is worked in 2 strands DROPS Air or you can use 2 strands DROPS Brushed Alpaca Silk.
DROPS 186-1 |
||||||||||
|
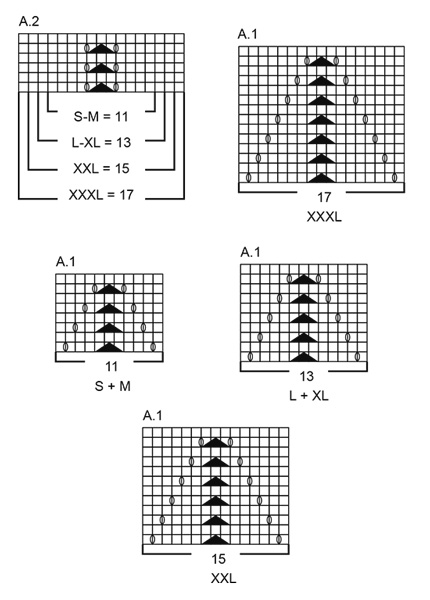
INFORMATION FOR THE PATTERN: RIDGE/GARTER STITCH (worked back and forth): 1 ridge = Knit 2 rows. PATTERN: See diagrams A.1 and A.2. Choose diagram for your size. The diagram shows all the rows in the pattern from the right side. DECREASE TIP (for neck): Decrease for neck inside the 2 edge stitches in garter stitch. All decreases are made from the right side! Decrease as follows after the 2 edge stitches: Slip 1 stitch as if to knit, knit 1, pass the slipped stitch over the knitted stitch. Decrease as follows before the 2 edge stitches: Knit 2 together. INCREASE TIP (for sleeve): Increase 1 stitch inside 1 edge stitch in garter stitch by making 1 yarn over. On next row work the yarn over twisted to avoid a hole. ---------------------------------------------------------- JUMPER: The piece is worked back and forth with circular needle. Front and back pieces are worked separately. The sleeves are worked back and forth with circular needle. BACK PIECE: Cast on 47-47-53-59-65-71 stitches with circular needle size 8 mm and 2 strands Air or 2 strands Brushed Alpaca Silk. Purl 1 row from the wrong side. Then work 4 rows rib (= knit 1 / purl 2) with 1 edge stitch in GARTER STITCH - see description above, in each side. Change to circular needle size 9 mm. On the next row work and decrease as follows - from the right side: Work 6-6-6-9-9-9 stitches in garter stitch - and decrease 1-0-1-1-1-1 stitch over these stitches, * A.1 (= 11-11-13-13-15-17 stitches), 1 stitch in garter stitch *, work from *-* a total of 2 times, work A.1 (= 11-11-13-13-15-17 stitches), 6-6-6-9-9-9 stitches in garter stitch - and decrease 1-0-1-1-1-1 stitch over these stitches = 45-47-51-57-63-69 stitches. Continue the pattern like this - REMEMBER THE KNITTING TENSION! When the piece measures 34-35-36-37-38-39 cm (measure along the one stitch in garter stitch between 2 repeats of A.1) cast off 3 stitches at the beginning of the next 2 rows = 39-41-45-51-57-63 stitches. When the piece measures approx. 42-44-46-47-49-51 cm - adjust so that you have worked the last row in the diagram, work A.2 (= 11-11-13-13-15-17 stitches) over A.1 to finished length. AT THE SAME TIME when the piece measures 49-51-53-55-57-59 cm work 2 ridges over the middle 13-13-15-15-15-15 stitches on the row; the other stitches are worked as before. On the first row from the right side after the 2 ridges, cast off the middle 9-9-11-11-11-11 stitches for neck. Place the 15-16-17-20-23-26 stitches on the right side of the row (seen from the right side) on 1 thread or leave them un-worked on a needle. Continue with pattern back and forth over the remaining 15-16-17-20-23-26 stitches and 2 edge stitches in garter stitch towards the neck - AT THE SAME TIME on the next row from the right side, decrease 1 stitch for the neck - read DECREASE TIP = 14-15-16-19-22-25 stitches on needle. Continue working until piece measures 52-54-56-58-60-62 cm. Then loosely cast off. Work the other shoulder in the same way. FRONT PIECE: Cast on and work in the same way as the back piece until the piece measures 40-42-44-45-47-49 cm. Now work 2 ridges over the middle 11-11-13-13-13-13 stitches on the row, the other stitches are worked as before. On the first row from the right side after the 2 ridges, cast off the middle 7-7-9-9-9-9 stitches for neck. Place 16-17-18-21-24-27 stitches on the right side of the row (seen from the right side) on 1 thread or leave them un-worked on a needle. READ THE WHOLE OF THE NEXT SECTION BEFORE CONTINUING: Continue back and forth with pattern over the remaining 16-17-18-21-24-27 stitches and 2 edge stitches in garter stitch towards the neck. On the next row from the right side, decrease for neck - remember DECREASE TIP. Decrease like this every 2nd row a total of 2 times = 14-15-16-19-22-25 stitches on needle. AT THE SAME TIME work A.1 up to and including the last row in the diagram, then work A.2 (= 11-11-13-13-15-17 stitches) over A.1 to finished length. Continue working until piece measures 52-54-56-58-60-62 cm. Then loosely cast off. Work the other shoulder in the same way. SLEEVE: Cast on 17-17-20-20-20-23 stitches (including 1 edge stitch in each side) with circular needle size 8 mm and 2 strands Air or 2 strands Brushed Alpaca Silk. Purl 1 row from the wrong side. Then work 6 rows rib (= knit 1 / purl 2) with 1 edge stitch in garter stitch in each side. Change to circular needle size 9 mm. The next row is worked as follows - from the right side: Work 1 edge stitch in garter stitch, * knit 1, 1 yarn over *, work from *-* until there are 2 stitches left, knit 1 stitch and work 1 edge stitch in garter stitch = 31-31-37-37-37-43 stitches (on the next row, work the yarn overs twisted to avoid holes). Knit 1 row from the wrong side where you increase 2-4-0-2-4-0 stitches evenly on row = 33-35-37-39-41-43 stitches. The next row is worked as follows - from the right side: 1 edge stitch in garter stitch, purl 10-11-11-12-12-12 (knit from wrong side), A.1 (= 11-11-13-13-15-17 stitches), purl 10-11-11-12-12-12 stitches (knit from wrong side) and 1 edge stitch in garter stitch. Continue the pattern like this. When the piece measures 14 cm increase 1 stitch in each side - read INCREASE TIP (= 2 stitches increased). Increase like this every 16-16-15-14-13-12 cm a total of 3 times = 39-41-43-45-47-49 stitches. Continue working until piece measures 51-50-49-47-45-43 cm (shorter measurements in larger sizes due to broader shoulders). Then loosely cast off. Work the other sleeve in the same way. ASSEMBLY: Sew shoulder seams inside the cast-off edge – make sure the seam is not tight. Sew the side seams in the outermost loop of the outermost stitch. Sew in the sleeves – sew the 2 cm on each side of sleeve so that it fits into the armhole, then sew the sleeve seams inside the 1 edge stitch. |
||||||||||
Diagram explanations |
||||||||||
|
||||||||||
 |
||||||||||
 |
||||||||||
Have you finished this pattern?Tag your pictures with #dropspattern #blushingbeautysweater or submit them to the #dropsfan gallery. Do you need help with this pattern?You'll find 25 tutorial videos, a Comments/Questions area and more by visiting the pattern on garnstudio.com. © 1982-2026 DROPS Design A/S. We reserve all rights. This document, including all its sub-sections, has copyrights. Read more about what you can do with our patterns at the bottom of each pattern on our site. |
||||||||||


With over 40 years in knitting and crochet design, DROPS Design offers one of the most extensive collections of free patterns on the internet - translated to 17 languages. As of today we count 324 catalogues and 12290 patterns translated into English (UK/cm). 12290
We work hard to bring you the best knitting and crochet have to offer, inspiration and advice as well as great quality yarns at incredible prices! Would you like to use our patterns for other than personal use? You can read what you are allowed to do in the Copyright text at the bottom of all our patterns. Happy crafting!
Post a comment to pattern DROPS 186-1
We would love to hear what you have to say about this pattern!
If you want to leave a question, please make sure you select the correct category in the form below, to speed up the answering process. Required fields are marked *.