
Popular categories
Looking for a yarn?


Comments / Questions (49)
![]() Krentner wrote:
Krentner wrote:
Voilà ce que vous dites, pour vous confirmer vos dire. Quand l'ouvrage mesure 34-35-36-37-38-39 cm (mesurer le long d'1 maille au point mousse entre 2 motifs de A.1), rabattre 3 mailles au début des 2 rangs suivants = 39-41-45-51-57-63 mailles.
07.01.2022 - 14:50DROPS Design answered:
- Tout à fait, mais vous aviez 6 mailles point mousse et diminué 1 m = 5 mailles point mousse de chaque côté; vous rabattez 3 mailles = il en reste 2 au point mousse de chaque côté, toutefois, vous pouvez tout à fait conserver vos 6 mailles point mousse si les emmanchures vous plaisent ainsi. Rappelez-vous juste que vous aurez plus de mailles pour chaque épaule. Bon tricot!
07.01.2022 - 16:15
![]() Krentner wrote:
Krentner wrote:
Bonjour, encore moi, vous est sûr de donner les bonnes explications pour ce pull, car au vu de la photo je vois que sur les emmanchures il y a toujours 6 mousses et non pas 3 comme vous le préciser , si c.est le cas il faut tout détricoter. Je ne suis pas la seule à le remarquer et vous n’avez pas répondu à cette personne. Allez soyez sympa et répondez moi. Bonne journée.
07.01.2022 - 14:45DROPS Design answered:
Bonjour Mme Krentner, vous tricotez le devant comme le dos, autrement dit, avec 6 mailles au point mousse de chaque côté après les côtes en diminuant 1 maille = il reste en fait 5 mailles point mousse; puis, à 36 cm de hauteur totale, vous rabattez 3 mailles point mousse pour les emmanchures = il reste 2 donc mailles point mousse de chaque côté. Maintenant, vous pouvez conserver les 6 mailles point mousse de chaque côté si vous le souhaitez. Bon tricot!
07.01.2022 - 16:12
![]() Krentner Mareka wrote:
Krentner Mareka wrote:
Pouvez-vous me donner la différence entre rabattre 3 mailles et diminuer 3 mailles, c’est à propos de ces 3 mailles que l’on doit retirer pour les emmanchures. Merci de votre réponse
06.01.2022 - 19:25DROPS Design answered:
Bonjour Mme Krentner, on rabat les 3 mailles des emmanchures ainsi, en début de rang sur l'endroit et en début de rang sur l'envers et on diminue pour l'encolure (cf DIMINUTIONS) après les 2 m de bordure ainsi (= côté droit du devant quand on porte le pull) et avant les 2 m de bordure ainsi (= côté gauche du devant). Cela peut-il vous aider?
07.01.2022 - 07:13
![]() Krentner Mareka wrote:
Krentner Mareka wrote:
Bonjour, Je suis sur le haut du devant taille L. J’en suis au diagramme A2, il me reste sur l’épaule 16 mailles, vous écrivez 13 mailles’ comment se fait-il ? Car plus haut vous indiquez qu’il en reste 16, est-ce une erreur de votre part. Merci de votre patience.
05.01.2022 - 15:03DROPS Design answered:
Bonjour Mme Krentner, vous aviez 45 mailles et avez mis 9 mailles en attente pour l'encolure = il reste 18 mailles pour chaque épaule. Vous rabattez 2 fois 1 maille pour l'encolure = il reste 16 mailles. Bon tricot!
05.01.2022 - 17:10
![]() Paulette KRENTNER wrote:
Paulette KRENTNER wrote:
Bonjour, serait-il possible de voir en photo ce joli pull de dos, car le haut du dos d’après les explications change car on ne tricote plus qu’un seul dessin A2 et j’ai du mal à comprendre par rapport au devant. Merci de votre patience, bonne fête.
31.12.2021 - 14:20DROPS Design answered:
Bonjour Mme Krentner, l'encolure dos va se tricoter de la même façon que l'encolure devant: vous tricotez A.2 au lieu de A.1 (autrement dit vous conservez les 2 derniers rangs de A.1 seulement; on le voit pour l'épaule droite sur la 2ème photo) puis vous tricotez les 13-15 mailles centrales (cf taille) au point mousse (= bordure d'encolure) et vous rabattez ensuite les 9-11 mailles centrales pour l'encolure = il va vous rester 2 mailles point mousse pour la bordure d'encolure. Bon tricot!
03.01.2022 - 10:25
![]() Alicja wrote:
Alicja wrote:
Dzień dobry, odnoszę wrażenie, że opis tyłu/przodu odnosi się do swetra Spring Peach. W opisie pomiędzy schematami A.1 występuje "11-11-13-13-15-17 oczek ściegiem francuskim". W tym miejscu powinien być chyba "środkowy" schemat A.1? A jeśli tak, to czy pozostała część opisu pozostanie bez zmian? Pozdrawiam.
19.11.2021 - 06:50DROPS Design answered:
Witaj Alu, masz rację. Już poprawiłam wzór. Teraz będzie ok. Bardzo dziękuję za zgłoszenie. Pozdrawiamy i życzymy miłej pracy!
19.11.2021 - 08:44
![]() Corinne R wrote:
Corinne R wrote:
Bonjour, ce modèle est censé se tricoter sur des aiguilles circulaires?!?!?!? Je cite :"PULL: Se tricote en allers et retours sur aiguille circulaire. Le devant et le dos se tricotent séparément. Les manches se tricotent en allers et retours sur aiguille circulaire" Explications erronées!!!
04.11.2021 - 01:16DROPS Design answered:
Bonjour Corinne R, les explications sont justes ainsi (cf modèle original), on utilise des aiguilles circulaires pour tricoter chaque pièce (dos, devant et manches) pour avoir suffisamment de place pour y loger toutes les mailles. Retrouvez plus d'infos sur les circulaires ici. Bon tricot!
04.11.2021 - 07:01
![]() Karen wrote:
Karen wrote:
Hi. What does “ Work 6 stitches and decrease 1 stitch over these stitches“ mean? Where do I decrease, and which technique do I use? Thank you!
01.08.2020 - 04:58DROPS Design answered:
Dear Karen, this means these 6 sts have to be decreased to 5 sts, work for example these 6 sts as follows: K2, K2 tog, K2 = 5 sts remain. Happy knitting!
03.08.2020 - 07:40
![]() Jolanta Konkol wrote:
Jolanta Konkol wrote:
Bardzo podoba mi się ten wzór ażuru w tym sweterku 🤗🤗🤗 czy była by możliwość przetłumaczenia na język polski pozdrawiam z Lęborka 👋👋👋
24.05.2020 - 21:24DROPS Design answered:
Witaj Jolu! Wzór jest przetłumaczony, zobacz TUTAJ. A propos, czy już zagłosowałaś na nową kolekcję DROPS Jesień/Zima, zapraszamy serdecznie!
07.06.2020 - 15:16
![]() Birgitte Skovdal wrote:
Birgitte Skovdal wrote:
Er det den totale garnmængde, der er angivet i de to materiale forslag, når der strikkes med 2 tråde?
15.03.2020 - 17:22
|
||||||||||
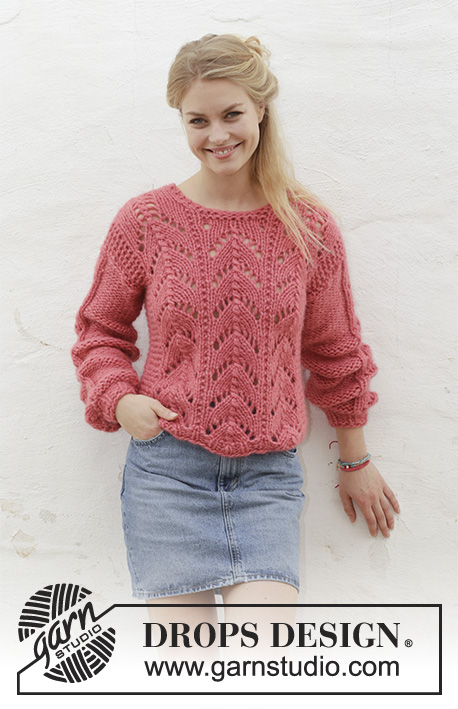
Blushing Beauty#blushingbeautysweater |
||||||||||
 |
 |
|||||||||
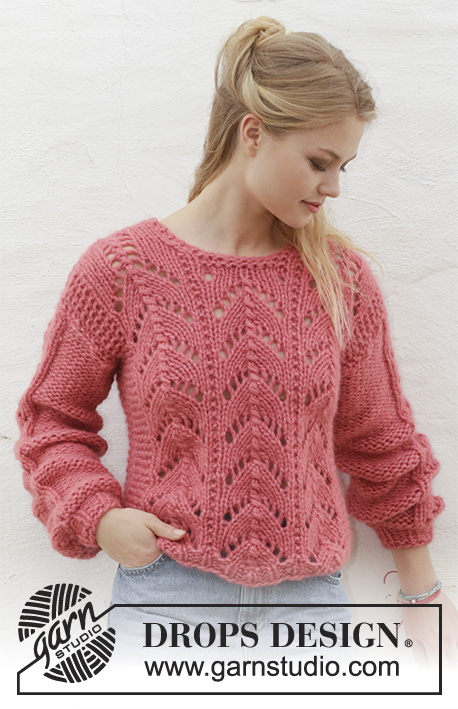
Knitted jumper with lace pattern. Sizes S - XXXL. The piece is worked in 2 strands DROPS Air or you can use 2 strands DROPS Brushed Alpaca Silk.
DROPS 186-1 |
||||||||||
|
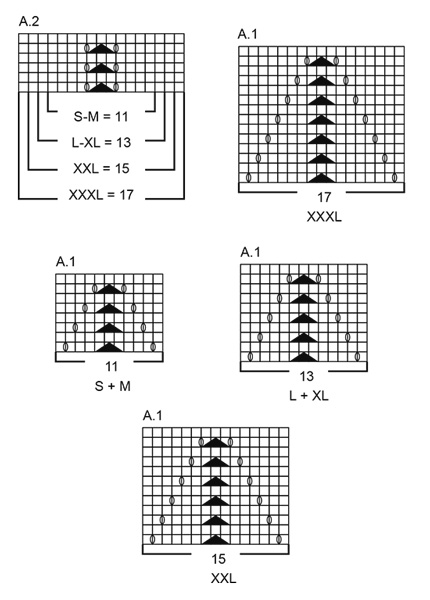
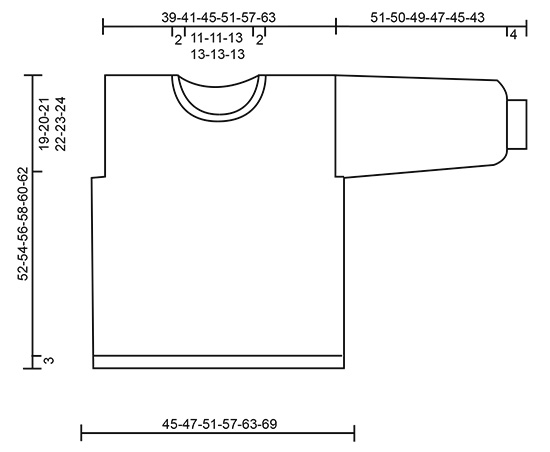
INFORMATION FOR THE PATTERN: RIDGE/GARTER STITCH (worked back and forth): 1 ridge = Knit 2 rows. PATTERN: See diagrams A.1 and A.2. Choose diagram for your size. The diagram shows all the rows in the pattern from the right side. DECREASE TIP (for neck): Decrease for neck inside the 2 edge stitches in garter stitch. All decreases are made from the right side! Decrease as follows after the 2 edge stitches: Slip 1 stitch as if to knit, knit 1, pass the slipped stitch over the knitted stitch. Decrease as follows before the 2 edge stitches: Knit 2 together. INCREASE TIP (for sleeve): Increase 1 stitch inside 1 edge stitch in garter stitch by making 1 yarn over. On next row work the yarn over twisted to avoid a hole. ---------------------------------------------------------- JUMPER: The piece is worked back and forth with circular needle. Front and back pieces are worked separately. The sleeves are worked back and forth with circular needle. BACK PIECE: Cast on 47-47-53-59-65-71 stitches with circular needle size 8 mm and 2 strands Air or 2 strands Brushed Alpaca Silk. Purl 1 row from the wrong side. Then work 4 rows rib (= knit 1 / purl 2) with 1 edge stitch in GARTER STITCH - see description above, in each side. Change to circular needle size 9 mm. On the next row work and decrease as follows - from the right side: Work 6-6-6-9-9-9 stitches in garter stitch - and decrease 1-0-1-1-1-1 stitch over these stitches, * A.1 (= 11-11-13-13-15-17 stitches), 1 stitch in garter stitch *, work from *-* a total of 2 times, work A.1 (= 11-11-13-13-15-17 stitches), 6-6-6-9-9-9 stitches in garter stitch - and decrease 1-0-1-1-1-1 stitch over these stitches = 45-47-51-57-63-69 stitches. Continue the pattern like this - REMEMBER THE KNITTING TENSION! When the piece measures 34-35-36-37-38-39 cm (measure along the one stitch in garter stitch between 2 repeats of A.1) cast off 3 stitches at the beginning of the next 2 rows = 39-41-45-51-57-63 stitches. When the piece measures approx. 42-44-46-47-49-51 cm - adjust so that you have worked the last row in the diagram, work A.2 (= 11-11-13-13-15-17 stitches) over A.1 to finished length. AT THE SAME TIME when the piece measures 49-51-53-55-57-59 cm work 2 ridges over the middle 13-13-15-15-15-15 stitches on the row; the other stitches are worked as before. On the first row from the right side after the 2 ridges, cast off the middle 9-9-11-11-11-11 stitches for neck. Place the 15-16-17-20-23-26 stitches on the right side of the row (seen from the right side) on 1 thread or leave them un-worked on a needle. Continue with pattern back and forth over the remaining 15-16-17-20-23-26 stitches and 2 edge stitches in garter stitch towards the neck - AT THE SAME TIME on the next row from the right side, decrease 1 stitch for the neck - read DECREASE TIP = 14-15-16-19-22-25 stitches on needle. Continue working until piece measures 52-54-56-58-60-62 cm. Then loosely cast off. Work the other shoulder in the same way. FRONT PIECE: Cast on and work in the same way as the back piece until the piece measures 40-42-44-45-47-49 cm. Now work 2 ridges over the middle 11-11-13-13-13-13 stitches on the row, the other stitches are worked as before. On the first row from the right side after the 2 ridges, cast off the middle 7-7-9-9-9-9 stitches for neck. Place 16-17-18-21-24-27 stitches on the right side of the row (seen from the right side) on 1 thread or leave them un-worked on a needle. READ THE WHOLE OF THE NEXT SECTION BEFORE CONTINUING: Continue back and forth with pattern over the remaining 16-17-18-21-24-27 stitches and 2 edge stitches in garter stitch towards the neck. On the next row from the right side, decrease for neck - remember DECREASE TIP. Decrease like this every 2nd row a total of 2 times = 14-15-16-19-22-25 stitches on needle. AT THE SAME TIME work A.1 up to and including the last row in the diagram, then work A.2 (= 11-11-13-13-15-17 stitches) over A.1 to finished length. Continue working until piece measures 52-54-56-58-60-62 cm. Then loosely cast off. Work the other shoulder in the same way. SLEEVE: Cast on 17-17-20-20-20-23 stitches (including 1 edge stitch in each side) with circular needle size 8 mm and 2 strands Air or 2 strands Brushed Alpaca Silk. Purl 1 row from the wrong side. Then work 6 rows rib (= knit 1 / purl 2) with 1 edge stitch in garter stitch in each side. Change to circular needle size 9 mm. The next row is worked as follows - from the right side: Work 1 edge stitch in garter stitch, * knit 1, 1 yarn over *, work from *-* until there are 2 stitches left, knit 1 stitch and work 1 edge stitch in garter stitch = 31-31-37-37-37-43 stitches (on the next row, work the yarn overs twisted to avoid holes). Knit 1 row from the wrong side where you increase 2-4-0-2-4-0 stitches evenly on row = 33-35-37-39-41-43 stitches. The next row is worked as follows - from the right side: 1 edge stitch in garter stitch, purl 10-11-11-12-12-12 (knit from wrong side), A.1 (= 11-11-13-13-15-17 stitches), purl 10-11-11-12-12-12 stitches (knit from wrong side) and 1 edge stitch in garter stitch. Continue the pattern like this. When the piece measures 14 cm increase 1 stitch in each side - read INCREASE TIP (= 2 stitches increased). Increase like this every 16-16-15-14-13-12 cm a total of 3 times = 39-41-43-45-47-49 stitches. Continue working until piece measures 51-50-49-47-45-43 cm (shorter measurements in larger sizes due to broader shoulders). Then loosely cast off. Work the other sleeve in the same way. ASSEMBLY: Sew shoulder seams inside the cast-off edge – make sure the seam is not tight. Sew the side seams in the outermost loop of the outermost stitch. Sew in the sleeves – sew the 2 cm on each side of sleeve so that it fits into the armhole, then sew the sleeve seams inside the 1 edge stitch. |
||||||||||
Diagram explanations |
||||||||||
|
||||||||||
 |
||||||||||
 |
||||||||||
Have you finished this pattern?Tag your pictures with #dropspattern #blushingbeautysweater or submit them to the #dropsfan gallery. Do you need help with this pattern?You'll find 25 tutorial videos, a Comments/Questions area and more by visiting the pattern on garnstudio.com. © 1982-2026 DROPS Design A/S. We reserve all rights. This document, including all its sub-sections, has copyrights. Read more about what you can do with our patterns at the bottom of each pattern on our site. |
||||||||||


With over 40 years in knitting and crochet design, DROPS Design offers one of the most extensive collections of free patterns on the internet - translated to 17 languages. As of today we count 324 catalogues and 12290 patterns translated into English (UK/cm). 12290
We work hard to bring you the best knitting and crochet have to offer, inspiration and advice as well as great quality yarns at incredible prices! Would you like to use our patterns for other than personal use? You can read what you are allowed to do in the Copyright text at the bottom of all our patterns. Happy crafting!
Post a comment to pattern DROPS 186-1
We would love to hear what you have to say about this pattern!
If you want to leave a question, please make sure you select the correct category in the form below, to speed up the answering process. Required fields are marked *.