
Popular categories
Looking for a yarn?


Comments / Questions (50)
![]() Kiki wrote:
Kiki wrote:
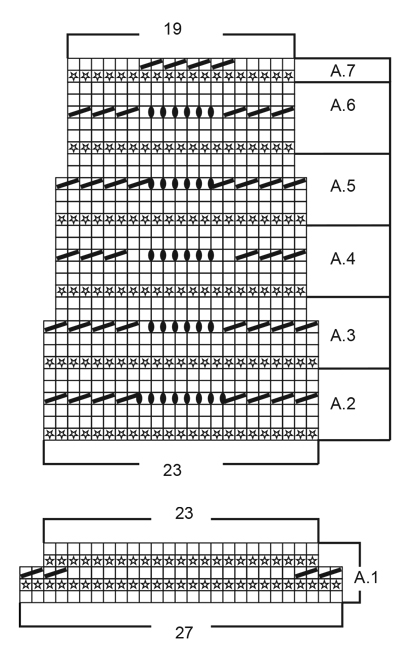
Hallo also ich habe jetzt schon das 4te mal angefangen... mache iegendeinen Gedankenfehler. Stricke in S...Muster sieht immer anders aus. Muss ich über A.2 3mal A.1 stricken? Die Maschenzahl stimmt doch nicht mehr. Sind nur noch 23 Maschen statt 27.. Liebe Grüße aus Hannover
18.09.2018 - 20:05DROPS Design answered:
Liebe Kiki, zuerst stricken Sie A.1 (= 27 Maschen) aber in der 3. Reihe in A.1 werden Sie 4 Maschen in jedem A.1 abnehmen = es sind nur noch 23 M in jedem A.1. Dann stricken Sie A.2 (= 23 M) über jedem A.1. Wenn A.2 3 Mal in der Höhe gestrickt wird, stricken Sie A.3 = 2 M werden dann in jedem A.2 abgenommen = 21 M bleiben übrig für A.4. Viel Spaß beim stricken!
19.09.2018 - 09:44
![]() Kiki wrote:
Kiki wrote:
Hey möchte mit den Pulli stricken und habe ein Problem kann mir bitte einer helfen bitte... bei mit in der Anleitung werden zur Erklärung zum Diagram die Symbole nicht angezeigt sodas ich deshalb nicht weiß wie ich Sie abzustricken habe. Vielleicht kann mit ja jemand ein Foto schicken.. wäre echt toll. Danke im Vorraus Liebe Grüße aus Hannover
10.09.2018 - 10:22DROPS Design answered:
Liebe Kiki, wegen Wartungsarbeiten waren die Bilder vor einigen Stunden nicht verfügbar, aber alles ist jetzt wieder in Ordnung. Viel Spaß beim stricken!
11.09.2018 - 08:41
![]() Bente Theibel wrote:
Bente Theibel wrote:
Jeg har købt garn tilspring forest Drops 178-27, så flot garn. Er nu kommet til A2 i opskriften. I diagrammet står der lav to omslag mellem 2 masker. Hvordan skal det forståes rigtigt, jeg synes det giver en masse ekstra masker da A2 skal holdes på 23 masker???? Håber i kan hjælpe mig?
12.06.2018 - 13:23DROPS Design answered:
Hej Bente, 4.pind (1.mønsterpind) i A.2 strikker du således (ret sammen = rs); 2rs, 2rs, 2rs, 2rs, 2oms, 1r, 2oms, 1r, 2oms, 1r, 2oms, 1r, 2oms, 1r, 2oms, 1r, 2oms, 1r, 2oms, 2rs, 2rs, 2rs, 2rs og så forfra igen. På næste pind strikker du det ene af de 2 omslag, det andet slipper du ned som hul. i A.2 har du lige mange omslag som du strikker masker sammen, det vil sige at du har samme antal masker. I A.3 har du 2 mindre omslag end hvad du tager ind, det vil sige at du har 2 masker mindre for hver gang du strikker rapporten. God fornøjelse!
12.06.2018 - 13:33
![]() M. Van Kerkhof wrote:
M. Van Kerkhof wrote:
Zoals ik ook al teruglees bij de overige opmerkingen, valt de trui erg kort uit als ik brei zoals het patroon het voorschrijft. Ik vind het moeilijk om de vaktermen te vertalen uit het Duits en Engels. Maar ik begrijp dat ik A6 vaker moet breien voordat ik met de armsgaten ga beginnen. Het is mij alleen niet duidelijk hoe vaak ik het gedeelte van A6 nog moet breien en of ik daarbij ook nog steken moet minderen. Hopelijk kunt u me dat vertellen. Bij voorbaat dank.
30.04.2018 - 08:28
![]() Carina wrote:
Carina wrote:
Ich bin etwas unsicher mit der Länge des Pullovers. Er erscheint mir viel zu kurz. Man sieht es leider bei dem Sitzmodell nicht richtig. Aber wenn man den Schnitt mit dem von Modell 165/35 vergleicht, was ja ungefähr derselbe Pulli nur in Fabel ist, dann ist 165/35 um ungefähr 7 bis 8 cm länger und der ist auf dem Foto schon ziemlich knapp geschnitten. Ich kann doch einfach noch mehrere Runden A6 oben weiterstricken, bis ich die gewünschte Länge habe?
01.03.2018 - 08:26DROPS Design answered:
Liebe Carina, die gesamte Höhe des Pullovers finden Sie für jede Größe in der Maßskizze, dh 54-64 cm je nach der Größe. Wenn Sie ihn länger möchten, können Sie Rumpfteil länger stricken, dann je nach Umfang A.6 (oder A.4 = mehr Maschen) länger anpassen (denken Sie auch daran, Garnmenge auch anzupassen) Viel Spaß beim stricken!
01.03.2018 - 09:34
![]() Monica wrote:
Monica wrote:
Buonasera, se volessi realizzare questo capo con Big Delight quali sono i colori che si avvicinano di più alle sfumature di Delight? Se non ho sbagliato a calcolare, il numero dei gomitoli che mi occorrono saranno 5 per ogni colore? Grazie per l'aiuto
15.02.2018 - 21:28DROPS Design answered:
Buonasera Monica, con Big Delight deve lavorare con un colore solo, per cui circa 10 gomitoli per la taglia S. Per il colore potrebbe provare con il n° 8 frutti di bosco, ma risulterà comunque molto diverso da quello in foto. Buon lavoro!
15.02.2018 - 21:52Richard wrote:
I called Drops in Norway and they were not able to help me! But please can you explain:- From the point where the sleeves are added to the circular needles (246 sts), measures 23 cm - this is correct. But the number of rows to cast off are:- 6 (A9) + 40 (Decreases) + 1 (8 evenly decreases) + 4 ( 2 Ridges). Therefore TOTAL = 51/52 rows! The tension you have given equals to 26 cm, but this is 3 cm SHORT of the 56cm that the pattern has stated.
13.02.2018 - 11:28DROPS Design answered:
Hello, Thank you fro calling our offices, but all questions regarding our patterns are answered through our website. Thus, the delay in the reply. There may be variations from one knitter's gauge to another even if your swatch gauge seemed correct. Also, working in the round changes your gauge. That's why we ask, in the pattern, to keep checking your gauge throughout. Do let us know if you managed to finish your project. Happy Knitting!
30.08.2018 - 11:17Richard wrote:
Thanks. Will do. :>)
12.02.2018 - 17:23Richard wrote:
Hi, once again. Thank you for your reply - but what should the finished measurement be, from the top of the shoulder to the hem? Your pattern states 56cm. Bur my finished length is 53cm!
12.02.2018 - 15:39DROPS Design answered:
Dear Richard, you should bring your work to your store or send them a picture to show them how to worked, it would be easier for them to help you furthermore, you will find their email under the retailer list (or you can call them or contact them on the social medias as you rather like). Seing your work may help them to find out any issue. Happy knitting!
12.02.2018 - 17:15Richard wrote:
Hi, again. I have completed the work, but the size is only 53 cms (from the shoulder)! Up to the beginning of A9, the dimension was correct (27 cm), up to where the sleeves are joined to the yoke. The umber of rows to cast-off are:- A9 (6) - Sleeves and Yoke (40) - when all decreases are done (1) - 2 Ridges (4) - Cast off. Total 52! The tension is:- 20 rows/10 cm, so 52 rows = 26 cm. Overall length of 53 cm!
12.02.2018 - 13:27DROPS Design answered:
Dear Richard, the measurement is taken flat from the top of shoulder to the bottom of jumper. Happy knitting!
12.02.2018 - 14:27
|
|||||||||||||||||||
Spring Forest#springforestsweater |
|||||||||||||||||||
 |
 |
||||||||||||||||||
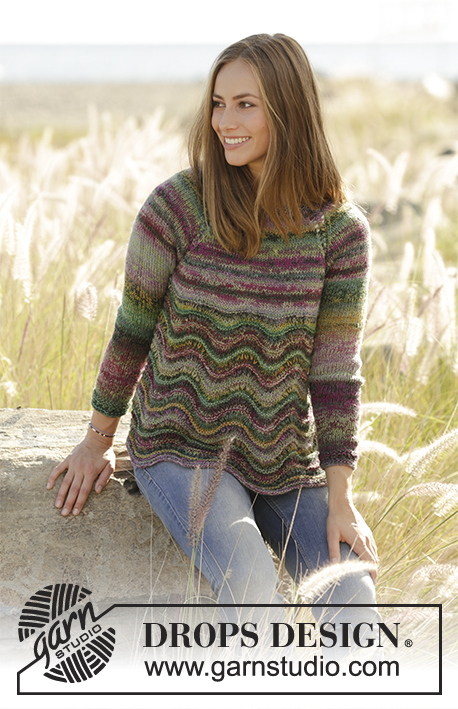
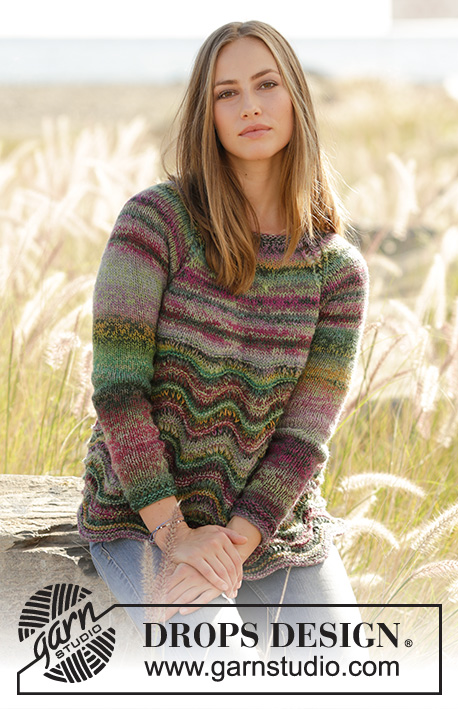
Jumper with wave pattern and raglan, worked bottom up with 2 strands DROPS Delight. Sizes: S - XXXL.
DROPS 178-27 |
|||||||||||||||||||
|
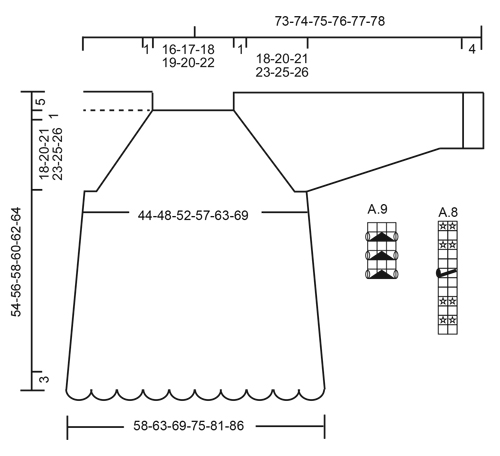
RIDGE/GARTER STITCH (worked back and forth): 1 ridge = knit 2 rows. CHANGING THE STRAND TIP: So that the transitions between colours in Delight are as neat as possible when changing balls, it is important to find a ball which starts with the colour the previous ball ended with. PATTERN: See diagrams A.1 to A.9. The diagrams show all the rows in the pattern seen from the right side. INCREASE TIP (for mid under the sleeve): Start 2 stitches before the marker thread, make 1 yarn over, knit 4 (the marker thread sits in the middle of these 4 stitches), make 1 yarn over. On the next round knit the yarn overs twisted to prevent holes. DECREASE TIP: Decrease 1 stitch by knitting 2 stitches together. To work out how to decrease evenly, count the total number of stitches on the needle (e.g. 88 stitches) and divide the number of stitches by the number of decreases to be made (e.g. 5) = 17.6. In this example you work approx. every 17th and 18th stitch together. RAGLAN: Decrease to raglan in each transition between body and sleeves. NOTE: In sizes S, M and XXL decreases are different on the body and sleeves as described in the text. Decrease as follows after A.9: Slip 1 stitch as if to knit, knit 1, pass the slipped stitch over (= 1 stitch decreased). Decrease as follows before A.9: Start 2 stitches before A.9 and knit 2 stitches together (= 1 stitch decreased). ---------------------------------------------------------- JUMPER: The piece is worked in the round with circular needle, from the bottom up. The sleeves are worked with double pointed needles. BODY: Cast on 270-297-324-351-378-405 stitches with circular needle size 5.5 mm with 1 strand in each colour (= 2 strands). Work A.1 (= 27 stitches) 10-11-12-13-14-15 times in width. When the whole of A.1 has been completed in height there are 230-253-276-299-322-345 stitches on the round. Work A.2 (= 23 stitches) over each repeat of A.1. Continue in this way until A.2 has been completed 3-3-3-3-3-4 times in height – READ CHANGING THE STRAND TIP! REMEMBER THE KNITTING TENSION! Work A.3 (= 23 stitches) 1 time in height. When the whole of A.3 has been completed in height there are 210-231-252-273-294-315 stitches on the round. Work A.4 (= 21 stitches) 2 times in height in all sizes. Work A.5 (= 21 stitches) 1 time in height. When the whole of A.5 has been completed in height there are 190-209-228-247-266-285 stitches on the round. Work A.6 (= 19 stitches) 3 times in height in all sizes. Then work A.7 (= 19 stitches). When A.7 has been completed in height there are 150-165-180-195-210-225 stitches on the round. Knit 1 round where you decrease 10-11-14-13-8-5 stitches evenly along the round = 140-154-166-182-202-220 stitches. Then work the next round as follows: Knit 32-35-38-42-47-52 stitches and insert 1 marker thread in the last stitch knitted, cast off 6 stitches for the armhole, knit 64-71-77-85-95-104 stitches and insert 1 marker thread in the first and last stitch knitted, cast off 6 stitches for the armhole, knit 32-36-39-43-48-52 stitches and insert 1 marker thread in the first stitch knitted. Put aside and work sleeves. SLEEVES: Cast on 32-34-36-40-42-46 stitches with double pointed needles size 4.5 mm with 1 strand in each colour (= 2 strands). Work pattern in the round according to diagram A.8. When A.8 has been completed 1 time in height change to double pointed needles size 5.5 mm. Insert 1 marker thread at the beginning of the round and allow the marker thread to follow the work upwards. Work stocking stitch in the round. When the piece measures 10-12-7-5-5-10 cm increase 2 stitches mid under the sleeve – READ INCREASE TIP. Increase in this way every 7th-5th-5th-5th-4th-4th round a total of 10-12-14-14-14-14 times = 52-58-64-68-70-74 stitches. When the piece measures 46-44-44-42-41-40 cm (shorter measurements in larger sizes due to wider neck and longer yoke) cast off 6 stitches mid under the sleeve (i.e. cast off 3 stitches on each side of the marker thread) = 46-52-58-62-64-68 stitches. Lay the piece to one side and work the other sleeve in the same way. YOKE: Place the sleeves on the same circular needle as the body where you have cast off stitches for the armholes (do this without working the stitches) = 220-246-270-294-318-344 stitches on the needle. There are now 4 marker thread in the piece (1 marker thread in each transition between body and sleeves). Continue by working stocking stitch and A.9 in each transition between body and sleeves (the stitches with marker threads are the middle stitches in A.9). AT THE SAME TIME on the first round start the decreases to RAGLAN – see the description above. NOTE: Decreases vary in the different sizes. SIZES S, M AND XXL: The decreases are different on body and sleeves. FRONT AND BACK PIECES: Decrease 1 stitch every 2nd round (= 4 stitches decreased on the round) a total of 18-20-25 times. SLEEVES: Decrease 1 stitch every 4th round a total of 2-2-1 times and every 2nd round (= 4 stitches decreased on the round) a total of 13-16-23 times. Change to short circular needle size 5.5 mm when the number of stitches has been sufficiently reduced. SIZES L, XL AND XXXL: Decrease 1 stitch on each side of each A.9 (= 8 stitches decreased on the round). Decrease in this way every 2nd round a total of 21-23-26 times. Change to short circular needle size 5.5 mm when the number of stitches has been sufficiently reduced. ALL SIZES: When all the decreases have been completed there are 88-94-102-110-122-136 stitches on the round. Work 1 round where you decrease 5-8-12-16-24-34 stitches evenly along the round – READ DECREASE TIP = 83-86-90-94-98-102 stitches. Change to short circular needle size 4.5 mm. Work 2 RIDGES – see description above and cast off. Make sure the cast-off edge is not tight! ASSEMBLY: Sew the openings under the sleeves. |
|||||||||||||||||||
Diagram explanations |
|||||||||||||||||||
|
|||||||||||||||||||
 |
|||||||||||||||||||
 |
|||||||||||||||||||
Have you finished this pattern?Tag your pictures with #dropspattern #springforestsweater or submit them to the #dropsfan gallery. Do you need help with this pattern?You'll find 26 tutorial videos, a Comments/Questions area and more by visiting the pattern on garnstudio.com. © 1982-2026 DROPS Design A/S. We reserve all rights. This document, including all its sub-sections, has copyrights. Read more about what you can do with our patterns at the bottom of each pattern on our site. |
|||||||||||||||||||


With over 40 years in knitting and crochet design, DROPS Design offers one of the most extensive collections of free patterns on the internet - translated to 17 languages. As of today we count 324 catalogues and 12290 patterns translated into English (UK/cm). 12290
We work hard to bring you the best knitting and crochet have to offer, inspiration and advice as well as great quality yarns at incredible prices! Would you like to use our patterns for other than personal use? You can read what you are allowed to do in the Copyright text at the bottom of all our patterns. Happy crafting!
Post a comment to pattern DROPS 178-27
We would love to hear what you have to say about this pattern!
If you want to leave a question, please make sure you select the correct category in the form below, to speed up the answering process. Required fields are marked *.