
Popular categories
Looking for a yarn?


Comments / Questions (41)
![]() Sol wrote:
Sol wrote:
Buenas tardes. Leyendo las instrucciones noto que no hay explicación para tejer una elevación en la espalda. Acaso no tiene elevación atrás? También quiero saber por qué pieza debo comenzar a tejer el canesú. Muchas gracias por su ayuda. Sol
10.09.2020 - 07:46DROPS Design answered:
Hola Sol, este patrón no tiene una elevación en la espalda. Para el canesú, normalmente se suele empezar en el marcapuntos entre la espalda y la manga izquierda (con la prenda puesta), y desde ahí, trabajar la manga izquierda y continuar con el delantero.
19.11.2020 - 20:51
![]() Sophie wrote:
Sophie wrote:
Bonjour, Je ne comprends pas les diminutions du raglan. Normalement, on ne diminue pas de la même façon avant et après la manche, sinon il y a des diminutions qui se retrouve sur la manche et non pas sur le corps du pull. On doit voir les diminutions de par et d'autres des manches. Et là, vous n'indiquez que les diminutions qui sont faites avant la manche. et après ? Merci
27.02.2020 - 21:09DROPS Design answered:
Bonjour Sophie, dans ce modèle, on va diminuer 8 mailles par tour de diminutions pour le raglan, autrement dit, on va diminuer au même rythme sur le dos/le devant et sur les manches comme expliqué sous RAGLAN: on tricote 2 m ens à l'end avant le marqueur, on a 2 m end pour le raglan (avec le marqueur au milieu) et après le marqueur on diminue avec 1 surjet simple (= on glisse 1 m à l'end, on tricote 1 m end et on passe la m glissée par-dessus la m tricotée). Bon tricot!
28.02.2020 - 08:02
![]() Pia östgård wrote:
Pia östgård wrote:
I diagrammet står det: ta 1 m löst av stickan som den skulle stickas rät, sticka 2 rm, dra den lyfta m över Men det ska väl stå: Sticka 2rm TILLSAMMANS , dra den lyfta maskan över.
16.02.2020 - 23:06DROPS Design answered:
Hej Pia. Nej de 2 maskorna ska inte stickas räta tillsammans, utan stickas som vanligt. Omslaget på nästa varv gör du sedan mellan dessa två maskor. Lycka till!
17.02.2020 - 09:11
![]() Ramaekers wrote:
Ramaekers wrote:
Beste Al jullie patronen zijn met een rondbreinaald te breien. Mijn vraag is of er ook patronen zijn die met 2 naalden gebreid worden? Met vriendelijke groeten Sonja
22.01.2020 - 09:42DROPS Design answered:
Dag Ramaekers,
Ja, er zijn ook patronen die met 2 naalden gebreid worden, dit zijn meestal de wat oudere patronen. Maar we hebben ook een instructie gemaakt hoe je een patroon aan kunt passen om met rechte naalden te breien, deze vindt je hier
26.01.2020 - 14:54
![]() Anne wrote:
Anne wrote:
Bonsoir, j'aimerais savoir si ce pull peut être tricoté en aller retour. Si c'est le cas, tous les rangs sont-ils représentés sur les diagrammes ou seulement les rangs impairs ? Vous remerciant.
04.01.2020 - 22:42DROPS Design answered:
Bonjour Anne, vous trouverez ici quelques informations sur l'ajustement d'un modèle sur aiguilles droites et toutes les infos sur les diagrammes ici. Bon tricot!
06.01.2020 - 08:18
![]() Karine wrote:
Karine wrote:
Mul tekkis küsimus kuidas mahutada ära: KEHAOSA Loo üles 192-216-240-264-288-312 silmust 3,5 mm sukavarrastele Belle lõngaga.
27.10.2019 - 10:18DROPS Design answered:
Tere! Kardetavasti läheb selleks väga palju sukavardaid vaja, aga ringvarrastega on palju lihtsam! Tänan, viga parandatud! Head kudumist!
29.10.2019 - 19:27
![]() Evelyne wrote:
Evelyne wrote:
Bonsoir, quand vous dites diminuer 13 fois avant et après le marqueur et diminuer 5 fois faut il faire d abord les 13 augmentations puis les 5 ou en même temps ?
17.05.2019 - 23:19DROPS Design answered:
Bonjour Évelyne, on augmente 2 mailles par tour d'augmentations (= 1 m de chaque côté du marqueur), et vous répétez ces augmentations encore 12 fois tous les 2,5 cm puis 5 fois tous les 2 cm = 91 m (soit 13x2 m + 5 x2 m = 19 x 2 m = 38 m augmentées au total). Bon tricot!
20.05.2019 - 14:33
![]() Stefania wrote:
Stefania wrote:
Salve vorrei realizzare il modello sentinel nel filto Puna. E' possibile? Devo mantenere lo stesso numero di maglie e di ferri indicati nello schema? Grazie Saluti
04.02.2019 - 06:52DROPS Design answered:
Buongiorno Stefania. Il filato Puna appartiene allo stesso gruppo di filati del filato proposto. Può quindi usare Puna. Verifichi di ottenere lo stesso campione indicato nelle spiegazioni. Buon lavoro!
04.02.2019 - 09:00
![]() Elena wrote:
Elena wrote:
Gracias por responder a mi pregunta , espero hacerlo bien y cualquier duda pediré ayuda por favor.Saludos
03.10.2018 - 05:39Elena wrote:
Por favor no se como unir la manga con el cuerpo para continuar con la manga ranglan en el modelo 174-2 El vídeo de unión que hay no es la unión muy clara. Agradezco una explicación más clara para poder continuar pues estoy en espera por este detalle muy importante. Saludos
29.09.2018 - 03:07DROPS Design answered:
Hola Elena. Para unir las mangas al cuerpo trabajamos de la siguiente manera. Primero cerramos en el cuerpo los puntos necesarios (según la talla) para las sisas. Ahora vamos a colocar las mangas: trabajamos los puntos de la espalda y,con la misma aguja, (en la que están los puntos de la espalda) trabajamos los puntos de una manga, seguimos con la misma aguja y trabajamos los puntos del delantero y para finalizar trabajamos los puntos de la otra manga.
29.09.2018 - 19:56
|
||||||||||||||||||||||
Sentinel#sentinelsweater |
||||||||||||||||||||||
 |
 |
|||||||||||||||||||||
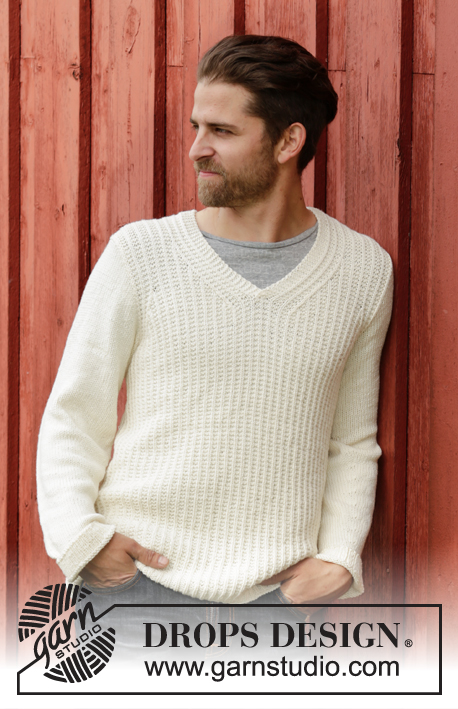
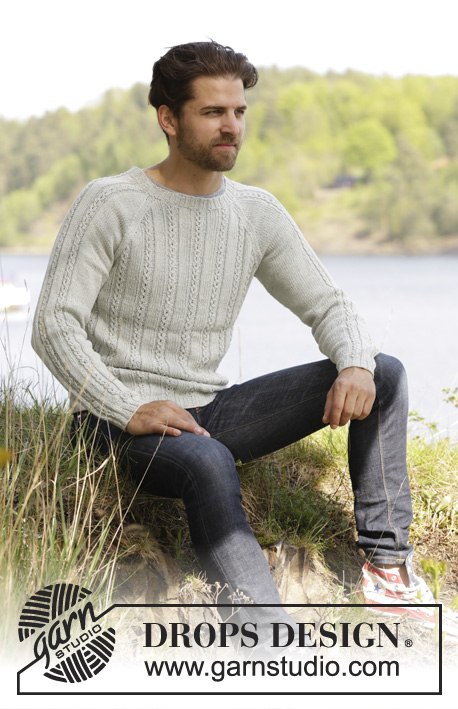
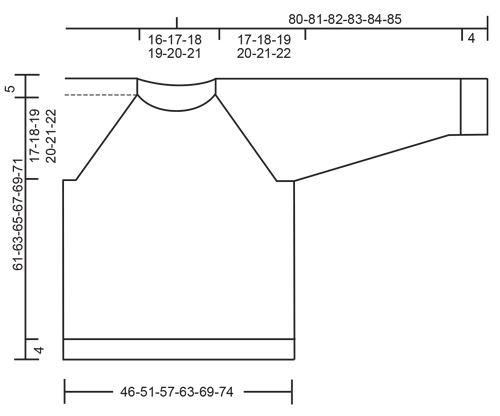
Knitted DROPS men’s jumper with cables and raglan in Belle. Size: S - XXXL.
DROPS 174-2 |
||||||||||||||||||||||
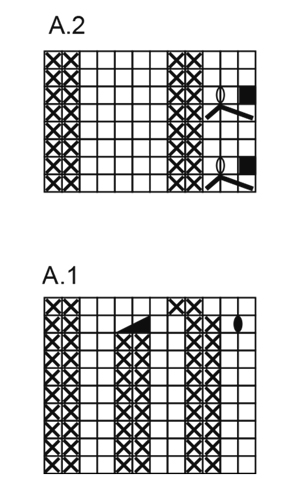
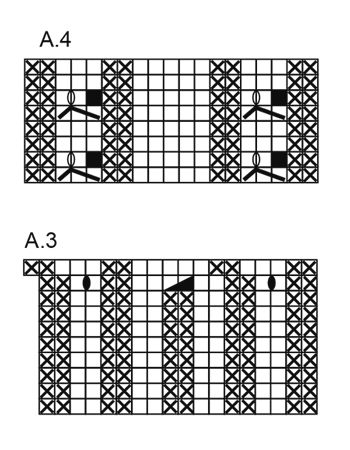
|
GARTER ST (in the round on circular needle): * K 1 round and P 1 round *, repeat from *-*. 1 ridge = 2 rounds. PATTERN: See diagrams A.1 to A.4. RAGLAN: Dec 2 sts in every transition between body and sleeves. Dec as follows from RS: Beg 3 sts before marker and work as follows: K 2 tog, K 2 (marker is between these 2 sts), slip 1 st as if to K, K 1, psso. ---------------------------------------------------------- JUMPER: Worked in the round on circular needle. BODY: Cast on 192-216-240-264-288-312 sts on circular needle size 3.5 mm with Belle. K 1 round, on next round work A.1 (= 12 sts) over all sts (16-18-20-22-24-26 repetitions). When A.1 has been worked 1 time vertically, switch to circular needle size 4 mm and continue with A.2 over A.1. REMEMBER THE KNITTING TENSION When piece measures 44-45-46-47-48-49 cm, cast off for armholes in each side as follows: Work the first 87-99-111-123-135-147 sts (= front piece), cast off the next 9 sts (= P 2 + K 5 + P 2), work the next 87-99-111-123-135-147 sts (= back piece), cast off the last 9 sts. Put piece aside and knit the sleeves. SLEEVE: Worked in the round on double pointed needles. Cast on 52-52-56-56-60-60 sts on double pointed needle size 3.5 mm with Belle. Insert 1 marker at the beg of round. K 1 round, then work as follows: Size S + M + XXL + XXXL: K 1, * P 2, K 2 *, repeat from *-* over the next 16-16-20-20 sts, A.3 (= 18 sts), * K 2, P 2 *, repeat from *-* over the next 16-16-20-20 sts, finish with K 1. Size L + XL: P 1, K 2, * P 2, K 2 *, repeat from *-* over the next 16-16 sts, A.3 (= 18 sts), * K 2, P 2 *, repeat from *-* over the next 16-16 sts, finish with K 2 and P 1. When A.3 has been worked, there are 53-53-57-57-61-61 sts on round. Switch to double pointed needles size 4 mm. Continue as follows: Stocking st over the first 17-17-19-19-21-21 sts, AT THE SAME TIME dec 1-0-1-0-1-0 sts evenly, A.4 over A.3, stocking st over the next 17-17-19-19-21-21 sts, AT THE SAME TIME dec 1-0-1-0-1-0 sts evenly = 51-53-55-57-59-61 sts. Continue with stocking st and A.4. When piece measures 8 cm, inc 1 st on each side of marker. Inc every 3½-3-2½-2½-2-2 cm 10-12-13-14-20-21 times in total, then every 2 cm 5-5-5-5-0-0 times = 81-87-91-95-99-103 sts. Work inc sts in stocking st. When piece measures 55-55-54-53-52-52 cm (NOTE! Shorter measurements in the larger sizes because of longer raglan dec and larger neck width) cast off the 4 sts on each side of marker = 73-79-83-87-91-95 sts. Put piece aside and knit another sleeve. YOKE: Slip sleeves on to same circular needle as body where armholes were cast off = 320-356-388-420-452-484 sts. Insert 1 marker in all transitions between sleeves and body (= 4 markers). Continue with pattern over sts on body and pattern and in stocking st as before on sleeves, AT THE SAME TIME on next round beg dec for RAGLAN – see explanation above (= 8 sts dec). Repeat dec on every other round 21-21-22-23-24-25 more times and then on every round 2-5-6-7-8-9 times. After all dec for raglan 128-140-156-172-188-204 sts remain on round. Work 1 ridge in GARTER ST - see explanation above AT THE SAME TIME on first round dec 12-20-32-44-56-68 sts evenly = 116-120-124-128-132-136 sts. Work rib K 2/P 2, cast off with K over K and P over P when rib measures approx. 3 cm. ASSEMBLY: Sew the opening under the sleeves. |
||||||||||||||||||||||
Diagram explanations |
||||||||||||||||||||||
|
||||||||||||||||||||||
 |
||||||||||||||||||||||
 |
||||||||||||||||||||||
 |
||||||||||||||||||||||
Have you finished this pattern?Tag your pictures with #dropspattern #sentinelsweater or submit them to the #dropsfan gallery. Do you need help with this pattern?You'll find 27 tutorial videos, a Comments/Questions area and more by visiting the pattern on garnstudio.com. © 1982-2026 DROPS Design A/S. We reserve all rights. This document, including all its sub-sections, has copyrights. Read more about what you can do with our patterns at the bottom of each pattern on our site. |
||||||||||||||||||||||


With over 40 years in knitting and crochet design, DROPS Design offers one of the most extensive collections of free patterns on the internet - translated to 17 languages. As of today we count 324 catalogues and 12290 patterns translated into English (UK/cm). 12290
We work hard to bring you the best knitting and crochet have to offer, inspiration and advice as well as great quality yarns at incredible prices! Would you like to use our patterns for other than personal use? You can read what you are allowed to do in the Copyright text at the bottom of all our patterns. Happy crafting!
Post a comment to pattern DROPS 174-2
We would love to hear what you have to say about this pattern!
If you want to leave a question, please make sure you select the correct category in the form below, to speed up the answering process. Required fields are marked *.