
Popular categories
Looking for a yarn?


Comments / Questions (53)
![]() Jenny wrote:
Jenny wrote:
Können Sie bitte einen Blick auf meinen Kommentar vom 27.8. werfen? Danke!
13.10.2025 - 13:48DROPS Design answered:
Liebe Jenny, wenn Sie die Maschen für die Armlöcher abgettet haben und jedes Teil separat stricken, wird man genauso wie zuvor stricken, nur mit weniger Maschen wegen Abnahmen für Armloch. Oder misverstehe ich was Sie meinten?
17.10.2025 - 15:48
![]() Gun Löfroth wrote:
Gun Löfroth wrote:
När arbetet ska delas i bakstycke och framstycken, så fattas beskrivningen för S+L+XXXL. Är det fel i mönsterbeskrivningen?
12.10.2025 - 20:01DROPS Design answered:
Hej Gun. Beskrivningen ska finnas där. Det står såhär "När arb mäter 37-38-39-40-41-42 cm maskas de mittersta 4-6-6-8-10-12 m i varje sida av för ärmhål (dvs maska av 2-3-3-4-5-6 m på varje sida av båda markörerna). Fram- och bakst stickas färdig var för sig." Efter det fortsätter du som beskrivet under BAKST. Mvh DROPS Design
13.10.2025 - 14:21
![]() Jenny wrote:
Jenny wrote:
Hallo, es fehlt der wichtige Hinweis, dass die Maschenzahl ab der Trennung immer auf die Reihen mit weniger Maschen, also gerade nach einem Überzug aus A.4, gezählt werden. Ich habe nach einer vollen Reihe angekettet und ewig gerätselt, wieso ich zu viele Maschen habe. Denn dann haut das auch mit den Abnahmen am Ärmel alles nicht hin.
27.08.2025 - 18:06
![]() Truus Van Pel wrote:
Truus Van Pel wrote:
Vraag je hebt het boord in patroon gebreid en geminderd nu moet ik door breien in tricot tot 8cm en aan beide kanten markeerder gaan minderen .Is dit inclusief boord of 8 cm na het boord en dan gaan minderen elke 5cm
23.07.2025 - 16:17DROPS Design answered:
Dag Truus,
De 8 cm is gemeten vanaf het opzetten, dus inclusief boord.
23.07.2025 - 19:37
![]() Teresa Della Pietra wrote:
Teresa Della Pietra wrote:
Ho diviso il lavoro per usare i ferri dritti quindi ho avviato esattamente metà maglie meno quelle per il bordo davanti (151 m). Perché in centimetri ottengo una larghezza dietro di 72 (cm) circa anziché 54 come da modello? Preciso che ho fatto il campione e la tensione è perfetta.
01.03.2025 - 12:16DROPS Design answered:
Buonasera Teresa, questo modello è un cardigan, ed è lavorato in piano, per cui può usare i ferri dritti seguendo le stesse istruzioni. Buon lavoro!
01.03.2025 - 19:17
![]() Wewndy Silverman wrote:
Wewndy Silverman wrote:
I am confused by the directions in the A2 section where it says to decrease on the last row. I should decrease 5 stitches evenly across row and have 329 stitches remaining (for size XXXL). I f I started out with 380 stitches before last row and decrease 5 stitches, I should have 375 stitches. I would have to decrease by 51 stitches to end up with 329 stitches. Please explain what I am not understanding. Thanks so much!
12.12.2024 - 03:21DROPS Design answered:
Dear Wewndy, remember that on the last row of A.2 you already have 1 decrease. Since you work A.2 over each repeat of A.1 you should have 46 repeats of A.2 (and, therefore, 46 decreases in A.2). Apart from these 46 decreases, decrease 5 extra stitches as stated. So you decrease 46+5 = 51 stitches. Happy knitting!
15.12.2024 - 19:34
![]() Marja Stravers wrote:
Marja Stravers wrote:
Hallo, kan ik dit vestje ook zonder rondbreinaald breien? Op 2 naalden dus?
08.06.2024 - 18:40DROPS Design answered:
Dag Marja,
Om een patroon aan te passen om op rechte naalden te breien hebben we een instructie gemaakt. Deze vind je hier.
09.06.2024 - 16:47
![]() Flaso wrote:
Flaso wrote:
Bonjour, je veux éviter la couture des manches. Je veux relever des mailles (sur l'emmanchure) pour les manches puis continuer à tricoter du haute vers le bas, mais seulement pour quelques centimètres de hauteurs. Ensuite, je veux tricoter les manches du bas vers le haut comme écrit dans l'explication (tricoter jusqu'au 74 mailles (taille M) après avoir augmenté 9 fois). Ensuite, je veux faire grafting pour rassembler les 2 parties des manches (le bas et le haut). (voir la suite)
06.01.2024 - 00:40
![]() Flaso wrote:
Flaso wrote:
(la suite de ma question) Je ne sais pas comment je peux rabattre des mailles si j'utilise cette méthode pour rassembler des 2 parties des manches. Est il possible de tricoter les manches comme ce que je viens de vous dire ? Merci pour votre retour.
05.01.2024 - 18:45DROPS Design answered:
Bonjour Mme Flaso, les manches se tricotent ici en rond sur aiguilles doubles pointes, lorsque vous avez atteint la hauteur requise, vous continuez en allers et retours à partir du milieu sous la manche et rabattez de chaque côté pour l'arrondi de la manche, autrement dit vous allez rabattre les mailles en début de rang sur l'endroit et sur l'envers comme indiqué, la manche va mesurer 42 ou 43 cm selon la taille. Bon tricot!
08.01.2024 - 09:37
![]() Lydia wrote:
Lydia wrote:
Bonjour, Je ne comprends pas trop cette partie (je tricote la taille M) "Glisser maintenant les 15 m côté milieu devant sur un arrêt de mailles pour l'encolure (les tricoter avant de les mettre en attente pour ne pas avoir à couper le fil). " Que fait on après avoir mettre ces 15m en attente ? Pourquoi ne rabat-on pas ces mailles qui sont en attente ?
20.12.2023 - 16:05DROPS Design answered:
Bonjour Lydia, on ne rabat pas ces mailles pour conserver suffisamment de souplesse pour le col, et, lorsque vous tricoterez le col, vous tricoterez d'abord ces mailles, puis vous relèverez les mailles autour de l'encolure et tricoterez ces mailles en attente du devant gauche. Bon tricot!
21.12.2023 - 08:45
|
|||||||||||||||||||
Golden Blossom#goldenblossomcardigan |
|||||||||||||||||||
|
|
|||||||||||||||||||
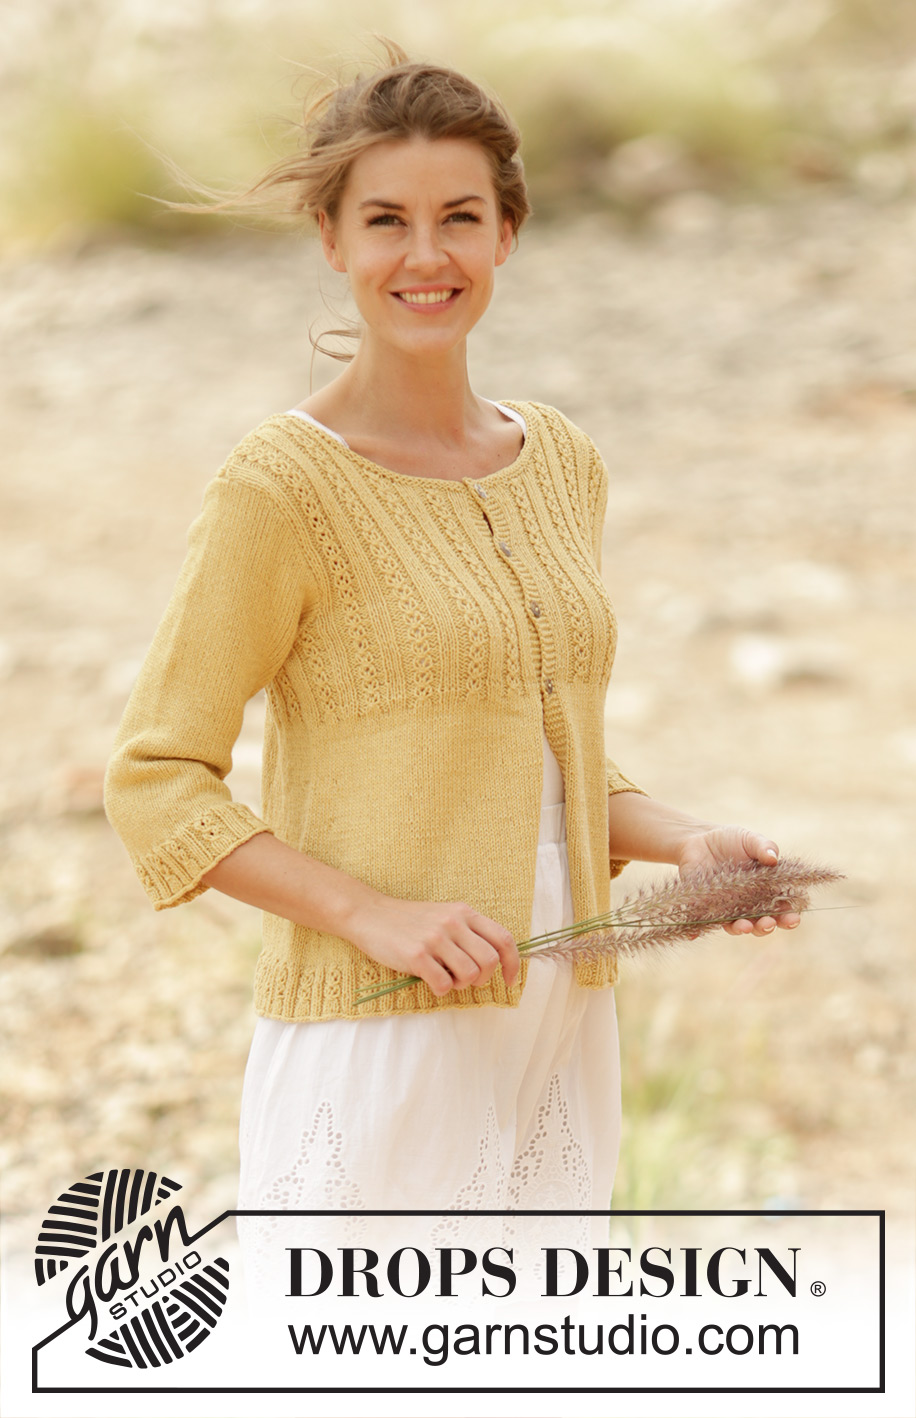
Knitted DROPS jacket with lace edge on yoke and ¾ sleeves in "Belle". Size: S - XXXL.
DROPS 170-29 |
|||||||||||||||||||
|
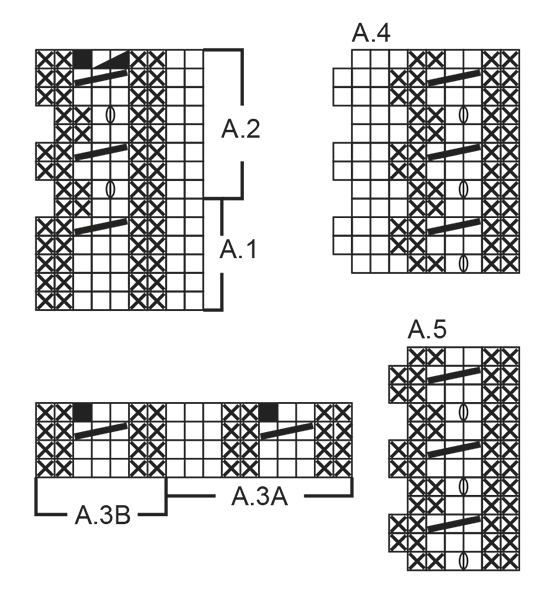
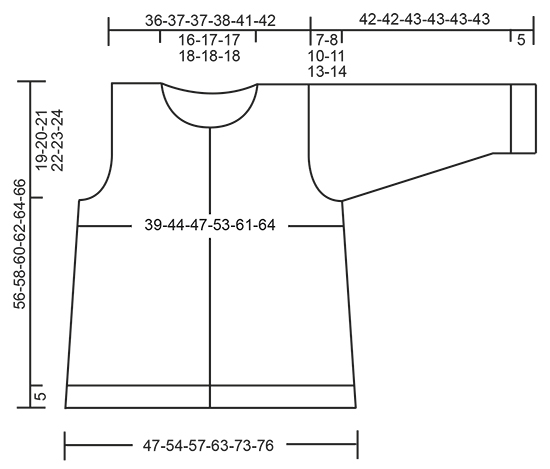
GARTER ST (back and forth): K all rows. 1 ridge = 2 rows K. PATTERN: See diagrams A.1 to A.5. The diagrams show all rows in pattern seen from RS. DECREASE TIP (applies to sides of body): All dec are done from RS! Dec on each side of marker in each side on body as follows: Beg 6 sts before marker and K 2 tog, K 8 (marker is between these 8 K sts), slip 1 st as if to K, K 1, psso (= 2 sts dec). INCREASE TIP (applies to mid under sleeve): Inc 1 st on each side of the middle 4 sts under sleeve as follows: Beg 2 sts before marker mid under sleeve, make 1 YO, work 4 sts in stocking st and make 1 YO (= 2 sts inc). On next round K YOs twisted to avoid holes (= 2 sts inc). BUTTONHOLES: Dec for buttonholes on right band. 1 buttonhole = cast off third and fourth st from edge and cast on 2 new sts on next row over these sts. Dec for buttonholes when piece measures: SIZE S: 28, 35, 41 and 48 cm SIZE M: 28, 35, 43 and 50 cm SIZE L: 29, 37, 44 and 52 cm SIZE XL: 30, 37, 45 and 52 cm SIZE XXL: 31, 39, 46 and 54 cm SIZE XXXL: 32, 40, 48 and 56 cm ---------------------------------------------------------- BODY: The piece is worked back and forth from mid front on circular needle because of no of sts. Cast on 282-309-327-354-408-426 sts (incl 5 band sts in each side towards mid front) on circular needle size 3.5 mm with Belle. P 1 row from WS. Work next row as follows from RS: 5 band sts in GARTER ST- see explanation above, work pattern according to diagram A.1 until 7 sts remain on row (= 30-33-35-38-44-46 repetitions of 9 sts), work 2 sts in stocking st and finish with 5 band sts in garter st. Continue pattern like this until A.1 has been worked 1 time vertically = 252-276-292-316-364-380 sts remain on needle. Then work pattern according to diagram A.2 the same way - NOTE: On last row in A.2 dec in addition 13-8-8-3-5-5 sts evenly (dec in P-sections and do not dec over bands) = 209-235-249-275-315-329 sts on needle. After A.2 switch to circular needle size 4 mm. Insert 2 markers in the piece; 54-62-64-72-82-84 sts in from each side = 101-111-121-131-151-161 sts between markers on back piece. Then work in stocking st with 5 band sts in garter st in each side towards mid front. REMEMBER THE KNITTING TENSION. When piece measures 8 cm, dec 1 st on each side of both markers - READ DECREASE TIP(= 4 sts dec). Repeat dec every 4-4-4-4½-5-5 cm a total of 5 times in each side = 189-215-229-255-295-309 sts. When piece measures 28-28-29-30-31-32 cm, dec for BUTTONHOLES on right band - see explanation above! AT THE SAME TIME work next row as follows from RS: SIZE S + L + XXXL: 5 band sts as before, P 2, K 3, work pattern according to diagram A.3A over the next 30-40-60 sts (= 3-4-6 repetitions of 10 sts), work A.3B (= 7 sts), 4 sts in stocking st (marker in the side is in the middle of these 4 sts), work A.3A over the next 80-100-140 sts (= 8-10-14 repetitions of 10 sts), work A.3B (= 7 sts), 4 sts in stocking st (marker is in the middle of these 4 sts), work A.3A over the next 30-40-60 sts, work A.3B (= 7 sts), K 3, P 2 and 5 band sts as before. When A.3A/A.3B have been worked 1 time vertically, 172-208-280 sts remain on needle. SIZE M + XL + XXL: 5 band sts as before, K 3, work pattern according to diagram A.3A over the next 40-50-60 sts (= 4-5-6 repetitions of 10 sts), work A.3B (= 7 sts), 4 sts in stocking st (marker in the side is in the middle of these 4 sts), work A.3A over the next 90-110-130 sts (= 9-11-13 repetitions of 10 sts), work A.3B (= 7 sts), 4 sts in stocking st (marker is in the middle of these 4 sts), work A.3A over the next 40-50-60 sts, work A.3B (= 7 sts), K 3 and 5 band sts as before. When A.3A/A.3B have been worked 1 time vertically, 195-231-267 sts remain on needle. Continue to work pattern as follows (1st row = RS): SIZE S + L + XXXL: 5 band sts as before, P 2, K 3, work pattern according to diagram A.4 over the next 27-36-54 sts (= 3-4-6 repetitions of 9 sts), work A.5 (= 6 sts), 4 sts in stocking st (marker in the side is in the middle of these 4 sts), work A.4 over the next 72-90-126 sts (= 8-10-14 repetitions of 9 sts), work A.5 (= 6 sts), 4 sts in stocking st (marker is in the middle of these 4 sts), work A.4 over the next 27-36-54 sts, work A.5 (= 6 sts), K 3, P 2 and 5 band sts as before. Continue pattern like this. SIZE M + XL + XXL: 5 band sts as before, K 3, work pattern according to diagram A.4 over the next 36-45-54 sts (= 4-5-6 repetitions of 9 sts), work A.5 (= 6 sts), 4 sts in stocking st (marker in the side is in the middle of these 4 sts), work A.4 over the next 81-99-117 sts (= 9-11-13 repetitions of 9 sts), work A.5 (= 6 sts), 4 sts in stocking st (marker is in the middle of these 4 sts), work A.4 over the next 36-45-54 sts, work A.5 (= 6 sts), K 3 and 5 band sts as before. Continue pattern like this. When piece measures 37-38-39-40-41-42 cm, cast off the middle 4-6-6-8-10-12 sts in each side for armholes (i.e. cast off 2-3-3-4-5-6 sts on each side of both markers). Finish front and back piece separately. BACK PIECE: = 78-85-94-101-117-124 sts. Continue with the pattern as before while AT THE SAME TIME cast off for armhole at beg of every row in each side as follows: Cast off 2 sts 0-1-2-3-4-5 times and then 1 st 1-2-4-5-7-8 times = 76-77-78-79-87-88 sts remain on needle. When piece measures 54-56-58-60-62-64 cm, cast off the middle 32-33-34-35-35-36 sts for neck and finish each shoulder separately. Continue pattern as before and cast off 1 st on beg on next row from neck = 21-21-21-21-25-25 sts remain on the shoulder. Continue pattern as before with 1 edge st in garter st towards the neck until piece measures 56-58-60-62-64-66 cm and loosely cast off. Repeat on the other shoulder. RIGHT FRONT PIECE: = 43-49-51-57-65-66 sts. Continue pattern as before and cast off for armhole in the side as on back piece = 42-45-43-46-50-48 sts. Work until piece measures approx. 48-50-52-52-54-56 cm (1-2 rows should be worked after last buttonhole on band). Now slip the outermost 12-15-13-16-16-14 sts towards mid front on 1 stitch holder for neck (work them before slipping them on stitch holder to avoid cutting the yarn). Continue to cast off for neck at beg of every row from neck as follows: Cast off 2 sts 3 times and 1 st 3 times = 21-21-21-21-25-25 sts remain on shoulder. Continue pattern as before with 1 edge st in garter st towards the neck until piece measures 56-58-60-62-64-66 cm and loosely cast off. LEFT FRONT PIECE: = 43-49-51-57-65-66 sts. Work as right but reversed - NOTE: Do not dec for buttonholes on left band. SLEEVE: Worked in the round on double pointed needles. Cast on 72-72-81-81-90-90 sts on double pointed needle size 3.5 mm with Belle. K 1 round. Then work pattern in the round according to diagram A.1 (= 8-8-9-9-10-10 repetitions of 9 sts). When A.1 has been worked 1 time vertically, there are 64-64-72-72-80-80 sts on needle. Then work pattern in the round according to diagram A.2 the same way - NOTE: On last round in A.2 dec in addition 0-0-3-1-6-4 sts evenly (dec in P-sections) = 56-56-60-62-64-66 sts. After A.2 switch to double pointed needles size 4 mm. Insert 1 marker at beg of round (= mid under sleeve) and work in stocking st in the round. When piece measures 8 cm, inc 2 sts mid under sleeve - READ INCREASE TIP (= 2 sts inc). Repeat inc a total of 6-9-9-11-13-15 times. In size S: On every 14th round, in size M: On every 8th round, in size L: Alternately on every 7th and 8th round, in size XL: On every 6th round, in size XXL: Alternately on every 4th and 5th round and size XXXL: Alternately on every 3rd and 4th round = 68-74-78-84-90-96 sts. When piece measures 35-34-33-32-30-29 cm (NOTE: Shorter measurements in the larger sizes because of wider shoulders and longer sleeve cap), cast off the middle 4-6-6-8-10-12 sts under sleeve and finish sleeve back and forth on needle. Continue with stocking st and cast off for sleeve cap at beg of every row in each side as follows: Cast off 2 sts 3-3-4-4-4-4 times and 1 st 2-2-4-5-8-10 times, then cast off 2 sts in each side until piece measures 41-41-42-42-42-42 cm. Cast off 3 sts at beg of the next 2 rows and loosely cast off the remaining sts. Sleeve measures approx. 42-42-43-43-43-43 cm. Knit another sleeve. ASSEMBLY: Sew the shoulder seams. Sew in sleeves. NECK EDGE: Pick up around the neck from RS inside 1 edge st approx. 98 to 112 sts (incl sts on stitch holders at the front) on circular needle size 3.5 mm. K 3 rows and then loosely cast off with K from RS. Sew the buttons on to the left band. |
|||||||||||||||||||
Diagram explanations |
|||||||||||||||||||
|
|||||||||||||||||||
 |
|||||||||||||||||||
 |
|||||||||||||||||||
Have you finished this pattern?Tag your pictures with #dropspattern #goldenblossomcardigan or submit them to the #dropsfan gallery. Do you need help with this pattern?You'll find 29 tutorial videos, a Comments/Questions area and more by visiting the pattern on garnstudio.com. © 1982-2026 DROPS Design A/S. We reserve all rights. This document, including all its sub-sections, has copyrights. Read more about what you can do with our patterns at the bottom of each pattern on our site. |
|||||||||||||||||||


With over 40 years in knitting and crochet design, DROPS Design offers one of the most extensive collections of free patterns on the internet - translated to 17 languages. As of today we count 324 catalogues and 12290 patterns translated into English (UK/cm). 12290
We work hard to bring you the best knitting and crochet have to offer, inspiration and advice as well as great quality yarns at incredible prices! Would you like to use our patterns for other than personal use? You can read what you are allowed to do in the Copyright text at the bottom of all our patterns. Happy crafting!
Post a comment to pattern DROPS 170-29
We would love to hear what you have to say about this pattern!
If you want to leave a question, please make sure you select the correct category in the form below, to speed up the answering process. Required fields are marked *.