
Popular categories
Looking for a yarn?


Comments / Questions (183)
![]() Caroline wrote:
Caroline wrote:
Bonjour, concernant le short Elly May, concernant le début quand on doit placer les marqueurs pour préparer le point fantaisie AX1, faut il démarrer le rang avec 3 brides (dont 3 ml en l'air compte comme 1 bride), ensuite encore 3 B ? (puisque vous mentionnez A1=3B) et à partir de là faire "5B, A1(3 brides). Donc au début du rang il y aurait 6 brides avant le point fantaisie ? Ou c'est 3 brides et après on fait "5B, A1" C'est pas très clair pour moi. Merci
25.05.2024 - 09:44DROPS Design answered:
Bonjour Caroline, on a 2 marqueurs: 1 de chaque côté du short; A.1 se crochète sur 3 brides et on doit avoir 5 brides entre chaque A.1, et on commence par 3 brides au début du tour avant le 1er A.1 et on termine par 2 brides après le dernier A.1 du tour (autrement dit, les tours commencent au milieu d'une section de 5 brides entre 2 A.1), vous aurez donc: 3 brides, (A.1, 3 brides) jusqu'à ce qu'il reste 5 brides, A.1 et 2 brides. Bon crochet!
27.05.2024 - 08:02
![]() Dominika wrote:
Dominika wrote:
Dlaczego w wersji angielskiej robimy na początku słupki a w wersji polskiej jest napisane oczko ścisłe?
20.04.2024 - 20:10DROPS Design answered:
Witaj Dominiko, po wykonaniu łańcuszka wykonujemy oczka ścisłe (w polskiej terminologii funkcjonujące również jako półsłupki). Jak wykonać to oczko znajdziesz TUTAJ. W kolejnym okrążeniu są już wykonywane słupki, Pozdrawiamy!
21.04.2024 - 19:23
![]() Emanuela wrote:
Emanuela wrote:
Buongiorno, avviando 224 catenelle, come indicato per una tg. S/M, mi viene un giro vita larghissimo. È possibile che sbagli qualcosa? Grazie
16.03.2024 - 23:12DROPS Design answered:
Buonasera Emanuela, non ci sono errori nel numero di catenelle di avvio, nel primo giro vengono diminuite. Buon lavoro!
17.03.2024 - 18:18
![]() Laura Silvestri wrote:
Laura Silvestri wrote:
Buonasera. Sono arrivata a finire il giro di maglie alte che suddivise in 3, 5, 3, 5 .. costituiscono il diagramma A1. Devo iniziare A1x, ora vedendo il video, si osserva che il motivo è preceduto da 1 maglia saltata così come dopo, questo riduce le maglie lavorate ai lati del motivo a 3 invece che 5 ma in figura con la modella ne conto sempre 5. Forse omi servirebbe uno schema più ampio che descriver il modello A1 ed A1x così da capire le ripetizioni. Grazie
14.01.2024 - 19:25DROPS Design answered:
Buonasera Laura, non ci sono errori nel modello. Buon lavoro!
17.03.2024 - 21:09
![]() Caroline wrote:
Caroline wrote:
Bonjour, je suis à 6 rgs de brides et j'ai déjà 5 cm de hauteur. Pour les augm. milieu du dos, que me conseilleriez vous pour avoir la bonne dimension : dois je commencer les diminutions un peu avant 15 cm ou faire moins d'augmentations (au lieu de 10 fois tous les tours, j en fais moins (8 par ex. ?) Merci !
17.09.2023 - 09:14DROPS Design answered:
Bonjour Caroline, votre tension en hauteur n'a pas l'air juste, essayez de tirer vos brides un peu moins en hauteur, ce sera bien plus simple, sinon vous devrez effectivement faire les ajustements nécessaires pour avoir la bonne forme et les bonnes mesures en fonction de votre propre tension et des mesures à obtenir - votre magasin peut vous y aider (même par mail ou téléphone); ou bien vous pouvez aussi demander à d'autres crocheteuses via notre DROPS Workshop; merci pour votre compréhension.. Bon crochet!
18.09.2023 - 08:37
![]() Caroline wrote:
Caroline wrote:
En même temps, ces 225 brides me permettent de pouvoir avoir 4 brides entre les futures augmentations comme vous me l'avez expliqué. Donc ça doit bien faire 225 ml au total
13.09.2023 - 09:01
![]() Caroline wrote:
Caroline wrote:
Bonjour, après les 2 rangs (1 rang brides avec marqueurs "5 brides -2 brides", 2 rg point fantaisie) en recomptant, j'ai 224 brides + 3 ml en l'air=225 ml. Est ce normal
13.09.2023 - 08:57DROPS Design answered:
Bonjour Caroline, vous devez avoir 224 mailles, la 1ère bride est remplacée par 3 mailles en l'air, cela vient peut-être de là?
13.09.2023 - 13:18
![]() Cattaneo wrote:
Cattaneo wrote:
Rebonjour, merci pour vos précisions concernant l augmentation des côtés. J'ai bien compris. Mais pour être bien sûre, ces augmentations il faut les démarrer après les rangs : 1 rang de brides (A1), 1 rang point fantaisie (Ax), donc au 3eme rang ou alors en même temps que le rang Ax ? Après je serai sûre de moi, merci 🙂
12.09.2023 - 14:00DROPS Design answered:
Bonjour Mme Cattaneo, vous crochetez d'abord A.1 en hauteur (= 3 rangs) puis répétez A.X en augmentant en même temps au 1er rang de A.X, autrement dit, les 3 premiers rangs de A.1 se font sans augmenter, vous ne commencez à augmenter que lorsque vous crochetez A.X la 2ème fois en hauteur. Bon crochet!
12.09.2023 - 17:17
![]() Cattaneo wrote:
Cattaneo wrote:
Bonjour, concernant l\'augmentation sur les côtés , dans la 3eme bride après le 7eme et 21eme motif: le \"motif\" c\'est bien \"3 brides-5 brides\" et on augmente dans la 3eme bride des 5 brides ? Et quand vous dites \"après le 7eme motif\" c\'est donc au 8eme motif ou alors dans le 7eme motif (c\'est pas clair pour moi car c\'est écrit \"après\".
11.09.2023 - 20:07DROPS Design answered:
Bonjour Mme Cattaneo, vous allez mettre un marqueur dans la bride au milieu des 5 brides entre 2 A.1, vous aurez ainsi: le 7ème A.1 depuis le début du tour, 2 brides, 1 bride avec 1 marqueur, 2 brides, continuez avec alternativement A.1 et 5 brides, puis après le 21 ème A.1, vous aurez à nouveau 2 brides 1 bride avec 1 marqueur, 2 brides, continuez alternativement avec A.1 et 5 brides jusqu'à la fin du tour. En espérant que ce soit plus clair ainsi. Bon crochet!
12.09.2023 - 09:04
![]() Cattaneo wrote:
Cattaneo wrote:
Bonjour, juste une précision : comme j'ai dû recommencer, au niveau du rang A1 où l'on fait 224 brides avant de faire le rang A1x, il faut inclure les 3 ml en l air dans les 224 brides où c'est 224 brides + 3 ml en l'air ?
06.09.2023 - 08:06DROPS Design answered:
Bonjour Mme Cattaneo, les 3 mailles en l'air du début du rang remplacent la 1ère bride (cf. INFO CROCHET, ainsi, vous devez avoir 3 mailles en l'air + 223 brides au total. Bon crochet!
06.09.2023 - 09:26
|
||||||||||||||||||||||||||||
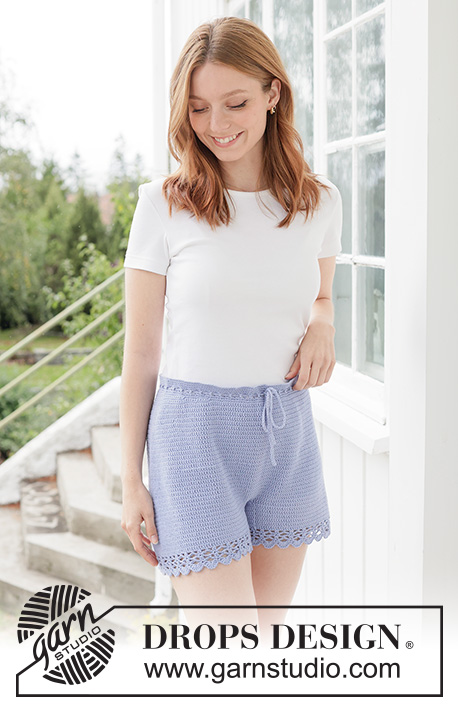
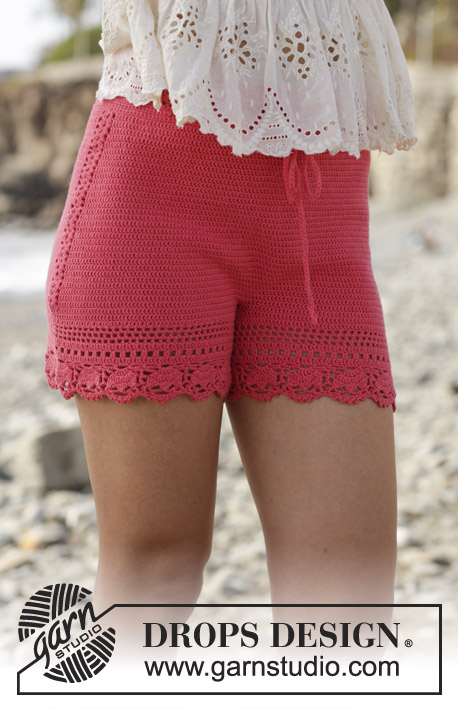
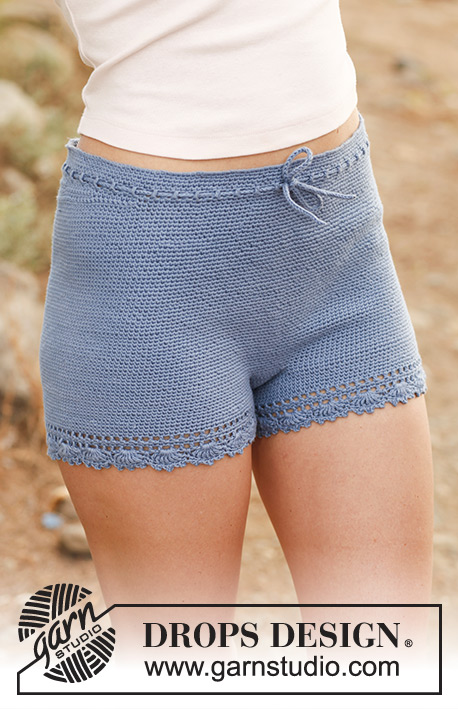
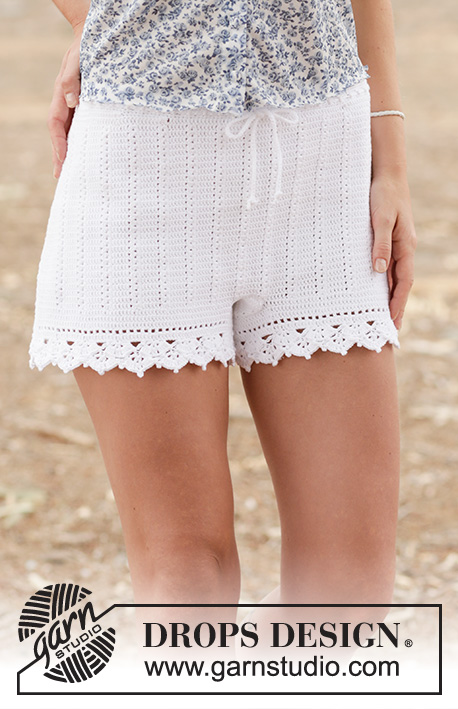
Elly May#ellymayshorts |
||||||||||||||||||||||||||||
 |
 |
|||||||||||||||||||||||||||
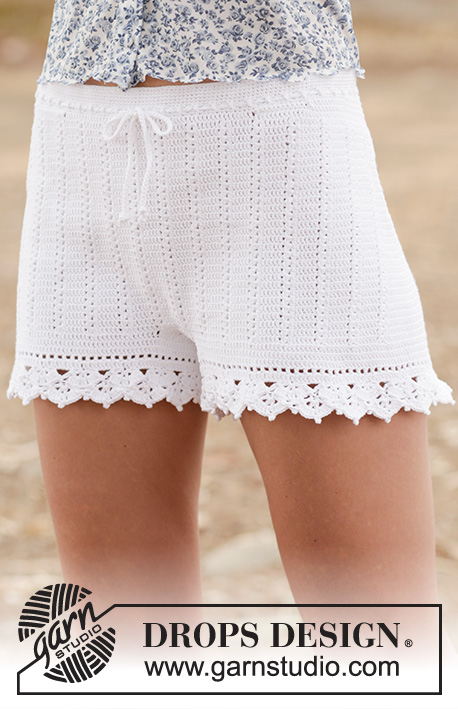
Crochet DROPS shorts with trebles and lace pattern in ”Safran”. Size: S - XXL.
DROPS 162-19 |
||||||||||||||||||||||||||||
|
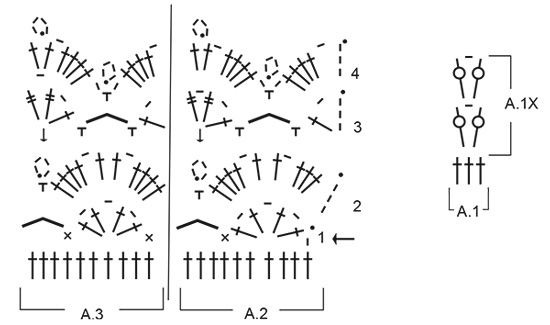
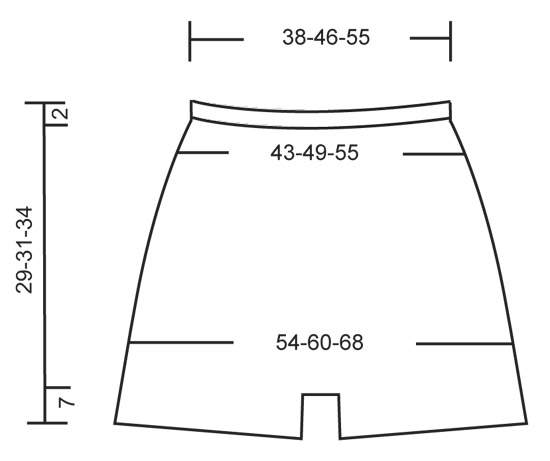
CROCHET INFO: Replace first dc at beg of every dc round with 1 ch. Finish round with 1 sl st in 1st ch at beg of round. Replace first tr at beg of every tr round with 3 ch. Finish round with 1 sl st in 3rd ch at beg of round. PATTERN: See diagrams A.1 to A.3. INCREASE TIP 1: Inc 2 tr mid back as follows: Work until 2 tr remain before marker mid back, work 2 tr in first tr, 1 tr in each of the next 2 tr (marker is between these) and 2 tr in next tr (= 2 tr inc). Inc 4 tr mid back as follows: Work until 4 tr remain before marker mid back, work 2 tr in first tr, 1 tr in next tr, 2 tr in next tr, 1 tr each of the next 2 tr (marker is between these) and 2 tr in next tr, 1 tr in next tr, 2 tr in next tr (= 4 tr inc). INCREASE TIP 2: Work until 1 tr remains before marker in the side, work 2 tr in first tr, 1 tr in next tr (marker is in this tr) and 2 tr in next tr (= 2 tr inc). Repeat the same inc in the other side = 4 sts inc on round. ---------------------------------------------------------- SHORTS: The piece is worked top down. Work 224-274-326 ch on hook size 2,5 mm with Safran and form a ring with 1 sl st in first ch. Insert 1 marker at beg of round = mid back. Work first round as follows: 1 ch, * skip 1 ch, 1 dc in each of the next 7 ch *, repeat from *-* until 0-2-6 ch remain, work 1 dc in each of these ch = 196-240-286 dc. READ CROCHET TIP! Continue working 1 dc in every dc until piece measures 2 cm. REMEMBER THE CROCHET TENSION! Now work an eyelet row as follows: 4 ch, skip 1 dc, * 1 tr in next dc, 1 ch, skip 1 dc *, repeat from *-* the entire round, finish with 1 sl st in 3rd ch from beg of round. On next round work 1 dc in every tr and every ch. Then work the shorts higher in the back as follows: Work 11-12-13 dc past the marker mid back, turn and work 1 sl st in first st, then 1 dc in each of the next 21-23-25 dc, turn and work 1 sl st in first st, then 1 dc in each of the next 32-35-38 sts (sl sts are also worked). Continue like this by working 11-12-13 sts more on every turn until a total of 154-192-208 sts have been worked. Turn again and work until marker mid back. Continue to work 1 round with dc while AT THE SAME TIME inc 28-16-2 dc evenly = 224-256-288 dc. Then work pattern (and insert markers) as follows from mid back: 3 tr, A.1 (= 3 tr), * 5 tr, A.1*, repeat from *-* until 2 tr remain, 2 tr, AT THE SAME TIME insert a marker in each side as follows: Insert a marker in the 3rd tr after 7th-8th-9th repetition A.1, and insert a marker in 3rd tr after 21th-24th-27th repetition with A.1 (i.e. 1 marker in each side). When A.1 has been worked 1 time vertically, continue pattern A.1X - AT THE SAME TIME inc mid back and in the sides as follows: SIDES: Inc on each side of tr with marker, in each side as follows - READ INCREASE TIP 2. Repeat inc every 4th round 7-7-8 times in total = 28-28-32 tr inc. MID BACK: AT THE SAME TIME when piece measures 15-17-19 cm (measured mid front), inc mid back as follows – Read INCREASE TIP-1. Repeat inc with 2 tr mid back every round 10 times in total, and repeat inc with 4 tr every round 2-2-3 times = 28-28-32 tr inc. There are now 280-312-352 tr on round. Now piece measures approx. 22-24-27 cm mid front and 27-29-32 cm mid back. Now divide for legs as follows: Work 1 sl st in each of the first 5-6-6 tr on round, turn and work 1 tr in each of the first 10-12-12 tr (i.e. 5-6-6 sts on each side of marker mid back). These 10-12-12 tr = gusset. Work tr back and forth over these tr. When piece measures 4-5-6 cm, dec 1 tr in each side, repeat dec when piece measures 8-9-10 cm = 6-8-8 tr. Continue with 1 tr in every tr until gusset measures 11-12-13 cm, cut the yarn. Fasten gusset edge to edge to the middle 6-8-8 sts towards mid front. Then work the legs. LEG: Work 1 tr in each of the 132-146-166 tr around one leg (i.e. work 1 tr in every tr in A.1X and 1 tr in ch-space = 3 tr), in addition work 28-31-34 tr along the gusset = 160-177-200 tr. Work 2 rounds with tr AT THE SAME TIME on last round inc 0-3-0 tr evenly by working 2 tr in 1 tr = 160-180-200 tr. Continue to work as follows: ROUND 1: 3 ch (= 1 tr), * 1 ch, skip 1 tr, 1 tr in next tr * , repeat from *-* until 1 tr remains, 1 ch, skip 1 tr, 1 sl st in 3rd ch at beg of round. ROUND 2: 3 ch (= 1 tr), * 1 tr in ch-space, 1 tr in next tr *, repeat from *-* the entire round until 1 ch-space remains, 1 tr in ch-space, finish with 1 sl st in 3rd ch on round. ROUND 3: Now work pattern as follows: Work pattern according to diagram A.2 over the first 10 tr, continue with A.3 the entire round. Finish every round with 1 sl st at beg of round. REMEMBER CROCHET INFO! Continue like this until pattern A.2-A.3 have been worked vertically. Fasten off. Work the other leg the same way. TIES: Work 130-140-150 cm with LOOSE ch, turn and work 1 sl st in every ch. Thread the tie in the row with eyelet holes at the top of shorts – start mid front |
||||||||||||||||||||||||||||
Diagram explanations |
||||||||||||||||||||||||||||
|
||||||||||||||||||||||||||||
 |
||||||||||||||||||||||||||||
 |
||||||||||||||||||||||||||||
Have you finished this pattern?Tag your pictures with #dropspattern #ellymayshorts or submit them to the #dropsfan gallery. Do you need help with this pattern?You'll find 13 tutorial videos, a Comments/Questions area and more by visiting the pattern on garnstudio.com. © 1982-2026 DROPS Design A/S. We reserve all rights. This document, including all its sub-sections, has copyrights. Read more about what you can do with our patterns at the bottom of each pattern on our site. |
||||||||||||||||||||||||||||


With over 40 years in knitting and crochet design, DROPS Design offers one of the most extensive collections of free patterns on the internet - translated to 17 languages. As of today we count 324 catalogues and 12290 patterns translated into English (UK/cm). 12290
We work hard to bring you the best knitting and crochet have to offer, inspiration and advice as well as great quality yarns at incredible prices! Would you like to use our patterns for other than personal use? You can read what you are allowed to do in the Copyright text at the bottom of all our patterns. Happy crafting!
Post a comment to pattern DROPS 162-19
We would love to hear what you have to say about this pattern!
If you want to leave a question, please make sure you select the correct category in the form below, to speed up the answering process. Required fields are marked *.