
Popular categories
Looking for a yarn?


Comments / Questions (68)
![]() Pirkko wrote:
Pirkko wrote:
I just finished the back square and I am in the part that you go to knitting 1 garter sts,k5,A2,k5,1garter.The instructions then say until finished measurement. How long is that finished measurement?
26.01.2024 - 19:29
![]() Jeeva wrote:
Jeeva wrote:
Hi, thank you so much for the pattern, as a beginner, this pattern is my first attempt at an apparel. And i got to learn many new techniques and tips. But i only had 1 problem and that was the size. I did a xxl but it looks smaller than the mentioned dimensions, not sure why. Though i made sure the stitches and tension were correctly managed. Any suggestions for improvement?
04.12.2023 - 15:51
![]() Lorraine Stephens wrote:
Lorraine Stephens wrote:
Drops 160-25 pattern to finish edge it says to pick up 20 stitches, then knit 63 stitches from holder, then pick up 40 stitches and knit next 63 stitches from holder and finally pick up 20 more stitches. I am so confused. Where do you pick up the 20,40 and 20 stitches from?
13.06.2023 - 04:30DROPS Design answered:
See answer below :)
13.06.2023 - 08:40
![]() Lorraine New Stephens wrote:
Lorraine New Stephens wrote:
On the drops 160-25 pattern for the edge instructions it says to pick up 20 stitches then knit the 63 stitches then pick up 40 stitches and knit next 63 stitches then pick up another 20 stitches. Where do you pick up the 20, then 40 then another 20 from?
13.06.2023 - 04:22DROPS Design answered:
Dear Mrs New Stephens, start picking up stitches straight after the seam on the sleeve (you left 9 cm left on sleeve seam - see chart), pick up 20 sts along these 9 cm, then work the 63 sts, pick up 40 sts along the 9 cm x 2 sides on top of next sleeve, pick up 63 sts along the other side of square and finish picking up 20 sts along the 9 cm on top of sleeve. Happy knitting!
13.06.2023 - 08:39
![]() Fanni wrote:
Fanni wrote:
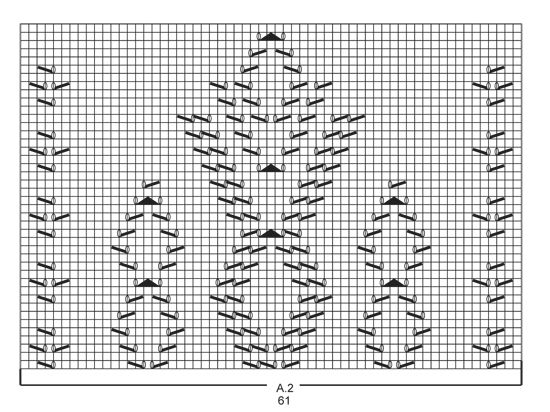
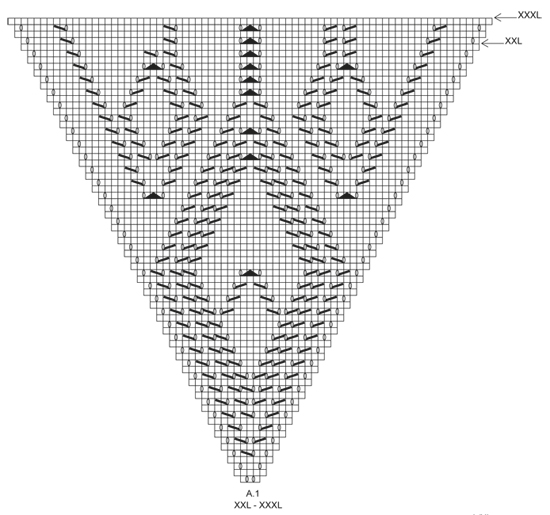
Hi, I think you have an error on the A1 diagrom for size xxl-xxxl. In the last 4 row on the left side a yarn over and a decrease is missing. Otherwise, it's a nice pattern, thank you.
24.04.2023 - 18:03
![]() Vania Monaco wrote:
Vania Monaco wrote:
Thank you for this great design and for your website full of tips. Unfortunately it appears that the schemes A3 to A6 have disappeared from this page. Could you please have a look? Thanks!
06.10.2022 - 01:26DROPS Design answered:
Dear Mrs Monaco, you should find diagrams A.3 to A.6 just above the measurement chart (below A.1 in size S/M -LXL). Happy knitting!
06.10.2022 - 09:06
![]() Isabelle REYT wrote:
Isabelle REYT wrote:
Merci pour le retour mais cela ne répond pas à ma question. Sur le premier tour de AU, il ne faut pas augmenter entre les marqueurs. Est que quand on tricote A6, une deuxième fois est qu'il ne faut pas augmenter entre les marqueurs également ? Ce n'est pas précisé. Merci
07.09.2022 - 08:40DROPS Design answered:
Bonjour Mme Reyt, effectivement, quand vous augmentez dans A.6 vous ne devez pas augmenter entre le 1er et le 2ème marqueur ni entre le 3ème et le 4ème marqueur - les augmentations doivent donc être réparties entre le 2ème et le 3ème marqueur et entre le 4ème et le 1er marqueur. Bon tricot!
07.09.2022 - 09:55
![]() Isabelle wrote:
Isabelle wrote:
Bonjour Concernant les dernières augmentations sur A6. Dois je aussi ne pas augmenter sur les mailles milieu dos du haut et bas ? Merci
06.09.2022 - 09:02DROPS Design answered:
Bonjour Isabelle, les augmentations de la bordure dans A.6 se font à intervalles réguliers réparties sur tout le tour, pas uniquement à quelques endroits du tour. Découvrez ici comment répartir des augmentations régulièrement. Bon tricot!
06.09.2022 - 09:32
![]() Amal wrote:
Amal wrote:
Hi this a follow up to my previous question about the A 6 chart. Unless I misunderstood the directions for the edge border I am knitting in the round so it’s impossible to get the garter stitch ridge by knitting all the rows. Please recheck the edge directions and clarify if you can. I purled the rows 10 and 12 to get the ridge effect. Thank you
30.05.2022 - 17:38DROPS Design answered:
Dear Amal, to work garter stitch in the round you will have to work 2 rounds (knit 1 round, purl 1 round), see video; that's what you have to work in A.6, ie knit (including lace pattern) rows 1 to 9, then Purl 1 round, K1 round and P 1 round = there are now 2 ridges in garter stitch. Can this help? Happy knitting!
31.05.2022 - 08:31
![]() Amal wrote:
Amal wrote:
Thank you for the response to my questions. I just want to ask about the A6 chart. We will be working on the right side on all the rows, shouldn’t the dark circle be purl on the right side so we get the garter stitch ridge?
30.05.2022 - 04:09DROPS Design answered:
Hi Amal, When working garter stitch back and forth you knit from both the right and wrong side to give the ridge pattern. So at the top of A.6, rows 10-12 you knit from the wrong side, knit from the right side and knit from the wrong side to finish. Happy knitting!
30.05.2022 - 06:57
|
|||||||||||||||||||
Kamelia#kameliashoulderpiece |
|||||||||||||||||||
 |
 |
||||||||||||||||||
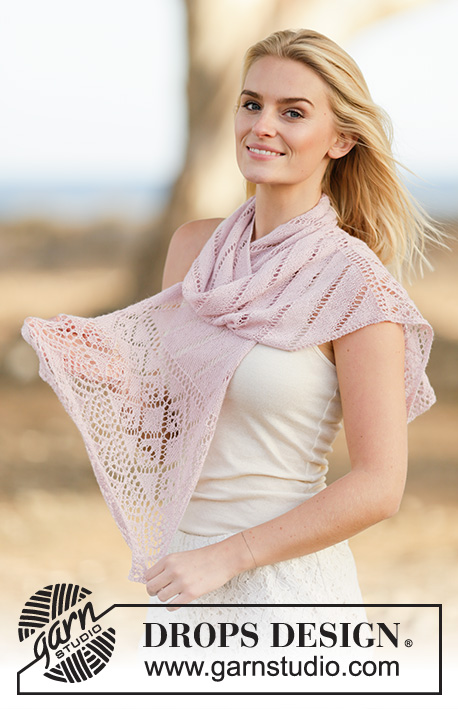
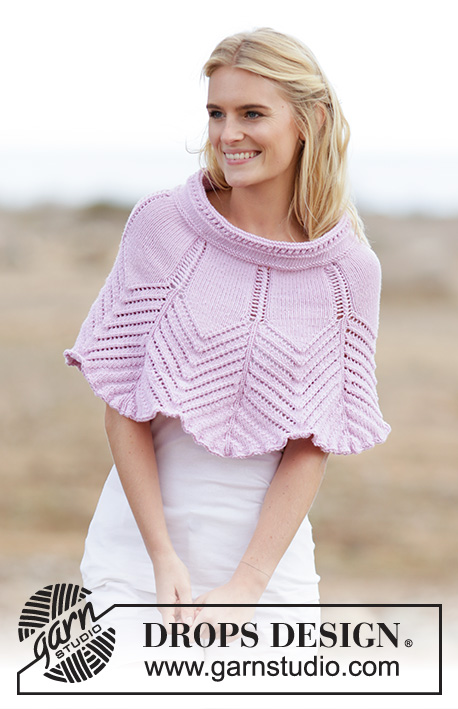
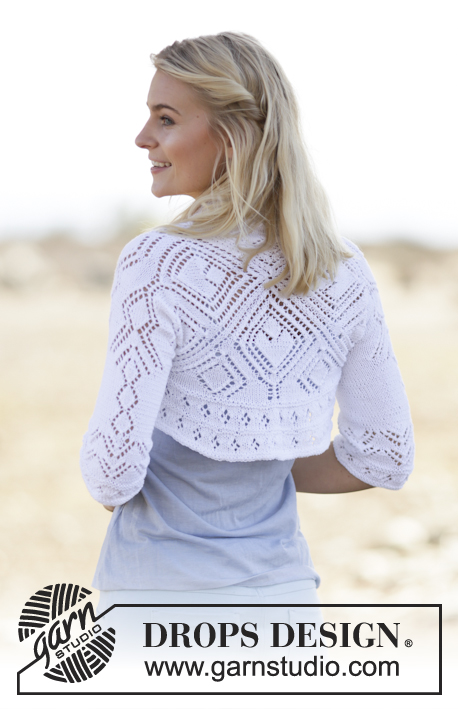
DROPS square knitted bolero with lace pattern in ”Safran”. Size: S - XXXL.
DROPS 160-25 |
|||||||||||||||||||
|
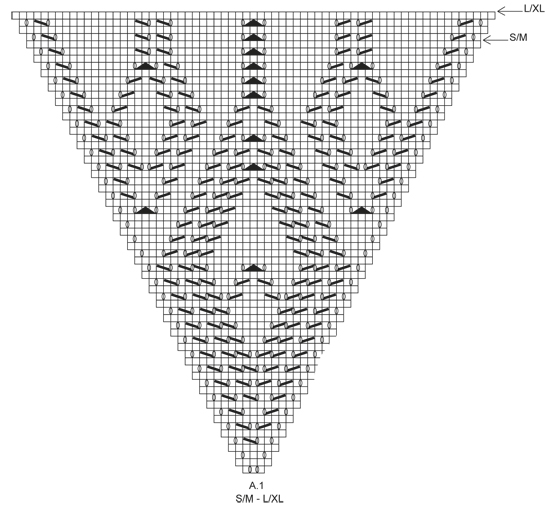
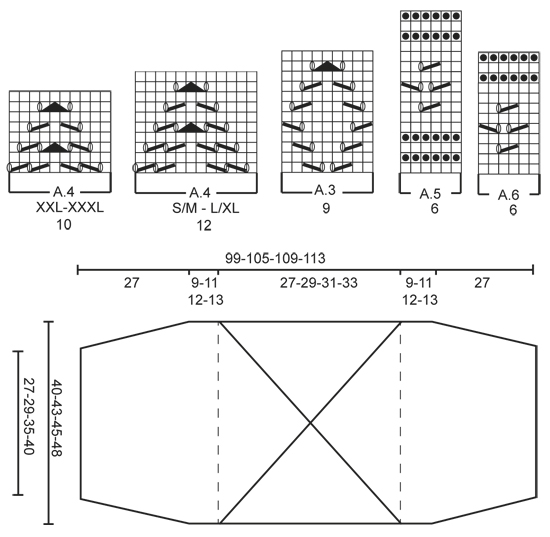
GARTER ST (back and forth): K all rows. 1 ridge = 2 rows K. INCREASE TIP: Inc 1 st by making 1 YO, on next row P YO twisted (i.e. work in back loop of st instead front) to avoid holes. PATTERN: See diagrams A.1 to A.6. The diagrams show all rows in pattern seen from RS. ---------------------------------------------------------- BOLERO: Work first a square in the round, then work out to each sleeve back and forth. BACK PIECE: Work in the round on double pointed needles, switch to circular needle when needed. Cast on 12 sts with Safran and distribute sts on 4 double pointed needles size 3.5 mm (= 3 sts on each needle). Then insert 4 markers in the piece as follows: Insert 1st marker between 3rd and 4th st, 2nd marker between 6th and 7th st, 3rd marker between 9th and 10th st and 4th marker between 12th and 1st st. Then work according to A.1 – choose diagram for correct size (= 4 times). Sts with markers are corner sts, let the markers follow when working outwards. REMEMBER THE KNITTING TENSION When A.1 has been worked 1 time vertically (see arrow for your size) each side will be worked seperatly = 63-67-71-75 sts along each side and 252-268-284-300 sts in total on needle. Then work only over the first 63-67-71-75 sts (= one side, sts between 4th and 1st marker), slip the other sides on stitch holders, work over sts between 2nd and 3rd marker later. Now work piece back and forth. On next row from RS work as follows: Work 2 sts in first st, K 0-2-4-6, A.2 (= 61 sts), K 0-2-4-6, work 2 sts in last st on row = 65-69-73-77 sts. Then work as follows: 1 edge st in GARTER ST - see explanation above, 1-3-5-7 sts in stocking st, A.2, 1-3-5-7 sts in stocking st, 1 edge st in garter st. Work edge sts in garter st until finished measurements. SIZE L/XL-XXL-XXXL: On next row from RS inc 1 st in each side of piece inside 1 edge st – READ INCREASE TIP, repeat inc on every row from RS 2-4-8 more times = 75-83-95 sts. Work inc sts in stocking st. ALL SIZES: = 65-75-83-95 sts. When A.2 has been worked 1 time vertically, work as follows from RS: 1 edge st in garter st, 27-32-36-42 sts in stocking st, A.3 (= 9 sts), 27-32-36-42 sts in stocking st, 1 edge st in garter st. Work A.3 2 times in total vertically. Work 0-6-0-4 rows in stocking st. On next row from RS, dec 3-1-1-3 sts evenly = 62-74-82-92 sts. P 1 row from WS. Work A.4 – see diagram for correct size (= 12-12-10-10 sts) 5-6-8-9 times in width. Work A.4 2-2-3-3 times in total vertically. Then work A.5 (= 6 sts) 10-12-13-15 times, AT THE SAME TIME on first row dec 0-0-2-0 sts evenly = 62-74-80-92 sts. Cast off when A.5 has been worked 1 time vertically. Work sts between 2nd and 3rd marker the same way. ASSEMBLY: Sew tog the side inside 1 edge st, 27 cm up from bottom of sleeve and up. Do same in the other side. EDGE: Worked in the round on circular needle. Beg at one sleeve seam and work with circular needle 3.5 mm with Safran from RS as follows: Pick up 20-25-28-30 sts inside 1 edge st in garter st, K the 63-67-71-75 sts from stitch holder, pick up 40-50-56-60 sts inside 1 edge st, K the 63-67-71-75 sts from stitch holder, pick up 20-25-28-30 sts = 206-234-254-270 sts. P 1 round - AT THE SAME TIME insert 4 markers in the piece as follows: P 40-47-52-56, insert 1st marker, P 23, insert 2nd marker, P 80-94-104-112, insert 3rd marker, P 23, insert 4th marker, work the rest of round (= P 40-47-52-56). When inc sts, do not inc sts between 1st and 2nd marker (marks the neck) and between 3rd and 4th marker (marks mid back on the back). K 1 round while AT THE SAME TIME inc 14-15-18-22 sts evenly = 220-249-272-292 sts. P 1 round. Then work A.6 (= 6 sts) AT THE SAME TIME on first round inc 14-15-16-20 sts evenly = 234-264-288-312 sts. A.6 is now worked 39-44-48-52 times in width. Repeat A.6 1 more time vertically AT THE SAME TIME on first round inc 24-30-36-36 sts evenly = 258-294-324-348 sts. A.6 is now worked 43-49-54-58 times in the round. When A.6 is done, loosely cast off. |
|||||||||||||||||||
Diagram explanations |
|||||||||||||||||||
|
|||||||||||||||||||
 |
|||||||||||||||||||
 |
|||||||||||||||||||
 |
|||||||||||||||||||
 |
|||||||||||||||||||
Have you finished this pattern?Tag your pictures with #dropspattern #kameliashoulderpiece or submit them to the #dropsfan gallery. Do you need help with this pattern?You'll find 27 tutorial videos, a Comments/Questions area and more by visiting the pattern on garnstudio.com. © 1982-2026 DROPS Design A/S. We reserve all rights. This document, including all its sub-sections, has copyrights. Read more about what you can do with our patterns at the bottom of each pattern on our site. |
|||||||||||||||||||


With over 40 years in knitting and crochet design, DROPS Design offers one of the most extensive collections of free patterns on the internet - translated to 17 languages. As of today we count 324 catalogues and 12290 patterns translated into English (UK/cm). 12290
We work hard to bring you the best knitting and crochet have to offer, inspiration and advice as well as great quality yarns at incredible prices! Would you like to use our patterns for other than personal use? You can read what you are allowed to do in the Copyright text at the bottom of all our patterns. Happy crafting!
Post a comment to pattern DROPS 160-25
We would love to hear what you have to say about this pattern!
If you want to leave a question, please make sure you select the correct category in the form below, to speed up the answering process. Required fields are marked *.