
Popular categories
Looking for a yarn?


Comments / Questions (4)
![]() Sharon Rowa wrote:
Sharon Rowa wrote:
I have not been successful in decreasing a stitch without leaving a small hole in my work. Do you have any tips? Thank you.
27.02.2021 - 02:41DROPS Design answered:
Dear Mrs Rowa, make sure to work the decrease not too loose - maybe this video can help you - your Yarn store might have more Tipps for you, do not hesitate to contact them even per mail or telephone. Happy knitting!
01.03.2021 - 08:02
![]() Gisele wrote:
Gisele wrote:
Question 1: the pattern states to cast off 8 sts for armholes and put the piece aside. That would leave the piece to start the next row on the WS. So do I start adding the sleeves starting on the WS? Question 2: I started adding the sleeves as shown in the video but there is no way all those sleeve sts would fit as easy as the tutorial shows it. Please help
15.05.2020 - 22:06DROPS Design answered:
Dear Gisele, you can cast off for sleeve from RS or then work 1 row from WS over all stitches and start diagram on next row from RS. When you add sleeves over armholes, the first rows might be somewhat tricky, you can keep the sleeve sts on the double pointed needles or use another circular needle for the first few rows, then it will work fine. Happy knitting!
18.05.2020 - 07:07
![]() Gisele wrote:
Gisele wrote:
My question is about the sleeve measurement for size 3/4. The pattern states that when sleeve measures 30 cm to start decreasing. Is 30 cm the right number or there is something wrong? It just seems 30 cm is too long. Thank you for your help
14.05.2020 - 05:24DROPS Design answered:
Dear Gisele, this is the right measurement - see also measurement chart. You can adjust if necessary comparing all measurements in chart with one similar jacket the child has. Happy knitting!
14.05.2020 - 08:03
![]() Margit Frank wrote:
Margit Frank wrote:
Ist in dem Diagramm (M1) für die Jacke hin ind Rückreihe gezeichnet?
08.07.2019 - 19:33DROPS Design answered:
Liebe Frau Frank, ja genau alle Reihen sind im Diagram (M.1 sowie M.2 gezeigt. Mehr über Diagramme lesen Sie hier. Viel Spaß beim stricken!
09.07.2019 - 08:33
|
||||||||||||||||||||||
Jeannie's Joy#jeanniesjoyset |
||||||||||||||||||||||
|
|
||||||||||||||||||||||
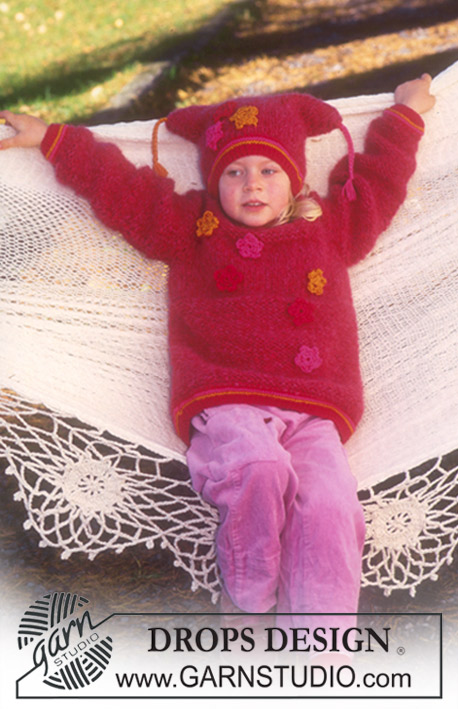
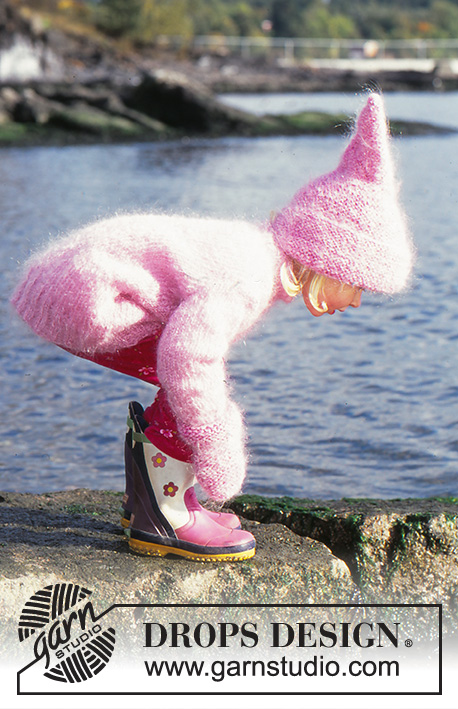
Norwegian style DROPS jacket with yoke and hat in BabyMerino
DROPS Baby 10-13 |
||||||||||||||||||||||
|
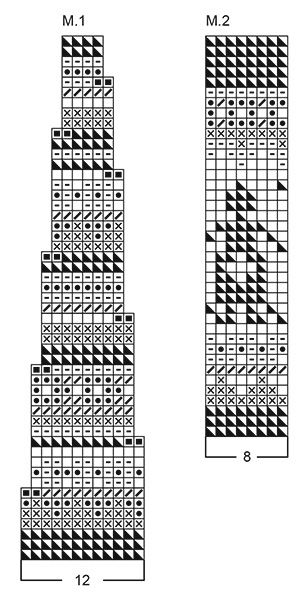
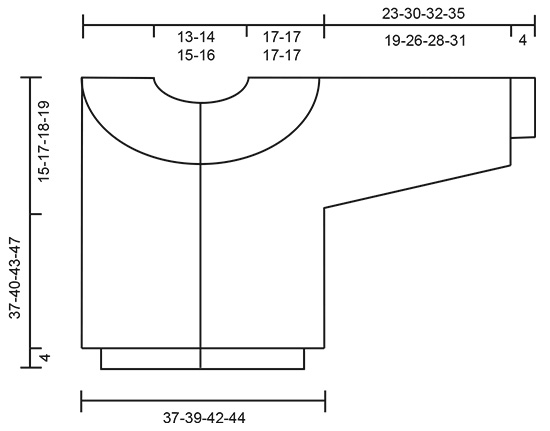
Knitting tension: 23 sts x 30 rows on needle size 3.5 mm in stocking sts = 10 x 10 cm. Rib: *K1, P1*, repeat from *-*. Garter sts (back and forth): Knit all rows Pattern: See diagram M1. The entire pattern is knitted in stocking sts and the diagram is seen from the RS. Buttonholes: Make 6 buttonholes evenly distributed on right front band (the last buttonhole will be on neckline). 1 buttonhole = cast of the 5th and 6th st from the edge and cast on 2 new sts on the return row. Back and front piece: The jacket is knitted back and forth on circular needles from mid front. Cast on 203-215-227-239 sts (incl 8 edge sts each side towards mid front) on circular needle size 2.5 mm with red. Knit Rib as follows: 1 edge st in garter st, *K1. P1*, repeat from *-* and finish with K1 and 1 edge st in garter sts. When piece measures 4 cm put 8 sts each side on a thread (= front edges to be knitted later and sewn to jacket) = 187-199-211-223 sts. Change to circular needle size 3,5 mm and continue in stocking sts, at the same time dec 19 sts evenly on row and cast on 1 new st each side (edge sts for sewing on front edges) = 170-182-194-206 sts. Remember the knitting tension. When piece measures 22-23-25-28 cm knit next row as follows: 39-42-45-48 sts (= front piece), cast off 8 sts for armhole, 76-82-88-94 sts (= back piece), cast off 8 sts for armhole, 39-42-45-48 sts (= front piece). Put piece aside and knit the sleeves. Sleeves: Cast on 48-50-52-54 sts on double pointed needles size 2.5 mm with red and knit 4 cm Rib. Change to needle size 3,5 mm and continue in stocking sts, at the same time dec 8 sts evenly on row = 40-42-44-46 sts. When piece measures 5 cm inc 2 sts mid under arm a total of 15-17-19-21 times as follows: Size 2 years: alternate between every 3rd and 4th round, Size 3/4 years + 5/6 + 7/8 years: alternate between every 4th and 5th round = 70-76-82-88 sts. When piece measures 23-30-32-35 cm cast off 8 sts mid under arm = 62-68-74-80 sts. Put piece aside and knit the other sleeve. Yoke: Put sleeves in on the same needle as body piece where you cast off for armholes = 278-302-326-350 sts. Knit M.1 (beg pattern inside 1 edge st) and dec as shown in the diagram, i.e. 23-25-27-29 sts dec per round = a total of 184-200-216-232 dec sts. After the last dec there are 94-102-110-118 sts left on needle. Cast off 1 edge st each side towards mid front = 92-100-108-116 sts. Put piece aside and knit front edges. Left front edge: put the 8 sts from thread back on needle size 2.5 mm and knit Rib, at the same time casting on 1 new sts towards front piece (= st for sewing on edge, knitted in garter sts throughout). Cast off the edge st when the edge, slightly stretched, is the same length as front piece, and put remaining 8 sts on a holder. Right front edge: Knit as the left but make buttonholes as described above. Assembly: Sew front edges to front pieces inside 1 edge st. Sew under arm seams. Neckline: Put sts from front edges on the same needle as the jacket = 108-116-124-132 sts. Change to needle size 2.5 mm and knit Rib, at the same time dec 18-20-26-30 sts evenly on first row = 90-96-98-102 sts. After 2 rows make a buttonhole in line with the others on right front edge. Cast off in Rib when measures 2.5 cm. Sew on buttons. HAT: Size: 2/3 – 4/5 – 6/8 years To fit head circumference: 46-48-50 cm Knitting tension: 23 sts x 30 rows on needle size 3.5 mm in stocking sts = 10 x 10 cm. Rib: *K1, P1*, repeat from *-*. Pattern: See diagram M2. The entire pattern is knitted in stocking sts and the diagram is seen from the RS. Cast on 96-104-112 sts on double pointed needles size 2.5 mm with red. Knit 2 rounds Rib, change to pink and knit 1 round Rib, change to off-white and knit 1 round Rib. Change back to red and continue in Rib until piece measures 2.5 cm. Now change to needle size 3.5 mm and knit M.2. After M.2 finish the hat in red and cast off when piece measures 13-14-15 cm. Top of hat: crochet a square to be sewn to the top of the hat. Use crochet hook size 5 mm and 2 threads pink + 1 thread red (= 3 threads) and crochet as follows: 6 ch and form a ring with a sl st. 1 round: 8 dc in ring 2 round: 1 dc, *3 dc in next dc (= corner), 1 dc in next dc*, repeat from *-* a total of 3 times and finish with 3 dc in the last dc and 1 sl st in ch from beg of round 3 round and further rounds: 1 dc in each dc, but crochet 3 dc in the corner dc, i.e. inc 8 dc per round. Continue until square measures 12-13-14 cm from side to side. Assembly: Sew the square to the top of the hat with a 1 cm edge all the way round. Crochet a border round the edge at the top as follows: Use crochet hook size 5 mm and 2 threads pink + 1 thread red (= 3 threads) and crochet a row of . = crochet dc from right to left, i.e. the opposite way as you would normally crochet. Crochet 2 chains of ch measuring approx 25 cm. Make 2 small pompons in red and attach to the ends of the chains and attach the other end to the top of the hat. |
||||||||||||||||||||||
Diagram explanations |
||||||||||||||||||||||
|
||||||||||||||||||||||
 |
||||||||||||||||||||||
 |
||||||||||||||||||||||
Have you finished this pattern?Tag your pictures with #dropspattern #jeanniesjoyset or submit them to the #dropsfan gallery. Do you need help with this pattern?You'll find 36 tutorial videos, a Comments/Questions area and more by visiting the pattern on garnstudio.com. © 1982-2026 DROPS Design A/S. We reserve all rights. This document, including all its sub-sections, has copyrights. Read more about what you can do with our patterns at the bottom of each pattern on our site. |
||||||||||||||||||||||


With over 40 years in knitting and crochet design, DROPS Design offers one of the most extensive collections of free patterns on the internet - translated to 17 languages. As of today we count 324 catalogues and 12290 patterns translated into English (UK/cm). 12290
We work hard to bring you the best knitting and crochet have to offer, inspiration and advice as well as great quality yarns at incredible prices! Would you like to use our patterns for other than personal use? You can read what you are allowed to do in the Copyright text at the bottom of all our patterns. Happy crafting!
Post a comment to pattern DROPS Baby 10-13
We would love to hear what you have to say about this pattern!
If you want to leave a question, please make sure you select the correct category in the form below, to speed up the answering process. Required fields are marked *.