
Popular categories
Looking for a yarn?


Comments / Questions (88)
![]() Elena wrote:
Elena wrote:
Salve, sto facendo la misura più piccola e sto iniziando M1. Ma come faccio ad allineare i buchi se i gettati diventano maglie in più che sul disegno non ci sono. Se allineo il buco non sono più 6 maglie ma 7. Dove sbaglio? Grazie
25.09.2021 - 23:49DROPS Design answered:
Buonasera Elena, nel diagramma M.1 i gettati sono compensati dalle diminuzioni laterali. Buon lavoro!
26.09.2021 - 21:04
![]() Tonya wrote:
Tonya wrote:
Добрый день! Помогите, пожалуйста, с этим местом: " Continue in pattern until there are 4 rows in garter sts over 10 sts each side. On the next row cast off 6 sts each side for armhole and finish each piece separately." Не понятно, в каком месте нужно закрыть по 6 петель? Если в начале и в конце ряда, то это не то...
13.08.2021 - 06:06DROPS Design answered:
Dear Tonya, you have to cast off the 6 middle of the 10 stitches worked in garter stitch, ie work these 10 stitches in garter stitch as follows: 2 stitches in garter stitch as before, cast off the next 6 stitches and work 2 stitches in garter stitch as before, repeat on the other side of piece for 2nd armhole. Happy knitting!
13.08.2021 - 07:33
![]() Kerstin wrote:
Kerstin wrote:
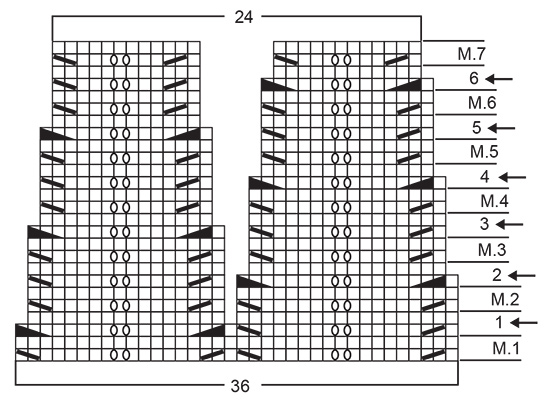
Hallo, ich habe eine Frage zum Rapport M9. Hier stricke ich ja nicht mehr rund, sondern hin und zurück. Wie sieht dann die Rückreihe aus, z. B. verstehe ich nicht wie auf der Rückreihe die Maschen 5+6 der 1.Reihe gestrickt wird. (Vorderseite Masche auf Extranadel, rechts verschränkt — dann Masche von Extranadel links stricken). Ich danke euch.
29.04.2021 - 22:06DROPS Design answered:
Liebe Kerstin, diese Maschen sind die jenigen mit dem 2. Symbol = diese stricken werden links verschränkt bei den Rückreihen gestrickt - die Maschen mit dem Kreuz (=3.Symbol) stricken Sie rechts bei den Rückreihen (glatt links). Die Rückreihen lesen Sie jetzt links nach rechts, dh M.9C, M.9B und M.9A - hier lesen Sie noch mehr. Viel Spaß beim stricken!
30.04.2021 - 07:13
![]() Marianne Rasmussen wrote:
Marianne Rasmussen wrote:
Hej, Har strikket kjolen sweet Rosie før og den var en succes. Ville så strikke den i str. 3/4 år, men øv den kun går til 2 år. Har fundet ud af at der er 36 m i forskel på størrelserne. Men er det muligt at lave den i str. 3/4 år. Det er vel ikke bare maske antal og længde, man skal lave om på,
20.11.2020 - 14:33DROPS Design answered:
Hej Marianne, du kan prøve at finde en lignende opskrift og sammenligne antal masker: Kjoler - Børn God fornøjelse!
23.11.2020 - 16:03
![]() Maibrit Runge wrote:
Maibrit Runge wrote:
Når jeg strikker mønster skal jeg starte med M1. Består det af 2 eller 4 pinde? Forstår ikke hvad 1 tallet betyder og der er 4 pinde op til M2
13.10.2020 - 20:39DROPS Design answered:
Hej Maibrit. M.1 består av 2 pinde. Pilarna och sifforna visar de pinde du ska ta ind på. Mvh DROPS Design
15.10.2020 - 11:14
![]() Barbro Stenvig wrote:
Barbro Stenvig wrote:
Hei! Strikker drops baby 11-4 oghar kommet til rad 10 på mønster M9, kan den være rett? Eller skal den være sånn som 4 omg? Får det ikke til å stemme
01.10.2020 - 09:24DROPS Design answered:
Hei Barbro. Ja, du helt riktig. Diagrammet er nå ordnet. Takk for at du gjorde oss oppmerksom på dette. mvh DROPS design
07.10.2020 - 08:53
![]() Ingeborg Dommersnes wrote:
Ingeborg Dommersnes wrote:
Hei! 🌸 Strikker kjolen i minste str. Skal begynne på første felling, men når jeg følger mønsterdiagrammet, får jeg det ikke til å stemme,hullmoensteret blir forskjøvet! Hva er det jeg gjør feil?
29.07.2020 - 19:14DROPS Design answered:
Hej Ingeborg, sæt et mærke imellem hver gang du starter diagrammet, da er det lettere for dig at få strikke alle masker i diagrammet. God fornøjelse!
30.07.2020 - 15:37
![]() Melody Ramírez Escorcia wrote:
Melody Ramírez Escorcia wrote:
Gracias por sus patrones y videos de ayuda , son muy prácticos lo que me a permitido realizar varios proyectos. Muchas gracias por compartir
29.04.2020 - 15:12
![]() Frau Ternes wrote:
Frau Ternes wrote:
Liebes Drops-Team, ich stricke zur Zeit das Model Baby 11-4. Dabei ist mir aufgefallen dass im Diagramm 9 in der Reihe 10 ein Fehler sein könnte. Ich würde die verschrenkten linken Maschen auf eine andere Position setzen, oder ist das so richtig wie abgebildet. LG Ternes
12.03.2020 - 10:54DROPS Design answered:
Siehe Antwort unten :)
12.03.2020 - 10:58
![]() Frau Ternes wrote:
Frau Ternes wrote:
Liebes Drops-Team, ich stricke zur Zeit das Model Baby 11-4. Dabei ist mir aufgefallen dass im Diagramm 9 in der Reihe 10 ein Fehler sein könnte. Ich würde die verschrenkten linken Maschen auf eine andere Position setzen, oder ist das so richtig wie abgebildet. LG Ternes
12.03.2020 - 10:39DROPS Design answered:
Liebe Frau Ternes, bei der 10. Reihe in M.9 sollten Sie die 2 "mittleren" Maschen stricken wie bei der 2. Reihe (= die selben Maschen, auch bei der letzten Reihe). Viel Spaß beim stricken!
12.03.2020 - 10:57
|
||||||||||||||||||||||||||||||||||
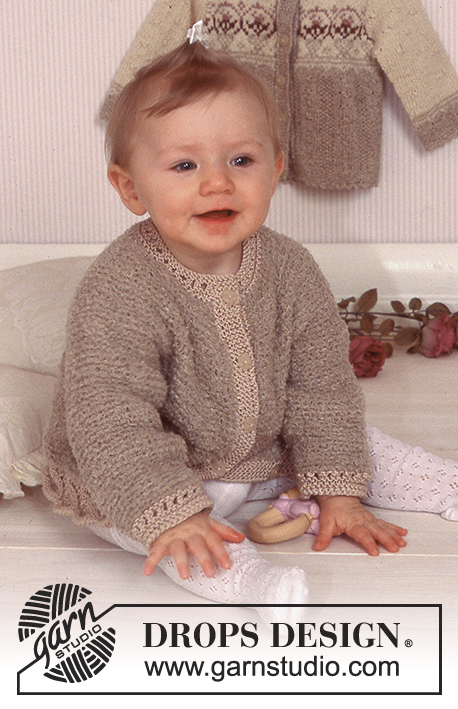
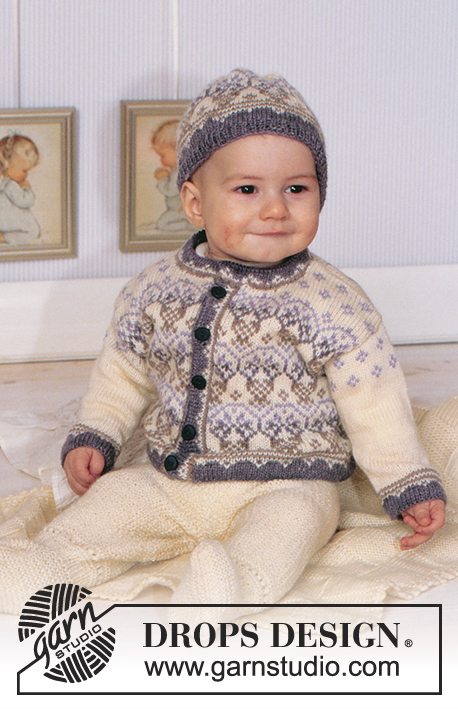
Sweet Rosie#sweetrosiedress |
||||||||||||||||||||||||||||||||||
|
|
||||||||||||||||||||||||||||||||||
DROPS Dress and socks with pattern in BabyMerino.
DROPS Baby 11-4 |
||||||||||||||||||||||||||||||||||
|
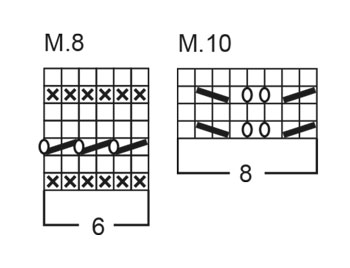
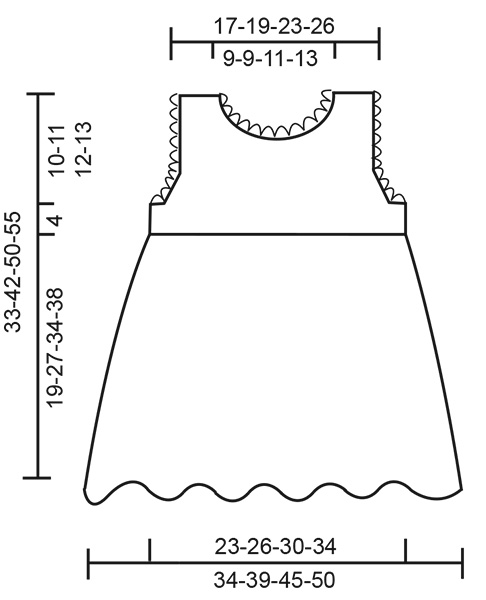
Knitting tension: M.1 to M.7 and M.9: 32 sts x 34 rows on needle size 2.5 mm = 10 x 10 cm. Stocking sts: 25 sts x 34 rows on needle size 2.5 mm = 10 x 10 cm. Garter sts (back and forth on needle: knit all rows. Garter sts (on circular needle): knit 1 round, purl 1 round. Pattern: See diagrams M.1 to M10. The diagrams are seen from the RS. -------------------------------------------------------------------- DRESS: Buttonhole: Make buttonholes on the right edge mid back from the RS. 1 buttonhole = cast off the 3rd and 4th sts from the edge and cast on 2 new sts in the same place on the return row. Make buttonholes as follows: Size 1/3 months: 2, 5, 8 and 11 cm Size 6/9 months: 2, 5, 9 and 12 cm Size 12/18 months: 2, 6, 10 and 13 cm Size 24 months: 2, 6, 10 and 14 cm Dec tips (apply to armhole and neckline): Dec inside 2 edge sts in garter sts from the RS. Dec as follows after 2 edge sts: slip 1 st as if to knit, K1, psso. Dec as follows before 2 edge sts: K2 tog. -------------------------------------------------------------------- Back and front piece: The dress is knitted round on circular needle from bottom edge up. Cast on 216-252-288-324 sts on circular needle size 2.5 mm with pink. Knit 2 rounds in garter sts and continue in M.1. When piece measures 8-10-13-17 cm begin the dec. Dec 12-14-16-18 sts per round, i.e. dec 2 sts on every 2nd repeat across – see arrows in diagram. This means the size of the zig-zags in the pattern will decrease as you go along. Dec as follows: When piece measures 8-10-13-17 cm knit first 1 round with dec = 204-238-272-306 sts, continue in M.2. When piece measures 10-14-17-21 cm knit second round with dec = 192-224-256-288 sts, continue in M.3. When piece measures 12-17-21-25 cm knit third round with dec = 180-210-240-270 sts, continue in M.4. When piece measures 14-20-25-29 cm knit fourth round with dec = 168-196-224-252 sts, continue in M.5. When piece measures 16-23-29-33 cm knit fifth round with dec = 156-182-208-234 sts, continue in M.6. When piece measures 18-26-33-37 cm knit sixth round with dec = 144-168-192-216 sts, continue in M.7. When piece measures 19-27-34-38 cm knit M.8 (= row with holes), at the same time on the last round of M.8 dec 2 sts evenly = 142-166-190-214 sts. Now carry on measuring piece from the first round of M.8. Divide the piece mid back and finish the dress back and forth on circular needle. Cast on 2 new sts each side = 146-170-194-218 sts. Knit next row as follows form the RS: 5 edge sts in garter sts, M.9A (= 8 sts), M.9B over 120-144-168-192 sts, M.9C (= 8 sts) and 5 edge sts in garter sts. Continue in pattern whilst making buttonholes on right edge – see explanation above. When piece measures 3 cm (from 1st round of M.8) knit next row as follows from the RS: 5 edge sts in garter sts, 28-34-40-46 sts of M.9, 10 sts in garter sts, 60-72-84-96 sts of M.9, 10 sts in garter sts, 28-34-40-46 sts of M.9, 5 edge sts in garter sts. Continue in pattern until there are 4 rows in garter sts over 10 sts each side. On the next row cast off 6 sts each side for armhole and finish each piece separately. Front piece: = 64-76-88-100 sts. Continue in M.9 with 2 sts in garter sts each side. At the same time dec 1 st for armhole – see Dec tips – on every other row a total of 5-8-8-8 times = 54-60-72-84 sts. P the sts (seen from the RS) not fitting into M.9. After the dec for armhole continue with 2 sts in garter sts + 1 st in stocking st each side (i.e. 1 st in stocking sts along armhole). When piece measures approx 9-10-10-11 cm – adjust after 1 full repeat of M.9 – knit 4 rows with garter sts over the middle 22-22-28-34 sts (M.9 over remaining sts). Now cast off the middle 18-18-24-30 sts for neck and dec 1 st towards neckline on every other row a total of 6 times – see Dec Tips = 12-15-18-21 sts left on each shoulder. Continue in M.9 with 2 sts in garter sts + 1 st in stocking st towards the neckline. When piece measures approx 14-15-16-17 cm (= 33-42-50-55 cm full length) cast off remaining sts – adjust after a full pattern repeat. Left back piece: = 35-41-47-53 sts. Continue in M.9 with 2 sts in garter sts towards armhole and 5 edge sts in garter sts towards mid back. At the same time dec for armhole as described for front piece = 30-33-39-45 sts. When piece measures approx 12-13-14-15 cm – adjust after a full pattern repeat – knit 4 rows with garter sts over 18-18-21-24 sts towards mid back. Now cast off 16-16-19-22 sts towards mid back for neck and dec 1 st towards neckline on every other row 2 times – see Dec Tips = 12-15-18-21 sts left on shoulder. Continue in M.9 with 2 sts in garter sts + 1 st in stocking st towards the neckline. When piece measures approx 14-15-16-17 cm (= 33-42-50-55 cm full length) cast off remaining sts – adjust after a full pattern repeat. Right back piece: = 35-41-47-53 sts. Knit as left back piece, but mirrored. Remember buttonholes! Assembly: Sew shoulder seams. Place right edge over left edge on back piece and sew at bottom. Sew on buttons. Crochet borders: Crochet round armholes and neckline with crochet hook size 2.5 mm with pink as follows (crochet round the 2 outermost sts in garter sts): 1 dc, *3 ch, 1 dc in first ch, skip 1 st, 1 dc in next st* , repeat from *-*. ------------------------------------------------------------------ SOCKS: Foot length: 10-11-12-14 cm Cast on 56-56-64-64 sts on double pointed needles size 2.5 mm with white Alpaca. Knit 1 round and knit 2 cm of M.10. Knit 1 round, at the same time dec 16-16-20-20 sts evenly on round = 40-40-44-44 sts. Knit M.8. Now knit heel as follows: Knit 3-3.5-3.5-4 cm stocking sts back and forth on needles over 18 sts mid back. Heel dec (1st row = RS): 1st row: Knit 10 sts, K2 tog into back of st, K1, turn. 2nd row: slip 1 st as if to P, P4, P2 tog, P1, turn. 3rd row: slip 1 st as if to K, K5, K2 tog into back of st, K1, turn. 4th row: slip 1 st as if to P, P6, P2 tog, P1, turn. 5th row: slip 1 st as if to K, K7, K2 tog into back of st, K1, turn. 6th row: slip 1 st as if to P, P8, P2 tog, P1, turn. 7th row: K2 tog, K8, K2 tog into back of st = 10 sts on needle (= total 32-32-36-36 sts). Now pick up 7-8-8-9 sts on each side of the heel = 46-48-52-54 sts. Continue in stocking sts over all sts and dec 1 st on each side of the upper 18-20-22-24 sts on every other row a total of 7 times = 32-34-38-40 sts. When foot measures 8-9-11-12 cm (from the start of the heel dec) insert a marking thread each side and dec 1 st on each side of both threads on every round (4 dec per round) a total of 7-7-8-8 times. Cut the thread and pull through remaining sts. Sew tight. Crochet a chain of ch with pink , approx 35 cm long, and pull through row with holes. |
||||||||||||||||||||||||||||||||||
Diagram explanations |
||||||||||||||||||||||||||||||||||
|
||||||||||||||||||||||||||||||||||
 |
||||||||||||||||||||||||||||||||||
 |
||||||||||||||||||||||||||||||||||
 |
||||||||||||||||||||||||||||||||||
Have you finished this pattern?Tag your pictures with #dropspattern #sweetrosiedress or submit them to the #dropsfan gallery. Do you need help with this pattern?You'll find 34 tutorial videos, a Comments/Questions area and more by visiting the pattern on garnstudio.com. © 1982-2026 DROPS Design A/S. We reserve all rights. This document, including all its sub-sections, has copyrights. Read more about what you can do with our patterns at the bottom of each pattern on our site. |
||||||||||||||||||||||||||||||||||


With over 40 years in knitting and crochet design, DROPS Design offers one of the most extensive collections of free patterns on the internet - translated to 17 languages. As of today we count 324 catalogues and 12290 patterns translated into English (UK/cm). 12290
We work hard to bring you the best knitting and crochet have to offer, inspiration and advice as well as great quality yarns at incredible prices! Would you like to use our patterns for other than personal use? You can read what you are allowed to do in the Copyright text at the bottom of all our patterns. Happy crafting!
Post a comment to pattern DROPS Baby 11-4
We would love to hear what you have to say about this pattern!
If you want to leave a question, please make sure you select the correct category in the form below, to speed up the answering process. Required fields are marked *.