
Popular categories
Looking for a yarn?


Comments / Questions (88)
![]() Margaret Tigchelaar wrote:
Margaret Tigchelaar wrote:
I am starting over, because I think I misunderstood when I am told to start M.1 after2 rnds in garter I understood to have to keep M.1 for 13 cm (size 3). but then I get stuck with not enough stitches on the second side of M.1 Can you help me, please? I really want to make this pattern. I did have a few cms knitted and enjoy the pattern, just need some help. Thank you so much!
20.04.2026 - 02:32DROPS Design answered:
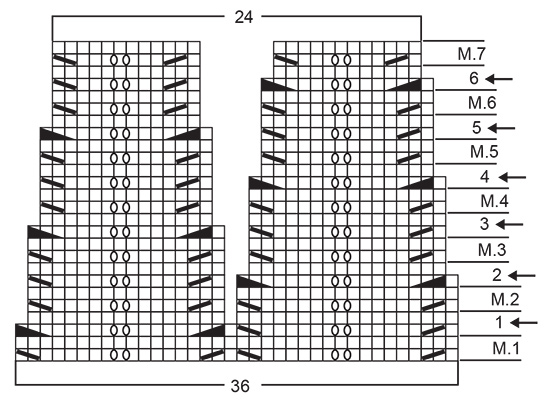
Dear Mrs Tigchelaar, you first repeat the 2 rows M.1 at the bottom of diagram (= 36 sts x 8 repeats = 288 sts in 3rd size). Then work the decrease -1 as shown in diagram: you decrease 2 sts (in 2nd part of diagram) so that you get 34 sts left after the first of 2 rounds = (34 x 8 repeats) = 272 sts left. Work now the 2 rows shown for M.2 and decrease after 17 cm as decrease -2 in diagram = you decrease 2 sts in the first part of each diagram in width = 32 sts remain in each repeat x 8 = 256 sts left. Work now M.3 and continue decreasing / working pattern working the different diagrams as shown between the decrease round. Can this help? Happy knitting!
20.04.2026 - 11:18
![]() Annelie wrote:
Annelie wrote:
Jag är på mönster M.9. Ja tycker det blir ett otydligt mönster med aviga på rätsidan . Ska det verkligen vara så?
09.04.2026 - 17:04DROPS Design answered:
Hej Annelie. Jo det stämmer att det ska vara aviga maskor på rätsidan i mönster M.9. Mvh DROPS Design
10.04.2026 - 07:04
![]() Sina wrote:
Sina wrote:
Weil ich keine Kontakt-Mail finde einmal hier. Dieser Etsy-Store hat das Pattern geklaut und verkauft es: FrigshopStore (ich konnte keinen Link posten).
02.03.2026 - 08:41
![]() Karen wrote:
Karen wrote:
Note to self...do not knit this pattern while doing ANYTHING ELSE!! The skirt part is fine, but the bodice???? Help!!! Im nearly at the end, and I can't get the measurements to add up! But I will persevere because it is just beautiful. And honestly, well worth the sweat, tears and grrrrrr moments!!
31.01.2026 - 12:32
![]() Solveig Zahl wrote:
Solveig Zahl wrote:
Hei, strikker nåSweet Rosie. Lurer på når felling tar til.? Står du skal følge M1 til 13 cm,er der nå.Skulle jeg allerede begynt felling på 1.?Så fortsette med2? med en gang. Veldig usikker på dette. Håper ikke jeg må rekke opp 13cm☺️mvh Solveig
28.01.2026 - 20:39DROPS Design answered:
Hei Solveig, Du har strikket riktig. M.1 er de 2 første rad i diagrammet som er gjentatt uten å felle i 13 cm. Nå feller du for første gang og deretter fortsetter med M.2. Hilsen Drops Team.
30.01.2026 - 06:49
![]() Torill Edvartsen wrote:
Torill Edvartsen wrote:
I sokkeoppskriften står det; strikk3-3,5-3,5-4 cm glattstrikk. Hvorfor to tall for hver størrelse? Mvh Torill
26.01.2026 - 21:24
![]() Iris wrote:
Iris wrote:
Ich meinte den Mustersatz M 9
08.11.2025 - 15:11
![]() Iris wrote:
Iris wrote:
Der Mustersatz fehlt in der Anleitung
08.11.2025 - 15:10
![]() SONIA wrote:
SONIA wrote:
Bonjour, sur le diagramme M9A M9B M9C il est noté en haut 23 alors qu'il y a 22 mailles. (8 mailles, 6 mailles 8 mailles) est-ce une erreur ou y a t'il quelque chose que je n'ai pas compris ? D'avance, merci pour votre retour. Très belle journée
31.10.2025 - 07:17DROPS Design answered:
Bonjour Sonia, il semble que ce soit juste une faute de frappe sur ce nombre de mailles car vous devez bien avoir 8, 6 et 8 (ce qui correspond aussi aux nombres des explications), nos stylistes vont corriger cela. Merci pour votre retour. Bon tricot!
31.10.2025 - 07:24
![]() Leila wrote:
Leila wrote:
On kyllä sekava ohje, kommenttikentässä on lukematon määrä kysymyksiä, ei vastauksia.malli on nätti, mutta käännös, kuka sen on ikinä tehnyt, on surkea.kääntäjän pitää itse testata ohje, jotta siitä tulee ymmärrettävä.
16.07.2025 - 13:14
|
||||||||||||||||||||||||||||||||||
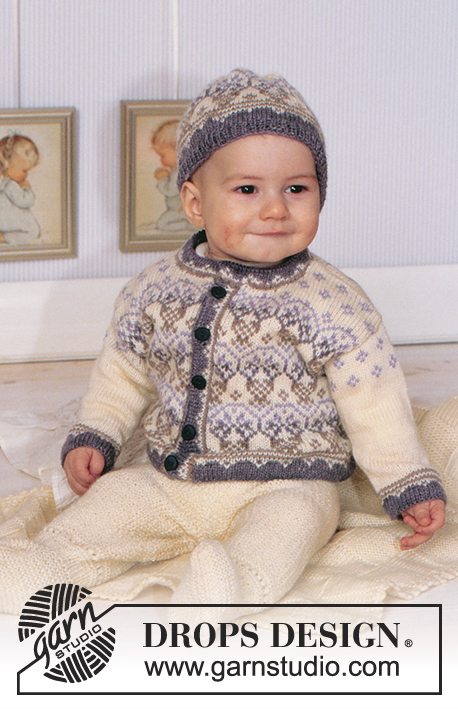
Sweet Rosie#sweetrosiedress |
||||||||||||||||||||||||||||||||||
|
|
||||||||||||||||||||||||||||||||||
DROPS Dress and socks with pattern in BabyMerino.
DROPS Baby 11-4 |
||||||||||||||||||||||||||||||||||
|
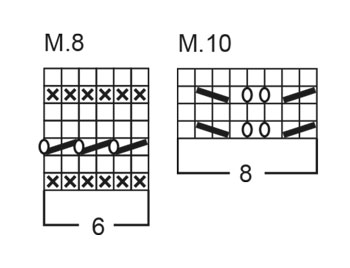
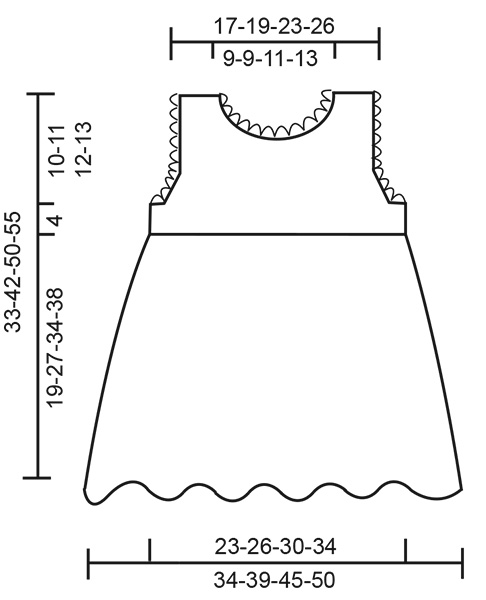
Knitting tension: M.1 to M.7 and M.9: 32 sts x 34 rows on needle size 2.5 mm = 10 x 10 cm. Stocking sts: 25 sts x 34 rows on needle size 2.5 mm = 10 x 10 cm. Garter sts (back and forth on needle: knit all rows. Garter sts (on circular needle): knit 1 round, purl 1 round. Pattern: See diagrams M.1 to M10. The diagrams are seen from the RS. -------------------------------------------------------------------- DRESS: Buttonhole: Make buttonholes on the right edge mid back from the RS. 1 buttonhole = cast off the 3rd and 4th sts from the edge and cast on 2 new sts in the same place on the return row. Make buttonholes as follows: Size 1/3 months: 2, 5, 8 and 11 cm Size 6/9 months: 2, 5, 9 and 12 cm Size 12/18 months: 2, 6, 10 and 13 cm Size 24 months: 2, 6, 10 and 14 cm Dec tips (apply to armhole and neckline): Dec inside 2 edge sts in garter sts from the RS. Dec as follows after 2 edge sts: slip 1 st as if to knit, K1, psso. Dec as follows before 2 edge sts: K2 tog. -------------------------------------------------------------------- Back and front piece: The dress is knitted round on circular needle from bottom edge up. Cast on 216-252-288-324 sts on circular needle size 2.5 mm with pink. Knit 2 rounds in garter sts and continue in M.1. When piece measures 8-10-13-17 cm begin the dec. Dec 12-14-16-18 sts per round, i.e. dec 2 sts on every 2nd repeat across – see arrows in diagram. This means the size of the zig-zags in the pattern will decrease as you go along. Dec as follows: When piece measures 8-10-13-17 cm knit first 1 round with dec = 204-238-272-306 sts, continue in M.2. When piece measures 10-14-17-21 cm knit second round with dec = 192-224-256-288 sts, continue in M.3. When piece measures 12-17-21-25 cm knit third round with dec = 180-210-240-270 sts, continue in M.4. When piece measures 14-20-25-29 cm knit fourth round with dec = 168-196-224-252 sts, continue in M.5. When piece measures 16-23-29-33 cm knit fifth round with dec = 156-182-208-234 sts, continue in M.6. When piece measures 18-26-33-37 cm knit sixth round with dec = 144-168-192-216 sts, continue in M.7. When piece measures 19-27-34-38 cm knit M.8 (= row with holes), at the same time on the last round of M.8 dec 2 sts evenly = 142-166-190-214 sts. Now carry on measuring piece from the first round of M.8. Divide the piece mid back and finish the dress back and forth on circular needle. Cast on 2 new sts each side = 146-170-194-218 sts. Knit next row as follows form the RS: 5 edge sts in garter sts, M.9A (= 8 sts), M.9B over 120-144-168-192 sts, M.9C (= 8 sts) and 5 edge sts in garter sts. Continue in pattern whilst making buttonholes on right edge – see explanation above. When piece measures 3 cm (from 1st round of M.8) knit next row as follows from the RS: 5 edge sts in garter sts, 28-34-40-46 sts of M.9, 10 sts in garter sts, 60-72-84-96 sts of M.9, 10 sts in garter sts, 28-34-40-46 sts of M.9, 5 edge sts in garter sts. Continue in pattern until there are 4 rows in garter sts over 10 sts each side. On the next row cast off 6 sts each side for armhole and finish each piece separately. Front piece: = 64-76-88-100 sts. Continue in M.9 with 2 sts in garter sts each side. At the same time dec 1 st for armhole – see Dec tips – on every other row a total of 5-8-8-8 times = 54-60-72-84 sts. P the sts (seen from the RS) not fitting into M.9. After the dec for armhole continue with 2 sts in garter sts + 1 st in stocking st each side (i.e. 1 st in stocking sts along armhole). When piece measures approx 9-10-10-11 cm – adjust after 1 full repeat of M.9 – knit 4 rows with garter sts over the middle 22-22-28-34 sts (M.9 over remaining sts). Now cast off the middle 18-18-24-30 sts for neck and dec 1 st towards neckline on every other row a total of 6 times – see Dec Tips = 12-15-18-21 sts left on each shoulder. Continue in M.9 with 2 sts in garter sts + 1 st in stocking st towards the neckline. When piece measures approx 14-15-16-17 cm (= 33-42-50-55 cm full length) cast off remaining sts – adjust after a full pattern repeat. Left back piece: = 35-41-47-53 sts. Continue in M.9 with 2 sts in garter sts towards armhole and 5 edge sts in garter sts towards mid back. At the same time dec for armhole as described for front piece = 30-33-39-45 sts. When piece measures approx 12-13-14-15 cm – adjust after a full pattern repeat – knit 4 rows with garter sts over 18-18-21-24 sts towards mid back. Now cast off 16-16-19-22 sts towards mid back for neck and dec 1 st towards neckline on every other row 2 times – see Dec Tips = 12-15-18-21 sts left on shoulder. Continue in M.9 with 2 sts in garter sts + 1 st in stocking st towards the neckline. When piece measures approx 14-15-16-17 cm (= 33-42-50-55 cm full length) cast off remaining sts – adjust after a full pattern repeat. Right back piece: = 35-41-47-53 sts. Knit as left back piece, but mirrored. Remember buttonholes! Assembly: Sew shoulder seams. Place right edge over left edge on back piece and sew at bottom. Sew on buttons. Crochet borders: Crochet round armholes and neckline with crochet hook size 2.5 mm with pink as follows (crochet round the 2 outermost sts in garter sts): 1 dc, *3 ch, 1 dc in first ch, skip 1 st, 1 dc in next st* , repeat from *-*. ------------------------------------------------------------------ SOCKS: Foot length: 10-11-12-14 cm Cast on 56-56-64-64 sts on double pointed needles size 2.5 mm with white Alpaca. Knit 1 round and knit 2 cm of M.10. Knit 1 round, at the same time dec 16-16-20-20 sts evenly on round = 40-40-44-44 sts. Knit M.8. Now knit heel as follows: Knit 3-3.5-3.5-4 cm stocking sts back and forth on needles over 18 sts mid back. Heel dec (1st row = RS): 1st row: Knit 10 sts, K2 tog into back of st, K1, turn. 2nd row: slip 1 st as if to P, P4, P2 tog, P1, turn. 3rd row: slip 1 st as if to K, K5, K2 tog into back of st, K1, turn. 4th row: slip 1 st as if to P, P6, P2 tog, P1, turn. 5th row: slip 1 st as if to K, K7, K2 tog into back of st, K1, turn. 6th row: slip 1 st as if to P, P8, P2 tog, P1, turn. 7th row: K2 tog, K8, K2 tog into back of st = 10 sts on needle (= total 32-32-36-36 sts). Now pick up 7-8-8-9 sts on each side of the heel = 46-48-52-54 sts. Continue in stocking sts over all sts and dec 1 st on each side of the upper 18-20-22-24 sts on every other row a total of 7 times = 32-34-38-40 sts. When foot measures 8-9-11-12 cm (from the start of the heel dec) insert a marking thread each side and dec 1 st on each side of both threads on every round (4 dec per round) a total of 7-7-8-8 times. Cut the thread and pull through remaining sts. Sew tight. Crochet a chain of ch with pink , approx 35 cm long, and pull through row with holes. |
||||||||||||||||||||||||||||||||||
Diagram explanations |
||||||||||||||||||||||||||||||||||
|
||||||||||||||||||||||||||||||||||
 |
||||||||||||||||||||||||||||||||||
 |
||||||||||||||||||||||||||||||||||
 |
||||||||||||||||||||||||||||||||||
Have you finished this pattern?Tag your pictures with #dropspattern #sweetrosiedress or submit them to the #dropsfan gallery. Do you need help with this pattern?You'll find 34 tutorial videos, a Comments/Questions area and more by visiting the pattern on garnstudio.com. © 1982-2026 DROPS Design A/S. We reserve all rights. This document, including all its sub-sections, has copyrights. Read more about what you can do with our patterns at the bottom of each pattern on our site. |
||||||||||||||||||||||||||||||||||


With over 40 years in knitting and crochet design, DROPS Design offers one of the most extensive collections of free patterns on the internet - translated to 17 languages. As of today we count 324 catalogues and 12290 patterns translated into English (UK/cm). 12290
We work hard to bring you the best knitting and crochet have to offer, inspiration and advice as well as great quality yarns at incredible prices! Would you like to use our patterns for other than personal use? You can read what you are allowed to do in the Copyright text at the bottom of all our patterns. Happy crafting!
Post a comment to pattern DROPS Baby 11-4
We would love to hear what you have to say about this pattern!
If you want to leave a question, please make sure you select the correct category in the form below, to speed up the answering process. Required fields are marked *.