
Popular categories
Looking for a yarn?


Comments / Questions (11)
![]() Martina wrote:
Martina wrote:
Ich verstehe die Anleitung für das Vorderteil nicht. Sind die zwei Krausrippen als Blende gedacht, also in der vorderen Mitte? Und wo mache ich die Zunahmen? Ebenfalls dort? Und wie? Aus dem Querfaden? Mit Umschlag (mit oder dekorativem Loch)? Ich verstehe leider Bahnhof.
19.04.2020 - 16:51DROPS Design answered:
Liebe Martina, die 2 kraus rechte Maschen sind als Blende gedacht, die neuen Maschen werden am Ende der Rückreihe (re. Vorderteil) angeschlagen wie in diesem Video gezeigt. Die 2 Maschen am Anfang jeder Hinreihe/Ende jeder Rückreihe sollen immer krausrechts gestrickt werden. Viel Spaß beim stricken!
20.04.2020 - 10:35
![]() Lara wrote:
Lara wrote:
Sul davanti bisogna aumentare 2 m. per 10 volte e poi 1 m. per 11 volte, ma ogni quanto? Perché non è specificato.
12.03.2020 - 12:24DROPS Design answered:
Buongiorno Lara, deve aumentare a ferri alterni, come indicato all'inizio della frase sugli aumenti. Buon lavoro!
12.03.2020 - 14:21
![]() Ewa Larsson wrote:
Ewa Larsson wrote:
Hur gör jag för att avmaska för ärmkullen? Är det lika på båda sidor av ärmen? Eller är det bara i ena sidan?
21.04.2018 - 16:33DROPS Design answered:
Hej, du ska avmaska lika många maskor i båda sidorna.
23.04.2018 - 14:17Doris wrote:
Spring over 2 cm for at ikke kanten ska bölge.
09.07.2014 - 19:05
![]() Inge Therkildsen wrote:
Inge Therkildsen wrote:
Der er vist en fejl, hvor man hækler kanterne. "hækl 3 lm, 1 st i første lm, spring over 2 cm, 1 fm i næste m. Menes der ikke spring over 2 m???
08.07.2014 - 15:07
![]() DROPS Deutsch wrote:
DROPS Deutsch wrote:
Die Ärmel sind separat gbeschrieben und M1 wird nach 1 Krausrippe gestickt.
16.06.2010 - 15:09
![]() Tine wrote:
Tine wrote:
Ich finde in der Anleitung für die Ärmel nicht, wann und wo ich das Lochmuster einarbeiten muss, es ist überhaupt nicht erwähnt!
16.06.2010 - 14:12
![]() Irene wrote:
Irene wrote:
Søt og praktisk. Please ha den med.
21.01.2006 - 20:03
![]() Lucia wrote:
Lucia wrote:
Flott jakke!. Jeg venter på oppskrift! Hva tid kommer den ?
13.01.2006 - 17:54karina wrote:
Enkel o välarbetad. Den vill jag ha
06.01.2006 - 19:50
|
||||||||||||||||
DROPS 94-27 |
||||||||||||||||
|
|
||||||||||||||||
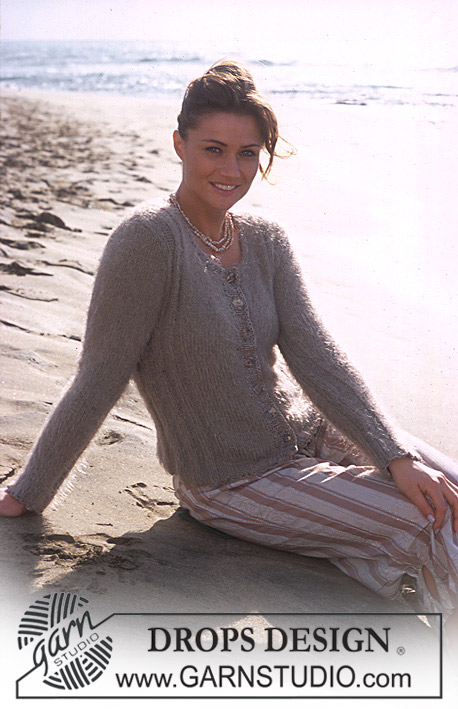
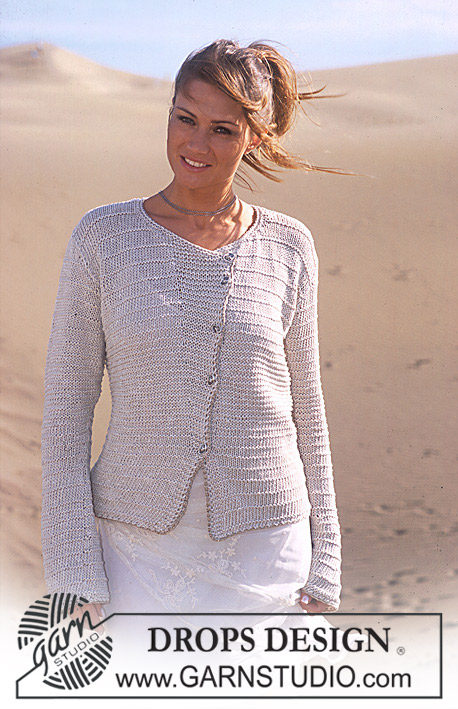
DROPS Jacket in Muskat with crochet borders
DROPS 94-27 |
||||||||||||||||
|
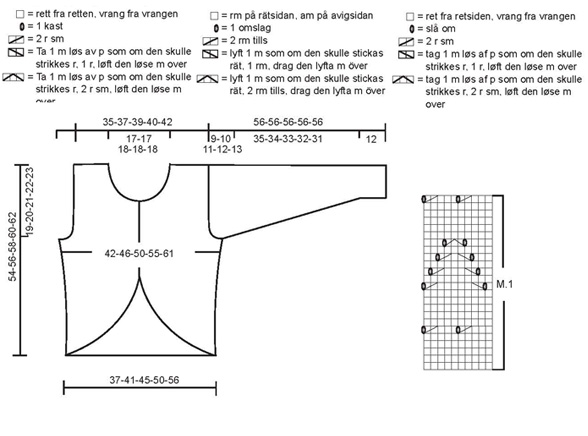
Knitting tension: 21 sts x 28 rows on needle size 4 mm in stocking stitch = 10 x 10 cm Garter stitch: Knit all rows Decreasing tips (applies to armhole): Decrease within 4 edge sts from the right side. Dec as follows after 4 edge sts: slip 1 st as if to knit, K1, psso. Dec as follows before 4 edge sts: K2 tog. Pattern: See diagram M.1. The diagram is seen from the right side Back piece: Cast on 80-88-96-108-120 sts (inclusive of 1 edge st each side) on needle size 4 with Muskat and knit 2 rows garter st. Continue in stocking st. When piece measures 10 cm, inc 1 st each side on every 5 cm a total of 5 times = 90-98-106-118-130 sts. When piece measures 35-36-37-38-39 cm dec 3-3-4-5-8 sts for armhole each side and thereafter 1 st each side on every other row a total of 5-7-8-12-13 times = 74-78-82-84-88 sts. When piece measures 52-54-56-58-60 cm, cast off the middle 32-32-34-34-34 sts for neck. Dec 2 sts at neckline on next row = 19-21-22-23-25 sts left on each shoulder. Cast off when piece measures 54-56-58-60-62 cm. Right Front: Cast on 6-7-8-9-10 sts (inclusive of 1 edge st at side) on needle size 4. Knit 2 rows garter st. Read all of the following section before continuing: Increases mid front: Continue in stocking st with 2 sts at mid front in garter st, at the same inc towards mid front on every other row as follows (insert a marking thread where the increases start and finish): 2 sts 10-10-10-12-14 times and 1 st 11-14-17-18-19 times, then on every 4th row 1 st 5 times for all sizes. NB! Knit only the outermost 2 sts towards mid front in garter – these 2 sts shift as you cast on new sts. Increases at side: At the same time, when piece measures 10 cm, inc at side as described for back piece. After all increases have been made there are 47-51-55-61-67 sts remaining. Decreases for armhole: When piece measures 35-36-37-38-39 cm dec for armhole as described for back piece = 39-41-43-44-46 sts. Pattern: At the same time when piece measures 42-43-45-46-48 cm, knit next row from the right side as follows: *K3, K2 tog, yo*, repeat from *-* a total of 6-6-7-7-7 times, knit remaining sts in stocking st. Neckline: When piece measures 43-44-46-47-49 cm cast off the outermost 10-10-11-11-11 sts towards mid front for neck. Now dec at neckline on every other row as follows: 3 sts 1 time, 2 sts 2 times and 1 st 3 times = 19-21-22-23-25 sts left on shoulder. Cast off when piece measures 54-56-58-60-62 cm. Left front piece: As right front piece, but mirrored. Sleeve: Cast on 52-52-52-62-62 sts (inclusive of 1 seam st each side) on needle size 4. Knit 2 rows garter and continue in M.1 with 1 seam st each side. After M.1 continue in stocking st until finished measurements. When sleeve measures 12 cm, inc 1 st each side on every 3.5-2.5-2.-2.5-2 cm a total of 10-13-15-12-15 times = 72-78-82-86-92 sts. When piece measures 47-46-45-44-43 cm cast off for sleeve cap each side on every other row as follows: 3 sts 1 time, 2 sts 3 times, 1 st 5-6-7-9-10 times, and then 2 sts each side until piece measures 55 cm, now dec 3 sts each side and cast off remaining sts on next row, piece measures approx 56 cm. Assembly: Sew shoulder seams. Set in sleeves and sew sleeve and side seams. Crochet border: Crochet round all edges, including neck and sleeves using crochet hook size 4 as follows: 1 dc in first st, *3 ch, 1 tr in first ch, skip approx 2 cm, 1 dc in next st*, repeat from *-*. Sew buttons on left front piece – use crochet border on right piece as buttonhole loops. Place top button approx 1 cm from neckline and space the rest of the buttons every 8 cm. |
||||||||||||||||
Diagram explanations |
||||||||||||||||
|
||||||||||||||||
 |
||||||||||||||||
Have you finished this pattern?Tag your pictures with #dropspattern or submit them to the #dropsfan gallery. Do you need help with this pattern?You'll find 23 tutorial videos, a Comments/Questions area and more by visiting the pattern on garnstudio.com. © 1982-2026 DROPS Design A/S. We reserve all rights. This document, including all its sub-sections, has copyrights. Read more about what you can do with our patterns at the bottom of each pattern on our site. |
||||||||||||||||


With over 40 years in knitting and crochet design, DROPS Design offers one of the most extensive collections of free patterns on the internet - translated to 17 languages. As of today we count 324 catalogues and 12290 patterns translated into English (UK/cm). 12290
We work hard to bring you the best knitting and crochet have to offer, inspiration and advice as well as great quality yarns at incredible prices! Would you like to use our patterns for other than personal use? You can read what you are allowed to do in the Copyright text at the bottom of all our patterns. Happy crafting!
Post a comment to pattern DROPS 94-27
We would love to hear what you have to say about this pattern!
If you want to leave a question, please make sure you select the correct category in the form below, to speed up the answering process. Required fields are marked *.