
Popular categories
Looking for a yarn?


Comments / Questions (109)
![]() Marja-liisa wrote:
Marja-liisa wrote:
Haluan kutoa yhdestä langasta. Alpaca brushed langasta tai Kid mohairista. Jotta ohje täsmää, pitääkö kutoa useampi kertaisesta langasta ja mikä on langan menekki kummassakin tapauksessa? Näin saan kevyen neuleen.
17.04.2026 - 11:31DROPS Design answered:
Hei, jos neulot työn DROPS Kid-Silk -langalla, voit neuloa tämän mallin 3-kertaisella langalla. Voit käyttää lankamuunnintamme, kun lasket langanmenekin. Löydät sen tästä!
17.04.2026 - 16:58
![]() Netta wrote:
Netta wrote:
Hey, how do I sew the 19 cm long front edges on the cardigan? They are too short to connect at the back even if i did just like told.
15.04.2026 - 18:33DROPS Design answered:
Dear Netta, in this video, we show how to sew this kind of front edges together and along neckline on back piece. You are supposed to stretch these front bands a bit, the 19 cm x 2 = 38 cm while the 60 sts cast on in between are approx. 40 cm. Happy knitting!
16.04.2026 - 08:49
![]() Diana wrote:
Diana wrote:
Es geht um die Blendteile was mache ich mit denen, gibt es eine Anleitung? Ihh versteh die Anleitung nicht so ganz. Vielen Dank
12.04.2026 - 22:43DROPS Design answered:
Siehe unten - sagen Sie uns gerne, ob es Ihnen helfen kann. Danke im voraus.
13.04.2026 - 10:52
![]() Diana wrote:
Diana wrote:
Hallo Ich verstehe die Anleitung nicht, wie die Passen eingearbeitet werden die vorher extra gestrickt wurden 4 Maschen mit 20 cm Länge, was mache ich damit? Die bleiben dann immer 20 cm hängen?
12.04.2026 - 22:29DROPS Design answered:
Liebe Diana, man strickt also zuerst die 2 Blende separat dann wird man neuen Maschen für die Passe dazwischen anschlagen; in diesem Video zeigen wir, wie man so strickt (die Halsblende sind im Video unterschiedlich, die Technik ist aber gleich). Viel Spaß beim Stricken!
13.04.2026 - 10:44
![]() Lucille wrote:
Lucille wrote:
J’ai de la laine patons Diana 70% acrylique 30% nylon et échantillons 15 mailles = 10 cm avec aiguilles 6 mm et je n’ai pas suffisamment de laine et c’est discontinue! Avec quelle laine je peux continuer mon chandail! Il est de couleur marine! Merci
06.04.2026 - 20:25DROPS Design answered:
Bonjour Lucille, demandez conseil à votre revendeur, il saura vous renseigner sur les alternatives, consultez notre convertisseur pour voir les alternatives possibles, l'une d'elles s'accordera probablement avec la vôtre. Bon tricot!
08.04.2026 - 12:41
![]() Lucille wrote:
Lucille wrote:
Encore moi! Aidez-moi à comprendre! Après le montage de mailles pour l’empiecement et l’explication de l’encolure et raglan, je vais tout de suite aux rangs 1, 2, 3 et 4
30.03.2026 - 02:43DROPS Design answered:
Bonjour Lucille, d'abord vous tricotez les rangs 1 et 2 - 'tricotez 3-3-6-7-4-4 fois au total les RANGS 1 et 2 (on a tricoté 6-6-12-14-8-8 rangs)'. Ensuite vous tricotez les rangs 1-4 - tricoter 9-10-9-10-13-14 fois au total fois les RANGS 1 à 4 . Bon tricot!
30.03.2026 - 09:26
![]() SIOUXIE wrote:
SIOUXIE wrote:
Les bandes sont travaillées d'abord, puis des points de suture sont jetés entre eux pour le joug, qui est travaillé d'avant en arrière, haut en bas et à partir du milieu avant. Lorsque le joug est terminé, il est divisé pour le corps et les manches. Je pense que la traduction n'est pas très bonne , que signifie "les point s de suture" et le joug svp? Qu'entendez vous par "les bandes" est ce qu'il s'agit de la bordure?
28.03.2026 - 14:51DROPS Design answered:
Bonjour Mme Siouxie, je ne trouve pas ces mots dans les explications en français; on commence ici par tricoter les mailles de bordure des devants séparément et on monte les mailles de l'encolure/l'empiècement entre elles pour tricoter l'empiècement. Est-ce que cela peut vous aider ? Si ce n'est pas le cas, n'hésitez pas à préciser quelle partie vous ne comprenez pas pour que nous puissions vous expliquer différemment. Merci pour votre compréhension.
07.04.2026 - 09:36
![]() Hildegard wrote:
Hildegard wrote:
Ich würde gerne diese Jacke stricken. Welche Alternative zum Garn Flora würden Sie vorschlagen? Ich vertrage leider keine Merino.
27.03.2026 - 12:42DROPS Design answered:
Liebe Hildegard, benutzen Sie den Garnumrechner um Garnalternative zu Flora sowie die passende Garnmenge zu finden. Viel Spaß beim Stricken!
27.03.2026 - 15:59
![]() Lucille wrote:
Lucille wrote:
Je ne comprends pas quand vous dites continuez ainsi Rang 1 Rang 2 Rang 3 Rang 4 Est- ce qu’il faut attendre d’avoir fait toutes les augmentations de l’encolure, puisque j’ai terminé les augmentations des manches avant celles de l’encolure?merci
27.03.2026 - 00:23DROPS Design answered:
Bonjour Lucille, les augmentations de l'encolure doivent être terminées avant la division et ces augmentations se font en plus des augmentations du raglan. Quand vous avez augmenté 3 à 7 fois (cf taille) 8 mailles tous les 2 rangs, vous augmentez désormais pour le raglan alternativement 8 m (au rang 1 des 4) et 4 m (au rang 3 des 4) jusqu'à ce que vous ayez augmenté le nombre de mailles requis et tricoté le nombre de rangs requis pour votre taille: 12 à 18 fois au total (y compris celles tous les 2 rangs) pour les manches et 21 à 32 fois au total pour le dos et les devants. Boon tricot!
27.03.2026 - 07:33
![]() Lucille wrote:
Lucille wrote:
RAGLAN: RANG 1 (sur l’endroit): Tricoter en jersey et augmenter de chaque côté de chacune des mailles avec un marqueur (on augmente 8 mailles). RANG 2 (sur l’envers): Tricoter en jersey avec les mailles de bordure des devants comme avant. Tricoter 3-3-6-7-4-4 fois au total les RANGS 1 et 2 (on a tricoté 6-6-12-14-8-8 rangs). Vous dites 8 augmentations mais il n’y a que 2 marqueurs pour les manches, donc 4 augmentations
27.03.2026 - 00:20DROPS Design answered:
Bonjour Lucile, vous devez augmenter pour le raglan de chaque côté des mailles avec un marqueur: 1 maille à la fin du devant gauche, 1 m au début de la manche + 1 m à la fin de la manche, 1 m au début du dos + 1 m à la fin du dos, 1 m au début de la manche + 1 m à la fin de la manche, et enfin 1 m au début du devant droit soit 8 mailles au total pour le raglan. Bon tricot!
27.03.2026 - 07:30
|
|
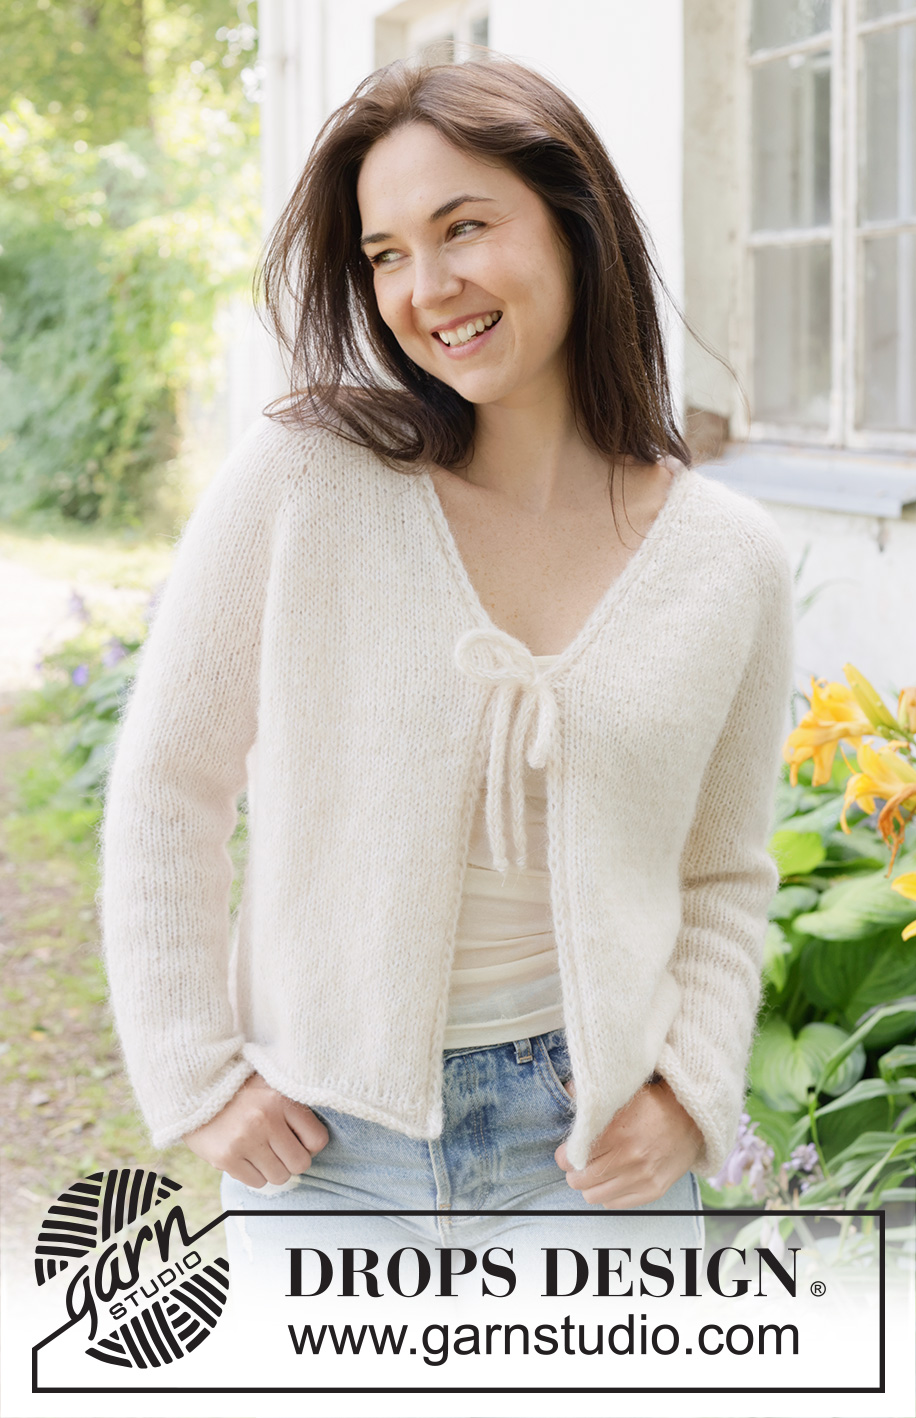
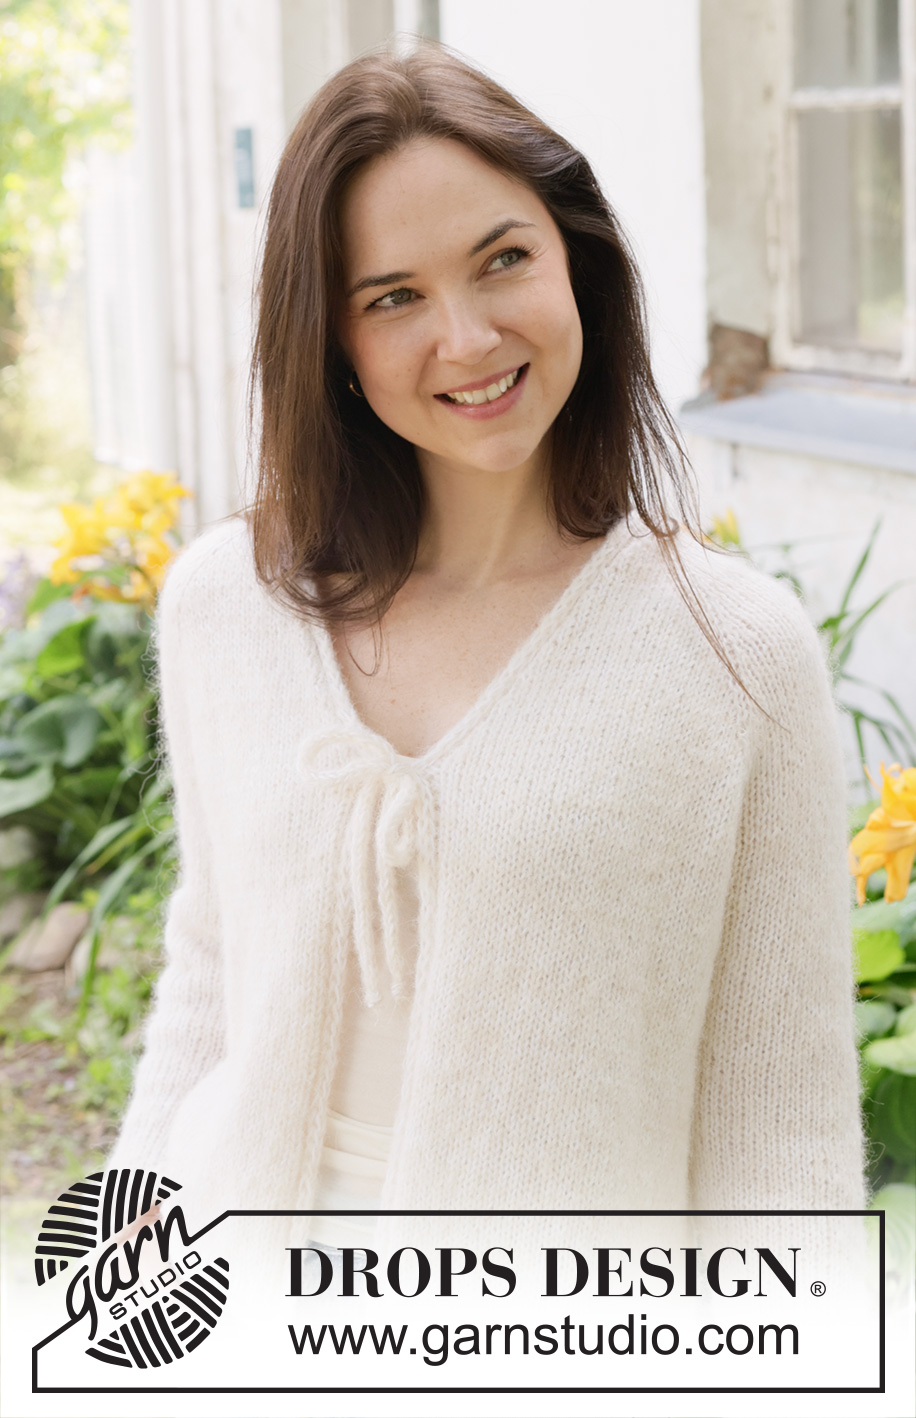
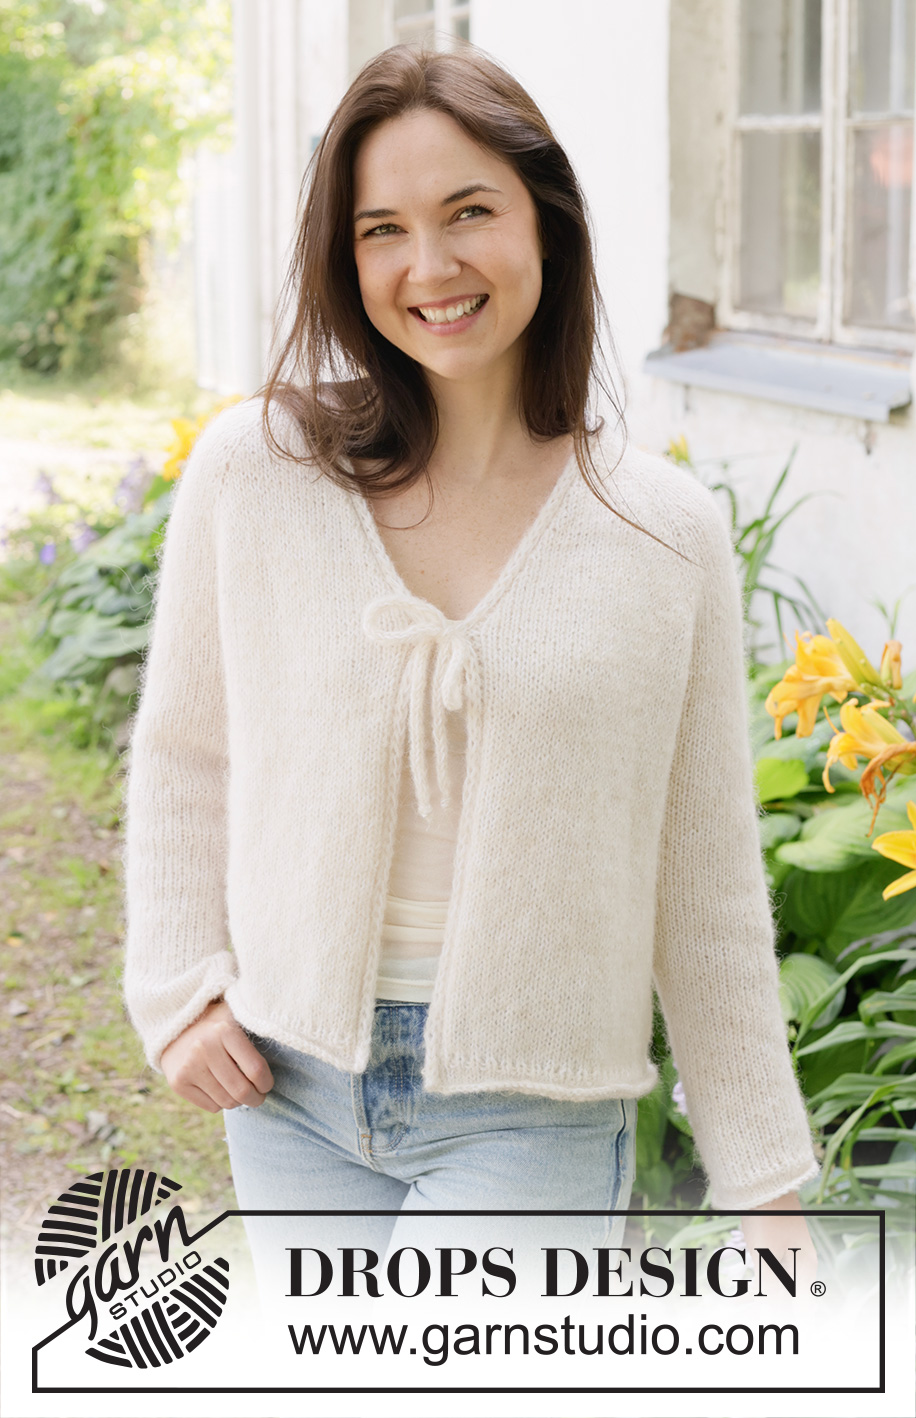
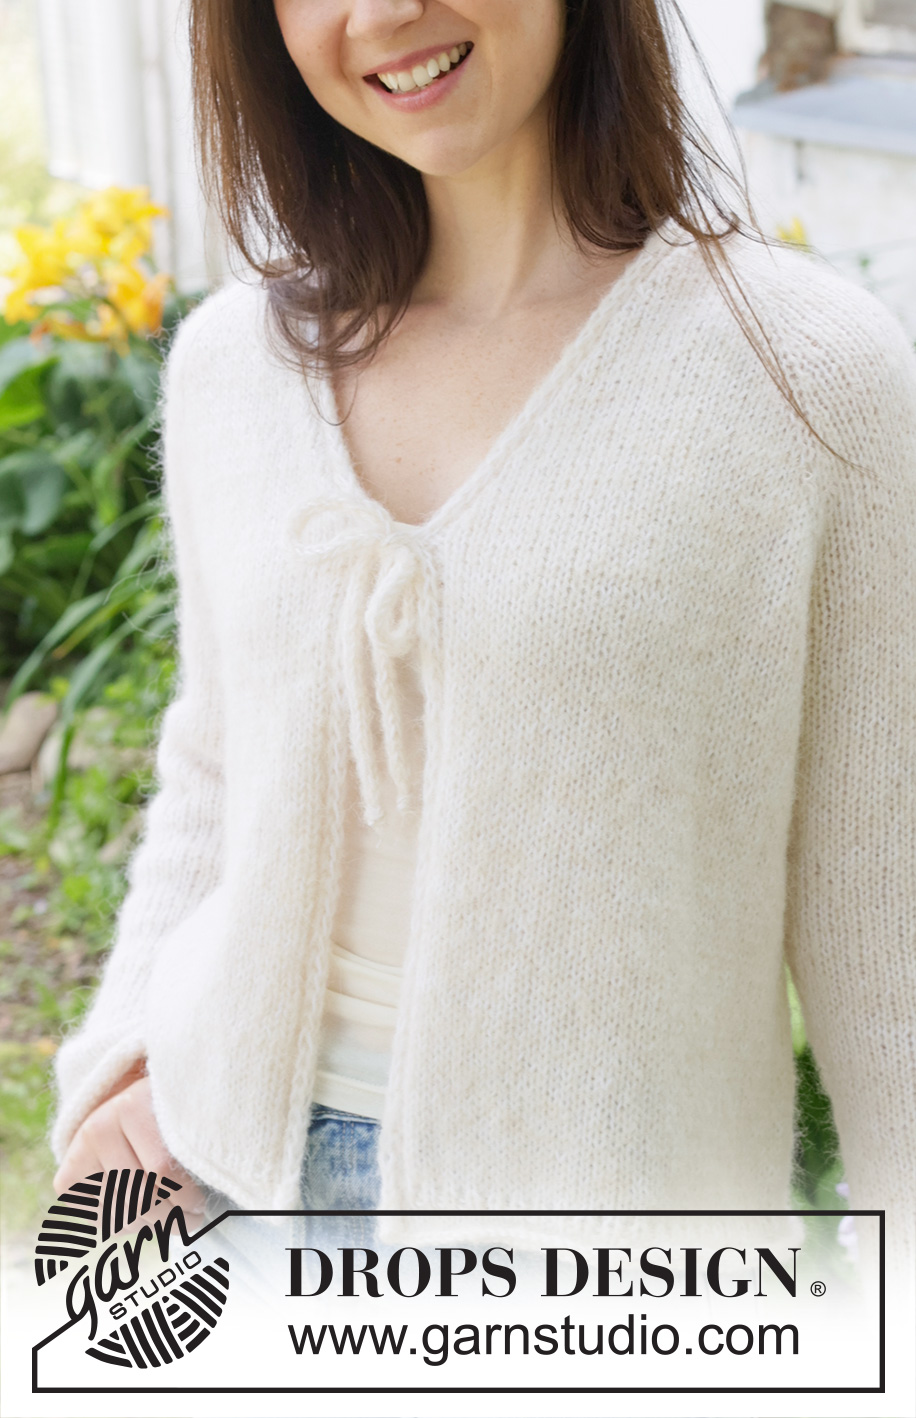
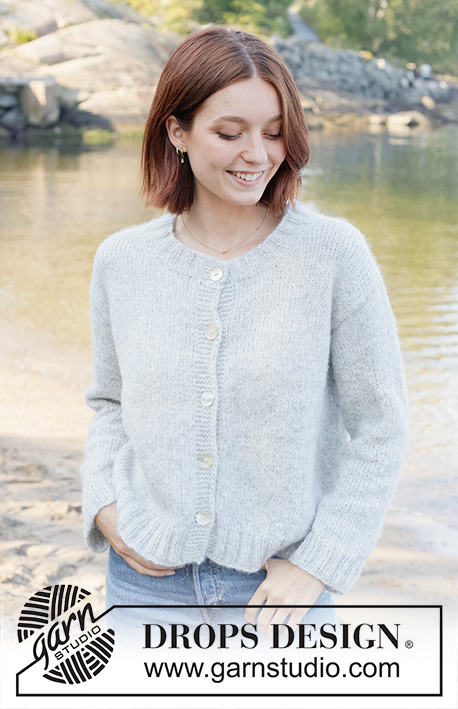
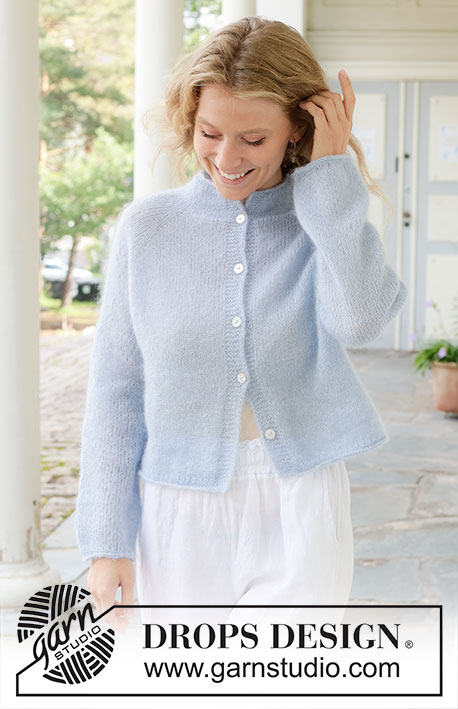
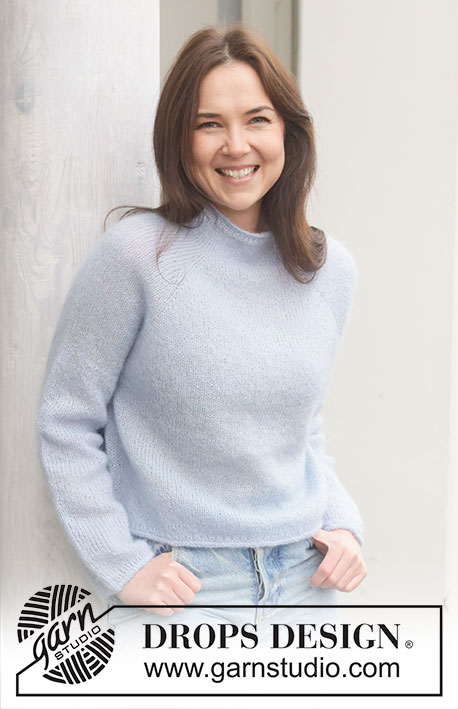
Delicate Dance Cardigan#delicatedancecardigan |
|
 |
 |
Knitted jacket in DROPS Brushed Alpaca Silk and DROPS Flora. The piece is worked top down with raglan, V-neck, rolled edges and I-cord. Sizes S - XXXL.
DROPS 258-14 |
|
|
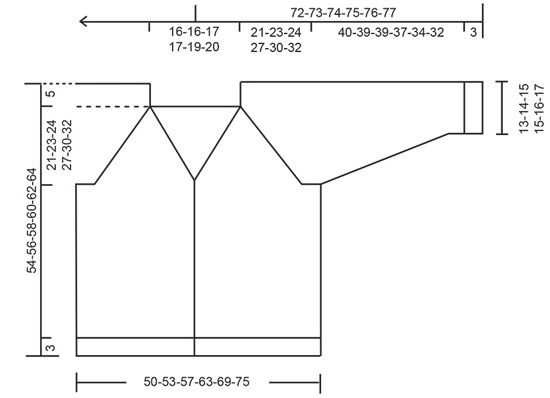
------------------------------------------------------- EXPLANATIONS FOR THE PATTERN: ------------------------------------------------------ RAGLAN: Increase 1 stitch by working 1 yarn over, which is worked twisted on the next row to avoid a hole. V-NECK: Increase 1 stitch by working 1 yarn over, which is worked twisted on the next row to avoid a hole. DECREASE TIP (mid-under sleeves): Decrease 1 stitch on each side of the marker-thread as follows: Work until there are 3 stitches left before the marker-thread, knit 2 together, knit 2 (marker-thread sits between these 2 stitches), slip 1 stitch knit-wise, knit 1 and pass the slipped stitch over the knitted stitch. ------------------------------------------------------- START THE PIECE HERE: ------------------------------------------------------- JACKET – SHORT OVERVIEW OF THE PIECE. The pattern uses both long and short needles; start with the length which fits the number of stitches and change when necessary. The bands are worked first, then stitches are cast on between them for the yoke, which is worked back and forth, top down and from mid front. When the yoke is finished, it is divided for body and the sleeves. The body is continued back and forth, while the sleeves wait. The sleeves are worked in the round, top down. Two ties are worked to finish (used to close the jacket). RIGHT BAND: Cast on 4 stitches with circular needle size 5.5 mm, 1 strand DROPS Brushed Alpaca Silk and 1 strand DROPS Flora (2 strands). RIGHT SIDE: Purl 2, slip 1 stitch purl-wise with strand in front, knit 1. WRONG SIDE: Slip 1 stitch purl-wise with strand in front, knit 3. Repeat these 2 rows until the band measures 19-19-20-20-20-21 cm, finishing after a row from the wrong side. Cut the strand and lay the piece to one side. LEFT BAND: Cast on 4 stitches with circular needle size 5.5 mm, 1 strand DROPS Brushed Alpaca Silk and 1 strand DROPS Flora (2 strands). RIGHT SIDE: Slip 1 stitch purl-wise with strand in front, knit 1, purl 2. WRONG SIDE: Knit 2, slip 1 stitch purl-wise with strand in front, knit 1. Repeat these 2 rows until the band measures 19-19-20-20-20-21 cm, finishing after a row from the wrong side. Now cast on stitches for the yoke between the bands as described below. YOKE: Work the left band as before, then cast on 60-60-62-62-64-66 stitches, work the right band as before (from the right side) = 68-68-70-70-72-74 stitches. Purl 1 row from the wrong side with 4 band stitches on each side. Insert 4 markers without working the stitches as follows: Count 5 stitches (= front piece), insert 1 marker in the next stitch, count 16 stitches (= sleeve), insert 1 marker in the next stitch, count 22-22-24-24-26-28 stitches (= back piece), insert 1 marker in the next stitch, count 16 stitches (= sleeve), insert 1 marker in the next stitch, there are 5 stitches left after the last marker (= front piece). Work stocking stitch back and forth with 4 band-stitches as before on each side. AT THE SAME TIME increase for both RAGLAN and the V-NECK – read descriptions above. Read both sections below before continuing. Remember to maintain the knitting tension. V-NECK: Start to increase for the V-neck on the first row from the right side, then every 4th row 10-10-11-11-12-13 times, increasing 1 stitch inside the bands on each side. RAGLAN: ROW 1 (right side): Increase on each side of each marker-stitch (8 increased stitches). ROW 2 (wrong side): Work stocking stitch and bands as before. Work ROWS 1 and 2 a total of 3-3-6-7-4-4 times (6-6-12-14-8-8 worked rows). Then increase as follows: ROW 1 (right side): Increase on each side of each marker-stitch (8 increased stitches). ROW 2 (wrong side): Work stocking stitch and bands as before. ROW 3 (right side): Increase only on the front and back pieces, i.e., before marker-stitches 1 and 3 and after marker-stitches 2 and 4 – do not increase on the sleeves (= 4 increased stitches). ROW 4 (wrong side): Work stocking stitch and bands as before. Work ROWS 1 to 4 a total of 9-10-9-10-13-14 times (= 36-40-36-40-52-56 rows worked; you have increased a total of 9-10-9-10-13-14 times on the sleeves and 18-20-18-20-26-28 times on the front and back pieces). All increases for raglan and the V-neck are finished. You have increased a total of 12-13-15-17-17-18 times on the sleeves and 21-23-24-27-30-32 times on the front and back pieces. There are 220-232-248-268-284-300 stitches. The yoke measures approx. 21-23-24-27-30-32 cm from the cast-on edge mid-back. Now divide for the body and sleeves. DIVIDE FOR BODY AND SLEEVES: Work the 4 band stitches as before, then 33-35-37-40-44-47 stocking stitches (= front piece), place the next 40-42-46-50-50-52 stitches on 1 thread for the sleeve, cast on 8-10-12-14-16-18 stitches (under sleeve), work 66-70-74-80-88-94 stocking stitches (= back piece), place the next 40-42-46-50-50-52 stitches on 1 thread for the sleeve, cast on 8-10-12-14-16-18 stitches (under sleeve), work 33-35-37-40-44-47 stocking stitches (= front piece) and the 4 band stitches as before. The body and sleeves are finished separately. BODY: = 156-168-180-196-216-232 stitches. Work stocking stitch back and forth with 4 band-stitches as before on each side until the piece measures 46-48-50-52-54-56 cm mid-back. On the last row decrease 1 stitch approx. mid-back = 155-167-179-195-215-231 stitches. Now you work a rolled edge, starting from the right side as follows: Work the band as before, * knit 1, purl 1 * until there are 5 stitches left on the row, knit 1 and 4 band stitches as before. Then work from the wrong side as follows: Work the band as before, * purl 1, knit 1 * until there are 5 stitches left on the row, purl 1 and 4 band stitches as before. Work 4 rows of stocking stitch. Cast off. The jacket measures approx. 49-51-53-55-57-59 cm mid-back and 54-56-58-60-62-64 cm from top of shoulder. SLEEVES: Place the 40-42-46-50-50-52 sleeve-stitches from one thread on circular needle size 5.5 mm and knit up 1 stitch in each of the 8-10-12-14-16-18 stitches cast on under the sleeve = 48-52-58-64-66-70 stitches. Insert a marker-thread in the middle of the stitches under the sleeve. Start at the marker-thread and work stocking stitch in the round. When the sleeve measures 3 cm, decrease 2 stitches under the sleeve – read DECREASE TIP. Decrease like this every 10-8-6-3½-3½-2½ cm a total of 4-5-7-9-9-10 times = 40-42-44-46-48-50 stitches. Continue working until the sleeve measures 40-39-39-37-34-30 cm from the division. There is 3 cm left to finished length. Work 2 rounds of rib (knit 1, purl 1). Knit 4 rounds. Cast off. The sleeve measures approx. 43-42-42-40-37-35 cm. ASSEMBLY: Sew the bands together mid-back and sew the bands to the neckline. TIES: Work a tube of 4 stitches, using double pointed needles size 5.5 mm. Cast on 4 stitches with 1 strand of each quality (2 strands). Knit 1 row, then work as follows: * Push all stitches to the right end of the needle without turning, tighten the strand and knit 1 row *, work from *-* until the tube measures 25 to 30 cm. Cut the strands. Work 1 more tie in the same way. Sew 1 tie onto each side, approx. 2 cm below the last increase for the V-neck. Tie a bow mid-front. |
|
 |
|
Have you finished this pattern?Tag your pictures with #dropspattern #delicatedancecardigan or submit them to the #dropsfan gallery. Do you need help with this pattern?You'll find 30 tutorial videos, a Comments/Questions area and more by visiting the pattern on garnstudio.com. © 1982-2026 DROPS Design A/S. We reserve all rights. This document, including all its sub-sections, has copyrights. Read more about what you can do with our patterns at the bottom of each pattern on our site. |
|


With over 40 years in knitting and crochet design, DROPS Design offers one of the most extensive collections of free patterns on the internet - translated to 17 languages. As of today we count 324 catalogues and 12290 patterns translated into English (UK/cm). 12290
We work hard to bring you the best knitting and crochet have to offer, inspiration and advice as well as great quality yarns at incredible prices! Would you like to use our patterns for other than personal use? You can read what you are allowed to do in the Copyright text at the bottom of all our patterns. Happy crafting!
Post a comment to pattern DROPS 258-14
We would love to hear what you have to say about this pattern!
If you want to leave a question, please make sure you select the correct category in the form below, to speed up the answering process. Required fields are marked *.