
Popular categories
Looking for a yarn?


Comments / Questions (49)
![]() Caroline wrote:
Caroline wrote:
Comment faire pour le raglan lorsque l'on fait des jetés pour agrandir que l on augmente côté dos et devant et pas tous les rangs côtés manches et pour que le dessin se poursuive D'Avance merci Coodialement
08.06.2025 - 19:33DROPS Design answered:
Bonjour Caroline, continuez à incorporer les nouvelles mailles du devant et du dos au point fantaisie (s'il n'est pas terminé), ou bien tricotez les en jersey, et tricotez les mailles des manches sans augmenter 1 fois sur 2, pour bien respecter les augmentations alternativement tous les 2 et 4 tours. Bon tricot!
09.06.2025 - 10:17
![]() Catherine wrote:
Catherine wrote:
Please clarify the no of stitches for the rib for size X-L after working on the total increases & A4(33) A5(16) A6(33),, The total no. I got is 348 stitches for size XL instead of 344 stitches. Thank you for your attention.
12.04.2025 - 12:04DROPS Design answered:
Dear Catherine, you start size L with 138 sts and increase a total of 26 times 8 sts for raglan= 138+(8x26)=346 stitches. After diagrams are done, work the new stitches before the 35 sts A.1 and after the 35 sts A.3 in stocking stitch. Hope it can help. Happy knitting!
23.04.2025 - 10:38
![]() Sylvie Gingras wrote:
Sylvie Gingras wrote:
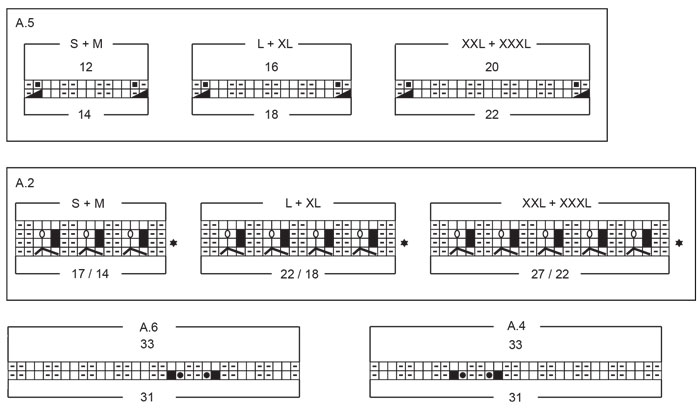
Bonjour, j'aimerais comprendre l'étoile sur diagramme A2. Je ne comprends l'explication - voir explications ci-dessus. Est-ce ce rang est tricoté comme suit 2 mailles envers 2 mailles endroits. Merci
17.03.2025 - 00:27DROPS Design answered:
Bonjour Mme Gingras, pour que les côtes du bas du pull tombent juste, vous devez ajuster la longueur du dos/devant après la division de sorte que le dernier rang tricoté dans A.2 soit celui avec une étoile noire, ainsi vous continuerez ces mailles en côtes 2 mailles envers, 2 mailles endroit. Bon tricot!
17.03.2025 - 09:58
![]() Karin Petry wrote:
Karin Petry wrote:
Leider komme ich mit dem Muster A2 nicht ganz klar. Sind in der zweiten Reihe des Musters dann in der Mitte vier Maschen? Und in der dritten Reihe 5 Maschen?
15.03.2025 - 12:07DROPS Design answered:
Liebe Frau Petry, bei der 1. Reihe A.2 wird man 1 Masche in jedem "3 Maschen rechts" Partie abnehmen, so in die 2 grösseren Größen wird man insgesamt 5 Maschen abnehmen, bei der 3. Reihe wird man dann 1 Umschlag zwischen den beiden rechten Maschen arbeiten, so sind es wieder 3 Maschen rechts. In diesem Video zeigen wir, wie man so ein Zopf strickt. Viel Spaß beim Stricken!
17.03.2025 - 07:33
![]() ANNA wrote:
ANNA wrote:
Can you clarify also how to accurately make the increases for the front and back every 2 rows but only the sleeves every 4 rows. How do you distinguish between the parts. are the front and back on one side of the markers and the sleeve the inner markers?
23.01.2025 - 00:09
![]() Anna wrote:
Anna wrote:
Your answer does not clarify where to start to continue on the charts with the whole pattern. Can you please be more specific as to where to read the pattern to finish the sweater as designed. I finished charts A1 AND A3 and A2 for XL.
22.01.2025 - 19:25DROPS Design answered:
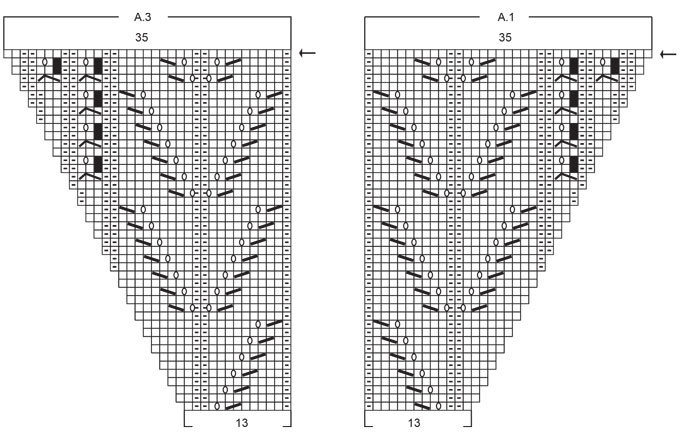
Dear Anna, A.2 is simply repeated. A.1 and A.3 are continued as before; you work the middle V shape with decreases and yarn overs as before, while on the sides you work over the cable stitches as in the previous V (but you now have 2 cables instead of 1). However, you won't add any more new cables as you work new repeats since all newly increased stitches will be worked in stocking stitch. Also, the markers are in transitions between the body and sleeves, so each side of the marker is either the sleeve or front/back piece. So depending on which round you will increase on both sides of the marker or only one side. Happy knitting!
25.01.2025 - 17:12
![]() Anna wrote:
Anna wrote:
This pattern does not clarify what to do next after completing charts A1andA3. How do I continue the lace pattern?
22.01.2025 - 13:18DROPS Design answered:
Dear Anna, just continue lace pattern so that you get the same V as before on each side of the P.2 and work the 2 small cables as before. Happy knitting!
22.01.2025 - 16:51
![]() Anna wrote:
Anna wrote:
What do you do to continue the pattern, after completing the A1A2a3 charts once. How do you continue the pattern accurately.
22.01.2025 - 13:13DROPS Design answered:
Dear Anna, repeat the first 2 small cables + continue the lace pattern in A.1 in height as before, and continue the lace pattern + the last 2 cables in A.3 as before too, and work the new stitches increased for raglan in stocking stitch. Happy knitting!
22.01.2025 - 16:50
![]() Maija wrote:
Maija wrote:
Ohjeessa on virhe. Kuvan puseron hakaset osoittavat alaspäin, kun taas ohjeen A1 ja A3 osoittavat ylöspäin.
20.09.2024 - 23:06
![]() Catherine PIERRON wrote:
Catherine PIERRON wrote:
Je viens de terminer ce modèle que j'ai tricoté avec la drops flora mix. J'ai dû ajouter 7cm aux manches pour avoir la bonne longueur.
09.06.2024 - 19:43
|
||||||||||||||||||||||||||||||||||
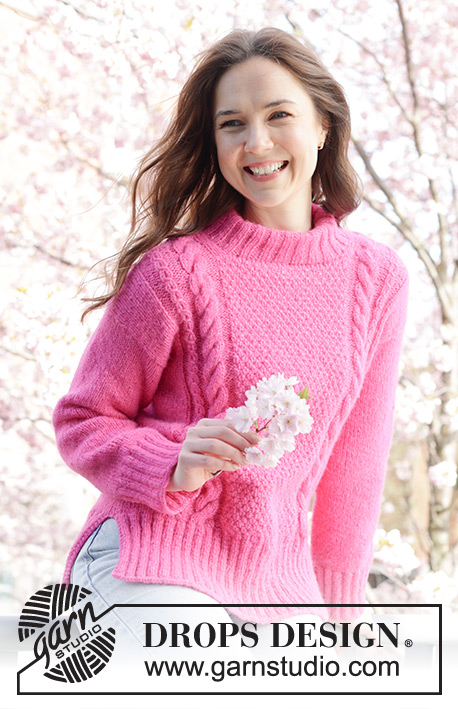
Pink Paradise#pinkparadisesweater |
||||||||||||||||||||||||||||||||||
 |
 |
|||||||||||||||||||||||||||||||||
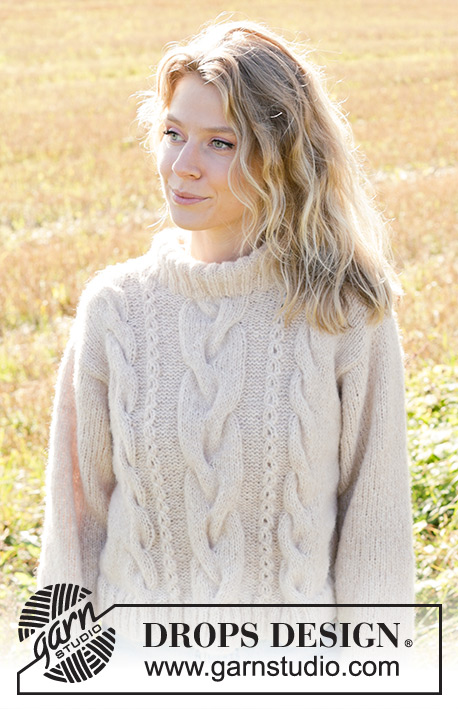
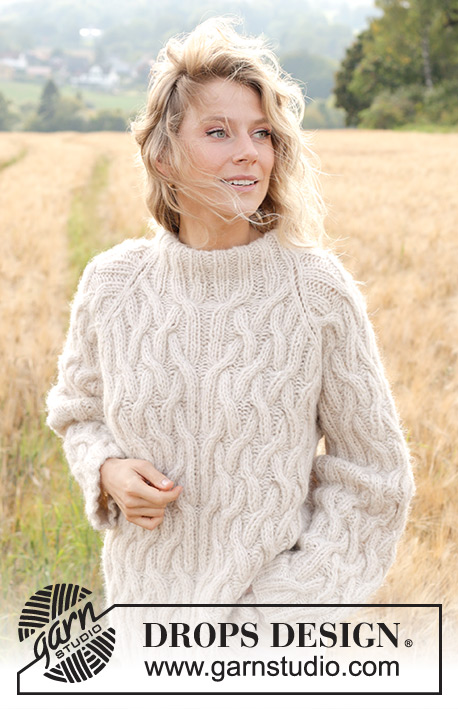
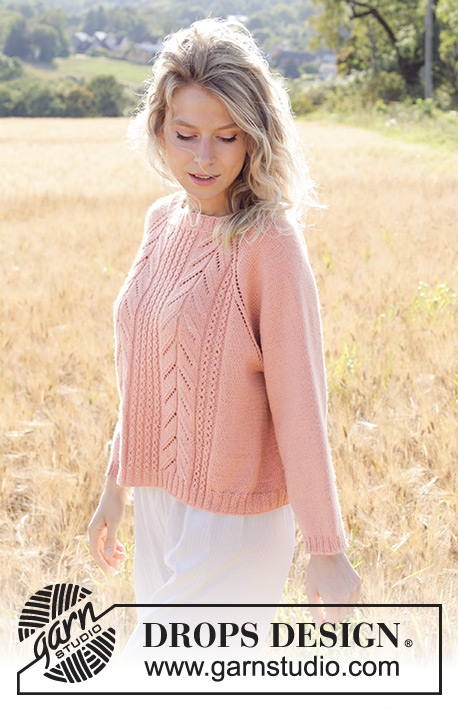
Knitted jumper in DROPS Flora or DROPS BabyMerino. The piece is worked top down with raglan, lace pattern and cables. Sizes S - XXXL.
DROPS 248-14 |
||||||||||||||||||||||||||||||||||
|
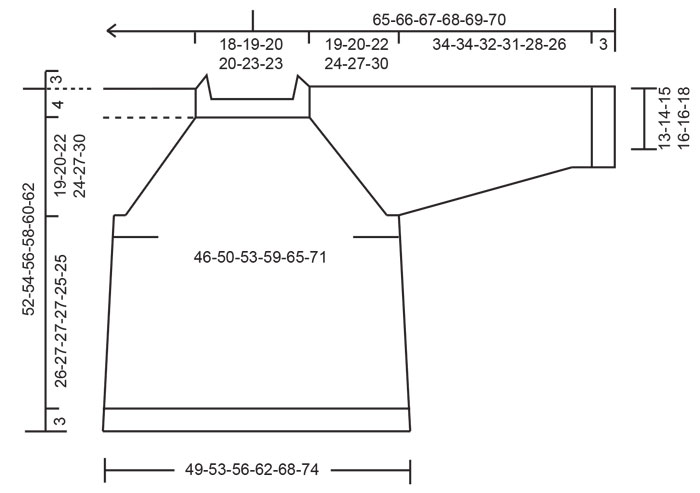
------------------------------------------------------- EXPLANATIONS FOR THE PATTERN: ------------------------------------------------------- GARTER STITCH (worked in the round): Alternate rounds of knit and purl. 1 ridge vertically = 2 rounds. PATTERN: See diagrams A.1 to A.6. Choose diagram for your size (applies to A.2 and A.5). The stitch count varies in A.1, A.2 and A.3 because the cables vary from 2 to 3 stitches. The stitch count is based on a 3-stitch cable. When A.1/A.3 are done, continue lace pattern as before. This means: Over the last 33 stitches in A.1 work A.1x over 12 stitches and A.1y over 21 stitches, work A.2 as before over the middle 17-17-22-22-27-27 stitches and work the first 33 stitches in A.3 work A.3x over 21 stitches and A.3y over 12 stitches. Repeat diagrams in height. RAGLAN: Increase 1 stitch by making 1 yarn over, which is knitted on the next round to leave a hole. On the back piece and sleeves, the increased stitches are worked in stocking stitch, on the front piece as shown in diagrams A.1 and A.3. When the diagrams have been worked as far as the arrow, work subsequent new stitches in stocking stitch. INCREASE TIP (sides of body): Increase 4 stitches on the round by working as follows: Start 1 stitch before the first marker-thread, make 1 yarn over, knit 2 (marker-thread sits between these 2 stitches), make 1 yarn over. Repeat at the second marker-thread. DECREASE TIP (for sleeves): Decrease 2 stitches on the round as follows: Work until there are 3 stitches left before the marker-thread, knit 2 together, knit 2 (marker-thread sits between these 2 stitches), slip 1 stitch knit-wise, knit 1 and pass the slipped stitch over the knitted stitch. ------------------------------------------------------- START THE PIECE HERE: ------------------------------------------------------- JUMPER – SHORT OVERVIEW OF THE PIECE: The pattern uses both long and short needles; start with the length which fits the number of stitches and change when necessary. The piece is worked in the round with circular needle, top down. When the neck and yoke are finished, the piece is divided for the body and sleeves. The body is continued in the round, while the sleeves wait. The sleeves are worked in the round, top down. NECK: Cast on 124-128-132-136-148-148 stitches with circular needle size 3 mm and DROPS Flora or DROPS Baby Merino. Work rib in the round (knit 2, purl 2) for 3 cm. Work 2 ridges – see GARTER STITCH above. AT THE SAME TIME increase 4-0-6-2-0-0 stitches evenly on the first round = 128-128-138-138-148-148 stitches. Insert 1 marker at the beginning of the round (= mid-back), the yoke is measured from here. YOKE: Insert 4 marker-threads, without working the stitches, which will be used when increasing for raglan: Count 22-22-25-25-27-27 stitches (= half back piece), insert 1 marker-thread, count 19 stitches (= sleeve), insert 1 marker-thread, count 45-45-50-50-55-55 stitches (= front piece), insert 1 marker-thread, count 19 stitches (= sleeve), insert 1 marker-thread. There are 23-23-25-25-28-28 stitches left after the last marker-thread (= half back piece). Work PATTERN – read description above, starting from the marker-thread mid-back as follows: Change to circular needle size 3.5 mm, knit until there is 1 stitch left before the next marker-thread (= half back piece), increase for RAGLAN – read description above, 2 stocking stitches, increase for raglan, knit until there is 1 stitch left before the next marker-thread (= sleeve), increase for raglan, 2 stocking stitches, increase for raglan, work A.1, A.2 over 17-17-22-22-27-27 stitches, A.3, there is 1 stitch left before the next marker-thread (= front piece), increase for raglan, 2 stocking stitches, increase for raglan, knit until there is 1 stitch left before the next marker-thread (= sleeve), increase for raglan, 2 stocking stitches, increase for raglan, and knit to end of round (= half back piece). Continue this pattern and increase for raglan on each side of 2 stocking stitches in each transition between the body and sleeves, every 2nd round a total of 19-18-26-29-27-24 times = 280-272-346-370-364-340 stitches – remember the stitch count is based on 3-stitch cables in A.1, A.2 and A.3 (= 8 stitches increased on the round). REMEMBER THE KNITTING TENSION! Now continue increasing for raglan as follows: Increase every 2nd round on the front and back pieces but every 4th round on the sleeves (= alternately 4 and 8 increased stitches). Increase a total of 8-14-6-10-16-24 times on the front and back pieces and 4-7-3-5-8-12 times on the sleeves. After the last increase there are 328-356-382-430-460-484 stitches and the yoke measures approx. 17-20-20-24-27-30 cm from the marker on the neck. Continue working without further increases until the yoke measures 19-20-22-24-27-30 cm – adjusting so the last round is either round 3 or 4 in A.2 (2 stitches and 1 yarn over or 3 stitches in each cable). DIVIDE FOR BODY AND SLEEVES: Work 49-54-57-64-70-75 stitches (= half back piece), place the next 65-69-77-87-89-91 stitches on 1 thread for the sleeve, cast on 12-12-14-14-16-20 stitches (= in side under sleeve), work 99-109-114-128-141-151 stitches (= front piece), place the next 65-69-77-87-89-91 stitches on 1 thread for the sleeve, cast on 12-12-14-14-16-20 stitches (= in side under sleeve), work the last 50-55-57-64-71-76 stitches (= half back piece). The body and sleeves are finished separately. The piece is now measured from here! BODY: = 222-242-256-284-314-342 stitches. Insert 1 marker-thread in the middle of the 12-12-14-14-16-20 cast-on stitches under each sleeve. Allow the threads to follow your work onwards; they are used when increasing in the sides. Start at one marker-thread and work stocking stitch/pattern in the round as before. When the body measures 3 cm, increase 1 stitch on each side of both marker-threads – read INCREASE TIP (= 4 increased stitches). Increase like this every 8-8-8-8-7-7 cm a total of 3 times = 234-254-268-296-326-354 stitches. Work until the body measures 26-27-27-27-25-25 cm – adjusting so the last round is a round marked with a black star in A.2. Insert a marker on each side of the middle 76-76-80-80-84-84 stitches in pattern A.1 to A.3 (NOTE! There are now 14-14-18-18-22-22 stitches in A.2). The next round begins by the marker-thread before the front piece: Change to needle size 3 and work rib (knit 2, purl 2), AT THE SAME TIME increase 5-4-7-8-7-8 stitches evenly over the first 17-22-23-30-35-42 stitches (= 22-26-30-38-42-50 ribbed stitches which finish with knit 2), first marker here, work A.4, A.5, A.6 over the 76-76-80-80-84-84 stitches between the markers (= 2 decreased stitches, the rib matches the pattern), second marker here. Work rib (knit 2, purl 2) over the next 17-22-23-30-35-42 stitches and increase 5-4-7-8-7-8 stitches evenly (= 22-26-30-38-42-50 ribbed stitches which finish with knit 2), marker-thread here, work rib (purl 2, knit 2), and increase 37-39-40-42-47-49 stitches evenly over the last 117-127-134-148-163-177 stitches (154-166-174-190-210-226 ribbed stitches which finish with purl 2) = 272-292-312-344-376-408 stitches. The rib (knit 2, purl 2) now fits over all stitches. Continue this rib for 3 cm. Cast off a little loosely. The jumper measures approx. 52-54-56-58-60-62 cm from the shoulder. SLEEVES: Place the 65-69-77-87-89-91 sleeve-stitches from the thread on one side of the piece on short circular needle size 3.5 mm and knit up 1 stitch in each of the 12-12-14-14-16-20 stitches cast on under the sleeve = 77-81-91-101-105-111 stitches. Insert a marker-thread in the middle of the 12-12-14-14-16-20 stitches under the sleeve. Start at the marker-thread and work stocking stitch in the round. When the sleeve measures 3-3-4½-3-4½-4 cm, decrease mid-under the sleeve – read DECREASE TIP. Decrease like this every 4½-4½-2½-2-1½-1½ cm a total of 7-7-10-13-13-13 times = 63-67-71-75-79-85 stitches. Continue working until the sleeve measures 34-34-32-31-28-26 cm from the division. Change to double pointed needles size 3 mm. Work rib (knit 2, purl 2), AT THE SAME TIME increase 9-9-9-9-9-11 stitches evenly on the first round = 72-76-80-84-88-96 stitches. When the rib measures 3 cm, cast off a little loosely. The sleeve measures approx. 37-37-35-34-31-29 cm. |
||||||||||||||||||||||||||||||||||
Diagram explanations |
||||||||||||||||||||||||||||||||||
|
||||||||||||||||||||||||||||||||||
 |
||||||||||||||||||||||||||||||||||
 |
||||||||||||||||||||||||||||||||||
 |
||||||||||||||||||||||||||||||||||
Have you finished this pattern?Tag your pictures with #dropspattern #pinkparadisesweater or submit them to the #dropsfan gallery. Do you need help with this pattern?You'll find 31 tutorial videos, a Comments/Questions area and more by visiting the pattern on garnstudio.com. © 1982-2026 DROPS Design A/S. We reserve all rights. This document, including all its sub-sections, has copyrights. Read more about what you can do with our patterns at the bottom of each pattern on our site. |
||||||||||||||||||||||||||||||||||


With over 40 years in knitting and crochet design, DROPS Design offers one of the most extensive collections of free patterns on the internet - translated to 17 languages. As of today we count 324 catalogues and 12290 patterns translated into English (UK/cm). 12290
We work hard to bring you the best knitting and crochet have to offer, inspiration and advice as well as great quality yarns at incredible prices! Would you like to use our patterns for other than personal use? You can read what you are allowed to do in the Copyright text at the bottom of all our patterns. Happy crafting!
Post a comment to pattern DROPS 248-14
We would love to hear what you have to say about this pattern!
If you want to leave a question, please make sure you select the correct category in the form below, to speed up the answering process. Required fields are marked *.