
Popular categories
Looking for a yarn?


Comments / Questions (81)
![]() Linda wrote:
Linda wrote:
I have knitted the bands, about to start the yoke but I cannot see how to do this- adding up the stitches I will have 10 too many. This doesn't appear to factor in the different sizes either. I am working size XL
06.05.2024 - 14:22DROPS Design answered:
Dear Linda, in XL you should have: 7 sts for left front band, then cast on 103 sts and work the 7 sts of right front piece = 117 sts in total. Note that the 12 sts cast on for each front band piece are decreased to 7 sts (you decrease a total of 5 sts on each front band). Happy knitting!
06.05.2024 - 15:40
![]() Susanne Storm Hansen wrote:
Susanne Storm Hansen wrote:
Når de to forkanter er strikket og masker er slået op imellem skal jeg slutte med en pind vrang. Så skal A 1 strikkes og der skal man starte med ret fra vrangsiden. Men man er på en retpind. Hvad gør man ???? Mvh Susanne
05.05.2024 - 22:22DROPS Design answered:
Hej Susanne, når du har slået de 99 masker op strikker du højre forkant, nu strikker du en pind vrang fra vrangen (kantmaskerne i retstrik). Nu strikker du fra BÆRESTYKKE fra retsiden ifølge opskriften :)
08.05.2024 - 11:22
![]() Kari wrote:
Kari wrote:
Jag menade hur många maskor som jag ska ha i stl XL på stickan innan jag går vidare till respektive storlek, efter att ha stickat A1 klart. 369 maskor är när hela oket är klart?
04.05.2024 - 08:06DROPS Design answered:
Hej Kari, du starter med 117 masker (7+1+2+2+22+2+2+10+20+11+2+2+22+2+2+1+7=117m) og går med det samme videre til respektive storlek, där du tager ud samtidigt ifølge A.1, A.2 og A.4 + de 4 raglanudtagninger på ærmerne, som er beskrevet i opskriften. Når du til sidst er færdig med alle udtagninger har du 369 masker
08.05.2024 - 12:20
![]() Sigrid Van Impe wrote:
Sigrid Van Impe wrote:
Ik maakte ondertussen een proeflapje enkel van het design...en inderdaad het klopt als een bus...en het is supermooi 😁
03.05.2024 - 21:09
![]() Maggan wrote:
Maggan wrote:
Hej. Stickar M Har sammanlagt 259 m.(7,41,2,56,2,43,2,56,2,41,7)
03.05.2024 - 18:06
![]() Marjut Svala wrote:
Marjut Svala wrote:
Hej, Det står att mönstret är uppdaterat (diagram A.2) ska finnas 'on line'. Det går inte att komma vidare på detta. Går det bra att följa mönstret utan att sett uppdateringen?
03.05.2024 - 15:35DROPS Design answered:
Hei Marjut. Litt usikker på hva du mener. Diagram A.2 ble oppdatert 29. februar 2024 og det er kun den oppdaterte versjonene som du ser online. mvh DROPS Design
06.05.2024 - 08:34
![]() Sigrid Van Impe wrote:
Sigrid Van Impe wrote:
Bij het telpatroon A2 in de derde rij staat brei een omslag - 1steek afhalen 1 recht breien en de afgehaald steek over halen - 1 omslag. In de terugnaald staat daar brei 2 rechte mieten dat er geen drie zijn?
02.05.2024 - 14:53DROPS Design answered:
Dag Sigrid,
Doordat je in de driehoek in het midden 2 steken mindert, minder je dus (met de steek overhalen aan het begin) in totaal 3 steken. Er staan ook 3 omslagen in die rij, dus het totaal aantal steken blijft hetzelfde op de volgende toer.
03.05.2024 - 20:24
![]() Marggan wrote:
Marggan wrote:
Stickat A1. Kommer inte vidare. Ser inte i beskrivningen att man ska öka något på oket utan bara bara på ärmarna. Har jag missuppfattat något?Förstår inte hur jag ska göra på första varvet efter A1 då jag inte har så många maskor som behövs efter beskrivningen.
01.05.2024 - 13:16DROPS Design answered:
Hej Marggan, jo efter A.1 fortsætter du udtagningerne ifølge A.2 og A.4 (med A.3 i midten) de vil da stemme over mønsteret du har strikket ifølge A.1. Hvis du skriver hvilken størrelse du strikker, hvor mange masker du har, så kan vi hjælpe dig med første pind :)
03.05.2024 - 14:18
![]() Karin wrote:
Karin wrote:
Stickar stl XL, hur många maskor ska det vara när oket är klart? Det är en del oklarheter i mönstret. Skriv gärna ut maskantal.
30.04.2024 - 22:44DROPS Design answered:
Hej Karin, når du er klar med raglanudtagningerne har du 369 masker på pinden i XL
03.05.2024 - 13:42
![]() Zarmeen wrote:
Zarmeen wrote:
I have started knitting a medium size cardigan. According to the pattern, before the division of sleeves, the piece should measure roughly 27 cm but my yolk is hardly 20 cm in length, even though my gauge was exactly same as it is mentioned in the pattern. What should I do at this point? My yolk will be too short if I go along with the pattern as it is.
28.04.2024 - 20:40DROPS Design answered:
Dear Zarmeen, the 27 cm should include the bands worked previously; you can check the measurements chart at the bottom of the pattern. The actual yoke should measure approx. 21 cm; if you have kept the row gauge and worked all rows in A.1 and A.2-A.3-A.4, you should have enough for 21cm. Happy knitting!
29.04.2024 - 00:20
|
|||||||||||||||||||
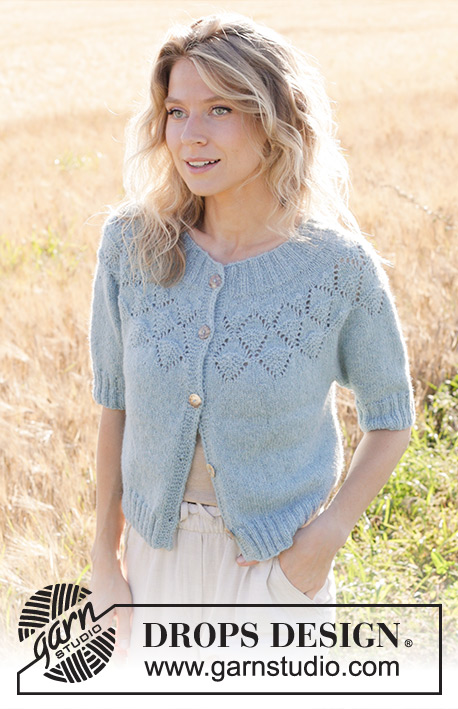
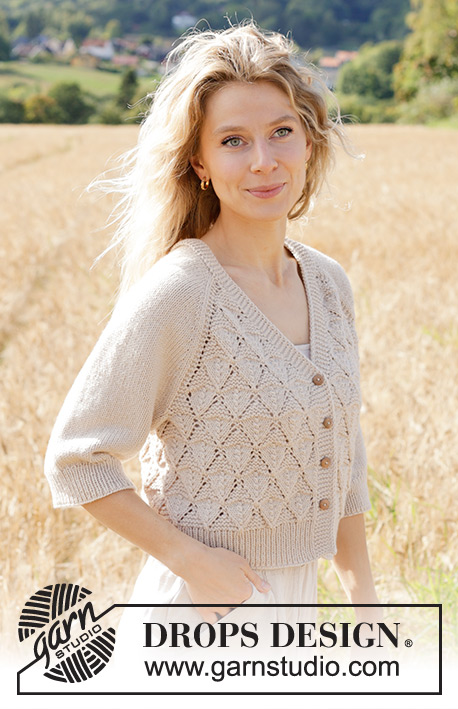
Sand Diamond Cardigan#sanddiamondcardigan |
|||||||||||||||||||
 |
 |
||||||||||||||||||
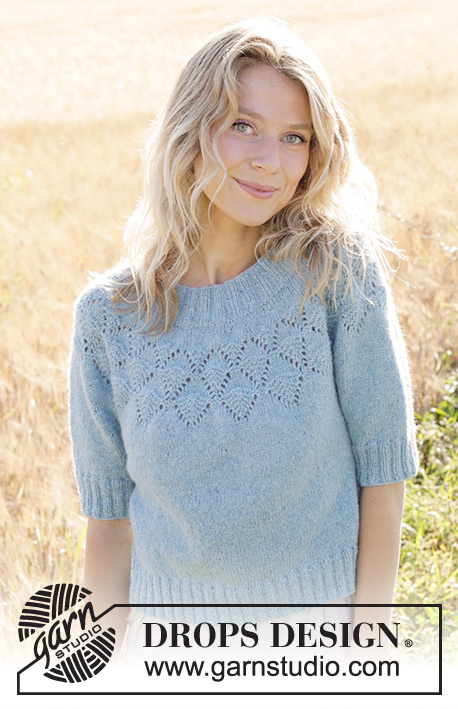
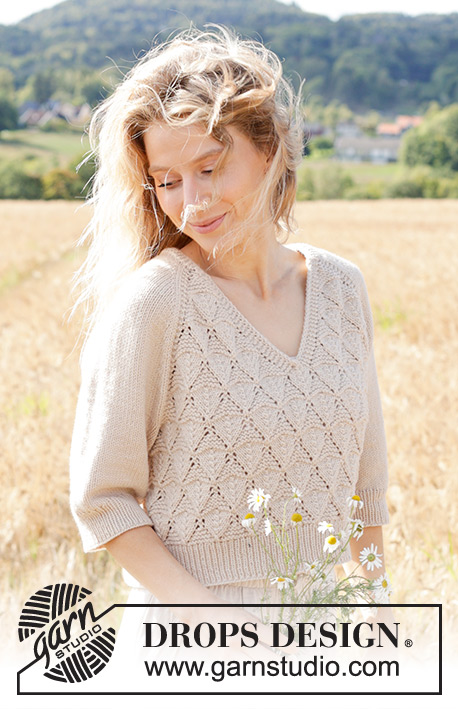
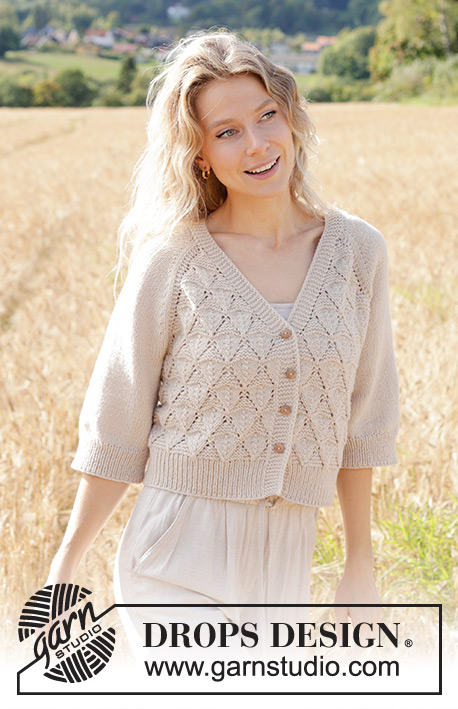
Knitted jacket in DROPS Daisy or DROPS Merino Extra Fine. The piece is worked top down with raglan, V-neck, lace pattern and ¾-length sleeves. Sizes S - XXXL.
DROPS 248-5 |
|||||||||||||||||||
|
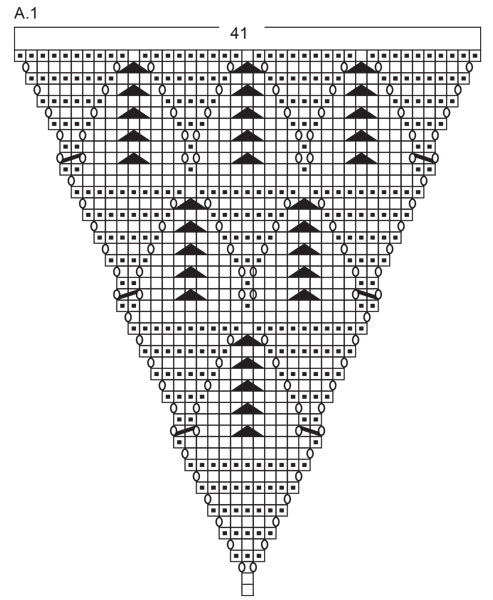
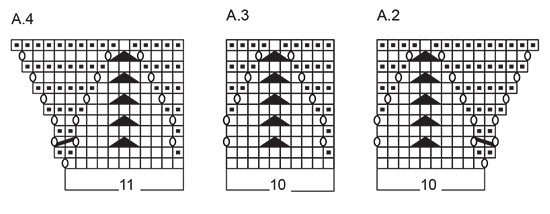
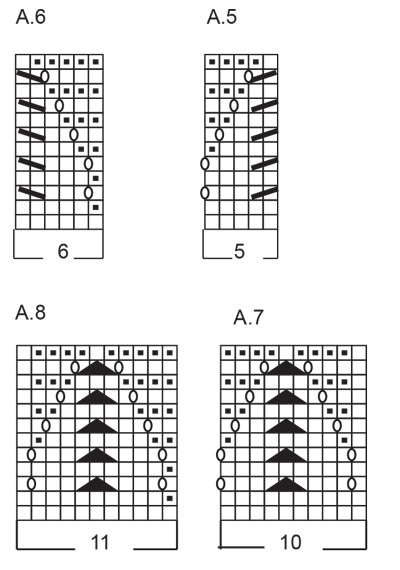
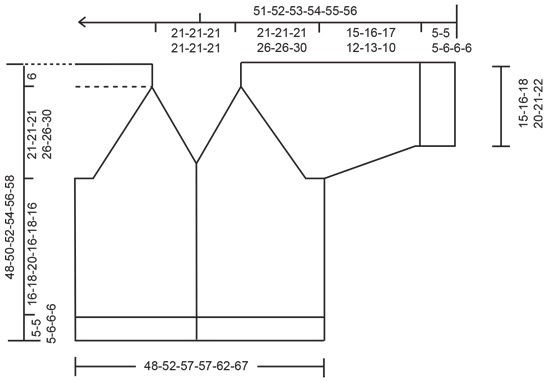
------------------------------------------------------- EXPLANATIONS FOR THE PATTERN: ------------------------------------------------------- GARTER STITCH (worked back and forth): Knit all rows, from both the right and wrong side. 1 ridge in height = knit 2 rows. PATTERN: See diagrams A.1 to A.8. The diagrams show all the rows in the pattern seen from the right side. RIGHT BAND WITH I-CORD: RIGHT SIDE: Work 10 garter stitches, slip 1 stitch purl-wise with strand in front, knit 1. WRONG SIDE: Slip 1 stitch purl-wise with strand in front, knit 1, 10 garter stitches. LEFT BAND WITH I-CORD: RIGHT SIDE: Slip 1 stitch purl-wise with strand in front, knit 1, 10 garter stitches. WRONG SIDE: Work 10 garter stitches, slip 1 stitch purl-wise with strand in front, knit 1. RAGLAN: Increase 1 stitch by making 1 yarn over, which is worked twisted on the next row. The new stitches are then worked in stocking stitch. BUTTONHOLES: Work the buttonholes on the right band from the right side. ROW 1: Work until there are 4 stitches left on the row, make 1 yarn over, knit 2 together, finish the band as before. ROW 2: Knit the yarn over (other band-stitches as before) to leave a hole. The first buttonhole is worked when the increases for V-neck are finished (front piece measures approx. 23 cm, from top of shoulder). The other buttonholes are worked when the front piece measures (from top of shoulder): S: 29, 36 and 43 cm M: 30, 38 and 45 cm L: 30, 39 and 47 cm XL: 30, 39 and 48 cm XXL: 31, 40 and 50 cm XXXL: 31, 41 and 52 cm (= the last buttonhole is worked in the transition between the stocking stitch and rib at the bottom of the front piece). DECREASE TIP (for sleeves): Decrease 1 stitch on each side of the marker-stitch as follows: Work until there are 2 stitches left before the marker-stitch, knit 2 together, knit 1 (= marker-stitch), slip 1 stitch knit-wise, knit 1 and pass the slipped stitch over the knitted stitch. ------------------------------------------------------- START THE PIECE HERE: ------------------------------------------------------- JACKET - SHORT OVERVIEW OF THE PIECE: The pattern uses both long and short needles; start with the length which fits the number of stitches and change when necessary. The piece is worked back and forth with circular needle, top down. Start by working 2 loose bands, then cast on stitches for the neckline between the bands and work the yoke back and forth. When the yoke is finished, divide for the body and sleeves. Continue the body back and forth, while the sleeves wait. The sleeves are then worked in the round. The bands are sewn together mid-back and sewn to the neckline. RIGHT BAND (when the garment is worn): Cast on 12 stitches with circular needle size 4 mm and DROPS Daisy or DROPS Merino Extra Fine. Work RIGHT BAND WITH I-CORD – read description above, back and forth for 4 cm. Now knit together the first 2 stitches from the right side (opposite side to the I-cord). Decrease like this every 3 cm a total of 5 times = 7 band stitches. Continue working until the band measures 21cm, finishing after a row from the wrong side. Cut the strand and lay the piece to one side. LEFT BAND (when the garment is worn): Cast on 12 stitches with circular needle size 4 mm. Work LEFT BAND WITH I-CORD – read description above, back and forth for 4 cm. Now knit together the last 2 stitches from the right side (opposite side to the I-cord). Decrease like this every 3 cm a total of 5 times = 7 band stitches. Continue working until the band measures 21 cm, finish after a row from the right side. Do not cut the strand. Cast on 99-99-99-103-103-103 stitches at the end of the row, then work the 7 stitches from the right band = 113-113-113-117-117-117 stitches. Work 1 row from the wrong side, purling the 99-99-99-103-103-103 cast on stitches and working the 7 band-stitches on each side as before. INFORMATION BEFORE CONTINUING. FRONT AND BACK PIECES: Lace pattern is now worked on the front and back pieces according to the diagrams.. The increases for the V-neck and raglan are drawn into the diagrams. When A.2, A.3 and A.4 have been worked 1 time in height, work 1 more repeat of A.3 between A.2 and A.4. SLEEVES: The sleeves are worked in stocking stitch and increased as described under RAGLAN. YOKE: Work the first row as follows from the right side: 7 band stitches as before, A.1, work 2 GARTER STITCHES – read description above, knit 2, increase 1 stitch for RAGLAN - read description above, 20-20-20-22-22-22 stocking stitches, increase 1 stitch for raglan, knit 2, 2 garter stitches, A,2, A.3 over the next 20 stitches, A.4, 2 garter stitches, knit 2, increase 1 stitch for raglan, 20-20-20-22-22-22 stocking stitches, increase 1 stitch for raglan, knit 2, 2 garter stitches, A.1 and 7 band stitches as before. REMEMBER THE KNITTING TENSION! FIND YOUR SIZE: Pattern is now worked differently in the different sizes. Continue from the section for your size. SIZE S: Increase for raglan and work pattern simultaneously as follows – read both RAGLAN and PATTERN before continuing. RAGLAN: Increase inside 2 stocking stitches on each side of the sleeves every 2nd row 4 times, then every 4th row 10 times = 14 increases on each side of each sleeve. PATTERN: When A.1 has been worked 1 time in height all increases are finished = 289 stitches. Work as follows from the right side: 7 band stitches, A.3 over the next 40 stitches, work the first stitch in A.3, 2 garter stitches, stocking stitch over the sleeve, 2 garter stitches, A.3 over the next 80 stitches, work the first stitch in A.3, 2 garter stitches, stocking stitch over the sleeve, 2 garter stitches, A.3 over the next 40 stitches, work the first stitch in A.3 and 7 band stitches – AT THE SAME TIME on this row work the first BUTTONHOLE – read description above! Work A.3 one time in height, the yoke measures approx. 27 cm from the shoulder. Continue from DIVIDE FOR BODY AND SLEEVES SIZES M-L: Increase for raglan and work pattern simultaneously as follows – read both RAGLAN and PATTERN before continuing. RAGLAN: Increase inside 2 stocking stitches on each side of the sleeves every 2nd row 3-2 times, then every 4th row 13-13 times = 16-15 increases on each side of each sleeve. PATTERN: When A.1 has been worked 1 time in height, the increases towards mid-front are finished; continue increasing for raglan in each transition between body and sleeves, working as follows from the right side: 7 band stitches, A.3 over the next 30 stitches, work A.4, 2 garter stitches, work and increase as before over the sleeve, 2 garter stitches, A.2, A.3 over the next 60 stitches, A.4, 2 garter stitches, work and increase as before over the sleeve, 2 garter stitches, A.2, A.3 over the next 30 stitches, work the first stitch in A.3 and 7 band stitches - AT THE SAME TIME on this row work the first BUTTONHOLE – read description above! Continue increasing like this until A.2, A.3 and A.4 have been worked 1-1 time in height. All increases are finished. There are 317-313 stitches and the yoke measures approx. 27-27 cm from the shoulder. Continue from DIVIDE FOR BODY AND SLEEVES. SIZES XL - XXL: Increase for raglan and work pattern simultaneously as follows – read both RAGLAN and PATTERN before continuing. RAGLAN: Increase inside 2 stocking stitches on each side of the sleeves every 2nd row 11-7 times, then every 4th row 12-14 times = 23-21 increases on each side of each sleeve. PATTERN: When A.1 has been worked 1 time in height, the increases towards mid-front are finished; continue increasing for raglan in each transition between body and sleeves, working as follows from the right side: 7 band stitches, A.3 over the next 30 stitches, work A.4, 2 garter stitches, work and increase as before over the sleeve, 2 garter stitches, A.2, A.3 over the next 60 stitches, A.4, 2 garter stitches, work and increase as before over the sleeve, 2 garter stitches, A.2, A.3 over the next 30 stitches, work the first stitch in A.3 and 7 band stitches - AT THE SAME TIME on this row work the first BUTTONHOLE – read description above! Continue increasing like this until A.2, A.3 and A.4 have been worked 1-1 time in height. Work as follows from the right side: 7 band stitches, A.5, A.3 over the next 30 stitches, work A.4, 2 garter stitches, work and increase as before over the sleeve, 2 garter stitches, A.2, A.3 over the next 70 stitches, A.4, 2 garter stitches, work and increase as before over the sleeve, 2 garter stitches, A.2, A.3 over the next 30 stitches, A.6 and 7 band stitches. Continue increasing like this until A.2, A.3 and A.4 have been worked 1-1 time in height. All increases are finished. There are 369-361 stitches and the yoke measures approx. 32-32 cm from the shoulder. Continue from DIVIDE FOR BODY AND SLEEVES. SIZE XXXL: Increase for raglan and work pattern simultaneously as follows – read both RAGLAN and PATTERN before continuing. RAGLAN: Increase inside 2 stocking stitches on each side of the sleeves every 2nd row 6 times, then every 4th row 17 times = 23 increases on each side of each sleeve. PATTERN: When A.1 has been worked 1 time in height, the increases towards mid-front are finished; continue increasing for raglan in each transition between body and sleeves, working as follows from the right side: 7 band stitches, A.3 over the next 30 stitches, work A.4, 2 garter stitches, work and increase as before over the sleeve, 2 garter stitches, A.2, A.3 over the next 60 stitches, A.4, 2 garter stitches, work and increase as before over the sleeve, 2 garter stitches, A.2, A.3 over the next 30 stitches, work the first stitch in A.3 and 7 band stitches - AT THE SAME TIME on this row work the first BUTTONHOLE – read description above! Continue increasing like this until A.2, A.3 and A.4 have been worked 1 time in height. Work as follows from the right side: 7 band stitches, A.5, A.3 over the next 30 stitches, work A.4, 2 garter stitches, work and increase as before over the sleeve, 2 garter stitches, A.2, A.3 over the next 70 stitches, A.4, 2 garter stitches, work and increase as before over the sleeve, 2 garter stitches, A.2, A.3 over the next 30 stitches, A.6 and 7 band stitches. Continue increasing like this until A.2, A.3 and A.4 have been worked 1 time in height. Work as follows from the right side: 7 band stitches, A.3 over the next 40 stitches, work A.4, 2 garter stitches, work and increase as before over the sleeve, 2 garter stitches, A.2, A.3 over the next 80 stitches, A.4, 2 garter stitches, work and increase as before over the sleeve, 2 garter stitches, A.2, A.3 over the next 40 stitches, work the first stitch in A.3 and 7 band stitches. Continue increasing like this until A.2, A.3 and A.4 have been worked 1 time in height. All increases are finished. There are 389 stitches and the yoke measures approx. 36 cm from the shoulder. Continue from DIVIDE FOR BODY AND SLEEVES. DIVIDE FOR BODY AND SLEEVES – ALL SIZES: Work as follows from the right side: Over the first 50-55-55-60-60-65 stitches, work the band and knit the other stitches (= left front piece), place the next 52-56-54-72-68-72 stitches on a thread for the sleeve, cast on 15-15-25-15-25-25 stitches under the sleeve, knit 85-95-95-105-105-115 stitches, place the next 52-56-54-72-68-72 stitches on a thread for the sleeve, cast on 15-15-25-15-25-25 stitches under the sleeve, knit and work the band over the last 50-55-55-60-60-65 stitches (= right front piece). BODY – ALL SIZES: = 215-235-255-255-275-295 stitches. FIND YOUR SIZE: Work the section for your size below. SIZES S - M - L- XXXL: Start from wrong side and work 2nd row in the diagrams as follows: Work 7 band stitches as before, A.6, A.3 until there are 12 stitches left, A.5 and 7 band stitches as before. Continue in pattern like this. NOTE! Start on row 3 in the diagrams. * Work 7 band stitches as before, A.5, A.3 until there are 13 stitches left, A.6 and 7 band stitches as before. Work the diagrams 1 time in height. Continue with 7 band stitches as before, A.7, A.3 until there are 18 stitches left, A.8 and 7 band stitches as before. Work the diagrams 1 time in height *. Work from *-* until the body measures 16-18-20-16 cm, finishing after a complete repeat of A.3 in height. Go to ALL SIZES. SIZES XL - XXL: Start from wrong side and work 2nd row in the diagrams as follows: Work 7 band stitches as before, A.8, A.3 until there are 17 stitches left, A.7 and 7 band stitches as before. Continue in pattern like this. NOTE! Start on row 3 in the diagrams. * Work 7 band stitches as before, A.7, A.3 until there are 18 stitches left, A.8 and 7 band stitches as before. Work the diagrams 1 time in height. Work 7 band stitches as before, A.5, A.3 until there are 13 stitches left, A.6 and 7 band stitches as before. Work the diagrams 1 time in height *. Work from *-* until the body measures 18-16 cm, finishing after a complete repeat of A.3 in height. Go to ALL SIZES. ALL SIZES: On the next row (= right side) begin the rib, AT THE SAME TIME increase 42-42-48-48-48-58 stitches evenly on the row = 257-277-303-303-323-353 stitches, working as follows: Change to circular needle size 3 mm, work 7 band stitches as before, rib (knit 1, purl 1 – remember the increases) until there are 8 stitches left, knit 1 and 7 band stitches as before. When the rib measures 5-5-5-6-6-6 cm, cast off. The jacket measures approx. 48-50-52-54-56-58 cm from the shoulder. SLEEVES: Place the 52-56-54-72-68-72 stitches from the thread on one side of the piece on circular needle size 4 mm and knit up 1 stitch in each of the 15-15-25-15-25-25 stitches cast on under the sleeve = 67-71-79-87-93-97 stitches. Insert 1 marker in the middle stitch of the 15-15-25-15-25-25 stitches under the sleeve – start the round just before this marker-stitch. Work stocking stitch in the round. When the sleeve measures 3 cm from the division, decrease under the sleeve – read DECREASE TIP, repeat this decrease when the sleeve measures 8-8-9-6-6-6 cm = 63-67-75-83-89-93 stitches. Work until the sleeve measures 15-16-17-12-13-10 cm from the division. Change to double pointed needles size 3 mm. Work rib (knit 1, purl 1), AT THE SAME TIME increase 13-13-15-17-19-19 stitches evenly on round 1 = 76-80-90-100-108-112 stitches. Cast off when the rib measures 5-5-5-6-6-6 cm. ASSEMBLY: Sew the buttons onto the left band. Sew the bands together mid-back, then sew the bands to the neckline, stretching the bands a little to sew it on. |
|||||||||||||||||||
Diagram explanations |
|||||||||||||||||||
|
|||||||||||||||||||
 |
|||||||||||||||||||
 |
|||||||||||||||||||
 |
|||||||||||||||||||
 |
|||||||||||||||||||
Have you finished this pattern?Tag your pictures with #dropspattern #sanddiamondcardigan or submit them to the #dropsfan gallery. Do you need help with this pattern?You'll find 37 tutorial videos, a Comments/Questions area and more by visiting the pattern on garnstudio.com. © 1982-2026 DROPS Design A/S. We reserve all rights. This document, including all its sub-sections, has copyrights. Read more about what you can do with our patterns at the bottom of each pattern on our site. |
|||||||||||||||||||


With over 40 years in knitting and crochet design, DROPS Design offers one of the most extensive collections of free patterns on the internet - translated to 17 languages. As of today we count 324 catalogues and 12290 patterns translated into English (UK/cm). 12290
We work hard to bring you the best knitting and crochet have to offer, inspiration and advice as well as great quality yarns at incredible prices! Would you like to use our patterns for other than personal use? You can read what you are allowed to do in the Copyright text at the bottom of all our patterns. Happy crafting!
Post a comment to pattern DROPS 248-5
We would love to hear what you have to say about this pattern!
If you want to leave a question, please make sure you select the correct category in the form below, to speed up the answering process. Required fields are marked *.