
Popular categories
Looking for a yarn?


Comments / Questions (13)
![]() Anja wrote:
Anja wrote:
Jag förstår inte det svar jag har fått. Det går inte att få ett ojämnt antal maskor av att sticka ihop ett jämnt antal. Om man stickar en maska och sedan stickar ihop 258 maskor, så Harman stickat 159 maskor. Vad ska jag göra med den sista av de 260 jag har lagt upp och som gör att jag har 132 maskor efter ihopstickning?
22.04.2026 - 22:37DROPS Design answered:
Hej Anja. När du stickar ihop 258 maskor 2 och 2 så får du kvar hälften så många maskor kvar (dvs 2 maskor blir 1 maska). 258/2=129. Du börjar och avslutar med 1 rätmaska; 1+129 (dvs 258 maskor minskade till 129 maskor)+1 = 131 maskor. Mvh DROPS Design
23.04.2026 - 08:21
![]() Anja wrote:
Anja wrote:
Är det fel antal maskor i uppläggningen? Där är det ett jämt antal, men när man läser första varvet och ihopstickningen efter halskanten så är det ojämnt antal.
21.04.2026 - 23:10DROPS Design answered:
Hej Anja. Det stämmer att det blir ett ojämnt antal maskor efter ihopstickningen. T.ex. i minsta storleken stickar du 1 maska, stickar ihop de nästa 258 maskorna 2 och 2 (dvs minskas 129 maskor), sticka 1 maska. 260-129=131 maskor. Mvh DROPS Design
22.04.2026 - 11:07
![]() Birte wrote:
Birte wrote:
Liebes Drops-Team, ich möchte den Cardigan in Babymerino stricken. Um eine kleine Erhöhung wie in 236-11 einzufügen, stricke ich zunächst eine Probe. Nach Halsblende, Erhöhung (im Muster) sowie ersten Musterreihen A1 fällt aber auf, dass der Kragen umklappt, sobald nur einlagig gestrickt wird. Er steht wellig nach oben ab - es wurden ja auch einige Zentimeter einfach gerade ohne Zunahmen gestrickt. Gibt es eine Verbesserungsmöglichkeit? Ändert es sich im Verlauf oder durchs Waschen?
09.02.2026 - 14:34
![]() Birte wrote:
Birte wrote:
Liebes Drops-Team, ich möchte den Cardigan in Babymerino stricken. Um eine kleine Erhöhung wie in 236-11 einzufügen, stricke ich zunächst eine Probe. Nach Halsblende, Erhöhung (im Muster) sowie ersten Musterreihen A1 fällt aber auf, dass der Kragen umklappt, sobald nur einlagig gestrickt wird. Er steht wellig nach oben ab - es wurden ja auch einige Zentimeter einfach gerade ohne Zunahmen gestrickt. Gibt es eine Verbesserungsmöglichkeit? Ändert es sich im Verlauf oder durchs Waschen?
09.02.2026 - 14:32
![]() Kristel wrote:
Kristel wrote:
Jätka parempidises koes edasi-tagasi ! see on ju vale, peaks olema paremal pool parempidises koes ja tööpahemal pool pahempidises koes.
14.05.2025 - 08:29DROPS Design answered:
Tere Kristel! Kui on öeldud, et koo parempidises koes, siis ju tähendapki, et pahemal pool kootakse pahempidi. Head kudumist!
18.06.2025 - 16:49
![]() Mikaëla wrote:
Mikaëla wrote:
Jag tror att jag löste det. Jag lyckades tolka det spanska inlägget här nere. :) Man stickar räta på den lyfta maskan varvet efter, så det blir aldrig mer än 2 trådar. Nu ska jag pröva! :)
12.03.2024 - 18:26
![]() Mikaëla Lind wrote:
Mikaëla Lind wrote:
Hej! Jag ska precis börja sticka den här fina koftan och jag undrar över första varvet. "lyft maskan som om den skulle stickas avigt, med tråden framför arbetet" står det. Då får man två maskor på stickan? Och nästa varv blir det 3 och sen 4! Det går inte. Står det fel, ska man inte lägga tråden framför arbetet?
12.03.2024 - 08:23DROPS Design answered:
Hei Mikaëla. Du strikket 1 maske rett som vanlig, legg tråden foran deg og ta neste maske på venstre pinne løs av pinnen som om den skulle strikkes vrang, strikk 1 rett. Du har ikke økt noen masker, men strikket 2 masker over 2 masker, men ved 1. maske er tråden bak arbeidet (som vanlig) og ved 2. maske er tråden foran. Gjenta dette over alle maskene i halskanten. Envt. ta en titt på videoen: Hur man dubbelstickar en framkant. Den viser en jakke stolpe, men teknikken er den samme. mvh DROPS Design
18.03.2024 - 13:40
![]() Camila wrote:
Camila wrote:
¡Hola! Tengo una duda en el inicio. Al momento de realizar lo que indica como fila 1 y luego repetirla no se me forma el elástico sino que punto arroz. No se si me lo podrían explicar mejor para entender el patrón y poder comprender el error que estoy cometiendo Muchas gracias
29.10.2023 - 03:35DROPS Design answered:
Hola Camila, cuando trabajas la fila 1 por el lado revés tienes que trabajar como se presentan los puntos: trabajas de derecho el punto deslizado de la fila anterior y deslizas de revés el punto de derecho de la fila anterior. Los 2 derechos de los extremos son puntos orillo y se trabajan de derecho siempre. De esta forma debería quedarte el elástico.
29.10.2023 - 20:06
![]() Sylvie wrote:
Sylvie wrote:
Bonjour, l’empiècement est en mailles envers sur l’endroit et le texte dit juste après le col : « tricoter le rang suivant ainsi sur l’envers: 8 mailles endroit, tricoter à l’envers jusqu’à ce qu’il reste 8 mailles, terminer par 8 mailles endroit. ». Ensuite la succession des rangs est également fausse. À mon avis, on tricote à l’endroit sur le rang envers afin d’avoir des mailles envers sur l’endroit. Merci de me dire si j’ai raison.
10.07.2023 - 18:10DROPS Design answered:
Bonjour Sylvie, ce dernier rang du col (à tricoter sur l'envers) est juste, on va le tricoter ainsi, puis commencer l'empiècement sur l'endroit en tricotant A.1 (en jersey envers avec 1 maille endroit). Bon tricot!
28.07.2023 - 09:07
![]() Carole wrote:
Carole wrote:
In the first row after completing the 4cm neck edge, would you please explain in more detail this instruction? ‘Work next row as follows from right side: Knit 1, knit 2 and 2 stitches together until 1 stitch remains, finish with knit 1 = 131-137-140-146-152-155 stitches.’ I’m unsure of that is meant by …knit 2 and 2 stitches together until 1 stitch remains. Does this mean *k2, k2 together*, repeat from * to * or is it something different?
12.06.2023 - 08:10DROPS Design answered:
Dear Carole, work this row as follows: knit 1 stitch, then K2 together until 1 stitch remain and finish row with knit 1. so knit 1, *k2 tog*, repeat from *-* until 1 stitch remain and knit 1. Happy knitting!
12.06.2023 - 09:16
|
||||||||||
Morning Hush Cardigan#morninghushcardigan |
||||||||||
 |
 |
|||||||||
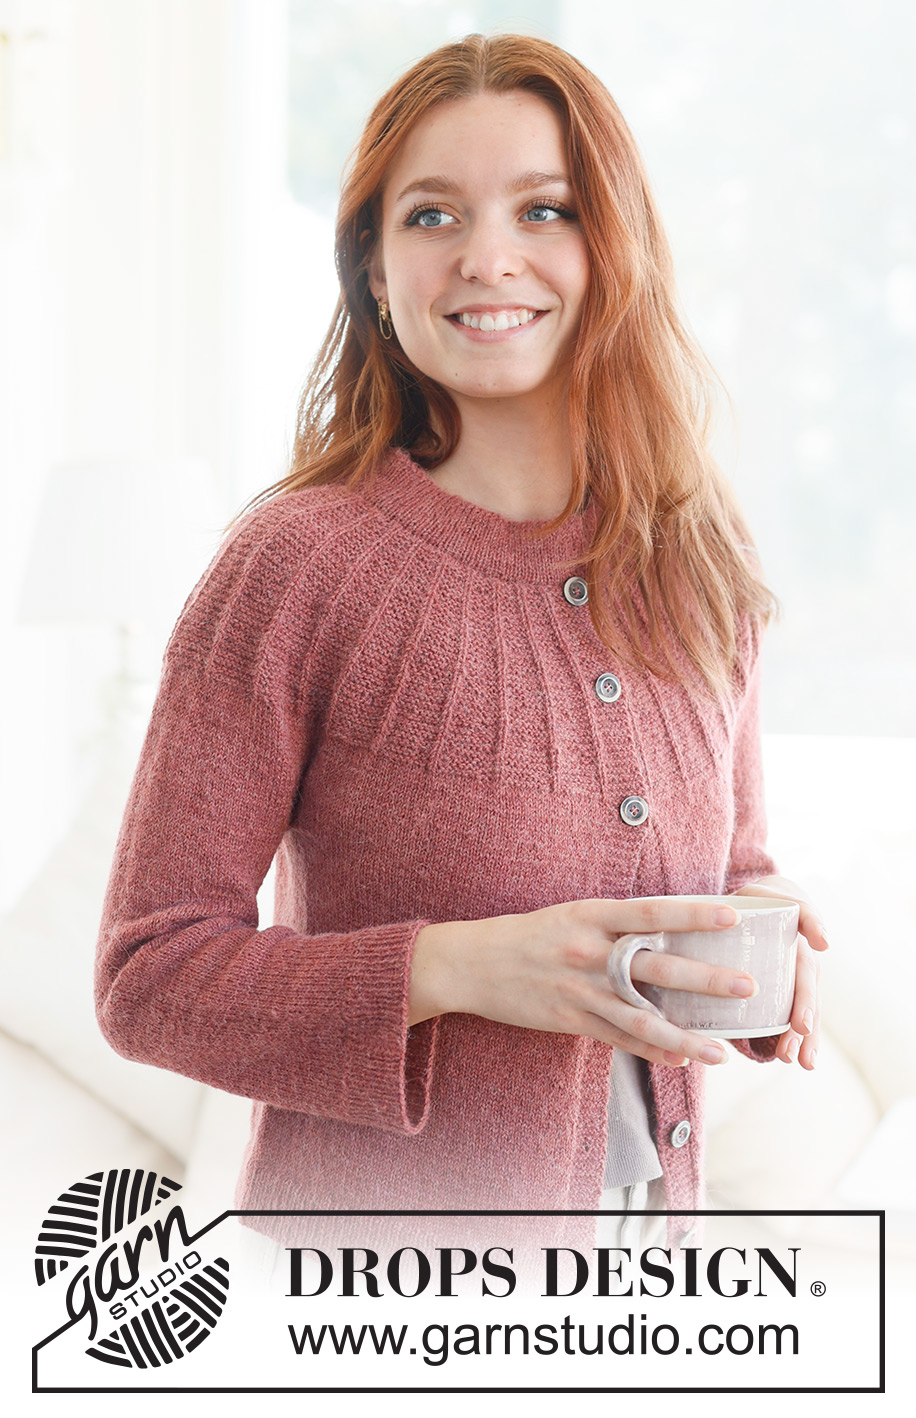
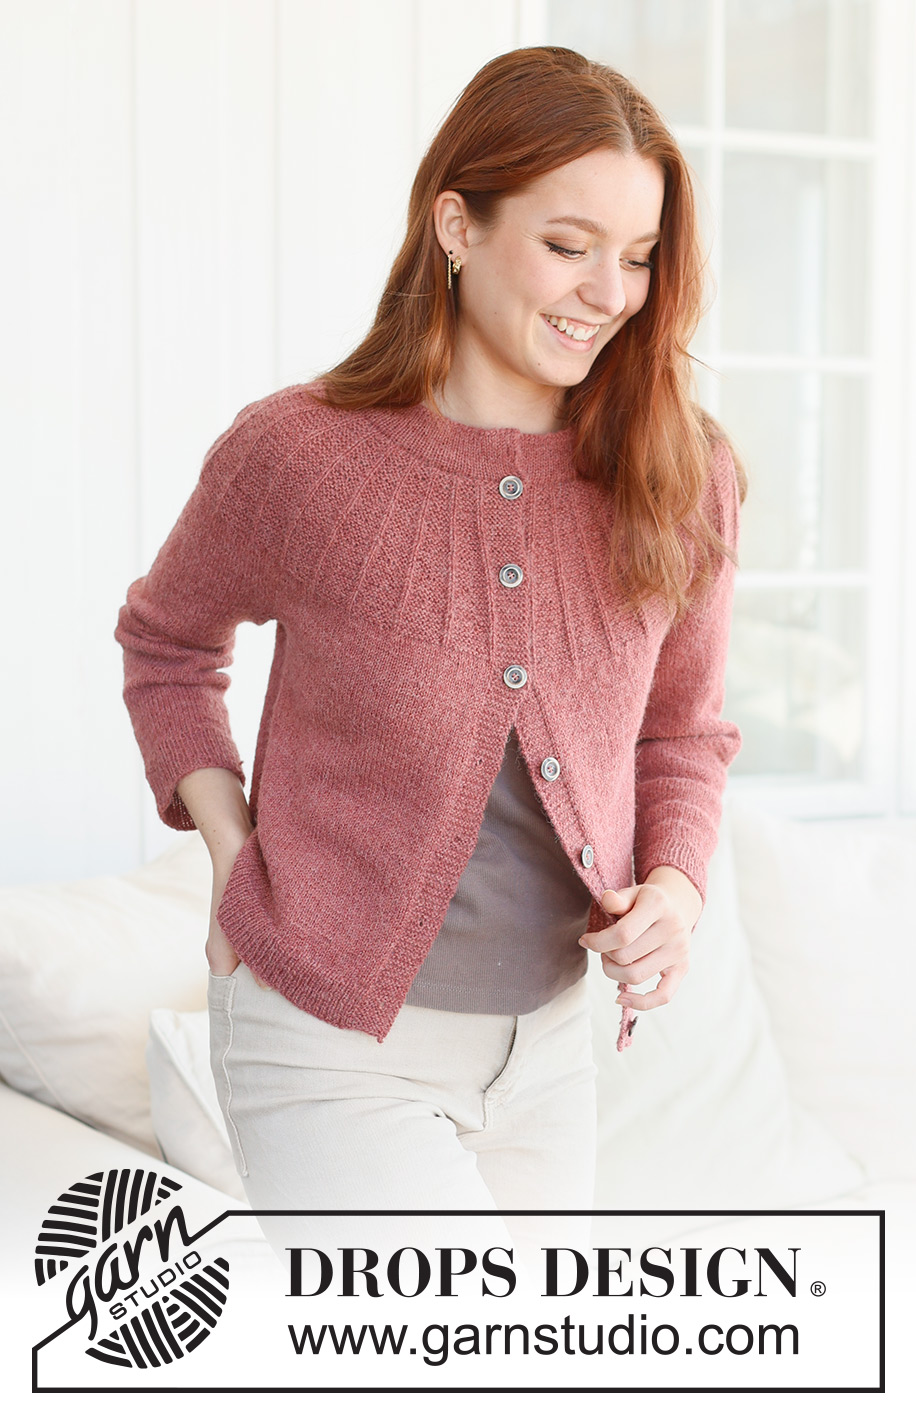
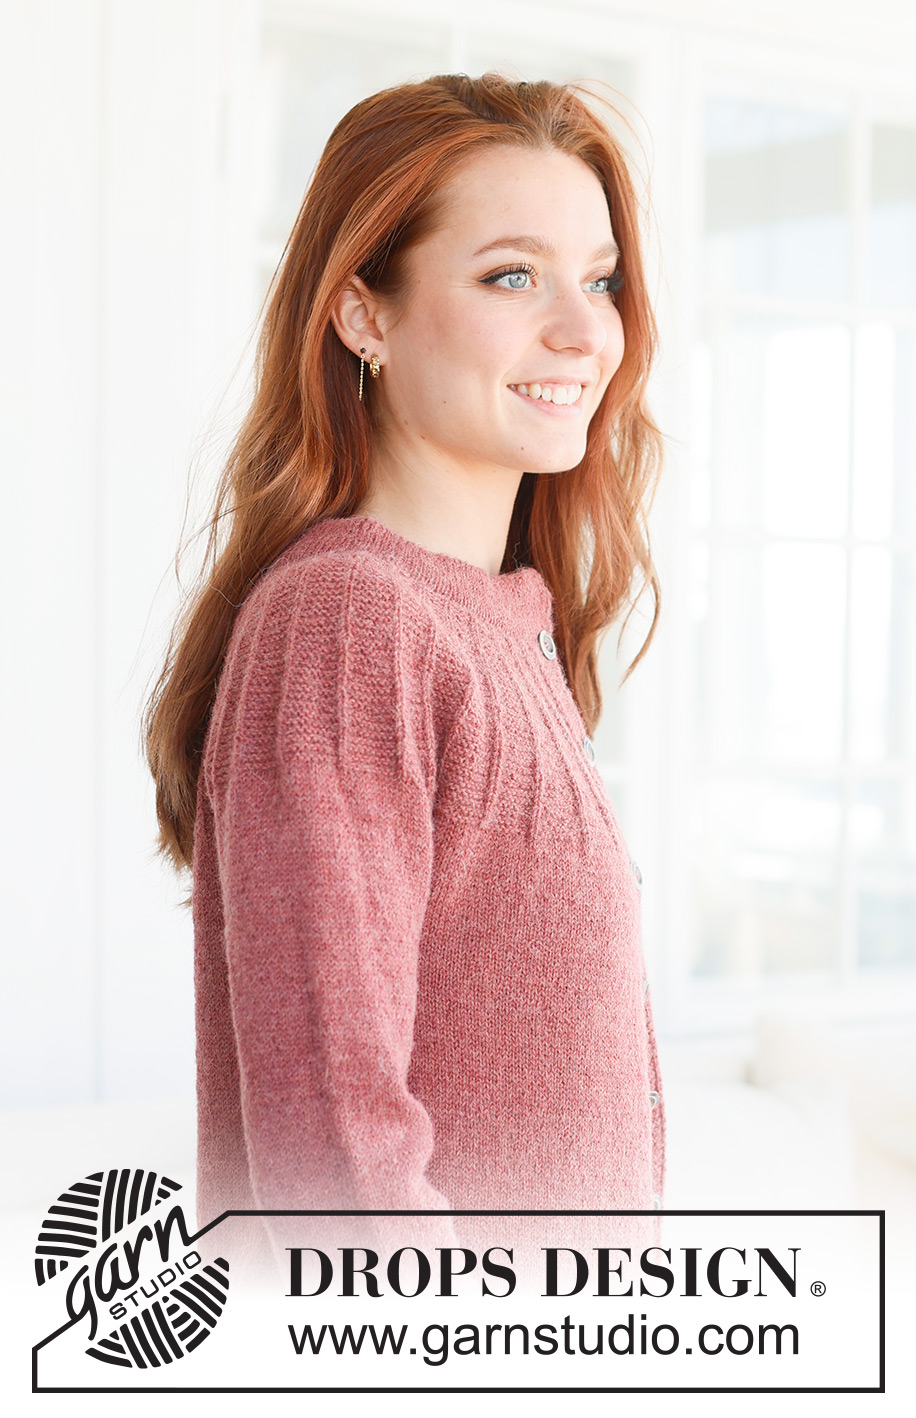
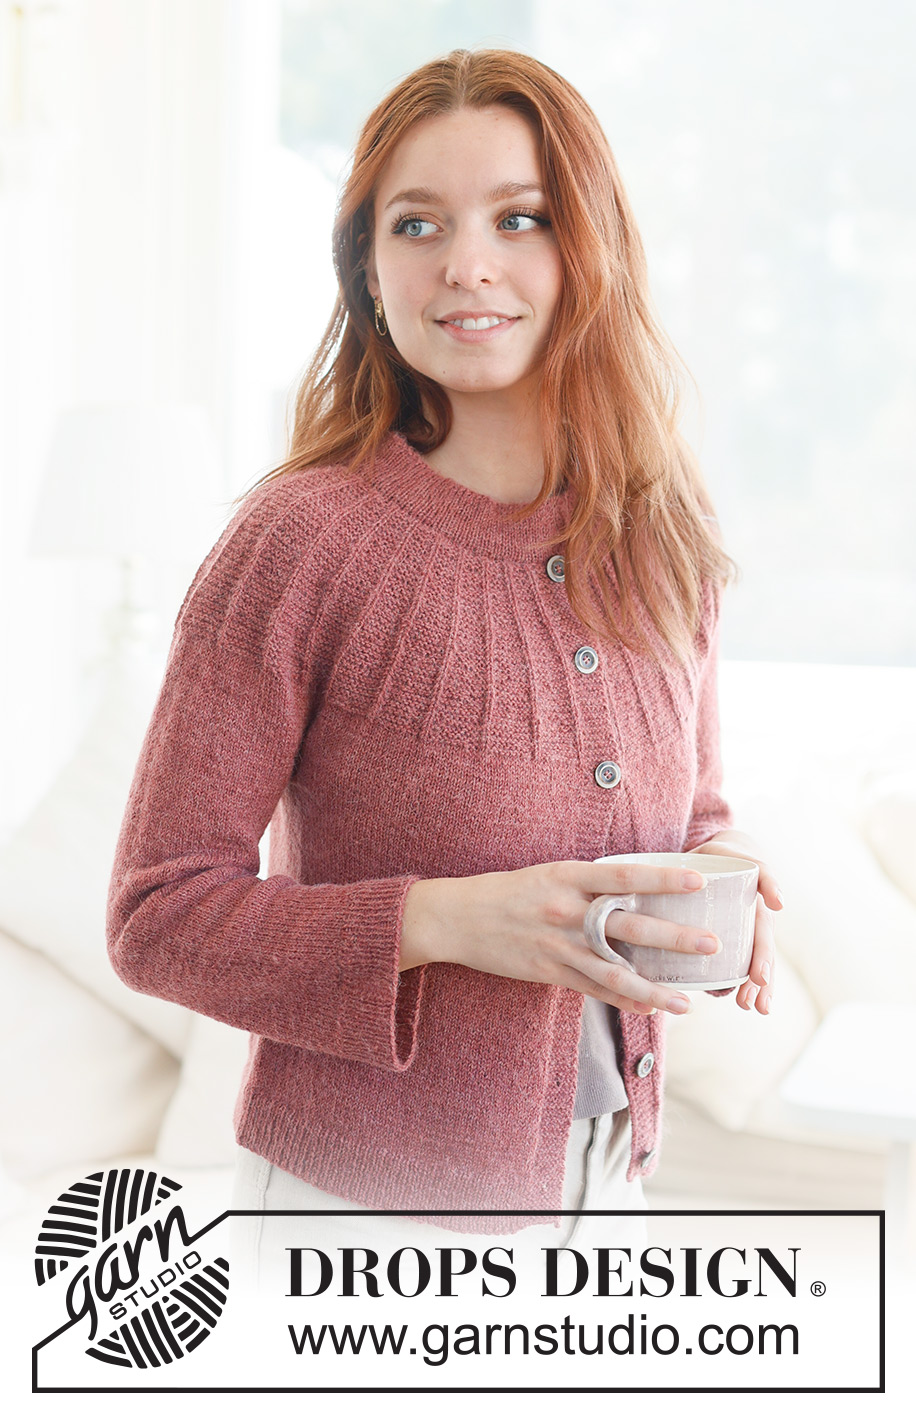
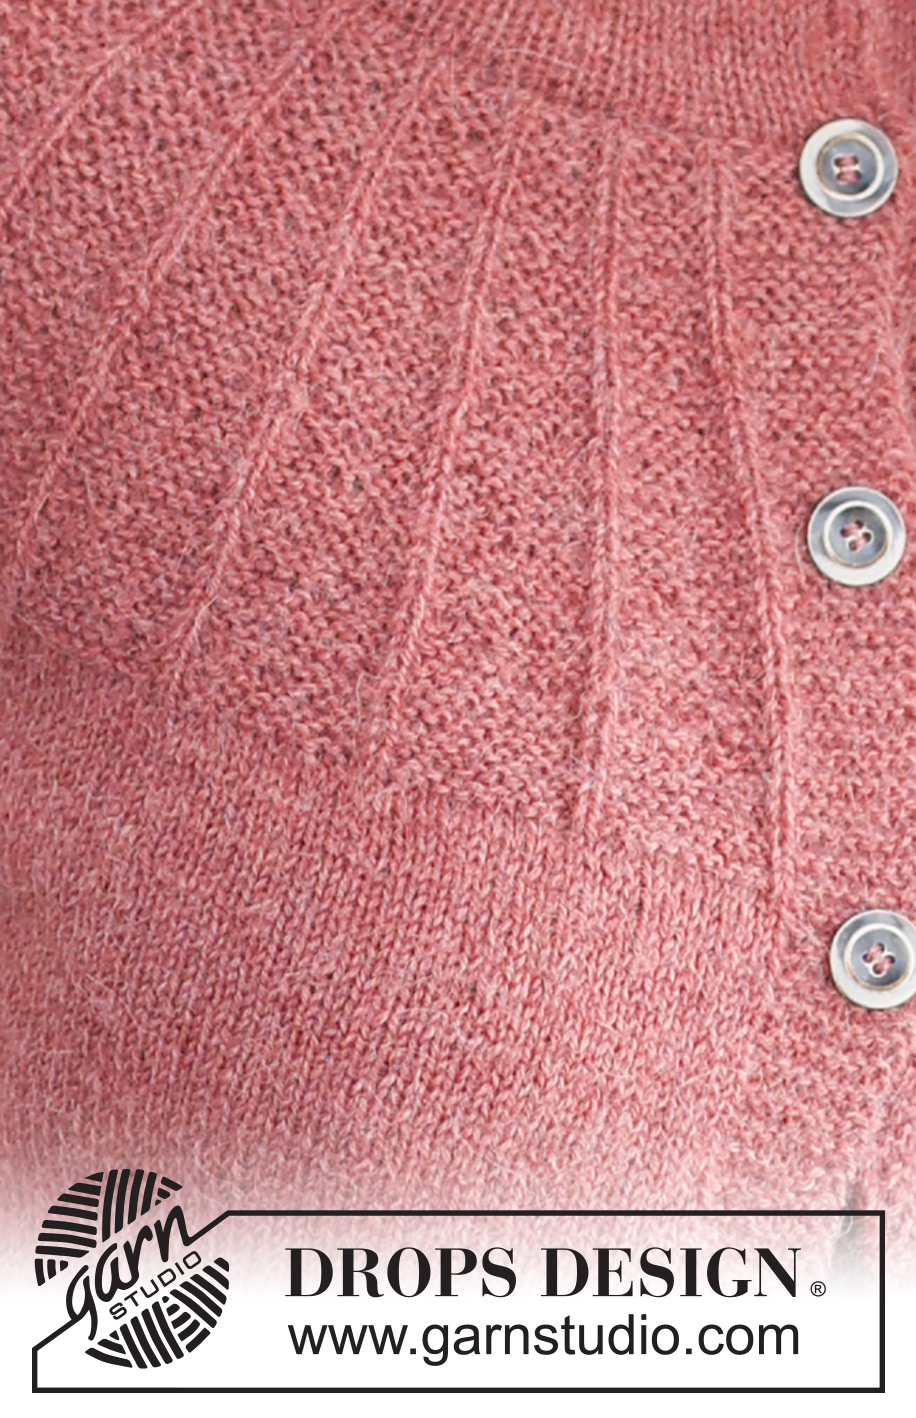
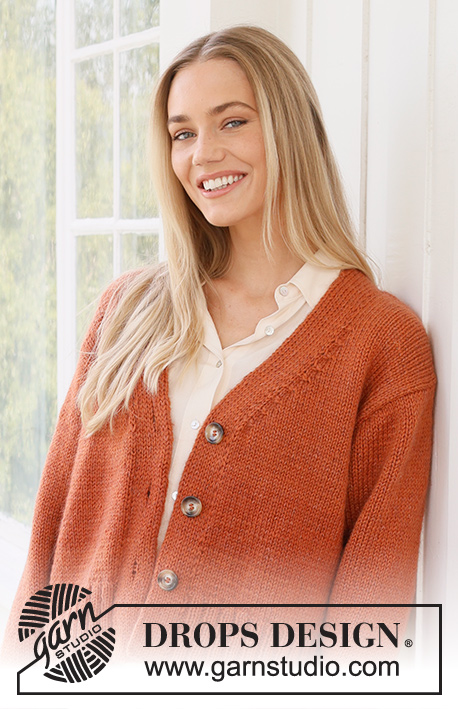
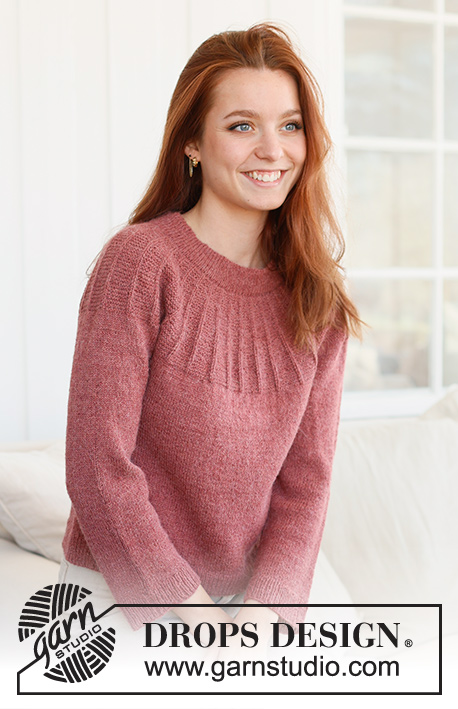
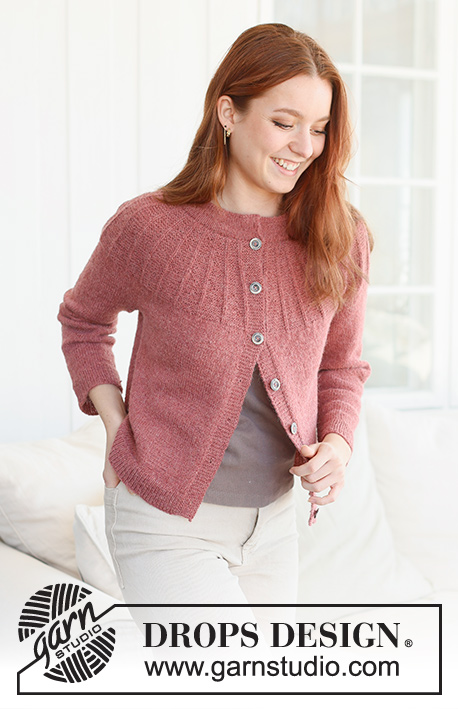
Knitted jacket in DROPS Alpaca. Piece is knitted top down with double knitted neck edge, round yoke and relief pattern on yoke. Size: S - XXXL
DROPS 235-12 |
||||||||||
|
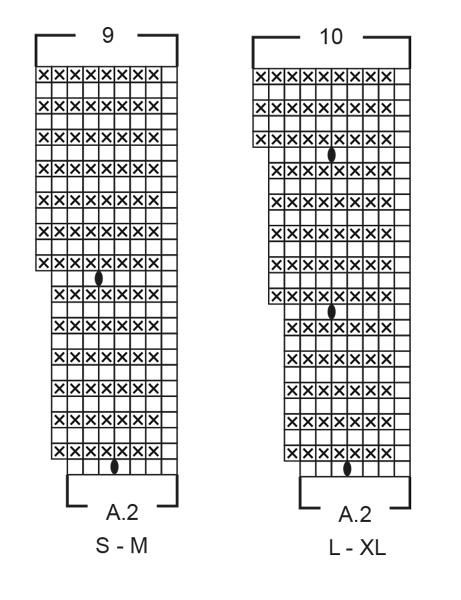
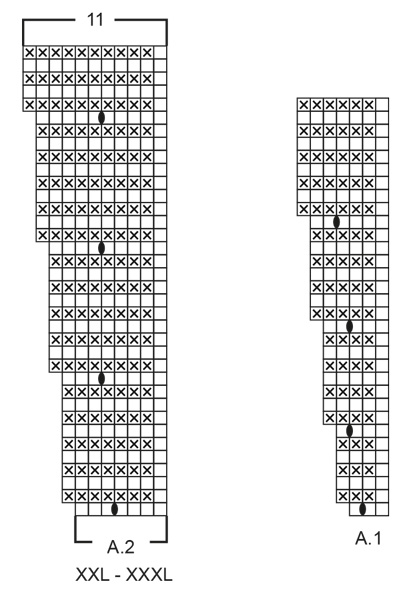
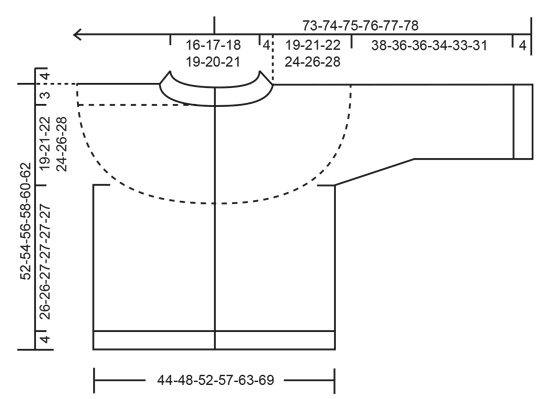
---------------------------------------------------------- EXPLANATION FOR THE PATTERN: ---------------------------------------------------------- GARTER STITCH (back and forth): Knit all rows. 1 ridge vertically = knit 2 rows. PATTERN: See diagrams A.1 and A.2. Choose diagram for your size (applies to A.2). Diagrams show all rows in pattern seen from the right side. DECREASE TIP (applies to mid under sleeves): Begin 3 stitches before marker thread and knit 2 together, knit 2 (marker thread is between these 2 stitches), slip 1 stitch knitwise, knit 1, pass slipped stitch over stitch worked. BUTTONHOLES: Decrease for buttonholes on right band (when garment is worn). Decrease from right side when 5 stitches remain on row as follows: Make 1 yarn over, knit 2 together, finish by knitting 3. On next row (wrong side) knit the yarn over to make a hole. Decrease for first buttonhole when neck edge has been worked, then decrease for the next 6 buttonholes approx. 7½-8-8-8½-8½-9 cm apart. ---------------------------------------------------------- START THE PIECE HERE: ---------------------------------------------------------- JACKET - SHORT OVERVIEW OF THE PIECE: Work double knitted neck edge and yoke back and forth on circular needle from mid front, top down. Now divide yoke for body and sleeves. Work body back and forth on circular needle. Work sleeves in the round on double pointed needles or a short circular needle. DOUBLE KNITTED NECK EDGE: Cast on somewhat tightly 260-272-278-290-302-308 stitches on circular needle size 2.5 mm with DROPS Alpaca and work as follows: ROW 1: Knit 1, * slip 1 stitch purlwise, with strand in front of piece, knit 1 *, work from *-* until 1 stitch remains, finish with knit 1. Repeat 1st row from right side and wrong side until neck edge measures 4 cm from cast-on edge. Work next row as follows from right side: Knit 1, knit 2 and 2 stitches together until 1 stitch remains, finish with knit 1 = 131-137-140-146-152-155 stitches. Work next row as follows from wrong side: Knit 8, purl until 8 stitches remain, finish with knit 8. Insert 1 marker inside the outermost 8 stitches at the beginning of row mid front. Work yoke as explained below, measure yoke from this marker! YOKE: Switch to circular needle size 3 mm. Work first row as follows from right side: 8 stitches in GARTER STITCH - read explanation above, work A.1 until 9 stitches remain on row, work first stitch in A.1 so that pattern begins and ends the same, finish with 8 stitches in garter stitch - remember BUTTONHOLES on band - read explanation above. Continue this pattern. REMEMBER THE KNITTING TENSION! When A.1 has been worked vertically, work A.2 the same way. When A.2 has been worked vertically, there are 359-377-427-447-512-523 stitches on needle. Work the same way without increases until piece measures 13-14-15-16-17-18 cm from marker at the neck. Then work in stocking stitch with 8 stitches in garter stitch in each side towards mid front – AT THE SAME TIME on first row from right side increase 14-24-6-38-1-26 stitches evenly (do not increase over bands) = 373-401-433-485-513-549 stitches. When piece measures 19-21-22-24-26-28 cm, from marker at the neck, divide yoke for body and sleeves, i.e. work next row as follows: Work 60-65-69-76-82-89 stitches as before, slip the next 74-78-86-98-100-104 stitches on a thread for sleeve, cast on 10-10-12-12-14-16 new stitches on needle (in the side under sleeve), work 105-115-123-137-149-163 stitches in stocking stitch, slip the next 74-78-86-98-100-104 stitches on a thread for sleeve, cast on 10-10-12-12-14-16 new stitches on needle (in the side under sleeve), and work the last 60-65-69-76-82-89 stitches as before. Finish body and sleeves separately. Now measure piece from here! BODY: = 245-265-285-313-341-373 stitches. Work in stocking stitch back and forth with 8 stitches in garter stitch in each side towards mid front. When piece measures 26-26-27-27-27-27 cm from division, knit 1 row from right side while increasing 64-68-74-80-88-96 stitches evenly = 309-333-359-393-429-469 stitches. Switch to circular needle size 2.5 mm. Work next row as follows from wrong side: 8 stitches in garter stitch, * purl 1, knit 1 *, repeat from *-* until 9 stitches remain, purl 1 and 8 stitches in garter stitch. Continue rib like this for 4 cm. Loosely cast off. Jacket measures approx. 52-54-56-58-60-62 cm from shoulder and down. SLEEVES: Slip the 74-78-86-98-100-104 stitches from thread in one side of piece on double pointed needles or a short circular needle size 3 mm and pick in addition up 1 stitch in each of the 10-10-12-12-14-16 stitches cast on under sleeve = 84-88-98-110-114-120 stitches. Insert 1 marker thread mid under sleeve, i.e. in the middle of the 10-10-12-12-14-16 stitches that were cast on under sleeves. Begin round at the marker thread, and work stocking stitch in the round. When sleeve measures 2 cm from division, decrease 2 stitches mid under sleeve - read DECREASE TIP. Decrease like this every 2-2-1½-1-1-1 cm 7-8-11-16-17-18 times in total = 70-72-76-78-80-84 stitches. Work without decrease until sleeve measures 38-36-36-34-33-31 cm from division. Approx. 4 cm remain until finished measurements, try the jacket on and work to desired length before rib. Knit 1 round while increasing 16-16-18-18-18-18 stitches evenly = 86-88-94-96-98-102 stitches. Switch to double pointed needles size 2.5 mm. Work rib (knit 1/purl 1) for 4 cm. Loosely cast off. Sleeve measures approx. 42-40-40-38-37-35 cm from division. Work the other sleeve the same way. ASSEMBLY: Sew the buttons on to the left band. |
||||||||||
Diagram explanations |
||||||||||
|
||||||||||
 |
||||||||||
 |
||||||||||
 |
||||||||||
Have you finished this pattern?Tag your pictures with #dropspattern #morninghushcardigan or submit them to the #dropsfan gallery. Do you need help with this pattern?You'll find 29 tutorial videos, a Comments/Questions area and more by visiting the pattern on garnstudio.com. © 1982-2026 DROPS Design A/S. We reserve all rights. This document, including all its sub-sections, has copyrights. Read more about what you can do with our patterns at the bottom of each pattern on our site. |
||||||||||


With over 40 years in knitting and crochet design, DROPS Design offers one of the most extensive collections of free patterns on the internet - translated to 17 languages. As of today we count 324 catalogues and 12290 patterns translated into English (UK/cm). 12290
We work hard to bring you the best knitting and crochet have to offer, inspiration and advice as well as great quality yarns at incredible prices! Would you like to use our patterns for other than personal use? You can read what you are allowed to do in the Copyright text at the bottom of all our patterns. Happy crafting!
Post a comment to pattern DROPS 235-12
We would love to hear what you have to say about this pattern!
If you want to leave a question, please make sure you select the correct category in the form below, to speed up the answering process. Required fields are marked *.