Comments / Questions (27)
![]() Beata wrote:
Beata wrote:
Co to znaczy "brak oczka, przejść bezpośrednio do kolejnego symbolu w schemacie"? Czy mam je przełożyć na drut bez przerobienia?
13.05.2023 - 23:45DROPS Design answered:
Witaj Beato, nie przekładasz oczka, tylko przerabiasz to oczko jak pokazuje kolejny symbol w schemacie. Pozdrawiamy!
14.05.2023 - 09:52
![]() Birgitta Olsson wrote:
Birgitta Olsson wrote:
Håller på med oket. Har stickat första varvet A1, A2, A3, A4, A2 4 ggr, A3, AA5, A6, A2 och A7. I vilken ordning ska jag sticka varvet tillbaka? Birgitta
19.04.2023 - 19:40DROPS Design answered:
Hei Birgitta. Da strikker du slik at A.1 kommer over A.1, A.2 over A.2, A.3 over A.3 osv. Og husk når du strikker frem og tilbake, vil annenhver pinne strikkes fra retten og annenhver pinne strikkes fra vrangen. Siden diagrammet viser alle masker sett fra rettsiden, må det derfor strikkes motsatt når det strikkes fra vrangen, du leser da raden fra venstre mot høyre, rettmasker strikkes vrang, vrangmasker strikkes rett (dette står i symbolforklaringen: «rett fra rettsiden, vrang fra vrangsiden»). mvh DROPS Design
24.04.2023 - 11:40
![]() Monica wrote:
Monica wrote:
Fråga om raglan ökningarna. Öka 1 maska på varje sida av maskorna med markör i genom att göra 1 omslag om stickan. På nästa varv (avigsidan) stickas omslagen vridet aviga, så att det inte blir hål. Om jag glömt att sticka omslaget vridet på avigsidan, har det någon betydelse för storleken? Stickar den i bomullsgarn så jag tycker inte att det gör något om det blir hål.
11.04.2023 - 19:29DROPS Design answered:
Hei Monica Nei, har ingen innvirkning på størrelsen (om det ikke har blitt et veldig stor hull). Men om det er bare et sted du glemte å stikke vridd, så blir det kanskje litt merkelig at det er et hull på den ene siden og ikke på den andre siden, men har du gjort det på alle steder du har økt, vil du bare få et ekstra hullmønster ved raglanslinjen :) mvh DROPS Design
17.04.2023 - 11:37
![]() Maj Banner wrote:
Maj Banner wrote:
Hei, prøver å lese dette mønsteret, og det jeg lurer på erom det er 8 eller 5 masker til stolpene? Og strikkes stolpene med 1 rett og 1 vrang..Litt forvirret her, så jeg håper dere kan hjelpe meg med dette..På forhånd tusen takk..Hilsen Maj Banner..Runcorn..Cheshire, England..
21.02.2023 - 11:10DROPS Design answered:
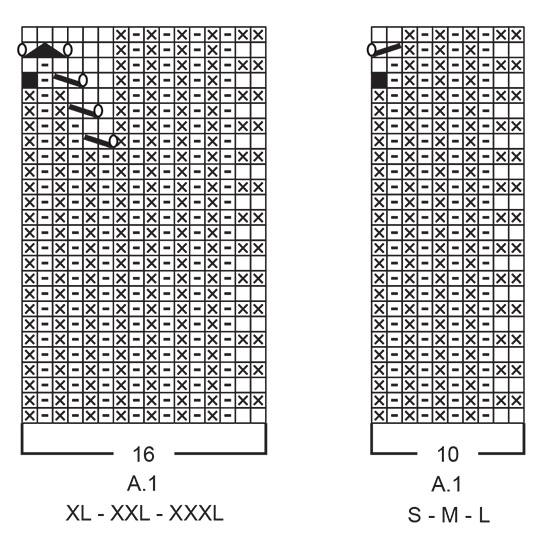
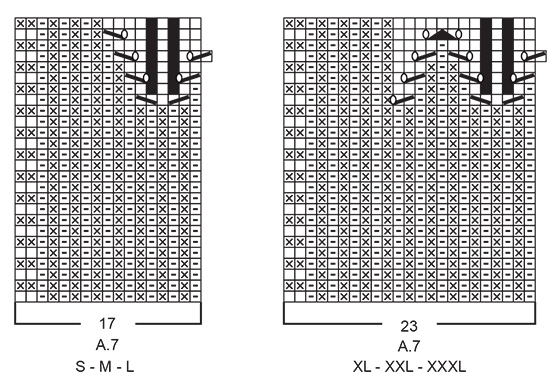
Hei Maj. Det kommer på hvilken str. du strikker. De 3 minste str har de 8 første maskene til stolpen og de 3 største str har 10 første maskene til stolpen (i A.1, se riktig diagram til riktig str) i den ene siden. På den andre siden er det de 8 og 10 siste maskene i diagram A.7. Se tekst forklaringen til diagrammene hvordan det strikkes (de 3 øverste ikonene). mvh DROPS Design
28.02.2023 - 19:25
![]() Ingrid Ehret wrote:
Ingrid Ehret wrote:
Hallo, es geht hier nicht um die Maschenzahl bei Ende des Diagrammes, sondern die Einteidlung der 19. Reihe stimmt nicht mit der vorhergehenden Reihe überein. Bitte überprüft dies doch mal und zählt die Maschen die 19. Reihe passt nicht auf die 18. Reihe (jeweils Vorderseitenreihen). Ich bitte um baldige Antwort da ich weiterstricken möchte. Liebe Grüse Ingrid Ehret
22.09.2022 - 14:10
![]() Ingrid Ehret wrote:
Ingrid Ehret wrote:
Liebes Drops Team, ich habe den Fehler entdeckt, es ist eine Reihe /17. und 18. Reihe zuviel gezeichnet. Es dürfen am Schluß nur 201 Maschen sein und nicht 209. Mit 209 Maschen geht das Muster nicht auf mit 201 Maschen stimmt es genau. Bitte Diagramm korrigieren. Liebe Grüsse Ingrid Ehret
22.09.2022 - 09:35DROPS Design answered:
Liebe Frau Ehret, Diagramme sind richtig und es sind 209 Maschen nach den Diagrammen fertig sind : A.1 (10 M), A.2 (8 M), A.3 (18 M), A.4 (14 M), A.2 (8 M), A.5 (19 M), A.6 (13 M), A.2 (24 M), A.3 (18 M), A.4 (14 M), A.2 (8 M), A.5 (19 M), A.6 (13 M), A.2 (8 M), A.7 (15 M) = 10+8+18+14+8+19+13+24+18+14+8+19+13+8+15=209 M. Viel Spaß beim stricken!
22.09.2022 - 10:15
![]() Ingrid Ehret wrote:
Ingrid Ehret wrote:
Hallo, Entschuldigung, Sorry ich meinte die 19. Reihe die stimmt nicht. Die 18. Reihe ist noch klar. In der 19. Reihe stimmt die Einteilung nicht. Liebe Grüsse Ingrid Ehret
21.09.2022 - 17:31DROPS Design answered:
Liebe Frau Ehret, wieso stimmt es nicht? In welchem Diagram fehlt es Ihnen Maschen? Versuchen Sie Markierungen zwischen jedem Diagram einzusetzen, so kann es Ihnen besser helfen.
22.09.2022 - 09:26
![]() Ingrid Ehret wrote:
Ingrid Ehret wrote:
Hallo ihr lieben, ich habe nicht verstnden, was es heißt die 18. Reihe wird wie zuzvor gestrickt. Ich beginne mit der 18. Reihe die Mustereinteilung wie am dem Diagramm beschrieben. Es ändert sich jedes Diagrammin der 18. Reihe. Ich kommen hiermit nicht klar. Ich warte auf baldige Antwort. Vielen Dank Ingrid Ehret
21.09.2022 - 17:29DROPS Design answered:
Liebe Frau Ehret, es wird genauso wie zuvor gestrickt, bis die Diagramme A.1 bis A.7 in der Höhe fertig sind bzw: (bei den Hinreihen): A.1, A.2, A.3, A.4, A.2, A.5, A.6, A.2 insgesamt 3 x, A.3, A.4, A.2, A.5, A.6, A.2, A.7 . Oder misverstehe ich Ihre Frage? Bei der 18. Reihen sind diese Diagramme noch nicht fertig, so stricken Sie die Diagramme weiter wie gezeichnet, dh mit Rippenmuster und auch Lochmuster bis zur 26. Reihe. Viel Spaß beim stricken!
22.09.2022 - 09:25
![]() Ingrid Ehret wrote:
Ingrid Ehret wrote:
Hallo liebes Drodps Team, es ist ja schön iund gute die antworten oder fragen von anderen zu lesen, man müsste nur die Sprache können, dann wäre vielleicht weiter geholfen. Liebe Grüsse Ingrid Ehret
21.09.2022 - 16:42
![]() Ingrid Ehret wrote:
Ingrid Ehret wrote:
Hallo liebes drops team, bin gerade dabei dieses modell zu stricken. Jedoch muss ich feststellen dass die Mustereinteilung ab der 18. Reihe nicht stimmt, ich habe laut der Mustereinteilung in allen Reihen 18 zum Schluß von den 209 Maschen 28 übrig. Die Musterienteilung stimmt nicht. Bitte baldige Antwort. da ich eiterstricken möchte. Liebe Grüße Ingrid Ehret
21.09.2022 - 11:36DROPS Design answered:
Liebe Frau Ehret, ab 18. Reihe in den Diagrammen A.1 bis A.7 wird es wie zuvor gestrickt, vielleicht können Sie eine Markierung nach jedem Rapport einstellen, es könnte Ihnen helfen, das Muster wie im Diagram zu stricken. Viel Spaß beim stricken!
21.09.2022 - 17:07
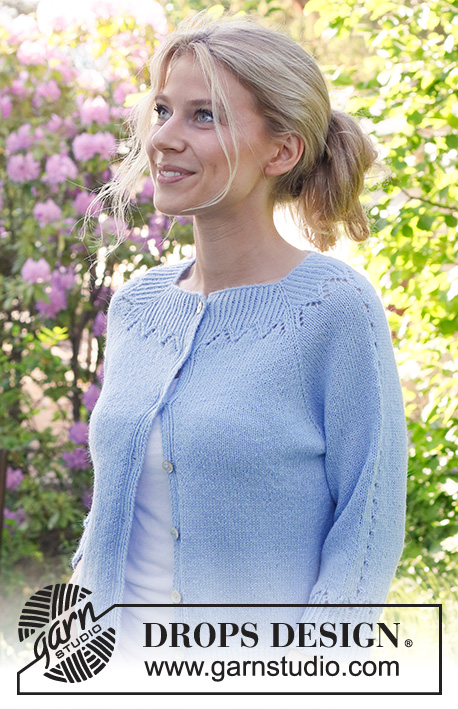
Lost in the Sky Cardigan#lostintheskycardigan |
|||||||||||||||||||||||||||||||
 |
 |
||||||||||||||||||||||||||||||
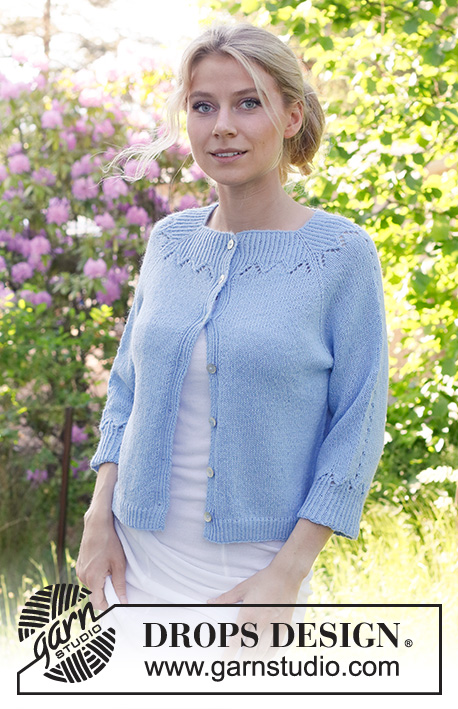
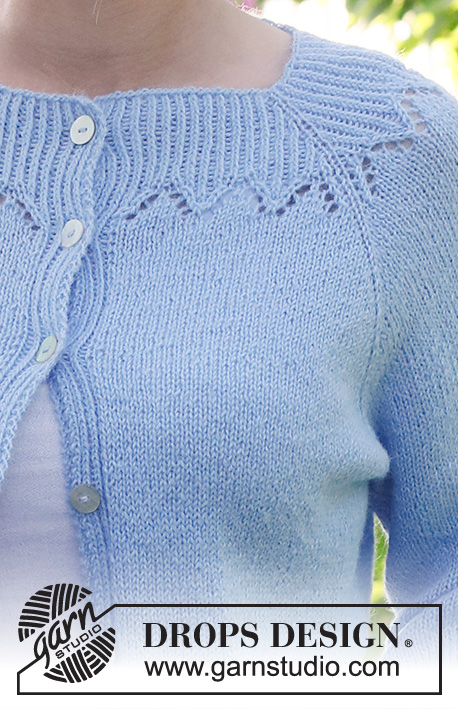
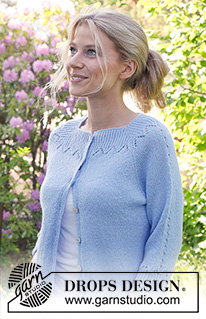
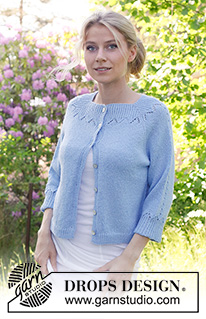
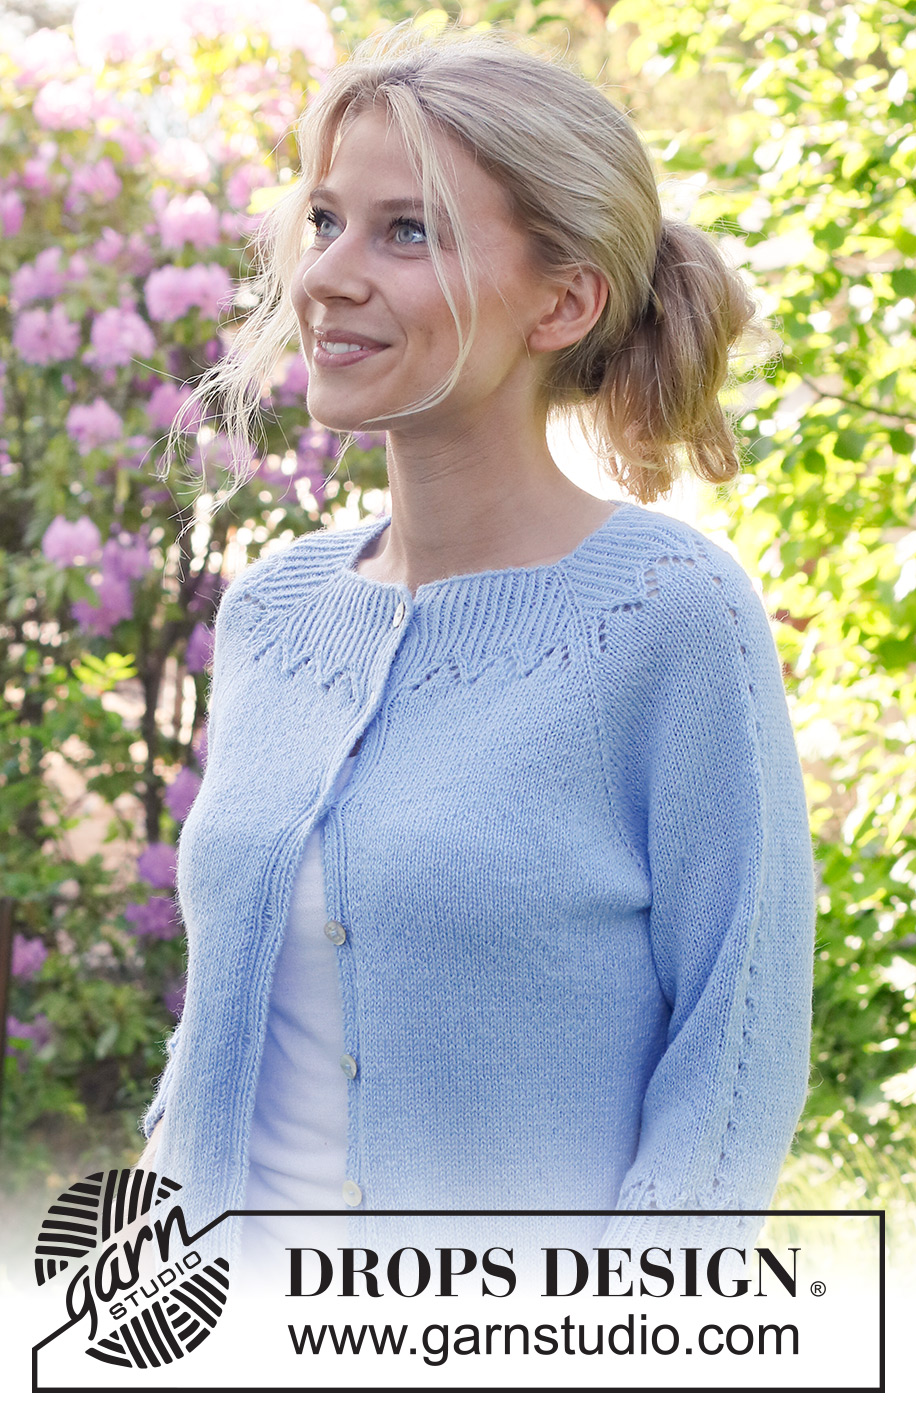
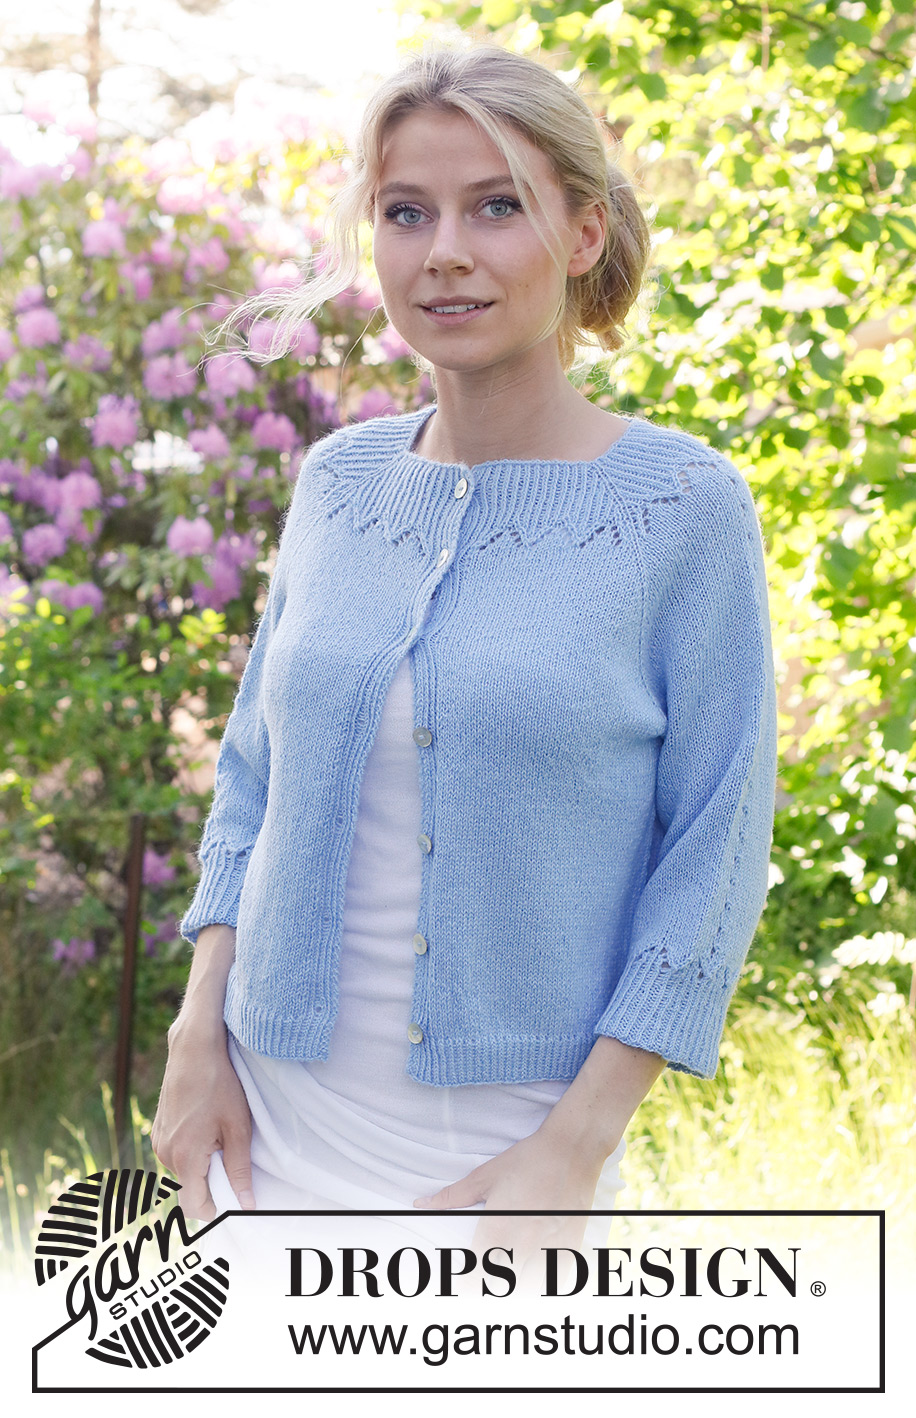
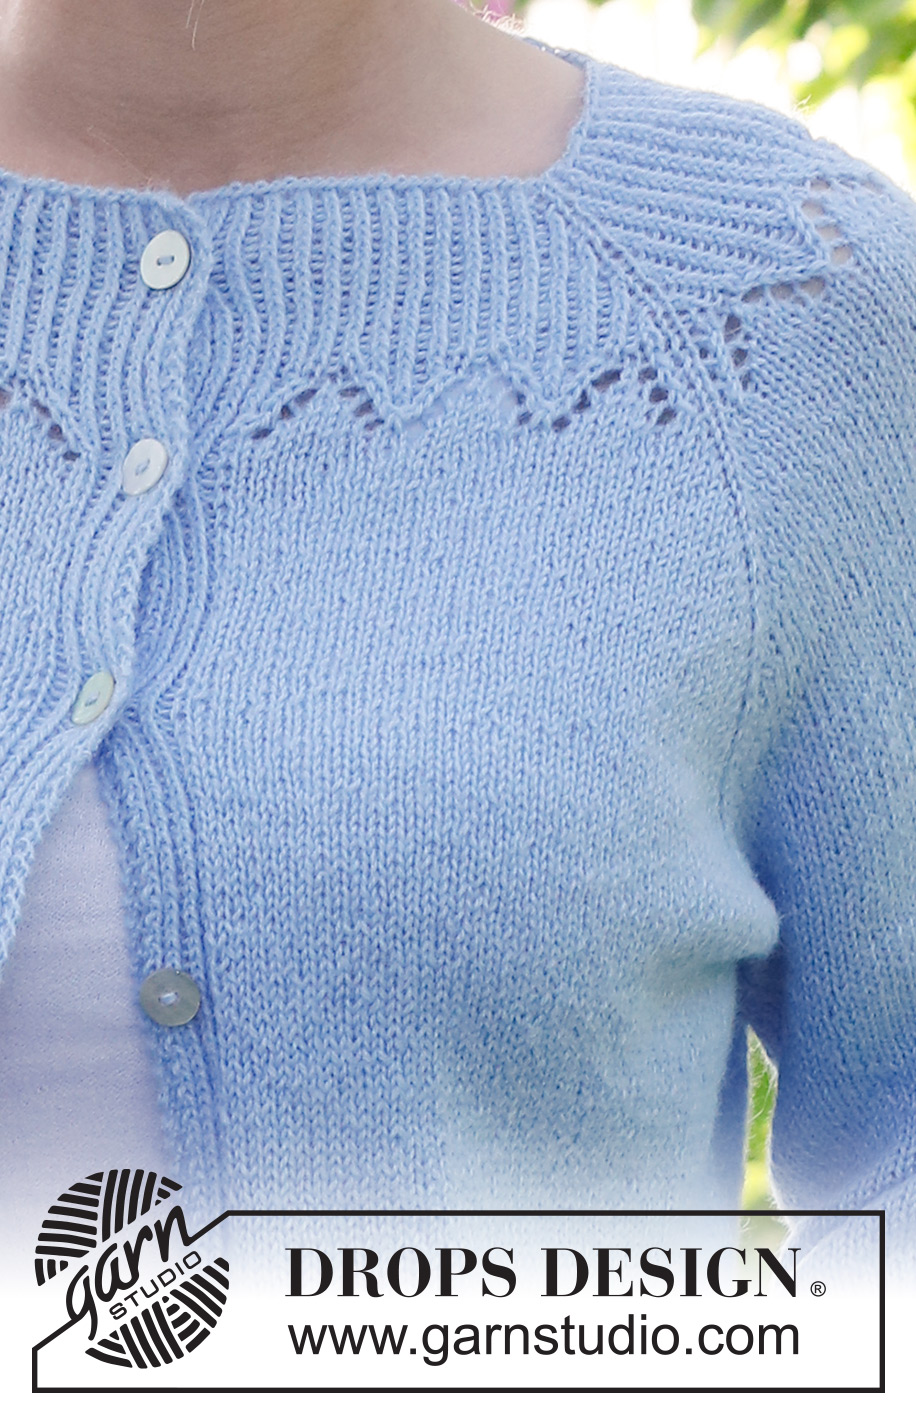
Knitted jacket with ¾ sleeves in DROPS Alpaca. Piece is knitted top down with raglan and lace pattern. Size: S - XXXL
DROPS 230-47 |
|||||||||||||||||||||||||||||||
|
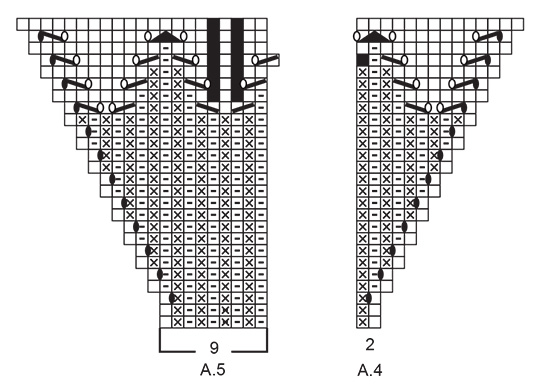
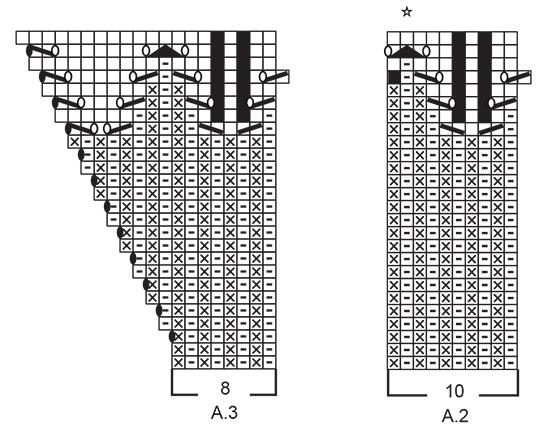
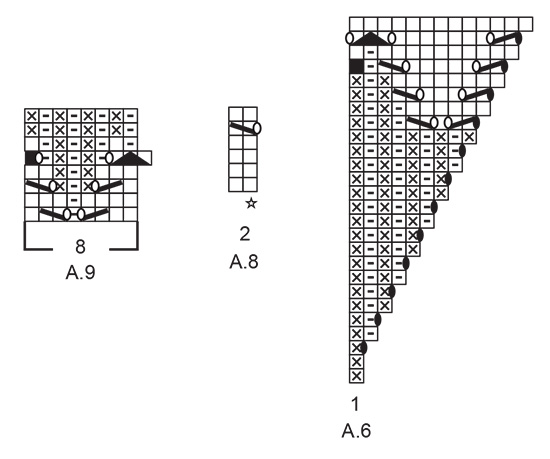
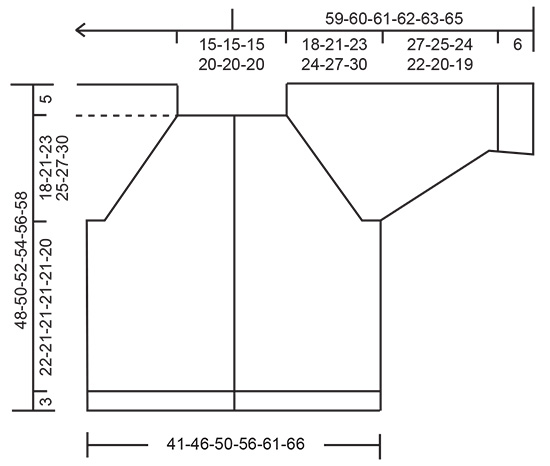
---------------------------------------------------------- EXPLANATION FOR THE PATTERN: ---------------------------------------------------------- GARTER STITCH (back and forth): Knit all rows. 1 ridge vertically = knit 2 rows. PATTERN: See diagrams A.1 to A.9. Choose diagram for your size (applies to A.1 and A.7). Diagrams show all rows in pattern seen from the right side. RAGLAN: All increases are done from the right side. Increase 1 stitch on each side of stitch with marker by making 1 yarn over. On next row (wrong side) purl yarn over twisted to avoid holes. DECREASE TIP (applies to sleeves): Decrease 1 stitch on each side of marker thread as follows: Work until 3 stitches remain before marker thread and knit 2 together, knit 2 (marker thread is between these 2 stitches), slip 1 stitch knitwise, knit 1, pass slipped stitch over stitch worked. BUTTONHOLES (top down): Decrease for buttonholes on right band (when garment is worn). 1 buttonhole = work as before until 5 stitches remain on needle, make 1 yarn over, work the last 5 stitches as before. Turn piece, work the first 5 stitches as before, knit yarn over together with next stitch to make a hole. Decrease first buttonhole when piece measures approx. 2 cm. Then decrease the next 6-6-6-6-7-7 buttonholes, approx. 7-7½-7½-8-7-7½ cm apart. ---------------------------------------------------------- START THE PIECE HERE: ---------------------------------------------------------- JACKET - SHORT OVERVIEW OF THE PIECE: Work yoke back and forth on circular needle from mid front, work top down. Now divide yoke for body and sleeves. Work body back and forth on circular needle. Work sleeves in the round on double pointed needles/a short circular needle. YOKE: Cast on 137-137-137-159-159-159 stitches on circular needle size 2.5 mm with DROPS Alpaca. Purl 1 row from wrong side. Work next row as follows from right side: A.1, A.2, A.3 (these stitches belong to left front piece), work A.4 (insert 1 marker in first stitch in A.4), A.2, A.5 (insert 1 marker in last stitch in A.5 – stitches between these 2 markers belong to sleeve), A.6, A.2 is worked 3-3-3-4-4-4 times in total, A.3 (these stitches belong to back piece), A.4 (insert 1 marker in first stitch), A.2, A.5 (insert 1 marker in last stitch – stitches between these 2 markers belong to sleeve), A.6, A.2, A.7 (these stitches belong to right front piece). Continue pattern back and forth like this - the 4 stitches with markers marks the raglan lines and are used later for increase for raglan. When 2 rows have been worked back and forth, switch to circular needle size 3 mm, then continue pattern as before - REMEMBER THE KNITTING TENSION and remember BUTTONHOLES on right band - read explanation above. When A.1 to A.7 have been worked vertically, there are 209-209-209-229-229-229 stitches on needle. Then work in stocking stitch back and forth, but continue the outermost 8-8-8-10-10-10 stitches in each side as before (bands) – in addition work A.8 in the middle of each sleeve – stitch with star in A.8 should fit stitches with star in A.2. AT THE SAME TIME on first row from right side increase for RAGLAN – see explanation above. Increase 1 stitch on each side of 4 stitches with markers (8 stitches increased on row). Increase for raglan on every row from right side 16-20-24-27-30-35 times in total After last increase for raglan there are 337-369-401-445-469-509 stitches on needle and piece measures approx. 18-21-23-25-27-30 cm from cast-on edge. If piece is shorter than this, continue without increases until correct measurements. On next row divide piece for body and sleeves, i.e. work next row as follows: Work as before over the first 54-60-63-70-75-82 stitches, slip the next 69-73-83-91-93-99 stitches on a thread for sleeve, cast on 8-8-10-10-12-12 new stitches on needle (in the side under sleeve), work 91-103-109-123-133-147 stitches in stocking stitch, slip the next 69-73-83-91-93-99 stitches on a thread for sleeve, cast on 8-8-10-10-12-12 new stitches on needle (in the side under sleeve), and work the last 54-60-63-70-75-82 stitches as before. Finish body and sleeves separately. Now measure piece from here! BODY: = 215-239-255-283-307-335 stitches. Work stocking stitch back and forth with 8-8-8-10-10-10 band stitches in each side as before. When piece measures 22-21-21-21-21-20 cm from division, knit 1 row from right side while increasing 22-24-26-28-30-34 stitches evenly (do not increase over bands) = 237-263-281-311-337-369 stitches. Switch to circular needle size 2.5 mm, and work rib as follows: ROW 1 (= wrong side): 8-8-8-10-10-10 stitches as before, * purl 1 twisted, knit 1 *, work from *-* until 9-9-9-11-11-11 stitches remain on needle, purl 1 twisted and 8-8-8-10-10-10 stitches as before. ROW 2 (= right side): 8-8-8-10-10-10 stitches as before, * knit 1 twisted, purl 1 *, work from *-* until 9-9-9-11-11-11 stitches remain on needle, knit 1 twisted and 8-8-8-10-10-10 stitches as before. Repeat 1st and 2nd row until rib measures 3 cm. Loosely cast off. Jacket measures approx. 48-50-52-54-56-58 cm from shoulder and down. SLEEVE: Slip the 69-73-83-91-93-99 stitches from thread in one side of piece on double pointed needles or a short circular needle size 3 mm and pick in addition up 1 stitch in each of the 8-8-10-10-12-12 new stitches cast on under sleeve = 77-81-93-101-105-111 stitches. Insert 1 marker thread in the middle of the 8-8-10-10-12-12 stitches that were cast on under sleeves. Move marker thread upwards when working. Begin round at the marker thread and work stocking stitch in the round, but continue A.8 mid on top of sleeve as before. When sleeve measures 2-2-2-3-3-1 cm from division, decrease 2 stitches mid under sleeve - read DECREASE TIP. Decrease like this every 3½-2½-1½-1-1-1 cm 6-8-10-14-12-15 times in total = 65-65-73-73-81-81 stitches. Work until sleeve measures 24-22-21-19-17-16 cm from division. 9 cm remain until finished measurements. Knit 1 round while decreasing 1 stitch under sleeve (on right sleeve knit the last 2 stitches on round twisted together, on left sleeve knit the first 2 stitches on round together) = 64-64-72-72-80-80 stitches. Work A.9 8-8-9-9-10-10 times in total around the sleeve - A.9 should fit nicely over A.8 mid on top of sleeve. When A.9 has been worked, switch to double pointed needles size 2.5 mm. Continue rib over stitches in A.9 with knit 1 twisted/purl 1. When rib measures 1 cm (measured after A.9), increase every fourth purl 1 to purl 2 (i.e. increase every 8th stitch to purl 2) = 72-72-81-81-90-90 stitches. When rib measures 2 cm, increase the same way but displace to avoid increasing over previous increases = 80-80-90-90-100-100 stitches. When rib measures 3½ cm, increase the same way and displace to next 1 purl = 88-88-99-99-110-110 stitches, and when rib measures 5 cm, increase the remaining 1 purl to 2 purl = 96-96-108-108-120-120 stitches. Cast off somewhat loosely when rib measures 6 cm. Sleeve measures approx. 33-31-30-28-26-25 cm from division. Work the other sleeve the same way. ASSEMBLY: Sew the buttons on to the left band. |
|||||||||||||||||||||||||||||||
Diagram explanations |
|||||||||||||||||||||||||||||||
|
|||||||||||||||||||||||||||||||
 |
|||||||||||||||||||||||||||||||
 |
|||||||||||||||||||||||||||||||
 |
|||||||||||||||||||||||||||||||
 |
|||||||||||||||||||||||||||||||
 |
|||||||||||||||||||||||||||||||
 |
|||||||||||||||||||||||||||||||
Have you finished this pattern?Tag your pictures with #dropspattern #lostintheskycardigan or submit them to the #dropsfan gallery. Do you need help with this pattern?You'll find 31 tutorial videos, a Comments/Questions area and more by visiting the pattern on garnstudio.com. © 1982-2026 DROPS Design A/S. We reserve all rights. This document, including all its sub-sections, has copyrights. Read more about what you can do with our patterns at the bottom of each pattern on our site. |
|||||||||||||||||||||||||||||||






Post a comment to pattern DROPS 230-47
We would love to hear what you have to say about this pattern!
If you want to leave a question, please make sure you select the correct category in the form below, to speed up the answering process. Required fields are marked *.