DROPS Alpaca
DROPS Alpaca
100% Alpaca
from 3.65 € /50g
Get the yarn to make this pattern from 18.25€.

The yarn cost is calculated from the pattern’s smallest size and the yarn’s cheapest product type. Looking for an even better price? You might find it on the DROPS Deals!

DROPS SS24

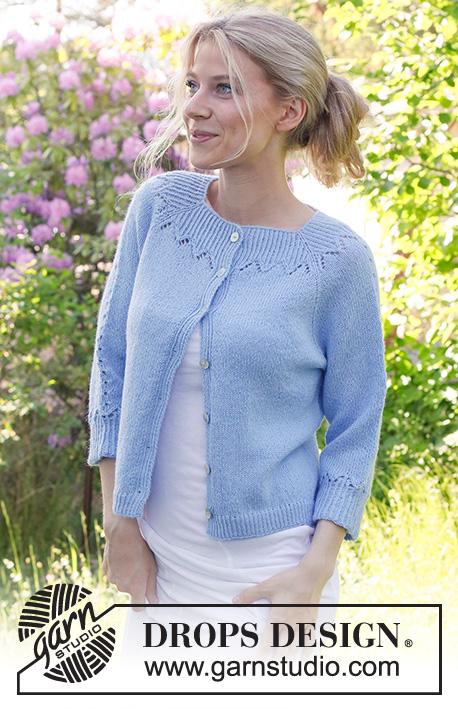
Lost in the Sky Cardigan

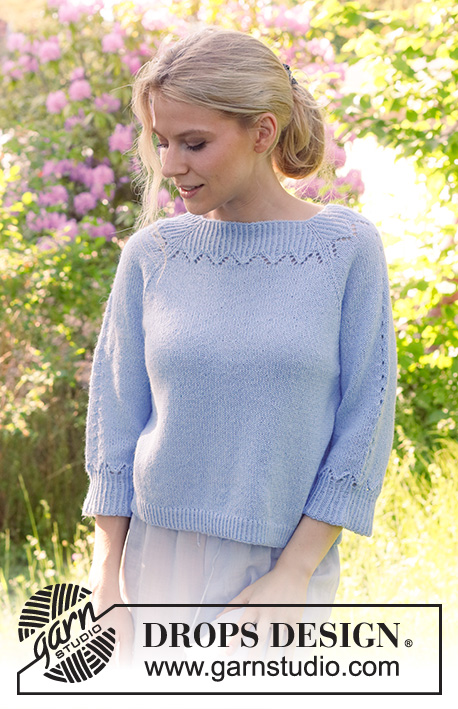
Knitted jacket with ¾ sleeves in DROPS Alpaca. Piece is knitted top down with raglan and lace pattern. Size: S - XXXL

DROPS 230-47
DROPS design: Pattern z-954
Yarn group A
----------------------------------------------------------

SIZE:
S - M - L - XL - XXL - XXXL

MATERIALS:
DROPS ALPACA from Garnstudio (belongs to yarn group A)
250-300-300-350-400-400 g colour 6205, light blue

DROPS BUTTON NO 521: 7-7-7-7-8-8 pieces

NEEDLES FOR SIZE S - M:
DROPS CIRCULAR NEEDLE SIZE 3 mm: Length: 80 cm
DROPS CIRCULAR NEEDLE SIZE 2.5 mm: Length: 80 cm
DROPS DOUBLE POINTED NEEDLES SIZE 3 mm
DROPS DOUBLE POINTED NEEDLES SIZE 2.5 mm
The technique MAGIC LOOP can be used – you then only need circular needle of 80 cm in each size.

NEEDLES FOR SIZE M - L - XL - XXL - XXXL:
DROPS CIRCULAR NEEDLE SIZE 3 mm: Length 40 and 80 cm.
DROPS CIRCULAR NEEDLE SIZE 2.5 mm: Length: 80 cm
DROPS DOUBLE POINTED NEEDLES SIZE 3 mm
DROPS DOUBLE POINTED NEEDLES SIZE 2.5 mm
The technique MAGIC LOOP can be used – you then only need circular needle of 80 cm in each size.

KNITTING TENSION:
24 stitches in width and 32 rows vertically in stocking stitch = 10 x 10 cm.
NOTE! Remember that needle size is only a suggestion. If you have too many stitches on 10 cm switch to larger needles. If you have too few stitches on 10 cm switch to smaller needles.

-------------------------------------------------------

Alternative Yarn – See how to change yarns here
Yarn Groups A to F – Use the same pattern and change the yarn here
Yarn usage using an alternative yarn – Use our yarn converter here

-------------------------------------------------------

DROPS Alpaca
DROPS Alpaca
100% Alpaca
from 3.65 € /50g
Get the yarn to make this pattern from 18.25€.

The yarn cost is calculated from the pattern’s smallest size and the yarn’s cheapest product type. Looking for an even better price? You might find it on the DROPS Deals!

Pattern instructions

----------------------------------------------------------

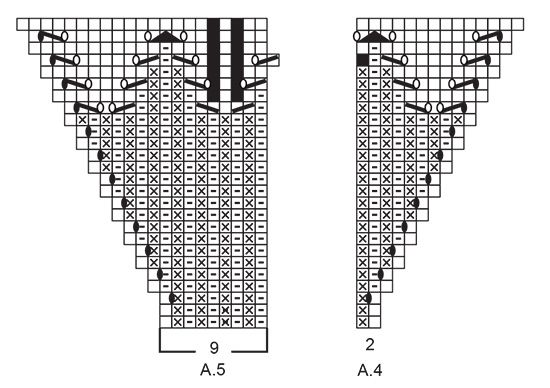
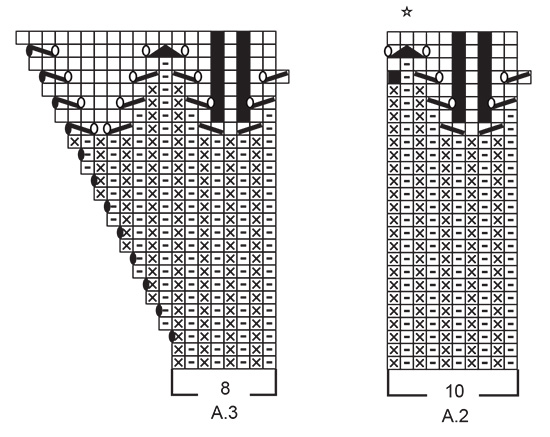
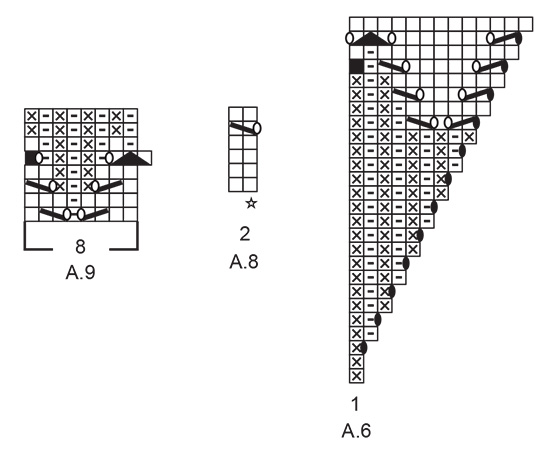
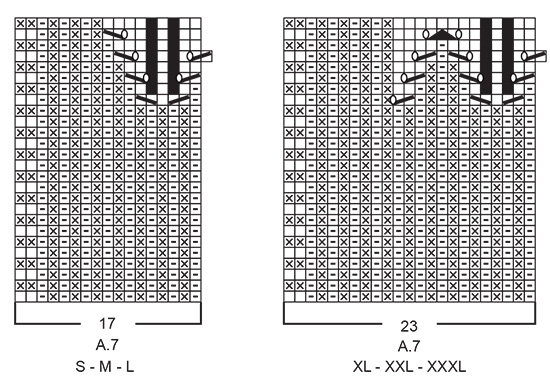
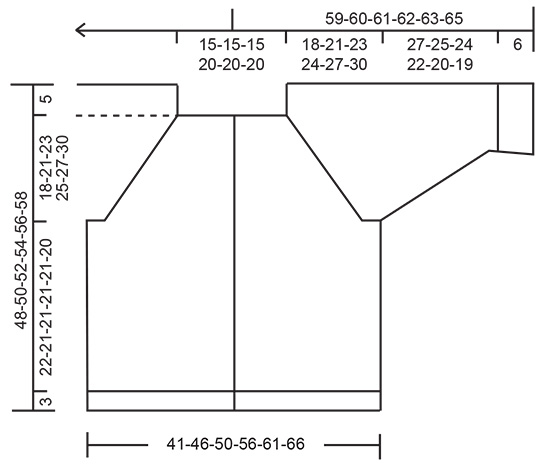
EXPLANATION FOR THE PATTERN:

----------------------------------------------------------

GARTER STITCH (back and forth):
Knit all rows.
1 ridge vertically = knit 2 rows.

PATTERN:
See diagrams A.1 to A.9. Choose diagram for your size (applies to A.1 and A.7). Diagrams show all rows in pattern seen from the right side.

RAGLAN:
All increases are done from the right side.
Increase 1 stitch on each side of stitch with marker by making 1 yarn over. On next row (wrong side) purl yarn over twisted to avoid holes.

DECREASE TIP (applies to sleeves):
Decrease 1 stitch on each side of marker thread as follows: Work until 3 stitches remain before marker thread and knit 2 together, knit 2 (marker thread is between these 2 stitches), slip 1 stitch knitwise, knit 1, pass slipped stitch over stitch worked.

BUTTONHOLES (top down):
Decrease for buttonholes on right band (when garment is worn). 1 buttonhole = work as before until 5 stitches remain on needle, make 1 yarn over, work the last 5 stitches as before. Turn piece, work the first 5 stitches as before, knit yarn over together with next stitch to make a hole.
Decrease first buttonhole when piece measures approx. 2 cm. Then decrease the next 6-6-6-6-7-7 buttonholes, approx. 7-7½-7½-8-7-7½ cm apart.

----------------------------------------------------------

START THE PIECE HERE:

----------------------------------------------------------

JACKET - SHORT OVERVIEW OF THE PIECE:
Work yoke back and forth on circular needle from mid front, work top down. Now divide yoke for body and sleeves. Work body back and forth on circular needle. Work sleeves in the round on double pointed needles/a short circular needle.

YOKE:
Cast on 137-137-137-159-159-159 stitches on circular needle size 2.5 mm with DROPS Alpaca.
Purl 1 row from wrong side.
Work next row as follows from right side: A.1, A.2, A.3 (these stitches belong to left front piece), work A.4 (insert 1 marker in first stitch in A.4), A.2, A.5 (insert 1 marker in last stitch in A.5 – stitches between these 2 markers belong to sleeve), A.6, A.2 is worked 3-3-3-4-4-4 times in total, A.3 (these stitches belong to back piece), A.4 (insert 1 marker in first stitch), A.2, A.5 (insert 1 marker in last stitch – stitches between these 2 markers belong to sleeve), A.6, A.2, A.7 (these stitches belong to right front piece).

Continue pattern back and forth like this - the 4 stitches with markers marks the raglan lines and are used later for increase for raglan.
When 2 rows have been worked back and forth, switch to circular needle size 3 mm, then continue pattern as before - REMEMBER THE KNITTING TENSION and remember BUTTONHOLES on right band - read explanation above.
When A.1 to A.7 have been worked vertically, there are 209-209-209-229-229-229 stitches on needle.

Then work in stocking stitch back and forth, but continue the outermost 8-8-8-10-10-10 stitches in each side as before (bands) – in addition work A.8 in the middle of each sleeve – stitch with star in A.8 should fit stitches with star in A.2.
AT THE SAME TIME on first row from right side increase for RAGLAN – see explanation above. Increase 1 stitch on each side of 4 stitches with markers (8 stitches increased on row). Increase for raglan on every row from right side 16-20-24-27-30-35 times in total
After last increase for raglan there are 337-369-401-445-469-509 stitches on needle and piece measures approx. 18-21-23-25-27-30 cm from cast-on edge. If piece is shorter than this, continue without increases until correct measurements.
On next row divide piece for body and sleeves, i.e. work next row as follows: Work as before over the first 54-60-63-70-75-82 stitches, slip the next 69-73-83-91-93-99 stitches on a thread for sleeve, cast on 8-8-10-10-12-12 new stitches on needle (in the side under sleeve), work 91-103-109-123-133-147 stitches in stocking stitch, slip the next 69-73-83-91-93-99 stitches on a thread for sleeve, cast on 8-8-10-10-12-12 new stitches on needle (in the side under sleeve), and work the last 54-60-63-70-75-82 stitches as before. Finish body and sleeves separately. Now measure piece from here!

BODY:
= 215-239-255-283-307-335 stitches. Work stocking stitch back and forth with 8-8-8-10-10-10 band stitches in each side as before.
When piece measures 22-21-21-21-21-20 cm from division, knit 1 row from right side while increasing 22-24-26-28-30-34 stitches evenly (do not increase over bands) = 237-263-281-311-337-369 stitches.
Switch to circular needle size 2.5 mm, and work rib as follows:
ROW 1 (= wrong side): 8-8-8-10-10-10 stitches as before, * purl 1 twisted, knit 1 *, work from *-* until 9-9-9-11-11-11 stitches remain on needle, purl 1 twisted and 8-8-8-10-10-10 stitches as before.
ROW 2 (= right side): 8-8-8-10-10-10 stitches as before, * knit 1 twisted, purl 1 *, work from *-* until 9-9-9-11-11-11 stitches remain on needle, knit 1 twisted and 8-8-8-10-10-10 stitches as before.
Repeat 1st and 2nd row until rib measures 3 cm. Loosely cast off. Jacket measures approx. 48-50-52-54-56-58 cm from shoulder and down.

SLEEVE:
Slip the 69-73-83-91-93-99 stitches from thread in one side of piece on double pointed needles or a short circular needle size 3 mm and pick in addition up 1 stitch in each of the 8-8-10-10-12-12 new stitches cast on under sleeve = 77-81-93-101-105-111 stitches.
Insert 1 marker thread in the middle of the 8-8-10-10-12-12 stitches that were cast on under sleeves. Move marker thread upwards when working.
Begin round at the marker thread and work stocking stitch in the round, but continue A.8 mid on top of sleeve as before.
When sleeve measures 2-2-2-3-3-1 cm from division, decrease 2 stitches mid under sleeve - read DECREASE TIP. Decrease like this every 3½-2½-1½-1-1-1 cm 6-8-10-14-12-15 times in total = 65-65-73-73-81-81 stitches.
Work until sleeve measures 24-22-21-19-17-16 cm from division. 9 cm remain until finished measurements.
Knit 1 round while decreasing 1 stitch under sleeve (on right sleeve knit the last 2 stitches on round twisted together, on left sleeve knit the first 2 stitches on round together) = 64-64-72-72-80-80 stitches. Work A.9 8-8-9-9-10-10 times in total around the sleeve - A.9 should fit nicely over A.8 mid on top of sleeve.
When A.9 has been worked, switch to double pointed needles size 2.5 mm.
Continue rib over stitches in A.9 with knit 1 twisted/purl 1.
When rib measures 1 cm (measured after A.9), increase every fourth purl 1 to purl 2 (i.e. increase every 8th stitch to purl 2) = 72-72-81-81-90-90 stitches. When rib measures 2 cm, increase the same way but displace to avoid increasing over previous increases = 80-80-90-90-100-100 stitches. When rib measures 3½ cm, increase the same way and displace to next 1 purl = 88-88-99-99-110-110 stitches, and when rib measures 5 cm, increase the remaining 1 purl to 2 purl = 96-96-108-108-120-120 stitches.
Cast off somewhat loosely when rib measures 6 cm. Sleeve measures approx. 33-31-30-28-26-25 cm from division.
Work the other sleeve the same way.

ASSEMBLY:
Sew the buttons on to the left band.

Diagram

symbols = knit from the right side, purl from the wrong side
symbols = purl from the right side, knit from the wrong side
symbols = knit twisted from right side, purl twisted from wrong side
symbols = between 2 stitches make 1 yarn over, on next row purl yarn over to make a hole
symbols = between 2 stitches make 1 yarn over, on next row work yarn over twisted as shown in diagram to avoid holes
symbols = this is no stitch, go directly to next symbol in diagram
symbols = knit 2 together
symbols = slip 1 stitch knitwise, knit 1, pass slipped stitch over stitch worked
symbols = slip 2 stitches as if to knit together, knit 1, pass the 2 slipped stitches over stitch worked
symbols = stitch with star in A.8 should fit stitch with star in A.2
diagram
diagram
diagram
diagram
diagram
diagram

Each of our patterns has specific tutorial videos to help you.

Do you have a question? See a list of frequently asked questions (FAQ)

Knitting tension is what determines the final measurements of your work, and is usually measured per 10 x 10 cm. It is provided like so: number of stitches in width x number of rows in height - eg: 19 stitches x 26 rows = 10 x 10 cm.

The knitting tension is very individual; some people knit/crochet loosely while others work tightly. You adjust the knitting tension with the needle size, which is why the suggested needle size is only meant as a guide! You need to adjust this (up or down) to ensure that YOUR knitting tension matches the knitting tension provided in the pattern. If you work with a different knitting tension than provided you will have a different yarn consumption, and your work will have different measurements than what the pattern suggests.

The knitting tension also determines which yarns can replace each other. As long as you achieve the same knitting tension you can replace one yarn with another.

See DROPS lesson: How to measure your tension/gauge

See DROPS video: How to make a gauge tension swatch

The required amount of yarn is provided in grams, eg: 450 g. To calculate how many balls you’ll need you first need to know how many grams are in 1 ball (25g, 50g or 100g). This information is available if you click on the individual yarn quality on our pages. Divide the amount required with the amount of each ball. For example, if each ball is 50g (the most common amount), the calculation will be as follows: 450 / 50 = 9 balls.

The important thing when changing from one yarn to another is that the knitting/crochet tension remains the same. This is so that the measurements of the finished piece will be the same as on the sketch provided. It is easier to achieve the same knitting tension using yarns from the same yarn group. It is also possible to work with multiple strands of a thinner yarn to achieve the knitting tension of a thicker one. Please try our yarn converter. We recommend you to always work a test swatch.

Please NOTE: when changing yarn the garment might have a different look and feel to the garment in the photo, due to individual properties and qualities of each yarn.

See DROPS lesson: Can I use a different yarn than the one mentioned in the pattern?

All our yarns are categorised into yarn groups (from A to F) according to thickness and knitting tension – group A contains the thinnest yarns and group F the thickest. This makes it easier for you to find alternative yarns to our patterns, should you wish to switch yarn. All yarns within the same group have a similar knitting tension and can easily replace each other. However, different yarn qualities have different structures and properties which will give the finished work a unique look and feel.

Click here for an overview of the yarns in each yarn group

At the top of all our patterns you’ll find a link to our yarn calculator, which is a helpful tool should you wish to use a different yarn than suggested. By filling in the yarn quality you wish to replace, the amount (in your size) and number of strands, the calculator will present good alternative yarns with the same knitting tension. Additionally it will tell you how much you’ll require in the new qualities and whether you’ll need to work with multiple strands. Most skeins are 50g (some are 25g or 100g).

If the pattern is worked with multiple colours, every colour will have to be calculated separately. Similarly, if the pattern is worked with several strands of different yarns (for example 1 strand Alpaca and 1 strand Kid-Silk) you will have to find alternatives for each, individually.

Click here to see our yarn calculator

Since different yarns have different qualities and textures we have chosen to keep the original yarn in our patterns. However, you can easily find options among our available qualities by using our yarn calculator, or simply pick a yarn from the same yarn group.

It is possible that some retailers still have discontinued yarns in stock, or that someone has a few skeins at home that they would like to find patterns for.

The yarn calculator will provide both alternative yarn as well as required amount in the new quality.

If you think it's hard to decide what size to make, it can be a good idea to measure a garment you own already and like the size of. Then you can pick the size by comparing those measures with the ones available in the pattern's size chart.

You'll find the size chart at the bottom of the pattern.

See DROPS lesson: How to read size chart

The needle size provided in the pattern serves only as a guide, the important thing is to follow the knitting tension. And since knitting tension is very individual, you will have to adjust the needle size to ensure that YOUR tension is the same as in the pattern – maybe you’ll have to adjust 1, or even 2 needle sizes, up or down to achieve the correct tension. For this, we recommend that you work test swatches.

Should you work with a different knitting tension than the one provided, the measurements of the finished garment might deviate from the measurement sketch.

See DROPS lesson: How to measure your tension/gauge

See DROPS video: How to make a tension/gauge swatch

Working a garment top-down provides more flexibility and room for personal adjustment. For example it is easier to try the garment on while working, as well as making adjustments to length of yoke and shoulder caps.

The instructions are carefully explaining every step, in the correct order. Diagrams are adjusted to the knitting direction and are worked as usual.

The diagram depicts all rows/rounds, and every stitch seen from the right side. It is read from bottom to top, from right to left. 1 square = 1 stitch.

When working back and forth, every other row is worked from the right side and every other row is worked from the wrong side. When working from the wrong side, the diagram will have to be worked reversed: from left to right, knit stitches are purled, purl stitches are knit etc.

When working in the round every round is worked from the right side and the diagram are worked from right to left on all rounds.

See DROPS lesson: How to read knitting diagrams

The diagram depicts all rows/rounds, and every stitch seen from the right side. It is worked from bottom to top, from right to left.

When working back and forth every other row is worked from the right side: from right to left and every other row is worked from the wrong side: from left to right.

When working in the round, every row in the diagram are worked from the right side, from right to left.

When working a circular diagram you start in the middle and work your way outwards, counter clockwise, row by row.

The rows usually start with a given number of chain stitches (equivalent to the height of the following stitch), this will either be depicted in the diagram or explained in the pattern.

See DROPS lesson: How to read crochet diagrams

Instructions for working several diagrams after each other on the same row/round, will often be written like so: “work A.1, A.2, A.3 a total of 0-0-2-3-4 times". This means you work A.1 once, then A.2 is worked once, and A.3 is repeated (in width) the number of times provided for your size – in this case like so: S = 0 times, M = 0 times, L=2 times, XL= 3 times and XXL = 4 times.

The diagrams are worked as usual: begin with the first row in A.1, then work the first row in A.2 etc.

See DROPS lesson: How to read knitting diagrams

See DROPS lesson: How to read crochet diagrams

The total width of the garment (from wrist-to-wrist) will be larger in the larger sizes, despite the actual sleeves being shorter. The larger sizes have longer sleeve caps and wider shoulders, so there will be a good fit in all sizes.

The measurement sketch/schematic drawing provides information regarding the full length of the garment. If it’s a jumper or a jacket the length is measured from the highest point on the shoulder closest to the neckline, and straight down to the bottom of the garment. It is NOT measured from the tip of shoulder. Similarly, the length of yoke is measured from the highest point on the shoulder and down to where yoke is split into body and sleeves.

On a jacket measures are never taken along bands, unless specifically stated. Always measure inside band stitches when measuring the length.

See DROPS lesson: How to read a schematic drawing

Diagrams are often repeated on the round or in height. 1 repeat is the diagram the way it appears in the pattern. If it says to work 5 repeats of A.1 in the round, then you work A.1 a total of 5 times after/next to each other in the round. If it says to work 2 repeats of A.1 vertically/in height you work the entire diagram once, then begin again at the start and work the entire diagram one more time.

Chain stitches are slightly narrower than other stitches and to avoid working the cast-on edge too tight, we simply chain more stitches to begin with. The stitch count will be adjusted on the following row to fit the pattern and measurement sketch.

The rib edge is more elastic and will contract slightly compared to, for example, stocking stitch. By increasing before the rib edge, you avoid a visible difference in width between the rib edge and the rest of the body.

It’s very easy to cast off too tightly, and by making yarn overs while casting off (and simultaneously casting these off) you avoid a too tight cast off edge.

See DROPS video: How to bind off with yarn overs (yo)

To achieve an even increase (or decrease) you can increase on, for example: every 3rd and 4th row alternately, like so: work 2 rows and increase on the 3rd row, work 3 rows and increase on the 4th. Repeat this until the increase is complete.

See DROPS lesson: Increase or decrease 1 st on every 3rd and 4th row alternately

Should you prefer to work in the round instead of back and forth, you may of course adjust the pattern. You’ll need to add steeks mid-front (usually 5 stitches), and follow the instructions. When you would normally turn and work from the wrong side, simply work across the steek and continue in the round. At the end you’ll cut the piece open, pick up stitches to work bands, and cover the cut edges.

See DROPS video: How to knit steeks and cut open

Should you prefer to work back and forth instead of in the round, you may of course adjust the pattern so you work the pieces separately and then assemble them at the end. Divide the stitches for the body in 2, add 1 edge stitch in each side (for sewing) and work the front and back pieces separately.

See DROPS lesson: Can I adapt a pattern for circular needles into straight needles?

Pattern repeats can vary slightly in the different sizes, in order to get the correct proportions. If you’re not working the exact same size as the garment in the photo, yours might deviate slightly. This has been carefully developed and adjusted so that the complete impression of the garment is the same in all sizes.

Make sure to follow instructions and diagrams for your size!

If you have found a pattern you like which is available in women’s size it’s not very difficult to convert it to men’s size. The biggest difference will be the length of sleeves and body. Start working on the women size that you think would fit across the chest. The additional length will be worked right before you cast off for the armhole/sleeve cap. If the pattern is worked top-down you can add the length right after the armhole or before the first decrease on sleeve.

Regarding additional yarn amount, this will depend on how much length you add, but it is better with a skein too many than too few.

All yarns will have excess fibres (from production) that might come off as lint or shedding. Brushed yarns (ie hairier yarns) have more of these loose, excess fibres, causing more shedding.

Shedding also depends on what is worn under or over the garment, and whether this pulls at the yarn fibres. It’s therefore not possible to guarantee that there will be no shedding

Below are some tips on how to get the best result when working with hairier yarns:

1. When the garment is finished (before you wash it) shake it vigorously so the looser hairs come off. NOTE: do NOT use a lint roller, brush or any method that pulls at the yarn.

2. Place the garment in a plastic bag and put it in your freezer - the temperature will cause the fibres to become less attached to each other, and excess fibres will come off easier.

3. Leave in the freezer for a few hours before taking it out and shaking it again.

4. Wash the garment according to the instructions on the yarn label.

Pilling is a natural process that happens to even the most exclusive of fibers. It's a natural sign of wear and tear that is hard to avoid, and that is most visible in high friction areas of your garment like a sweater's arms and cuffs.

You can make your garment look as new by removing the pilling, using a fabric comb or a pill/lint remover.

Still can't find the answer you need? Then scroll down and leave your question so one of our experts can try to help you. This will be done normally within 5 to 10 working days.
In the meantime, you can read the questions and answers that others have left to this pattern or join the DROPS Workshop on Facebook to get help from fellow knitters/crocheters!

You might also like...

Post a comment to pattern DROPS 230-47

We would love to hear what you have to say about this pattern!

If you want to leave a question, please make sure you select the correct category in the form below, to speed up the answering process. Required fields are marked *.

Comments / Questions (22)

country flag Oriana wrote:

Grazie per la cortese risposta, proverò. Oriana

28.03.2024 - 21:19

country flag Oriana wrote:

Buongiorno, mi piace molto questo modello, xo' non ho mai lavorato dall'alto in basso. Esiste la versione per poterlo lavorare dal basso in alto? Grazie

21.03.2024 - 14:54

DROPS Design answered:

Buonasera Oriana, non esiste nessuna tecnica per lavorare dall'alto in basso, deve semplicemente seguire le istruzioni. Buon lavoro!

28.03.2024 - 19:27

country flag Ingrid Ehret wrote:

Hallo, verstehe es nicht ganz, also ich schlage die Maschen an, stricke die Rückreihe linkge Maschen, dann beginne ich mit der Einteilung und Muster, und dann nach den ersten zwei Musterreihen, das heisst also die dritte Musterreihe mit der Nadel Nr. 3 stricken .. Ist das so richtig. Also nicht erst wenn der Glatt rechte Teil beginnt mit Nadeln nummer 3 weiter glatt rechts stricken. Liebe Grüsse auf baldige Antwort. Ingrid Ehret

20.10.2023 - 15:05

DROPS Design answered:

Liebe Frau Ehret, nein nicht genau, es wird dann insgesamt 3 Reihen mit den kleineren Nadeln gestrickt: 1 Rückreihe links + die 2 ersten Reihen mit Muster: Wenn 2 Reihen hin- und zurückgestrickt wurden, zu Rundnadel Nr. 3 wechseln.. Viel Spaß beim stricken!

20.10.2023 - 15:59

country flag Ingrid Ehret wrote:

Wann wechsele ich zur Nadel Nummer 3, so wie ich es verstehe in der 3. Reihe von Muster A 1, A 2, A 3 oder werden die Muster dzu Ende gestrickt (26 Reihen) und dann zur 3 er Nadel gewechselt ? Also nochmal, die ersten beiden Musterreihen mit 2,5 Nadel und dann weitter mit 3 er Nadeln. ? Bitte um baldige Antwort, da ich stzricken möchte.

20.10.2023 - 13:14

DROPS Design answered:

Liebe Frau Ehret, wechseln Sie für die Nadeln Nr 3 nachdem die 2 ersten Reihen gestrickt werden. Viel Spaß beim stricken!

20.10.2023 - 14:15

country flag Sissel wrote:

Hei! Jeg får ikke antall oppleggsmasker til å stemme, str M!!! Jeg legger opp 137 m og regnet ut : venstre og høyre forstykker = 28 m x 2 =56m, ermer 19 m x2 = 38m, og ryggstykke 41 m = totalt 135 m (pluss 2x2 raglan m) dette blir 139m. Beklager, men hva gjør jeg feil?

17.08.2023 - 20:14

DROPS Design answered:

Hej Sissel A.1 = 10, A.2 = 10, A.3 = 8, A.4 = 2, A.2 = 10, A.5 = 9, A.6 = 1, A.2 = 10 x 3 = 30, A.3 = 8, A.4 = 2, A.2 = 10, A.5 = 9, A.6 = 1, A.2 = 10, A.7 = 17. = 137 masker

18.08.2023 - 12:02

country flag Beata wrote:

Co to znaczy "brak oczka, przejść bezpośrednio do kolejnego symbolu w schemacie"? Czy mam je przełożyć na drut bez przerobienia?

13.05.2023 - 23:45

DROPS Design answered:

Witaj Beato, nie przekładasz oczka, tylko przerabiasz to oczko jak pokazuje kolejny symbol w schemacie. Pozdrawiamy!

14.05.2023 - 09:52

country flag Birgitta Olsson wrote:

Håller på med oket. Har stickat första varvet A1, A2, A3, A4, A2 4 ggr, A3, AA5, A6, A2 och A7. I vilken ordning ska jag sticka varvet tillbaka? Birgitta

19.04.2023 - 19:40

DROPS Design answered:

Hei Birgitta. Da strikker du slik at A.1 kommer over A.1, A.2 over A.2, A.3 over A.3 osv. Og husk når du strikker frem og tilbake, vil annenhver pinne strikkes fra retten og annenhver pinne strikkes fra vrangen. Siden diagrammet viser alle masker sett fra rettsiden, må det derfor strikkes motsatt når det strikkes fra vrangen, du leser da raden fra venstre mot høyre, rettmasker strikkes vrang, vrangmasker strikkes rett (dette står i symbolforklaringen: «rett fra rettsiden, vrang fra vrangsiden»). mvh DROPS Design

24.04.2023 - 11:40

country flag Monica wrote:

Fråga om raglan ökningarna. Öka 1 maska på varje sida av maskorna med markör i genom att göra 1 omslag om stickan. På nästa varv (avigsidan) stickas omslagen vridet aviga, så att det inte blir hål. Om jag glömt att sticka omslaget vridet på avigsidan, har det någon betydelse för storleken? Stickar den i bomullsgarn så jag tycker inte att det gör något om det blir hål.

11.04.2023 - 19:29

DROPS Design answered:

Hei Monica Nei, har ingen innvirkning på størrelsen (om det ikke har blitt et veldig stor hull). Men om det er bare et sted du glemte å stikke vridd, så blir det kanskje litt merkelig at det er et hull på den ene siden og ikke på den andre siden, men har du gjort det på alle steder du har økt, vil du bare få et ekstra hullmønster ved raglanslinjen :) mvh DROPS Design

17.04.2023 - 11:37

country flag Maj Banner wrote:

Hei, prøver å lese dette mønsteret, og det jeg lurer på erom det er 8 eller 5 masker til stolpene? Og strikkes stolpene med 1 rett og 1 vrang..Litt forvirret her, så jeg håper dere kan hjelpe meg med dette..På forhånd tusen takk..Hilsen Maj Banner..Runcorn..Cheshire, England..

21.02.2023 - 11:10

DROPS Design answered:

Hei Maj. Det kommer på hvilken str. du strikker. De 3 minste str har de 8 første maskene til stolpen og de 3 største str har 10 første maskene til stolpen (i A.1, se riktig diagram til riktig str) i den ene siden. På den andre siden er det de 8 og 10 siste maskene i diagram A.7. Se tekst forklaringen til diagrammene hvordan det strikkes (de 3 øverste ikonene). mvh DROPS Design

28.02.2023 - 19:25

country flag Ingrid Ehret wrote:

Hallo, es geht hier nicht um die Maschenzahl bei Ende des Diagrammes, sondern die Einteidlung der 19. Reihe stimmt nicht mit der vorhergehenden Reihe überein. Bitte überprüft dies doch mal und zählt die Maschen die 19. Reihe passt nicht auf die 18. Reihe (jeweils Vorderseitenreihen). Ich bitte um baldige Antwort da ich weiterstricken möchte. Liebe Grüse Ingrid Ehret

22.09.2022 - 14:10