
Popular categories
Looking for a yarn?


Comments / Questions (89)
![]() Kirsten wrote:
Kirsten wrote:
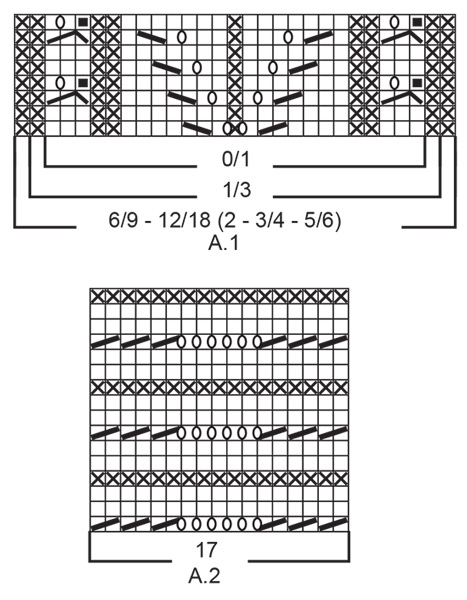
I diagram A1 forstår jeg ikke hvordan de tre masker i begge sider skal strikkes når de strikkes sammen til en maske, og et omslag, hvordan bliver det til 3 m igen
12.04.2026 - 20:18DROPS Design answered:
Hei Kirsten. Det blir ikke til 1 maske, men 2 masker. Det strikkes over 3 masker slik: ta 1 maske løs av pinnen som om den skulle strikkes rett, strikk 2 rett, løft den løse masken over maskene som ble strikket = 2 masker. På neste omgang lages det et kast og på neste omgange igjen strikkes kast rett. mvh DROPS Design
13.04.2026 - 14:44
![]() Line wrote:
Line wrote:
Je suis rendue à diviser pour le 6/9 mois. Je dois donc tricoter les 29 premières mailles soit en partant du milieu dos qui lui compte au total 29 mailles ?
11.02.2026 - 21:25DROPS Design answered:
Bonjour Line, vous tricotez effectivement à partir du milieu dos approx. et vous tricotez les 29 premières mailles pour le demi-dos, vous mettez en attente les 38 m suivantes pour la manche, vous montez 6 m, vous tricotez les 57 m suivantes pour le devant, vous mettez en attente les 38 m suivantes pour la manche et vous montez 6 m et vous tricotez les 28 dernières mailles du tour (fin du dos). Bon tricot!
12.02.2026 - 17:48
![]() Armelle Paccalin wrote:
Armelle Paccalin wrote:
Bonjour, Au 3ème range de A1, on diminue 2 mailles (on glisse 1 m , on tricote 2m et on passe la maille glissée par dessus les mailles tricotées) , mais au 4ème rang on augmente que d'une maille au lieu de 2. Merci de votre retour. Armelle
01.02.2026 - 20:48DROPS Design answered:
Bonjour Armelle, on ne diminue ici qu'une seule maille, les 2 mailles sont tricotées séparément, pas ensemble, retrouvez ici, en vidéo comment on réalise ce type de petites torsades. Bon tricot!
02.02.2026 - 09:11
![]() Armelle Paccalin wrote:
Armelle Paccalin wrote:
Bonjour, Je tricote la taille 0/1 mois et je ne comprends pas :"Tricoter les augmentations en jersey . NOTE! en taille 0/1 et 1/3mois , tricoter d'abord les nouvelles mailles en A1 puis en jersey"? Merci de votre réponse. Armelle
01.02.2026 - 18:06
![]() Armelle Paccalin wrote:
Armelle Paccalin wrote:
Bonjour, Je tricote la taille 0/1 mois et je ne comprends pas :"Tricoter les augmentations en jersey . NOTE! en taille 0/1 et 1/3mois , tricoter d'abord les nouvelles mailles en A1 puis en jersey"? Merci de votre réponse. Armelle
01.02.2026 - 18:05DROPS Design answered:
Bonjour Mme Paccalin, dans ces 2 tailles, on commence par seulement 25-27 mailles de A.1, alors que le point fantaisie se tricote sur 29 mailles, pour que le motif soit bien complet, les premières augmentations vont être incorporées au point fantaisie, et, quand vous aurez les 29 m de A.1, vous tricoterez les augmentations des raglans en jersey. Bon tricot!
02.02.2026 - 09:07
![]() Karen wrote:
Karen wrote:
Meget elegant og ikke stramtsiddende
23.01.2026 - 09:44
![]() Astrid wrote:
Astrid wrote:
Bij de pas staat voeg na 6 cm het werk samen , de eerste 3 ribbelsteken worden afgekant, worden de laatste 3 steken op de naald vanaf hier in tricot gebreid?
13.01.2026 - 14:43DROPS Design answered:
Dag Astrid,
Ja, de naald voor het samenvoegen brei je de laatste 3 steken in ribbelsteek. Dan voeg je het werk samen en brei je het achterpand in tricotsteek. De laatste 3 steken blijven daar deel van uit maken.
14.01.2026 - 19:20
![]() Schmitt Elisabeth wrote:
Schmitt Elisabeth wrote:
Bonjour J'aimerais savoir ce que signifie : "Décaler les tours au milieu du dos" ? Merci d'avance E.Schmitt
08.01.2026 - 14:34DROPS Design answered:
Bonjour Mme Schmitt, lorsque vous avez joint l'ouvrage pour continuer en rond, le début des tours doit maintenant être au milieu du dos, tricotez comme avant, mais notez que le début des tours est au milieu du dos, placez un marqueur pour mieux le repérer. Bon tricot!
09.01.2026 - 08:20
![]() Carina Meyer wrote:
Carina Meyer wrote:
Hallo, Werden in dem Diagramm nur Hinreihen abgebildet ? Mit freundlichen Grüßen Carina Meyer
12.12.2025 - 07:06DROPS Design answered:
Liebe Frau Meyer, die Diagramme zeigen alle Reihen, die Hin- sowie die Rückreihen. hier lesen Sie mehr. Viel Spaß beim Stricken!
12.12.2025 - 08:22
![]() Roz Ferguson wrote:
Roz Ferguson wrote:
How do l download this pattern
08.11.2025 - 05:49DROPS Design answered:
Hi Roz, Right click on the pattern and you get a drop-down menu with the option to "Save as". Give the pattern a title and which file you would like to save it in, press "Save". Regards, Drops Team.
12.11.2025 - 07:02
|
||||||||||||||||||||||
Sweet Ivy#sweetivysweater |
||||||||||||||||||||||
 |
 |
|||||||||||||||||||||
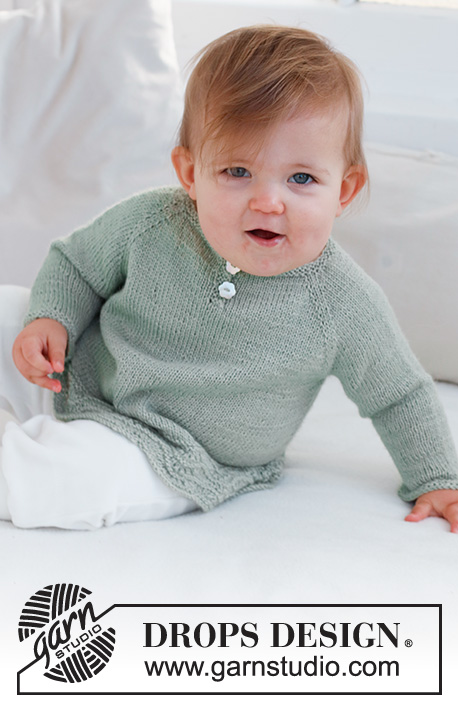
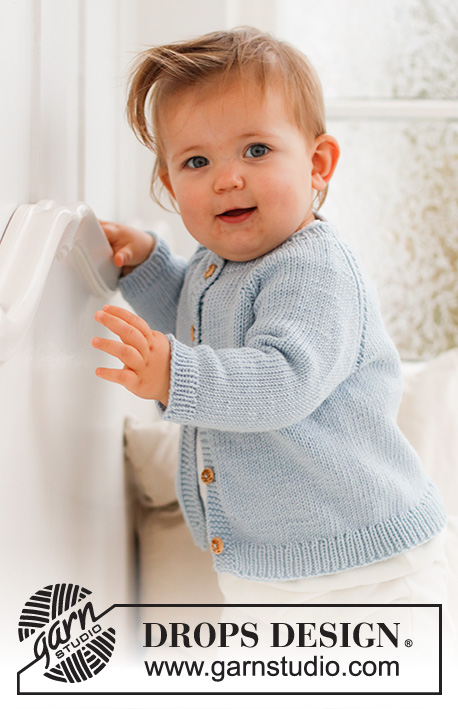
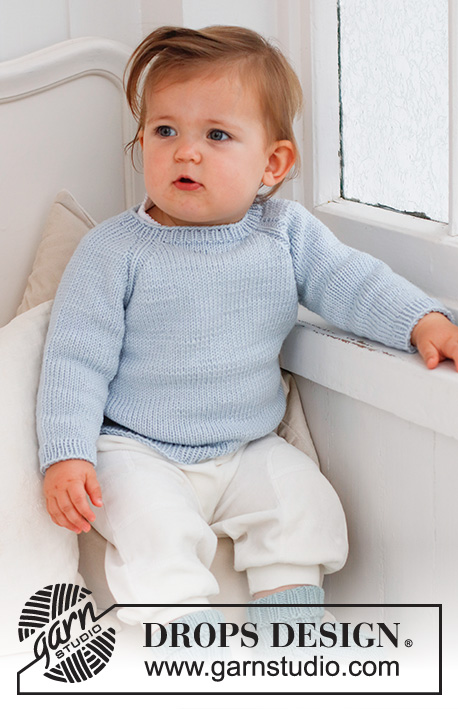
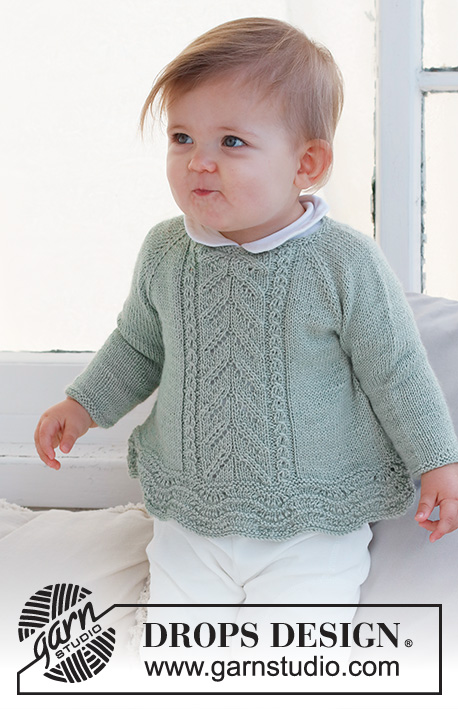
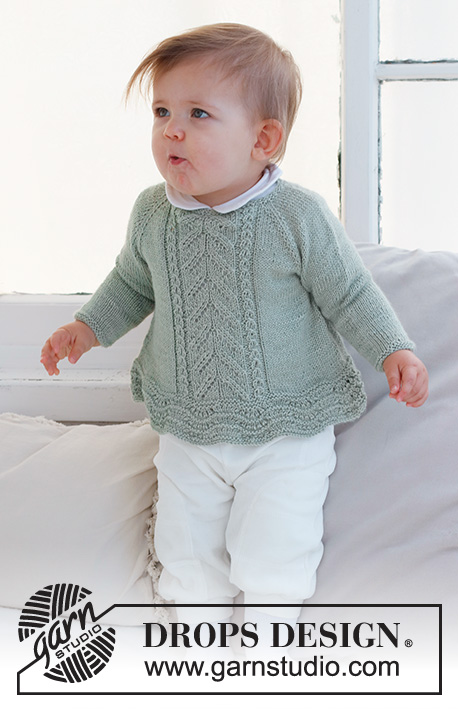
Knitted jumper for babies and children in DROPS Safran. The piece is worked top down with raglan, wave-pattern and lace-pattern. Sizes 0 - 6 years.
DROPS Baby 42-7 |
||||||||||||||||||||||
|
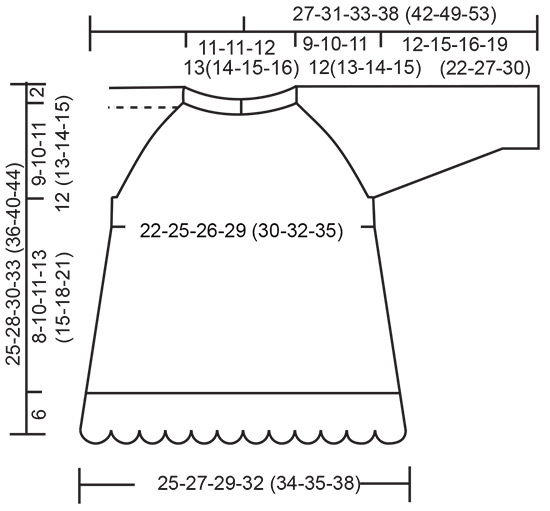
------------------------------------------------------- EXPLANATIONS FOR THE PATTERN: ------------------------------------------------------- RIDGE/GARTER STITCH (worked in the round): 1 ridge in height = 2 rounds; Knit 1 round and purl 1 round. RIDGE/GARTER STITCH (worked back and forth): Knit all rows. 1 ridge = knit 2 rows. PATTERN: See diagrams A.1 and A.2. The diagrams show all rows in the pattern from the right side. INCREASE TIP (for sides of body): Work until there are 2 stitches left before the marker, make 1 yarn over, knit 4 (marker thread sits between these 4 stitches), make 1 yarn over. On the next round work the yarn overs twisted to avoid holes. Then work the new stitches in stocking stitch. RAGLAN: Increase 1 stitch on each side of the 2 stocking stitches in each transition between body and sleeves (8 stitches increase on row/round). Increase 1 stitch by making 1 yarn over. On the next row (wrong side) purl the yarn overs twisted to avoid holes. On the next round (i.e. when working in the round) knit the yarn overs twisted to avoid holes. Then work the new stitches in stocking stitch. DECREASE TIP (sleeves): Decrease 1 stitch on either side of the marker as follows: Work until there are 3 stitches left before the marker, knit 2 together, knit 2 (marker sits between these 2 stitches), slip 1 stitch as if to knit, knit 1 and pass the slipped stitch over the knitted stitch. BUTTONHOLES: 2 buttonholes are worked on the bands at the back of the neck. Work from the right side when there are 3 stitches left on the row as follows: Make 1 yarn over, knit 2 together and knit 1. On the next row, knit the yarn over to leave a hole. The first buttonhole is worked when the neck measures 1½ cm. Then work the other buttonhole after 4 cm. ------------------------------------------------------- START THE PIECE HERE: ------------------------------------------------------- JUMPER – SHORT OVERVIEW OF THE PIECE: The piece is first worked back and forth from mid-back and top down. When the split is finished, it is continued in the round. The yoke is divided for the body and sleeves and the body continued in the round. The sleeves are worked in the round with double pointed needles. NECK: Cast on 73-77-81-85 (89-93-97) stitches with circular needle size 2.5 mm and DROPS Safran. Work 2 RIDGES back and forth – read description above. Change to circular needle size 3 mm. YOKE: READ THE NEXT SECTION BEFORE CONTINUING! The first row is worked as follows from the right side: 3 band stitches in garter stitch, 11-12-13-14 (15-16-17) stitches in stocking stitch (half back piece), 1 yarn over, 2 stitches in stocking stitch (raglan-line), 1 yarn over, 6 stitches in stocking stitch and increase 4 stitches evenly over these stitches (10 stitches on the sleeve), 1 yarn over, 2 stitches in stocking stitch (raglan-line), 1 yarn over, 0-0-0-1 (2-3-4) stitches in stocking stitch, A.1 = 25-27-29-29 (29-29-29) stitches – see the start for your size in the smaller sizes, 0-0-0-1 (2-3-4) stitches in stocking stitch (= front piece), 1 yarn over, 2 stitches in stocking stitch (= raglan-line), 1 yarn over, 6 stitches in stocking stitch and increase 4 stitches evenly over these stitches (10 stitches on the sleeve), 1 yarn over, 2 stitches in stocking stitch (raglan-line), 1 yarn over, 11-12-13-14 (15-16-17) stitches in stocking stitch and 3 band stitches in garter stitch (half back piece). The first increase to RAGLAN – read description above, is now finished and there are 89-93-97-101 (105-109-113) stitches on the row. Continue with stocking stitch, A.1 and 3 band stitches in garter stitch on each side and continue to increase to raglan every 2nd row (each row from the right side) – REMEMBER THE KNITTING TENSION and the BUTTONHOLES – read description above. Increase like this every 2nd row (each row from the right side). The increased stitches are worked in stocking stitch. NOTE! In sizes 0/1 and 1/3 months first work the new stitches into A.1 then in stocking stitch. AT THE SAME TIME when the piece measures 6 cm join the piece on the next row from the right side as follows: Cast off the first 3 stitches and work to the end of the row. When the row is finished, continue in the round. You now are working stocking stitch on the back piece, stocking stitch and A.1 on the front piece. Move the beginning of the round to mid-back. Increase to raglan a total of 10-12-13-14 (15-16-18) times = 158-178-190-202 (214-226-246) stitches. Continue without further increases until the piece measures 9-10-11-12 (13-14-15) cm. Work the next round as follows: Work the first 24-27-29-31 (33-35-38) stitches, place the next 32-36-38-40 (42-44-48) stitches on a thread for the sleeve, cast on 6-6-6-8 (8-8-8) stitches (in side under sleeve), work 47-53-57-61 (65-69-75) stitches (front piece), place the next 32-36-38-40 (42-44-48) stitches on a thread for the sleeve, cast on 6-6-6-8 (8-8-8) stitches (in side under sleeve), work the last 23-26-28-30 (32-34-37) stitches. The body and sleeves are finished separately. BODY: = 106-118-126-138 (146-154-166) stitches. Insert 1 marker in each side, in the middle of the new stitches cast on under each sleeve. When the piece measures 3 cm from the division, increase 1 stitch on each side of both markers - read INCREASE TIP. Increase like this every 2 cm a total of 3-3-3-4 (4-4-4) times = 118-130-138-154 (162-170-182) stitches. When the piece measures 8-10-11-13 (15-18-21) cm from the division, work 2 ridges over all stitches. Knit 1 round where you increase 18-23-32-33 (42-34-39) stitches evenly spaced = 136-153-170-187 (204-204-221) stitches. Knit 1 round; the yarn overs are knitted twisted to avoid holes. Now work A.2 over all stitches. When A.2 has been completed in height, loosely cast off. The jumper measures approx. 25-28-30-33 (36-40-44) cm from the shoulder down. SLEEVES: Place the 32-36-38-40 (42-44-48) stitches from the thread on the one side of the piece on double pointed needles size 3 mm and knit up 1 stitch in each of the 6-6-6-8 (8-8-8) stitches cast on under the sleeve = 38-42-44-48 (50-52-56) stitches. Insert a marker in the middle of the new stitches under the sleeve. Work stocking stitch in the round. When the sleeve measures 3 cm from the division, decrease 1 stitch on each side of the marker - read DECREASE TIP! Decrease like this every 5-4-3-3 (4-5-3½) cm a total of 2-3-4-5 (5-5-7) times = 34-36-36-38 (40-42-42) stitches. When the sleeve measures 11-14-15-18 (21-26-29) cm, change to double pointed needles size 2.5 mm. Work 2 ridges over all stitches. Cast off with knit. Work the other sleeve in the same way. ASSEMBLY: Sew the buttons onto the band without buttonholes. Lay the button-band under the buttonhole-band and sew together at the bottom. |
||||||||||||||||||||||
Diagram explanations |
||||||||||||||||||||||
|
||||||||||||||||||||||
 |
||||||||||||||||||||||
 |
||||||||||||||||||||||
Have you finished this pattern?Tag your pictures with #dropspattern #sweetivysweater or submit them to the #dropsfan gallery. Do you need help with this pattern?You'll find 32 tutorial videos, a Comments/Questions area and more by visiting the pattern on garnstudio.com. © 1982-2026 DROPS Design A/S. We reserve all rights. This document, including all its sub-sections, has copyrights. Read more about what you can do with our patterns at the bottom of each pattern on our site. |
||||||||||||||||||||||


With over 40 years in knitting and crochet design, DROPS Design offers one of the most extensive collections of free patterns on the internet - translated to 17 languages. As of today we count 324 catalogues and 12290 patterns translated into English (UK/cm). 12290
We work hard to bring you the best knitting and crochet have to offer, inspiration and advice as well as great quality yarns at incredible prices! Would you like to use our patterns for other than personal use? You can read what you are allowed to do in the Copyright text at the bottom of all our patterns. Happy crafting!
Post a comment to pattern DROPS Baby 42-7
We would love to hear what you have to say about this pattern!
If you want to leave a question, please make sure you select the correct category in the form below, to speed up the answering process. Required fields are marked *.