
Popular categories
Looking for a yarn?


Comments / Questions (33)
![]() Alena wrote:
Alena wrote:
Dobrý den, nerozumím této instrukci \"1 oko hladce, vpíchnuté pod následující oko\" . Poradíte mi, jak to udělat? nebo někde najdu video? Děkuji Vám moc, srdečně zdraví Alena.
22.03.2021 - 09:34DROPS Design answered:
Dobrý den, Aleno, při pletení těchto "hlubokých" ok vpíchnete jehlici ne do oka, které máte plést, ale do oka, které leží pod ním, tj. o řadu níž. Upletete je hladce běžným způsobem a při spuštění z jehlice zůstanou obě tato oka zavěšená na oku nově upleteném - tím vznikne plastický vzor s dlouhým hladkým okem sahajícím přes 2 řady. Názornou video-ukázku najdete zde. Hodně zdaru! Hana
24.03.2021 - 07:06
![]() Lilly Chauvidon wrote:
Lilly Chauvidon wrote:
Bonjour je ne comprends pas les explications pour les épaules et l'encolure du dos serait-il possible d'avoir de l'aide merci
31.12.2020 - 09:48DROPS Design answered:
Bonjour Mme Chauvidon, pour l'encolure dos, on doit d'abord diminuer le nombre de mailles centrales (car il faut plus de mailles quand on tricote des torsades) puis rabattre les 36-38-40 mailles centrales (= cf taille) et terminer chaque épaule séparément. Au début du rang suivant qui commence par l'encolure, vous rabattrez encore 1 maille = il restera entre 21 et 39 m pour l'épaule. Continuez jusqu'à la hauteur indiquée et rabattez toutes les mailles. Coupez le fil. Reprenez les mailles de l'autre épaule et tricotez comme la 1ère. Bon tricot!
04.01.2021 - 13:35
![]() Celia wrote:
Celia wrote:
Bonjour cela fait 4 fois que j'essaie de faire ce pull en suivant les diagrammes mais a chaque fois cela ne ressemble pas du tout au modèle les torsades ne se forment pas pouvez vous m'aider en m'envoyant des liens de vidéos avec les techniques pour faites toutes les torsades de ce modèle ou en me donnant les noms des torsades que je puisses regarder ce que je fais de mal merci .
29.12.2020 - 09:06DROPS Design answered:
Bonjour Celia, cette leçon explique comment lire un diagramme, peut être cela pourra-t'il vous aider? Si ces torsades ont un nom, nous ne le connaissons pas, suivez bien les indications des diagrammes en croisant les mailles aux rangs indiqués et suivant bien les symboles. N'hésitez pas à demander assistance à votre magasin si besoin, même par mail ou téléphone. Bon tricot!
04.01.2021 - 11:40
![]() Murielle wrote:
Murielle wrote:
Qu'entendez vous par ne pas relever les mailles me long du bas de l'emmanchure
20.11.2020 - 19:08DROPS Design answered:
Bonjour Murielle, quand vous avez tricoté le dos et le devant, vous avez rabattu pour les emmanchures de chaque côté 1-3-5-7-9-13 mailles. Lorsque vous relevez les mailles des manches, commencez à les relever juste après ces mailles rabattues et arrêtez juste avant. La partie de la manche tricotée en allers et retours sera assemblée ensuite aux 1-3-5-7-9-13 mailles rabattues des emmanchures sur le dos/le devant. Bon tricot!
23.11.2020 - 08:01
![]() Åshild Hellesund wrote:
Åshild Hellesund wrote:
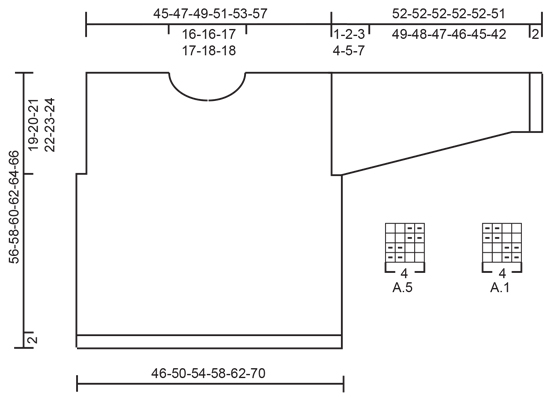
Oppskrift 205-7 mangler mønster A.1 og A.5
02.09.2020 - 19:38DROPS Design answered:
Hej Åshild. Du hittar de längst ner, till höger om måttskissen. Mvh DROPS Design
03.09.2020 - 08:07
![]() Sar wrote:
Sar wrote:
Hei, er det mulig å strikke glattstrikk på hele bakstykket istedenfor mønster med samme garnmengde som er oppgitt til oppskriften? Eller trengs det mer garn ?
11.04.2020 - 13:21DROPS Design answered:
Hei Sar. Du kan strikke bakstykket i glattstrikk, men bakstykket vil da bli større enn forstykket. Mønstret på fremstykket trekker seg sammen, det vil også bli en forskjell på ryggen og ermene. Det vil ikke gå mer garn. mvh DROPS design
17.04.2020 - 15:11
![]() Bertrand Annie wrote:
Bertrand Annie wrote:
Comment je fais pour relever les mailles Leblanc de l emmanchée un rang sur deux ce qui serai plus joli et je n ai pas assez de mailles ou tous les rangs ce qui me parai difficile et j en ai trop Merci je tricitte ce pull avec une laine pas utilisée trouvé e dans les placards car c est le pull du confinement sante a vous et merci
09.04.2020 - 14:36DROPS Design answered:
Bonjour Mme Bertrand, cette vidéo montre comment relever des mailles le long d'un côté comme celui des emmanchures. On relève habituellement 3 mailles tous les 4 rangs, mais vous pourrez toujours ajuster au 1er rang de la manche en diminuant/augmentant à intervalles réguliers pour avoir le bon nombre ensuite. Bon tricot!
09.04.2020 - 17:58
![]() Giovanna wrote:
Giovanna wrote:
Ciao, come posso diminuire le maglie centrali cercando di non rovinare il disegno? Grazie
16.02.2020 - 19:20DROPS Design answered:
Buongiorno Giovanna. Potrebbe scegliere la distanza che le piace dopo aver incrociato le maglie per la treccia, p.es 1 o 2 ferri dopo l'intreccio. Buon lavoro!
17.02.2020 - 11:08
![]() Marja wrote:
Marja wrote:
Volgens de uitleg van het PATROON laat het telpatroon alle naalden aan de goede kant zien. Dat klopt niet: het patroon laat de goede ÉN de verkeerde kant zien. Op deze manier ziet het patroon een stuk langer uit.
02.02.2020 - 13:25
![]() Margit wrote:
Margit wrote:
Ich würde sehr gerne diesen Pullover stricken. Allerdings kann ich das Diagramm A1 nicht finden.
28.12.2019 - 12:29DROPS Design answered:
Liebe Margit. A.1 liegt direkt unter Arm (siehe das Diagramm) Viel Spaß beim stricken!
29.12.2019 - 00:01
|
|||||||||||||||||||||||||
Winter Delight#winterdelightsweater |
|||||||||||||||||||||||||
 |
 |
||||||||||||||||||||||||
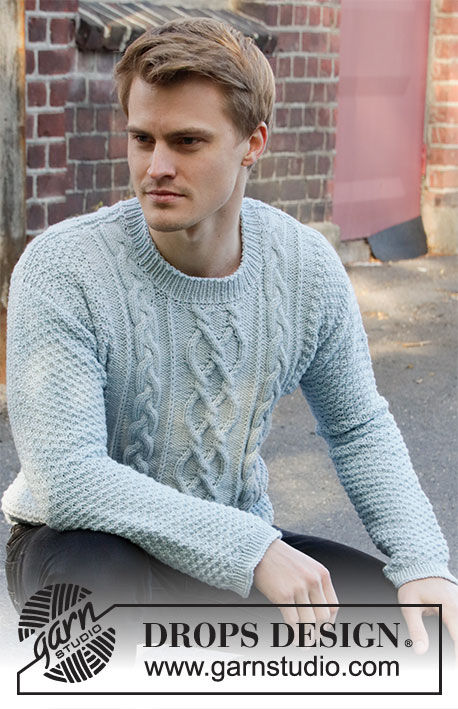
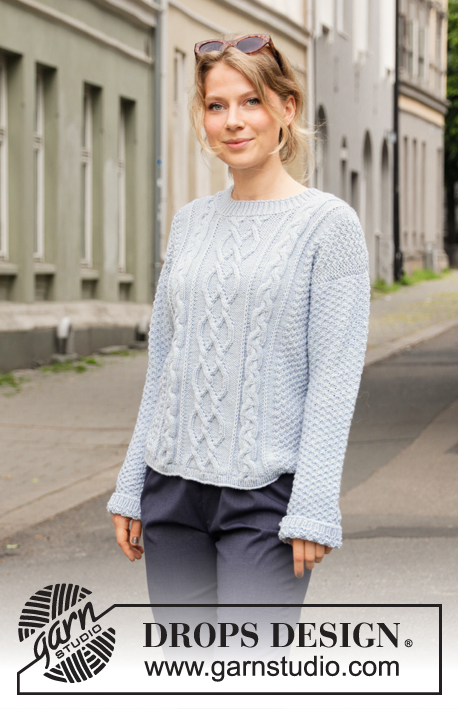
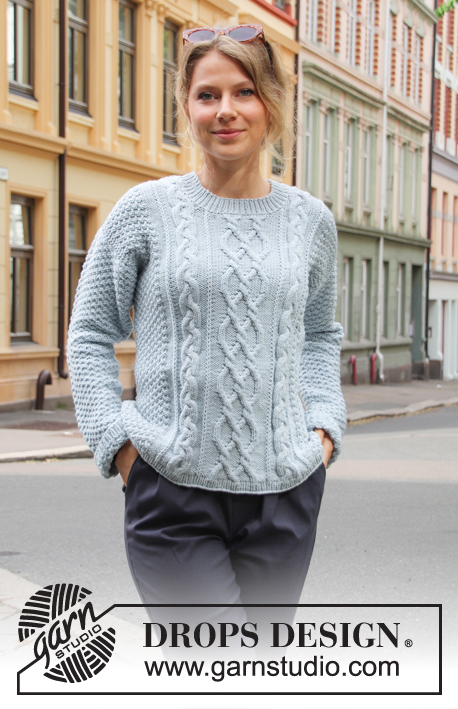
Knitted jumper with cables and double moss stitch. The piece is worked in DROPS Merino Extra Fine. Sizes S – XXXL.
DROPS 205-7 |
|||||||||||||||||||||||||
|
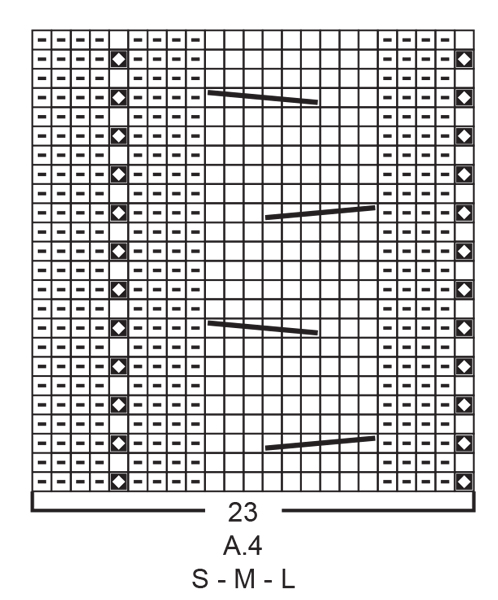
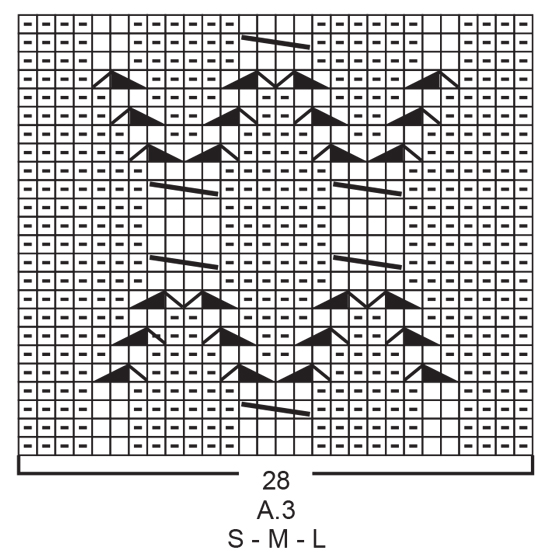
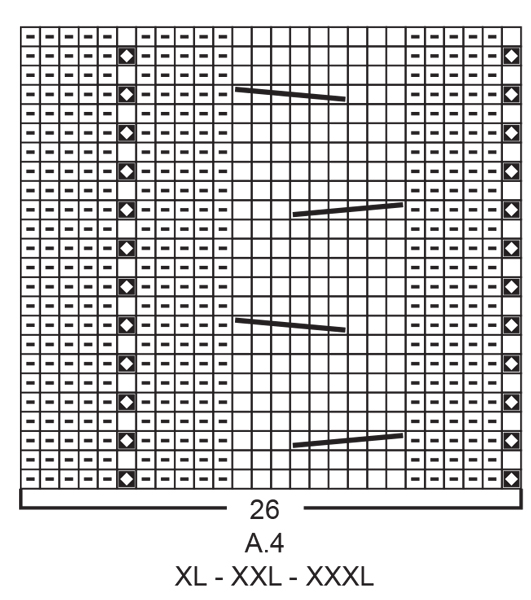
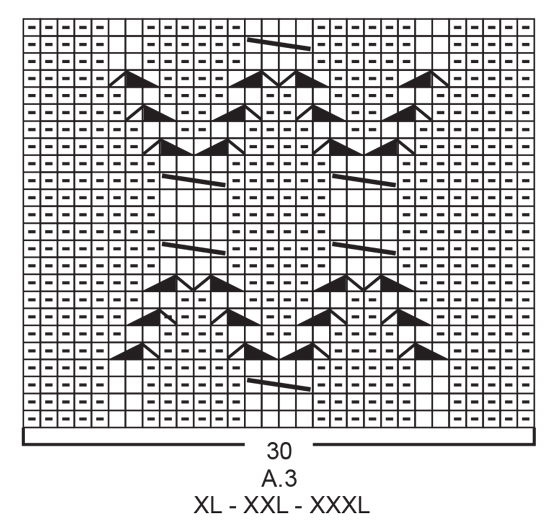
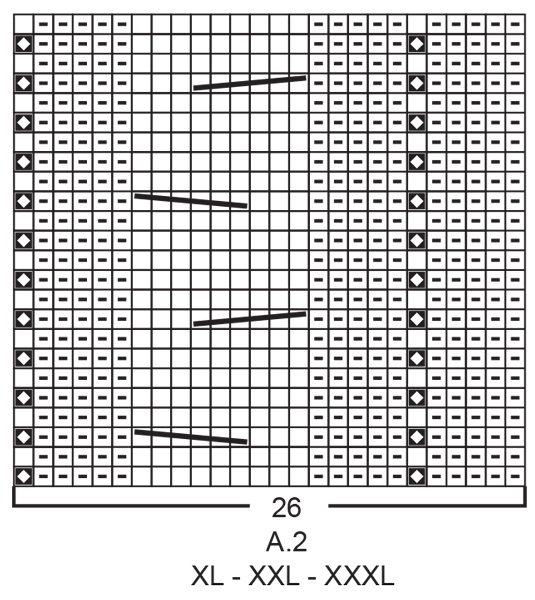
------------------------------------------------------- EXPLANATIONS FOR THE PATTERN: ------------------------------------------------------- RIDGE/GARTER STITCH (worked back and forth): Knit all rows. 1 ridge in height = Knit 2 rows. PATTERN: See diagrams A.1 to A.5. Choose diagram for your size (applies to A.2, A.3 and A.4). The diagrams show all rows in the pattern seen from the right side. KNITTING TIP: In this pattern you knit up stitches along the armholes and the sleeves are worked top down. This is to control the sleeve-length. If you would like to work the sleeves separately and sew them in afterwards, this can be done by casting on the same number of stitches as are knitted up along the armholes and then follow the instructions in the text. To sew in the sleeves place the sleeve under the garter stitch edge along the armholes so the edge is visible – sew in the outermost stitch along the garter stitch edge. DECREASE TIP-1 (evenly spaced): To work out how to decrease evenly, count the total number of stitches on needle (e.g. 44 stitches) and divide by number of decreases to be made (e.g. 10) = 4.4. All decreases are worked from the right side! In this example decrease by knitting together alternately each 3rd and 4th stitch and each 4th and 5th stitch. DECREASE TIP-2 (for mid under sleeve): Decrease 1 stitch before the marker thread as follows: Work until there are 2 stitches left before the marker thread, knit 2 together if this stitch should be a knit stitch or purl 2 together if this stitch should be a purl stitch. Decrease 1 stitch after the marker thread as follows: Knit 2 twisted if this stitch should be a knit stitch or purl 2 twisted together if this stitch should be a purl stitch. ------------------------------------------------------- START THE PIECE HERE: ------------------------------------------------------- JUMPER – SHORT OVERVIEW OF THE PIECE: The front and back pieces are worked back and forth with circular needle, bottom up. The shoulder seams are sewn together, then stitches are knitted up around the armholes for the sleeves – read KNITTING TIP! The sleeves are worked back and forth with circular needle until the sleeve cap is finished, then the sleeve is continued in the round with short circular needle/double pointed needles to finished length. The bottom of the armhole is sewn together and finally the neck is worked. BACK PIECE: Cast on 108-116-124-132-140-156 stitches with circular needle size 3.5 mm and Merino Extra Fine. Purl 1 row (= wrong side). The next row is worked as follows from the right side: 1 edge stitch in GARTER STITCH – read description above, * knit 1, purl 1 *, work from *-* until there is 1 stitch left on the row, finish with 1 edge stitch in garter stitch. Continue this rib for 2 cm but adjust so the last row is worked from the right side. Purl 1 row from the wrong side with 1 edge stitch in garter stitch in each side. Change to circular needle size 4.5 mm. Now start the pattern by working the next row from the right side as follows: 1 edge stitch in garter stitch, work A.1 over the next 16-20-24-24-28-36 stitches (= 4-5-6-6-7-9 repeats of 4 stitches), work A.2 (= 23-23-23-26-26-26 stitches), A.3 (= 28-28-28-30-30-30 stitches), A.4 (= 23-23-23-26-26-26 stitches), A.5 over the next 16-20-24-24-28-36 stitches (= 4-5-6-6-7-9 repeats of 4 stitches), and finish with 1 edge stitch in garter stitch. Continue this pattern. REMEMBER THE KNITTING TENSION! When the piece measures 37-38-39-40-41-42 cm cast off 1-3-5-7-9-13 stitches at the beginning of the next 2 rows for the armholes = 106-110-114-118-122-130 stitches. Continue the pattern as before but now with 4 edge stitches in garter stitch on each side towards the armholes. When the piece measures 54-56-58-60-62-64 cm, decrease 10 stitches evenly over the middle 44-44-44-48-48-48 stitches on the row – read DECREASE TIP-1 = 96-100-104-108-112-120 stitches left. On the next row (wrong side), cast off the middle 36-36-38-38-40-40 stitches for the neck and each shoulder is finished separately. Continue the pattern and cast off 1 stitch on the next row from the neck = 29-31-32-34-35-39 stitches left on shoulder. Continue working until the piece measures 55-57-59-61-63-65 cm. Knit 1 row from the right side and knit 1 row from the wrong side. Loosely cast off with knit from the right side. Work the other shoulder in the same way. The back piece measures approx. 56-58-60-62-64-66 cm from the shoulder down. FRONT PIECE: Cast on 108-116-124-132-140-156 stitches with circular needle size 3.5 mm and Merino Extra Fine. Purl 1 row (= wrong side). The next row is worked as follows from the right side: 1 edge stitch in GARTER STITCH – read description above, * knit 1, purl 1 *, work from *-* until there is 1 stitch left on the row, finish with 1 edge stitch in garter stitch. Continue this rib for 2 cm but adjust so the last row is worked from the right side. Purl 1 row from the wrong side with 1 edge stitch in garter stitch on each side. Change to circular needle size 4.5 mm. Now start the pattern by working the next row from the right side as follows: 1 edge stitch in garter stitch, work A.1 over the next 16-20-24-24-28-36 stitches (= 4-5-6-6-7-9 repeats of 4 stitches), A.2 (= 23-23-23-26-26-26 stitches), A.3 (= 28-28-28-30-30-30 stitches), A.4 (= 23-23-23-26-26-26 stitches), A.5 over the next 16-20-24-24-28-36 stitches (= 4-5-6-6-7-9 repeats of 4 stitches) and finish with 1 edge stitch in garter stitch. Continue this pattern. When the piece measures 37-38-39-40-41-42 cm, cast off 1-3-5-7-9-13 stitches at the beginning of the next 2 rows for the armholes = 106-110-114-118-122-130 stitches. Continue the pattern as before but now with 4 edge stitches in garter stitch on each side towards the armholes. When the piece measures 47-49-51-52-54-56 cm, decrease 10 stitches evenly over the middle 44-44-44-48-48-48 stitches on the row = 96-100-104-108-112-120 stitches left. On the next row (wrong side) place the middle 20-20-22-22-22-22 stitches on 1 thread for the neck and each shoulder is finished separately. Continue the pattern and cast off at the beginning of each row from the neck as follows: Cast off 2 stitches 3 times and then 1 stitch 3-3-3-3-4-4 times = 29-31-32-34-35-39 stitches left on the shoulder. Continue working until the piece measures 55-57-59-61-63-65 cm. Knit 1 row from the right side and knit 1 row from the wrong side. Loosely cast off with knit from the right side. Work the other shoulder in the same way. ASSEMBLY: Sew the shoulder seams inside the cast-off edge. SLEEVE: Knit up stitches along the armhole on the front and back pieces. Start in the corner of the armhole on the one side of the piece where stitches were cast off for the armhole and knit up from the right side 76-80-84-88-92-96 stitches inside the 1 edge stitch in garter stitch with circular needle size 4.5 mm and Merino Extra Fine (do not knit up stitches along the bottom of the armhole) – read KNITTING TIP! Work A.1 back and forth with 1 edge stitch in garter stitch on each side. When the sleeve measures 1-2-3-4-5-7 cm from where stitches were knitted up insert 1 marker on the row; this marker shows where the sleeve will be sewn to the bottom of the armhole and the sleeve is now measured from this marker! Continue by working the sleeve in the round. Change to short circular needle or double pointed needles size 4.5 mm. Insert 1 marker thread at the beginning of the round and allow it to follow your work onwards; it will be used when decreasing mid under the sleeve. Continue A.1 in the round over all stitches (= 19-20-21-22-23-24 repeats of 4 stitches). When the sleeve measures 3-2-3-2-3-2 cm from the marker decrease 2 stitches mid under sleeve – read DECREASE TIP-2. Decrease like this every 3-3-2½-2½-2-2 cm a total of 15-16-17-18-19-20 times = 46-48-50-52-54-56 stitches. Continue working until the sleeve measures 49-48-47-46-45-42 cm from the marker (there is approx. 2 cm left to finished length; you can try the jumper on and work to desired length). Change to double pointed needles size 3.5 mm and work rib (= knit 1 / purl 1) for 2 cm. Loosely cast off with knit. The sleeve measures approx. 52-52-52-52-52-51 cm from where stitches were knitted up. Work the other sleeve in the same way. ASSEMBLY: Sew the side seams – sew in the outermost loop of the outermost stitch so the seam is flat. Sew the sleeve to the bottom of the armhole from the marker to the corner on each side. NECK: Knit up from the right side with short circular needle size 3.5 mm approx. 80 to 94 stitches around the neck (including the stitches on the thread in front). Purl 1 round. Knit 1 round where you increase evenly to 90-92-94-96-100-102 stitches. Then work rib in the round (= knit 1 / purl 1) for approx. 3 cm. Cast off with knit over knit and purl over purl. |
|||||||||||||||||||||||||
Diagram explanations |
|||||||||||||||||||||||||
|
|||||||||||||||||||||||||
 |
|||||||||||||||||||||||||
 |
|||||||||||||||||||||||||
 |
|||||||||||||||||||||||||
 |
|||||||||||||||||||||||||
 |
|||||||||||||||||||||||||
 |
|||||||||||||||||||||||||
 |
|||||||||||||||||||||||||
Have you finished this pattern?Tag your pictures with #dropspattern #winterdelightsweater or submit them to the #dropsfan gallery. Do you need help with this pattern?You'll find 32 tutorial videos, a Comments/Questions area and more by visiting the pattern on garnstudio.com. © 1982-2026 DROPS Design A/S. We reserve all rights. This document, including all its sub-sections, has copyrights. Read more about what you can do with our patterns at the bottom of each pattern on our site. |
|||||||||||||||||||||||||


With over 40 years in knitting and crochet design, DROPS Design offers one of the most extensive collections of free patterns on the internet - translated to 17 languages. As of today we count 324 catalogues and 12290 patterns translated into English (UK/cm). 12290
We work hard to bring you the best knitting and crochet have to offer, inspiration and advice as well as great quality yarns at incredible prices! Would you like to use our patterns for other than personal use? You can read what you are allowed to do in the Copyright text at the bottom of all our patterns. Happy crafting!
Post a comment to pattern DROPS 205-7
We would love to hear what you have to say about this pattern!
If you want to leave a question, please make sure you select the correct category in the form below, to speed up the answering process. Required fields are marked *.