
Popular categories
Looking for a yarn?


Comments / Questions (79)
![]() Gabi wrote:
Gabi wrote:
Guten Tag Wird bei der Grösse S Diagramm A5 noch einmal zugenommen? Habe leider zu viele Maschen auf der Nadel . Herzlichen Dank
08.06.2023 - 09:10DROPS Design answered:
Liebe Gabi, wenn A.2 bis A.4 einmal in der Höhe gestrickt wurden, wurde es nur 24 Mal für Raglan zugenommen; bei der 1. Reihe A.5 sollen Sie noch die letzte Raglanzunahmen stricken, so sind es 14 M in A.5 und 9 M in A.7. Viel Spaß beim stricken!
08.06.2023 - 09:56
![]() Toril wrote:
Toril wrote:
Jeg ser at mange har spurt om dette, men svarene forklarer ikke godt nok. Det gjelder de siste 10 omfarene i A5 og A7 (str L). Da er raglanøkning ferdig. Skal man lage kast og to sammen nedover på begge sider (erme og rygg/foran)? Hva med de fire maskene imellom (selve raglanøkningen og to masker mellom)? For de er jo utenfor diagrammet.. Presiserer at det kun gjelder de siste ti omganger etter at 31 økninger er ferdig.
06.06.2022 - 23:16
![]() Reidun wrote:
Reidun wrote:
37 country flag Astrid wrote: Hei! Strikker i str M og ved A5-A7 er man være ferdig med raglan. På starten og slutten av ermene er det felling og hullmønster. På bildet ser det ut som det fortsett er hullmønster på starten og slutten av bak-og forstykket også, men ser ikke noe i oppskriften om det. Skal jeg da ordne hull, også felle rett etterpå der også? Slik at det blir hullmønster på hver side av merkemaskene.
20.05.2022 - 21:23DROPS Design answered:
Hei Reidun. Det ble gitt et svar til Astrid/10.06.2021. Om du har samme spørsmål som henne kan du se vårt svar som ligger under hennes spørsmål/ evnt se under. Eller hadde du et annet spørsmål? Slik står det i oppskrfiten: Det økes 2 masker ved hver merketråd og totalt 8 masker på omgangen. På neste omgang strikkes kastene rett slik at det blir hull = Hullmønster på hver side av "raglanlinjen", i tillegg kommer hullmønstret fra diagrammene. mvh DROPS design
23.05.2022 - 08:21
![]() Kasia wrote:
Kasia wrote:
Tak zrobiłam, tylko nie rozumiem polecenia, żeby zacząć tył/ przód od jednej z nitek markerów czyli na środku 8 dobranych oczek pod rękawem ? "zaczynając okrążenie od jednej z nitek markerów"? Tzn. po 4 dobranym oczku pod rękawem?
07.05.2022 - 11:53DROPS Design answered:
Witaj Kasiu, dokładnie tak. Pozdrawiamy!
08.05.2022 - 15:32
![]() Katarzyna Widenka wrote:
Katarzyna Widenka wrote:
Witam, mam pytanie czy zaczynając przód/ tył od jednej z nitek markerów, czyli począwszy od czwartego oczka tzn. połowy 8 nabranych pod rękawem trzeba zmienić druty? Jak to zrobic, bo na tych które do tej pory przerabiałam karczek pozostają oczka. Czy przerabiać tymi samymi ale jak?
06.05.2022 - 12:11DROPS Design answered:
Witaj Kasiu, nie zmieniasz drutów, przerabiasz dalej na tych samych drutach, czyli drutach z żyłką nr 3. Oczka na rękawy powinnaś zdjąć wcześniej na nitki, zostaje do przerabiania tylko tył i przód. Spójrz jeszcze na video TUTAJ. Pozdrawiamy!
06.05.2022 - 16:01
![]() Carla wrote:
Carla wrote:
Hallo! Ich möchte gerne dieses Modell stricken, bin aber wegen der Größe unschlüssig . Ich habe eine recht große Brust und bräuchte vom Umfang her XXL. Eigentlich würde aber L locker sitzen. Macht es Sinn vorne XXL- Abmessungen zu nehmen und hinten und die Ärmel in XL, damit es nicht zu locker sitz? Die Länge passe ich eh keiner Größe an. Vielen Dank schon mal für die Hilfe
01.05.2022 - 22:56DROPS Design answered:
Liebe Carla, am besten messen Sie ein ähnliches Top, das Sie gerne haben, und vergleichen Sie die Maßen mit den in der Maßskizze. Hier lesen Sie noch mehr. Viel Spaß beim stricken!
02.05.2022 - 10:28
![]() Kasia wrote:
Kasia wrote:
Dzień dobry, chciałam upewnić się, czy schemat A 1 jest poprawny? Ponieważ dziurki wychodzą inaczej na schemacie niż na zdjęciu projektu. I nad jakimi 21 oczkami przerabiać schemat A1?
06.04.2022 - 19:49DROPS Design answered:
Witaj Kasiu, schemat A.1 jest poprawny. Może nieodpowiednio czytasz schemat, zobacz kurs DROPS jak odczytywać schematy w robótce na dritach TUTAJ. Patrz fragment w którym jest przerabianie na okrągło. Pozdrawiamy!
11.04.2022 - 08:48
![]() Sandra wrote:
Sandra wrote:
Hallo liebes Team, wenn ich A 5 nach Anleitung stricke, ist das Lochmuster am Ärmel insgesamt 6 x gestrickt. Auf der Abbildung der Arbeit ist es nur 5 x vorhanden. Wie muss ich die Anleitung verstehen, nachdem ich A 2 - A 4 einmal in der Höhe gestrickt habe? Lieben Dank und beste Grüße Sandra
26.03.2022 - 23:35DROPS Design answered:
Liebe Sandra, in S und M stricken Sie das Lochmuster 5 Mal in der Höhe (A.1 = 2 x, A.2-A.4= 2x, A.5-A.7=1x) in L +XL stricken Sie 6 Mal (A.1=2x, A.2-A.4=2x, A.5-A.7=2x) und in XXL + XXXL stricken Sie 7 Mal (A.1=2x, A.2-A.4=2x (2Mal = 4), A.5-A.7(1 x). Viel Spaß beim stricken!
28.03.2022 - 10:40
![]() Maria wrote:
Maria wrote:
Pletu velikost XL a uvízla jsem v polovině vzoru A.5. Nejen že mi vyšlo 32 dírek v raglánu a na jehlici 426 ok (místo 31dírek a 418 ok, jak je v návodu), ale nevím: v rukávku bude ještě 5 dírek nad sebou bez rozšiřování, ale co v trupu? Těch 10 řad mám uplést hladce bez raglánového přidávání a pak teprve se práce rozdělí na trup a rukávky? Děkuji!
29.01.2022 - 02:29DROPS Design answered:
Hej Maria, if you could write your question in English, we will try to answer :)
22.04.2022 - 11:46
![]() Uliana wrote:
Uliana wrote:
Hello! Thank you for this pattern! I am interested why the back and the front of the top are the same and there are no additional rows in the back? I am not sure how these rows are called in English, I hope that I described it clear. Is it OK not to knit these rows? Will the top fit OK without them?
10.11.2021 - 10:31DROPS Design answered:
Dear Uliana, the "thing" is called "short rows" in English, but this garnemnt does not have them. It is designed as a summer to, where a slightly bigger neck opening is not a problem. If you are really worried, you can add them, and HERE is a tutorial on how to do them. Happy Stitching!
10.11.2021 - 12:14
|
|||||||||||||
Rivage Top#rivagetop |
|||||||||||||
 |
 |
||||||||||||
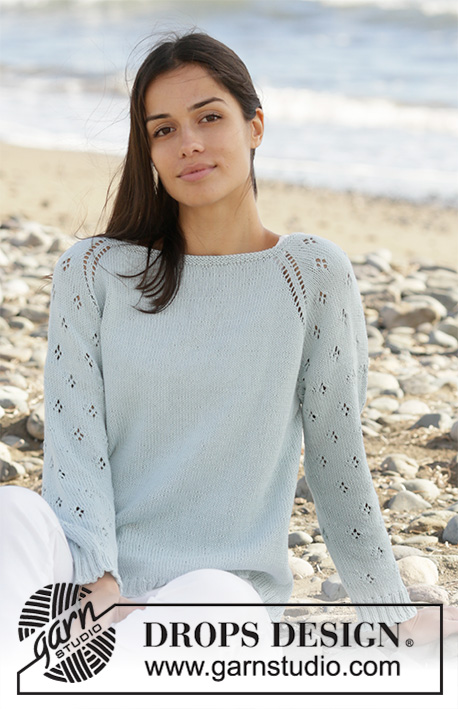
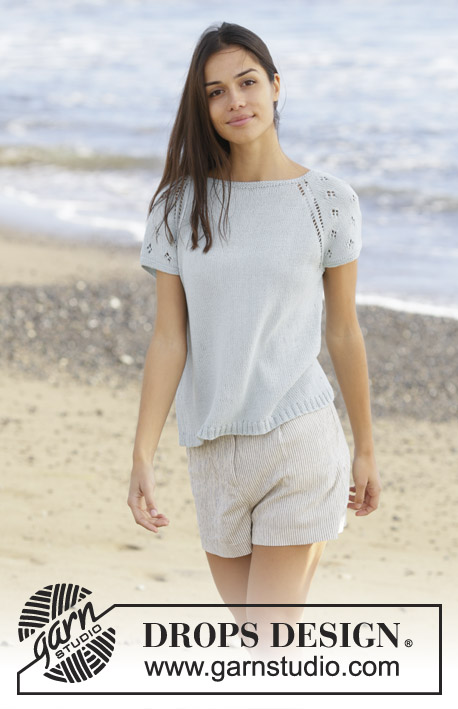
Knitted top with raglan in DROPS Safran. Piece is knitted top down with lace pattern on sleeves. Size: S - XXXL
DROPS 199-23 |
|||||||||||||
|
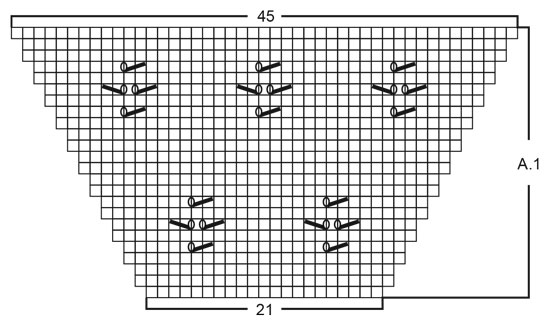
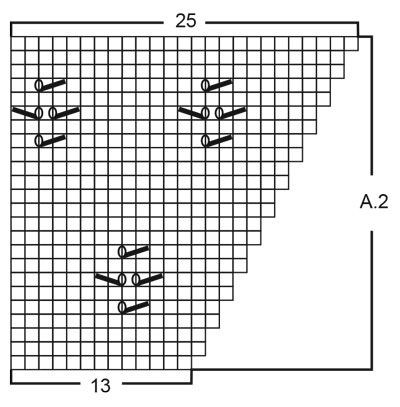
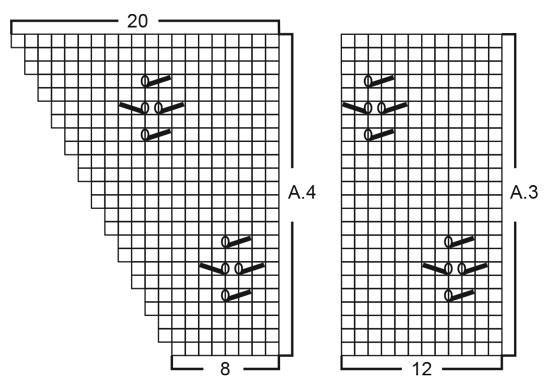
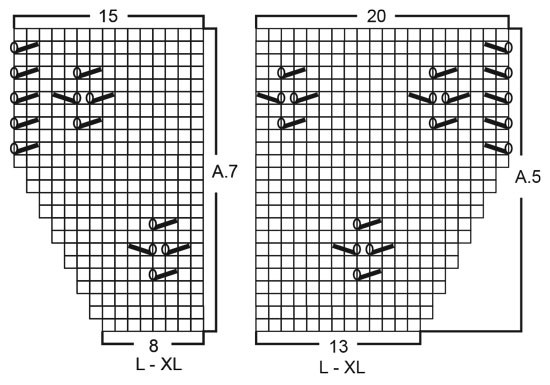
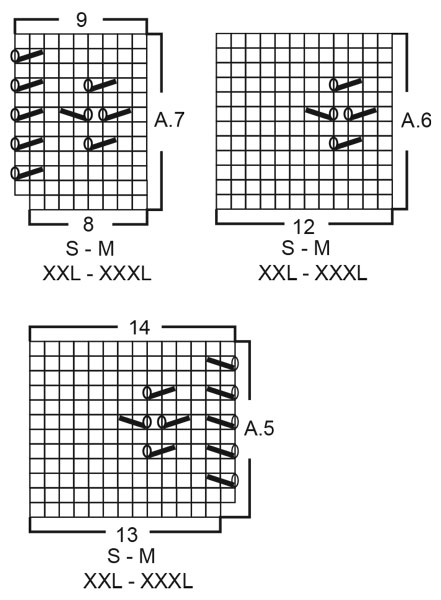
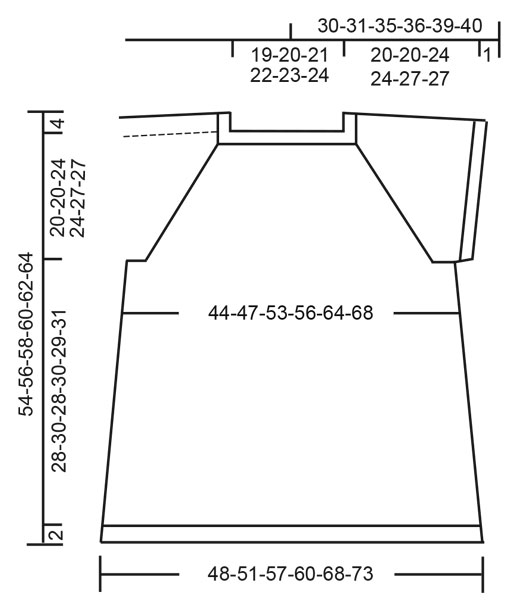
---------------------------------------------------------- EXPLANATION FOR THE PATTERN: ---------------------------------------------------------- GARTER STITCH (worked in the round): 1 ridge vertically = 2 rounds, i.e. knit 1 round and purl 1 round. PATTERN: See diagrams A.1 to A.7. Choose diagram for your size (applies to A.5, A.6 and A.7). INCREASE TIP-1 (evenly): To calculate how to increase evenly, use the total number of stitches on row (e.g. 124 stitches) and divide stitches by number of increases to be done (e.g. 26) = 4.8. In this example increase by making 1 yarn over after approx. every 5th stitch. On next round knit yarn overs twisted to avoid holes. RAGLAN: Increase for raglan in every transition between front/back piece and sleeves as explained below: Increase after the marker thread like this: knit 1, make 1 yarn over. Increase before the marker thread like this: work until 1 stich remain before the marker thread, make 1 yarn over, knit 1. You increase 2 stitches at each marked thread, and a total of 8 stitches on the round. On next round knit the yarn overs to make holes. Then work the new stitch in stocking stitch on body and in lace pattern on sleeves. INCREASE TIP-2 (applies to sides of body): Work until 3 stitches remain before marker thread, make 1 yarn over, knit 6 (marker thread is in the middle of these 6 stitches), make 1 yarn over (= 2 stitches increased at the marker thread and 4 stitches increased in total on round.) On next round knit yarn overs twisted to avoid holes. Then work the new stitches in stocking stitch. ---------------------------------------------------------- START THE PIECE HERE: ---------------------------------------------------------- TOP - SHORT OVERVIEW OF THE PIECE: Neck edge and yoke are worked in the round on circular needle, top down. Divide yoke for body and sleeve edges. Continue body in the round, top down. Work sleeve edges in the round on double pointed needles, top down. NECK EDGE: Cast on 120-124-128-132-138-146 stitches on circular needle size 2.5 mm with Safran. Work 3 ridges in GARTER STITCH in the round - read explanation above. Knit 1 round while increasing 6-26-22-38-32-44 stitches evenly - read INCREASE TIP-1 = 126-150-150-170-170-190 stitches. Knit 1 round (knit yarn overs twisted). Then work yoke as explained below. YOKE: Switch to circular needle size 3 mm. Insert 4 marker threads in piece as explained below (without working the stitches). Use marker threads later when increasing for raglan. Insert 1 marker thread at beginning of round, count 23 stitches (= sleeve), insert 1 marker before next stitch, count 40-52-52-62-62-72 stitches (= front piece), insert 1 marker thread before next stitch, count 23 stitches (= sleeve), insert 1 marker thread before next stitch. There are 40-52-52-62-62-72 stitches after last marker thread on back piece. Work first round as follows: increase for RAGLAN after the marker thread – read explanation above, work A.1 over the next 21 stitches (= sleeve), increase for raglan on each side of marker thread, work in stocking stitch until 1 stitch remains before next marker thread (= front piece), increase for raglan on each side of marker thread, work A.1 over the 21 stitches (= sleeve), increase for raglan on each side of marker thread, work in stocking stitch until 1 stitch remain before marker thread at the beginning of round (=back piece), increase for raglan before marker thread. Continue pattern like this in stocking stitch on front and back piece and A.1 on sleeves. REMEMBER THE KNITTING TENSION! AT THE SAME TIME continue increase for raglan every other round until increase has been done 25-25-31-31-37-37 times in total at every marker thread (including increase explained on first round). Work the new stitch in stocking stitch on front and back piece and in lace pattern the way diagrams show on sleeves. When A.1 has been worked 1 time vertically, continue lace pattern on sleeves as explained below: LACE PATTERN SLEEVE: SIZE S and M: When A.1 has been worked 1 time vertically, work next round as follows over stitches on sleeves: Work A.2 (= 13 stitches), work A.3 over the next 24 stitches (= 2 repetition of 12 stitches), and finish with A.4 (= 8 stitches). When A.2 to A.4 have been worked 1 time vertically, work next round as follows over stitches on sleeves: Work A.5 (= 13 stitches), work A.6 over the next 48 stitches (= 4 repetition of 12 stitches), and finish with A.7 (= 8 stitches). When last row in A.5 to A.7 remain, divide yoke for body and sleeves as explained below ALL SIZES. SIZE L and XL: When A.1 has been worked 1 time vertically, work next round as follows over stitches on sleeves: Work A.2 (= 13 stitches), work A.3 over the next 24 stitches (= 2 repetition of 12 stitches), and finish with A.4 (= 8 stitches). When A.2 to A.4 have been worked 1 time vertically, work next round as follows over stitches on sleeves: Work A.5 (= 13 stitches), work A.3 over the next 48 stitches (= 4 repetition of 12 stitches), and finish with A.7 (= 8 stitches). When last row in A.5 to A.7 remain, divide yoke for body and sleeves as explained below ALL SIZES. SIZE XXL and XXXL: When A.1 has been worked 1 time vertically, work next round as follows over stitches on sleeves: Work A.2 (= 13 stitches), work A.3 over the next 24 stitches (= 2 repetition of 12 stitches), and finish with A.4 (= 8 stitches). When A.2 to A.4 have been worked 1 time vertically, work next round as follows over stitches on sleeves: Work A.2 (= 13 stitches), work A.3 over the next 48 stitches (= 4 repetition of 12 stitches), and finish with A.4 (= 8 stitches). When A.2 to A.4 have been worked, work next round as follows over stitches on sleeves: Work A.5 (= 13 stitches), work A.6 over the next 72 stitches (= 6 repetition of 12 stitches), and finish with A.7 (= 8 stitches). When last row in A.5 to A.7 remain, divide yoke for body and sleeves as explained below ALL SIZES. ALL SIZES: When increases for raglan are done, there are 326-350-398-418-466-486 stitches on round. Continue lace pattern as explained above until last row in A.5 and A.7 remains. Now divide yoke for body and sleeves and work last round as follows: Knit 4-1-2-0-4-3, slip the next 65-71-81-85-89-91 stitches on 1 stitch holder for sleeve, cast on 8-8-8-10-10-12 new stitches on needle (= in the side under sleeve), knit the next 98-104-118-124-144-152 stitches (= front piece), slip the next 65-71-81-85-89-91 stitches on 1 stitch holder for sleeve, cast on 8-8-8-10-10-12 new stitches on needle (= in the side under sleeve) and knit the remaining 94-103-116-124-140-149 stitches (= back piece). Yoke measures now approx. 20-20-24-24-27-27 cm from cast-on edge mid front. Remove all marker threads in piece and cut the yarn. Now finish body and sleeves separately. NOW MEASURE THE PIECE FROM HERE! BODY: = 212-224-252-268-308-328 stitches. Insert 1 marker thread in each side on body, in the middle of the 8-8-8-10-10-12 stitches that were cast on under sleeves. Move marker threads upwards when working. Use them later when increasing in the sides. Begin round at one of the marker threads and work stocking stitch in the round. When piece measures 4 cm from division in all sizes, increase 1 stitch on each side of both markers - READ INCREASE TIP-2 (= 4 stitches increased). Increase like this every 5 cm 5 times in total in all sizes = 232-244-272-288-328-348 stitches. Work until piece measures approx. 28-30-28-30-29-31 cm from division (or desired length, approx. 2 cm remain until finished measurements). Knit 1 round while increasing 56-60-68-72-80-84 stitches evenly = 288-304-340-360-408-432 stitches. This is done to avoid the rib to be worked, from contracting. Switch to circular needle size 2.5 mm. Work rib in the round = knit 2/purl 2 for 2 cm. Cast off stitches with knit over knit and purl over purl. Top measures approx. 54-56-58-60-62-64 cm from shoulder and down. SLEEVE EDGES: Slip the 65-71-81-85-89-91 stitches from stitch holder in one side of piece on double pointed needles size 2.5 mm and pick in addition up 1 stitch in each of the 8-8-8-10-10-12 new stitches cast on under sleeve = 73-79-89-95-99-103 stitches. Work 3 ridges in the round. Cast off by knitting. Work the other sleeve edge the same way. |
|||||||||||||
Diagram explanations |
|||||||||||||
|
|||||||||||||
 |
|||||||||||||
 |
|||||||||||||
 |
|||||||||||||
 |
|||||||||||||
 |
|||||||||||||
 |
|||||||||||||
Have you finished this pattern?Tag your pictures with #dropspattern #rivagetop or submit them to the #dropsfan gallery. Do you need help with this pattern?You'll find 23 tutorial videos, a Comments/Questions area and more by visiting the pattern on garnstudio.com. © 1982-2026 DROPS Design A/S. We reserve all rights. This document, including all its sub-sections, has copyrights. Read more about what you can do with our patterns at the bottom of each pattern on our site. |
|||||||||||||


With over 40 years in knitting and crochet design, DROPS Design offers one of the most extensive collections of free patterns on the internet - translated to 17 languages. As of today we count 324 catalogues and 12245 patterns translated into English (UK/cm). 12245
We work hard to bring you the best knitting and crochet have to offer, inspiration and advice as well as great quality yarns at incredible prices! Would you like to use our patterns for other than personal use? You can read what you are allowed to do in the Copyright text at the bottom of all our patterns. Happy crafting!
Post a comment to pattern DROPS 199-23
We would love to hear what you have to say about this pattern!
If you want to leave a question, please make sure you select the correct category in the form below, to speed up the answering process. Required fields are marked *.