
Popular categories
Looking for a yarn?


Comments / Questions (26)
![]() Françoise Haquart wrote:
Françoise Haquart wrote:
Bonjour Sur la photo du modèle, le devant se termine par une pointe légèrement arrondie. Cela ne correspond pas du tout aux explications puisqu'on arrête toutes les mailles d'un coup. Cordialement Françoise Haquart
13.01.2021 - 14:11DROPS Design answered:
Bonjour Mme Haquart, cet arrondi va se former automatiquement à cause du point fantaisie tricoté au milieu devant/milieu dos. Bon tricot!
13.01.2021 - 15:37
![]() Gisela Hohn wrote:
Gisela Hohn wrote:
Hallo, heute habe ich mit der Anleitung begonnen, habe es bis zur 1. Runde nach der Passe geschafft, jetzt muss ich lesen, dass die Zunahmen nur alle 2 Runden gemacht erden. Was passiert in den Runden dazwischen? Grüße aus Burgas
04.09.2020 - 16:55DROPS Design answered:
Liebe Frau Hohn, die Raglanzunahmen werden in jede 2. Runde gestrickt (und unterchiedlich am Vorder-Rückenteil als an den Ärmeln) - bei der Runde nach den Zunahmen stricken Sie wie zuvor - die Umschläge für den Raglan werden verschränkt gestrickt. Viel Spaß beim stricken!
07.09.2020 - 08:02
![]() Gisela wrote:
Gisela wrote:
Ich habe versucht die Anleitung zu drucken, es kommen immer nur 2 Seiten aus dem Drucker mit der Fußzeile 2 von 2 Seiten. Der Beginn der Anleitung fehlt, was mache ich falsch?
13.10.2019 - 17:27DROPS Design answered:
Liebe Gisela, die ganze Anleitung sollte gedruckt werden; prüfen Sie mal die Druckereinstellungen damit alle Seiten gedruckt sind; versuchen Sie den Browser-Cache zu löschen und den Browser neu starten, und Sie können auch mal mit einem anderen Browser versuchen . Viel Spaß beim stricken!
14.10.2019 - 10:36
![]() Shosho wrote:
Shosho wrote:
We want to see videos for finally patterns
05.05.2019 - 00:58
![]() Martine wrote:
Martine wrote:
Bonjour une fois tricoter le motif n'est pas comme sur la photo,il y a un soucis avec le diagramme ,il ne fait pas de tulipe merci cdt
14.02.2019 - 09:19DROPS Design answered:
Bonjour Martine, le diagramme correspond bien au motif sur la photo. Vérifiez bien votre diagramme et vos mailles, n'hésitez pas à demander conseil auprès de votre magasin en leur apportant ou en leur montrant une photo de votre ouvrage. Ce sera plus facile ainsi de vous aider. Bon tricot!
14.02.2019 - 11:51
![]() Maria Jose wrote:
Maria Jose wrote:
Buenas, este patron me parece muy bonito, pero las explicaciones no se corresponden, me parece, con él. En primer lugar, el resorte inclinado no lo veo descrito. En segundo lugar, tampoco veo cómo se hace la forma ondulada de la parte final del jersey (en el croquis está además recta). Muchas gracias. Un cordial saludo.
05.02.2019 - 12:09DROPS Design answered:
Hola Maria Jose. El patrón es correcto. Se trabaja de arriba abajo. La forma ondulada en la parte inferior del jersey se consigue después de finalizar los diagramas A.1B y A.3B. El dibujo de este patrón solo se presenta en diagramas, no esta duplicado en el texto.
11.02.2019 - 20:23
![]() Teresa wrote:
Teresa wrote:
La descrizione del modello mostra 4 modelli di conteggio. Tuttavia, vedo l'olefina ma i modelli di conteggio A1a, A1b, A3a e A3b. Dove posso trovare gli schemi A2 e A4?
09.01.2019 - 12:21DROPS Design answered:
Buongiorno Teresa. Trova i diagrammi A2 e A4 alla fine delle spiegazioni, di fianco al grafico con le misure. Buon lavoro!
09.01.2019 - 14:09
![]() Greet wrote:
Greet wrote:
Misschien iets duidelijker vermelden dat het aantal steken oploop voor en na de omslagen. Vb), 1 omslag (= 1 steek gemeerderd voor de raglan), 2-4-4-6-6-6 steken in tricotsteek, 1 omslag (= 1 steek gemeerderd voor de raglan), De steken 2-4-4-6-6-6 worden dus resp. Steeds 1 of 2 meer. . Altijd voor en na het patroon A2.
10.11.2018 - 20:46
![]() Klazien Modderman-Bijlsma wrote:
Klazien Modderman-Bijlsma wrote:
De patroonbeschrijving vermeld 4 telpatronen. Ik zie echter alkeen maar de telpatronen A1a,A1b, A3a en A3b. Waar kan ik de telpatronen A2 en A4 vinden?
06.11.2018 - 11:05
![]() Wenche Ulvan wrote:
Wenche Ulvan wrote:
Jeg får ikke opp noe bilde av strikkeplaggene
09.09.2018 - 22:10
|
||||||||||||||||
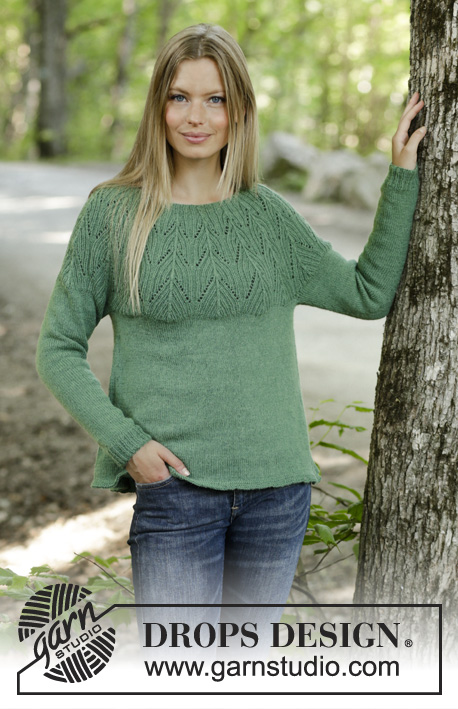
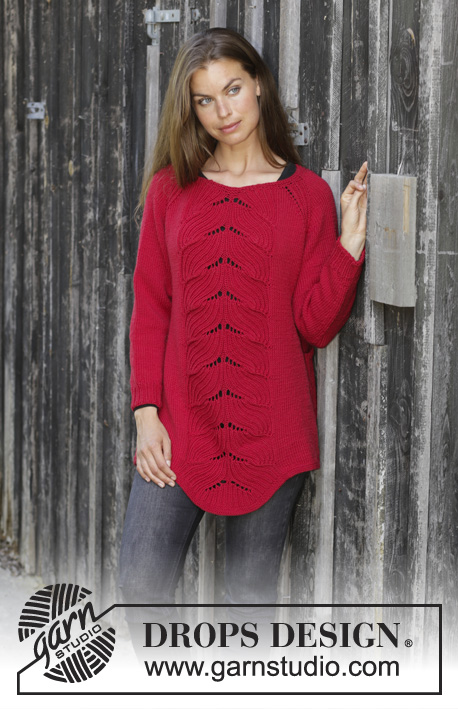
Red Tulip#redtulipsweater |
||||||||||||||||
 |
 |
|||||||||||||||
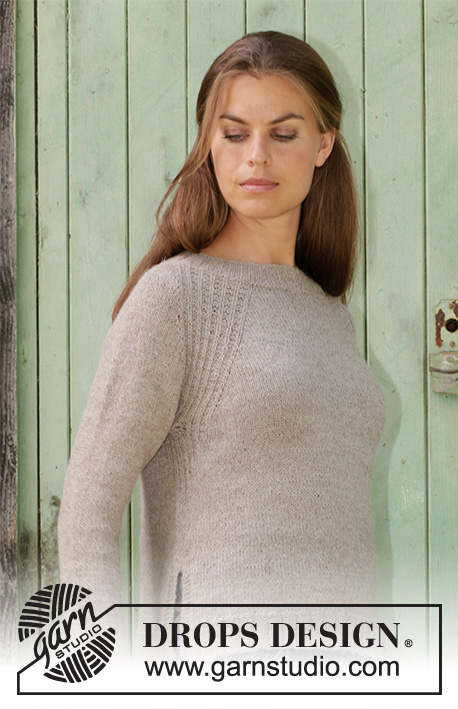
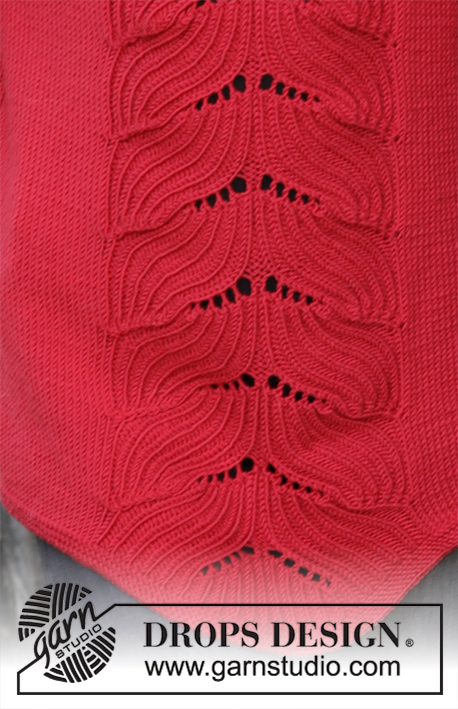
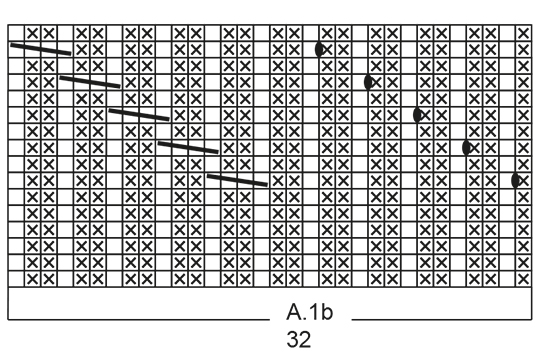
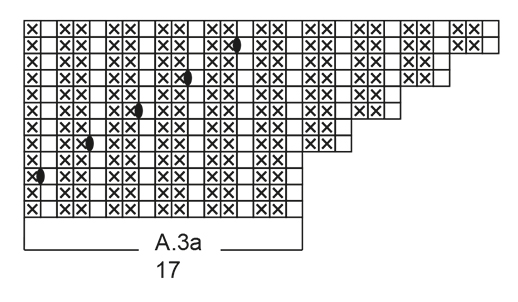
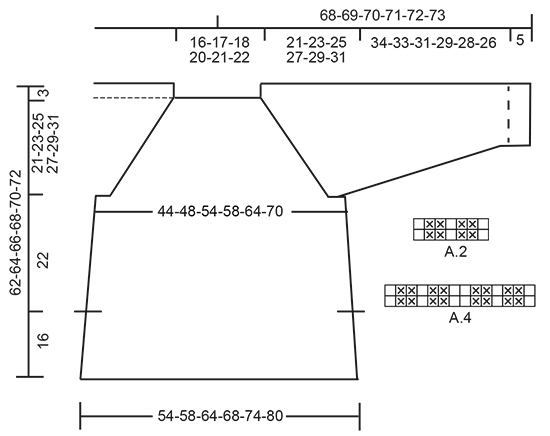
Knitted jumper with raglan in DROPS Merino Extra Fine. Piece is knitted top down with rib displacement. Size: S - XXXL
DROPS 197-9 |
||||||||||||||||
|
---------------------------------------------------------- EXPLANATION FOR THE PATTERN: ---------------------------------------------------------- GARTER STITCH (worked in the round): 1 ridge = 2 rounds. Knit 1 round and purl 1 round. GARTER STITCH (back and forth): 1 ridge = knit 2 rows. PATTERN: See diagrams A.1 to A.4. Diagram A.1b/A.3b measures approx. 10 cm in width. INCREASE TIP-1 (evenly): To calculate how to increase evenly, use the total number of stitches on row (e.g. 88 stitches) and divide stitches by number of increases to be done (e.g. 20) = 4.4. In this example increase by making 1 yarn over after alternately approx. every 4th and 5th stitch. On next round work yarn over twisted to avoid hole. INCREASE TIP-2 (applies to sides of body): Increase by making 1 yarn over. On next round work yarn over twisted to avoid holes. Then work the new stitches in stocking stitch. DECREASE TIP (applies to sleeves): Decrease 1 stitch on each side of marker thread as follows: Work until 3 stitches remain before marker thread and knit 2 together, knit 2 (marker thread is between these stitches), slip 1 stitch knitwise, knit 1, pass slipped stitch over stitch worked. ---------------------------------------------------------- START THE PIECE HERE: ---------------------------------------------------------- JUMPER - SHORT OVERVIEW OF THE GARMENT: Worked top down on circular needle. Work first a yoke in the round on circular needle. Now divide yoke for body and sleeves. Continue in the round on circular needle until approx. 16 cm remain, then work front and back piece separately (= vent in the side). Work sleeves in the round on double pointed needles. YOKE: Cast on 88-92-96-104-108-112 stitches on circular needle size 3.5 mm with Merino Extra Fine. Work in GARTER STITCH - read explanation above. When piece measures 2 cm, increase 20-20-24-20-24-28 stitches evenly on next round - read INCREASE TIP-1 = 108-112-120-124-132-140 stitches. Purl 1 round. Switch to circular needle size 4.5 mm and work as follows (round begins mid back): Half back piece: Work A.1a (= 17 stitches), 2-2-4-4-6-8 stitches in stocking stitch, 1 yarn over (= 1 stitch increased for raglan). Right sleeve: Work A.2 (= 7 stitches), 1 yarn over (= 1 stitch increased for raglan), 2-4-4-6-6-6 stitches in stocking stitch, 1 yarn over (= 1 stitch increased for raglan), A.2 over the next 7 stitches Front piece: Work 1 yarn over (= 1 stitch increased for raglan), 2-2-4-4-6-8 stitches in stocking stitch, A.3a (= 17 stitches) (= mid front), A.1a over the next 17 stitches, 2-2-4-4-6-8 stitches in stocking stitch, 1 yarn over (= 1 stitch increased for raglan). Left sleeve: Work A.2 over the next 7 stitches, 1 yarn over (= 1 stitch increased for raglan), 2-4-4-6-6-6 stitches in stocking stitch, 1 yarn over (= 1 stitch increased for raglan), A.2 over the next 7 stitches Half back piece: Work 1 yarn over (= 1 stitch increased for raglan), 2-2-4-4-6-8 stitches in stocking stitch and finish with A.3a over the last 17 stitches. REMEMBER THE KNITTING TENSION! Work yarn overs twisted on each side of A.2 to avoid holes! Continue pattern like this and increase for raglan, increase differently on front/back piece and sleeves (first increase as explained above), increase stitches on each side of A.2 as follows: Front/back piece: Increase 1 stitch every other round 18-22-25-29-32-36 times in total (= 2 stitches increase on each front/back piece). Sleeve: Increase 1 stitch every other round 20-23-26-27-28-30 times in total (= 2 stitches increase on each sleeve). When A.1a and A.3a have been worked 1 time vertically, work A.1b (= 32 stitches) over A.1a and A.3b (= 32 stitches) over A.3a. When all increases are done there are 320-352-384-408-432-464 stitches on row. Work until piece measures 21-23-25-27-29-31 cm from cast-on edge. Now divide piece for body and sleeves as follows: Half back piece: Work A.1b (= 32 stitches), work 20-24-29-33-38-44 stitches in stocking stitch. Right sleeve: Slip the next 56-64-70-74-76-80 stitches on a stitch holder for sleeve and cast on 8-8-10-10-12-12 stitches under sleeve. Front piece: Work 20-24-29-33-38-44 stitches in stocking stitch, A.3b (= 32 stitches) (= mid back), A.1b (= 32 stitches), 20-24-29-33-38-44 stitches in stocking stitch. Left sleeve: Slip the next 56-64-70-74-76-80 stitches on a stitch holder for sleeve and cast on 8-8-10-10-12-12 stitches under sleeve. Half back piece: Work 20-24-29-33-38-44 stitches in stocking stitch and finish with A.3b (= 32 stitches). BODY: = 224-240-264-280-304-328 stitches. Work A.3b (= 32 stitches) as before, 17-21-27-31-37-43 stitches in stocking stitch, A.4 (= 14 stitches = mid under sleeve), 17-21-27-31-37-43 stitches in stocking stitch. A.1b and A.3b as before (= 64 stitches in total), 17-21-27-31-37-43 stitches in stocking stitch, A.4 over the next 14 stitches (= mid under sleeve), 17-21-27-31-37-43 stitches in stocking stitch and finish with A.1b (= 32 stitches) as before. Continue pattern like this. When piece measures 2 cm from where body was divided from sleeves, increase 1 stitch on each side of every A.4 (= 4 stitches increased) - read INCREASE TIP-2. Increase like this every 2 cm 10 times in total = 264-280-304-320-344-368 stitches. When piece measures 22 cm from where body was divided from sleeves, divide front and back piece, to make a vent in each side (= approx. 16 cm). Divide the piece in the middle of each A.4 (= 132-140-152-160-172-184 stitches on each front/back piece). BACK PIECE: Now work back and forth. Continue with half pattern A.4 (= 7 stitches), stocking stitch, A.1b and A.3b as before until piece measures 36 cm from where body was divided from sleeves, switch to circular needle size 3.5 mm and work GARTER STITCH – read explanation above, for 2 cm (= 16 cm vent). Cast off by knitting. Piece measures approx. 62-64-66-68-70-72 cm in total from shoulder. FRONT PIECE: Work as back piece. SLEEVE: Work sleeves in the round on double pointed needles. Slip the 56-64-70-74-76-80 stitches from stitch holder in one side of piece on double pointed needles size 4.5 mm and pick up 1 stitch in each of the 8-8-10-10-12-12 stitches under sleeve = 64-72-80-84-88-92 stitches. Insert 1 marker thread in the middle of the 8-8-10-10-12-12 stitches under sleeve. Continue with pattern A.2 (on each side of marker thread) and stocking stitch, but decrease A.2 as follows: Decrease 1 stitch on each side of marker thread – read DECREASE TIP (= 2 stitches decreased) on every other round and increase 1 stitch on every other round by making a yarn over after first A.2 and before last A.2 (= 2 stitches increased), i.e. the stitches under sleeve are decreased and the stitches in stocking stitch are increased. Knit the increased stitches twisted on next round, then work them in stocking stitch. When sleeve measures 2 cm from where sleeve was divided for body, do not increase stitches on next round with increase/decrease, i.e. decrease 2 stitches. Decrease like this every 3-2-1½-1½-1-1 cm 10-13-16-17-18-19 times in total = 44-46-48-50-52-54 stitches (when A.2 has been decreased in both sides, stitches are no longer increased). When sleeve measures 34-33-31-29-28-26 cm from where sleeve was divided from body, increase 1-2-0-1-2-0 stitches evenly on next round = 45-48-48-51-54-54 stitches. Switch to double pointed needles size 3.5 mm and work rib = knit 1/purl 2. When sleeve measures 39-38-36-34-33-31 cm from where sleeve was divided from body, cast off with knit over knit and purl over purl. Work the other sleeve the same way. |
||||||||||||||||
Diagram explanations |
||||||||||||||||
|
||||||||||||||||
 |
||||||||||||||||
 |
||||||||||||||||
 |
||||||||||||||||
 |
||||||||||||||||
 |
||||||||||||||||
Have you finished this pattern?Tag your pictures with #dropspattern #redtulipsweater or submit them to the #dropsfan gallery. Do you need help with this pattern?You'll find 26 tutorial videos, a Comments/Questions area and more by visiting the pattern on garnstudio.com. © 1982-2026 DROPS Design A/S. We reserve all rights. This document, including all its sub-sections, has copyrights. Read more about what you can do with our patterns at the bottom of each pattern on our site. |
||||||||||||||||


With over 40 years in knitting and crochet design, DROPS Design offers one of the most extensive collections of free patterns on the internet - translated to 17 languages. As of today we count 324 catalogues and 12290 patterns translated into English (UK/cm). 12290
We work hard to bring you the best knitting and crochet have to offer, inspiration and advice as well as great quality yarns at incredible prices! Would you like to use our patterns for other than personal use? You can read what you are allowed to do in the Copyright text at the bottom of all our patterns. Happy crafting!
Post a comment to pattern DROPS 197-9
We would love to hear what you have to say about this pattern!
If you want to leave a question, please make sure you select the correct category in the form below, to speed up the answering process. Required fields are marked *.