
Popular categories
Looking for a yarn?


Comments / Questions (25)
![]() Mieke wrote:
Mieke wrote:
Er zijn 3 varianten in de drops glitter. Kan ik de zilver variant combineren met gelijk welke kleur in het palet? Bvb pistache groen met een zilver draadje?
26.04.2025 - 18:03DROPS Design answered:
Dag Mieke,
Indien er DROPS Glitter gebruikt wordt in een patroon wordt aangegeven in het patroon welke kleur je nodig hebt bij de materialen. Als je zelf glitter toe wilt voegen is het toch een beetje persoonlijke smaak wat je mooi vindt :) Zelf zou ik geneigd zijn om de rode glitter bij rood/oranje/roest tinten te kiezen, de zilver bij koele kleuren en de goud bij warme kleuren.
27.04.2025 - 10:09
![]() Mieke wrote:
Mieke wrote:
Kan je cotton Merino extra fine combineren met drops glitter en zo ja, hoeveel klusjes moet ik gebruiken voor maat L?
26.04.2025 - 09:27DROPS Design answered:
Dag Mieke,
Jazeker, je kunt DROPS Glitter mee breien. Om te weten hoeveel klossen je nodig hebt, deel je de totale looplengte (dus het aantal bollen x de looplengte per bol) van cotton Merino wat je nodig hebt voor dit project, door de looplengte van een klos glitter. Dat getal is het aantal klossen wat je nodig hebt.
26.04.2025 - 17:42
![]() Katy Posth wrote:
Katy Posth wrote:
Das heißt nach den Mustern A.1a und A.3a (wo in jeder 2. Runde 6 Machen zugenommen werden). kommen die Muster A.1b und A.3b in denen nichts mehr zugenommen wird. Dann sind noch nicht die 324 Maschen auf der Nadel. Die weitern Zunamen erfolgen dann über die 1 Masche als Raglanzunahme? Bei einer eine Länge von 25 cm ab dem Anschlagrand sind dann die 324 Machen erreicht oder wird weiter zugenommen?
21.10.2024 - 09:31DROPS Design answered:
Liebe Frau Posth, tut mir Leid ich habe falsch beschrieben und die Zunahmen in A.1a und A.3a vergessen, so zusätzlich von den Raglanzunahmen wird man in A.1a und in A.3a je 3 Maschen 5 Mal zunehmen (siehe 3. Symbol unter Zeichenerklärung), so wenn A.1a und A.3a fertig sind, hat man 15 Maschen x 4 (A.1a und A.3a werden je 2 Mal gestrickt) zugenommen, so haben Sie: 120 M + 60 M in A.1a/A.3a + 4x25 = Raglan/Vorder- + RÜckenteil + 4x26 Raglan Ärmel = 384 Maschen. Viel Spaß beim Stricken!
21.10.2024 - 16:07
![]() Katy Posth wrote:
Katy Posth wrote:
Bei Größe L habe ich bei der Passe 120 Maschen auf der Nadel. Für das Vorder- und Rückenteil nehme ich insgesamt 25 Maschen zu und 26 Maschen für die Ärmel. Das sind 171 Maschen. Wie komme ich da auf 384 Maschen?
19.10.2024 - 19:30DROPS Design answered:
Liebe Frau Posth, für das Vorder- und Rückenteil wird man je 2 Maschen insgesamt 25 Mal zunehmen (so insgesamt 50 Zunahmen bei Vorder- sowie beim Rückenteil) und bei den Ärmeln wird man je 2 Maschen insgesamt 26 Mal zunehmen (2 x26= 52 M x 2 Ärmel, so hat man: 120+ (4x25)+(4x26)=324 Maschen; Viel Spaß beim Stricken!
21.10.2024 - 08:37
![]() Maru wrote:
Maru wrote:
Hola. Sería útil saber cuantos puntos debemos obtener en el canesú después de tejer la primera línea de A.1a y A.3a (en la talla S me aumenta en 8 o sea, ahora tengo 116 puntos) Luego, cuando empiezan las repeticiones (18 para frente/espalda y 20 para mangas), que es lo que se repite exactamente?, esa primera línea del patrón A.1a y A.3a con los aumentos para el raglán? o repetimos la tercera línea de ambos patrones? Es que no me dan los números.
27.05.2023 - 16:42
![]() Tigresse wrote:
Tigresse wrote:
Bonsoir, je ne sais pas ce qui se passe mais on ne peut plus imprimer vos modèles. Pouvez-vous s'il vous plaît y remédier? Merci d'avance
06.06.2022 - 20:42DROPS Design answered:
Bonjour Tigresse, nous ne rencontrons pas de problème particulier, vérifiez bien les paramètres de votre imprimante, vous pouvez également essayer de vider votre cache/les cookies, cela aide parfois. Bon tricot!
07.06.2022 - 10:30
![]() Lien Ly wrote:
Lien Ly wrote:
Hej igen Jeg er nået til dér hvor arbejdet skal deles i midt i A.4 (= 152 masker på forstykke/bagstykke) og kan ikke komme videre, hvordan strikke man "den halv runde afslutning" (halv måne)? Jeg håber I kan hjælpe. På forhånd tak for hjælp. Med venlig hilsen Lien Ly
14.05.2022 - 23:25DROPS Design answered:
Hei Lien Ly. Jo, nå har du delt arbeidet i sidene og du skal nå strikke halve A.4 (= 7 masker), glattstrikk som før og A.1b og A.3b som før til arbeidet måler 36 cm fra der bolen ble delt fra ermene, Du vil da få en "halvmåne" med de økningene som er i diagram A.1b og A.3b. mvh DROPS Design
16.05.2022 - 10:08
![]() Lien Ly wrote:
Lien Ly wrote:
Hej jeg strikker Red Tulip i størrelse L. når alle udtagninger er klaret er der 384 masker, men efter deling af arbejdet har jeg kun 244 masker til RYG&FORSTYKKE. i opskriften skal der være 264 masker og der står ingen steder at jeg skal lave udtagning til de 20 masker? og jeg håber I kan hjælpe. På forhånd tak. Med venlig hilsen Lien Ly
07.03.2022 - 13:37DROPS Design answered:
Hej Lien, jo du slår 10 masker op under hvert ærme :)
09.03.2022 - 11:02
![]() Susan Godden wrote:
Susan Godden wrote:
Why can't you put these patterns in straight needle's as not all of us and get on with these circular needles and as such we're loosing out on theses patterns
11.12.2021 - 16:18DROPS Design answered:
Dear Mrs Godden, circular needles are very popular in Scandinavia reason why we use them a lot, if we are not able to adjust every pattern to every single request, this lesson might help you to adjust into straight needles, your DROPS store will be also able to help you even per mail or telephone. Happy knitting!
13.12.2021 - 10:36
![]() Françoise Haquart wrote:
Françoise Haquart wrote:
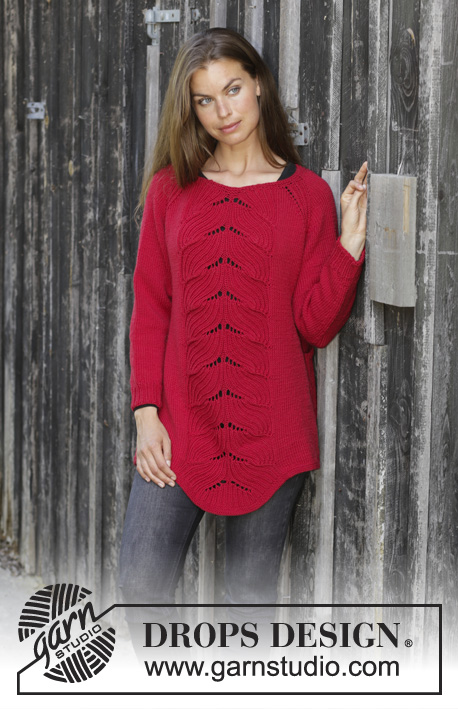
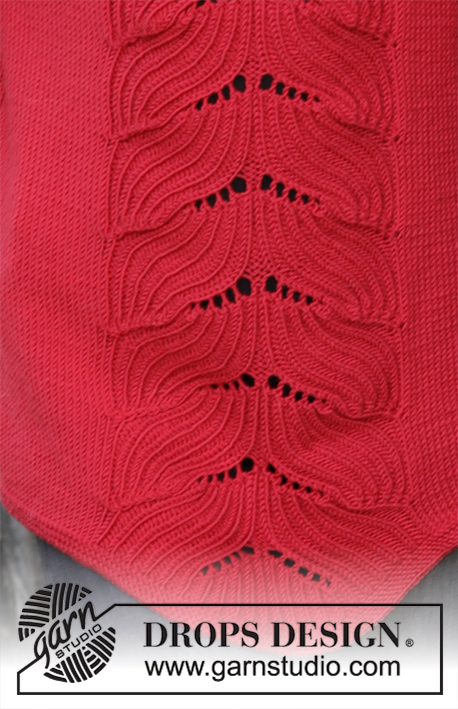
Bonjour Sur la photo du modèle, le devant se termine par une pointe légèrement arrondie. Cela ne correspond pas du tout aux explications puisqu'on arrête toutes les mailles d'un coup. Cordialement Françoise Haquart
13.01.2021 - 14:11DROPS Design answered:
Bonjour Mme Haquart, cet arrondi va se former automatiquement à cause du point fantaisie tricoté au milieu devant/milieu dos. Bon tricot!
13.01.2021 - 15:37
|
||||||||||||||||
Red Tulip#redtulipsweater |
||||||||||||||||
 |
 |
|||||||||||||||
Knitted jumper with raglan in DROPS Merino Extra Fine. Piece is knitted top down with rib displacement. Size: S - XXXL
DROPS 197-9 |
||||||||||||||||
|
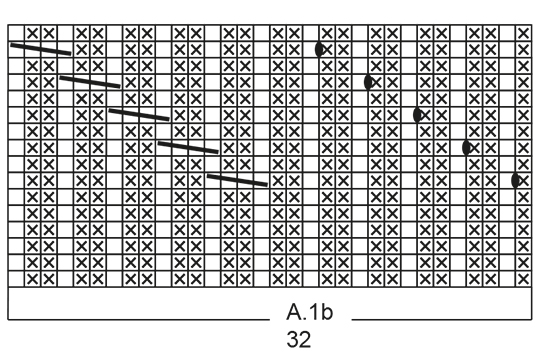
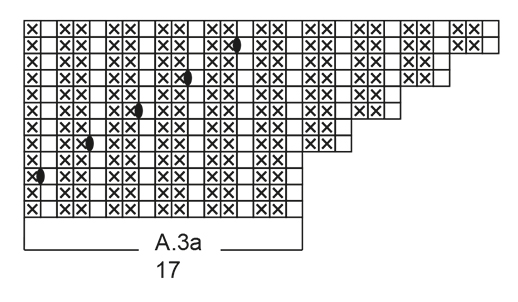
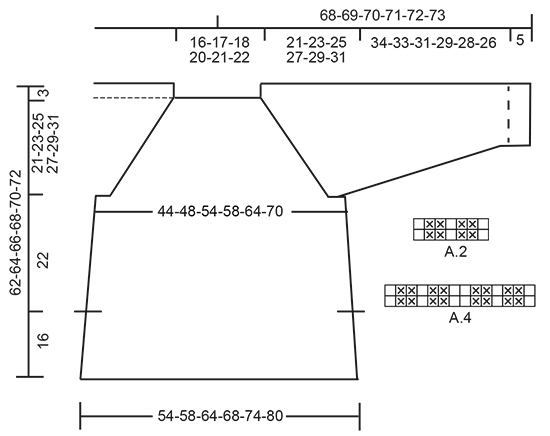
---------------------------------------------------------- EXPLANATION FOR THE PATTERN: ---------------------------------------------------------- GARTER STITCH (worked in the round): 1 ridge = 2 rounds. Knit 1 round and purl 1 round. GARTER STITCH (back and forth): 1 ridge = knit 2 rows. PATTERN: See diagrams A.1 to A.4. Diagram A.1b/A.3b measures approx. 10 cm in width. INCREASE TIP-1 (evenly): To calculate how to increase evenly, use the total number of stitches on row (e.g. 88 stitches) and divide stitches by number of increases to be done (e.g. 20) = 4.4. In this example increase by making 1 yarn over after alternately approx. every 4th and 5th stitch. On next round work yarn over twisted to avoid hole. INCREASE TIP-2 (applies to sides of body): Increase by making 1 yarn over. On next round work yarn over twisted to avoid holes. Then work the new stitches in stocking stitch. DECREASE TIP (applies to sleeves): Decrease 1 stitch on each side of marker thread as follows: Work until 3 stitches remain before marker thread and knit 2 together, knit 2 (marker thread is between these stitches), slip 1 stitch knitwise, knit 1, pass slipped stitch over stitch worked. ---------------------------------------------------------- START THE PIECE HERE: ---------------------------------------------------------- JUMPER - SHORT OVERVIEW OF THE GARMENT: Worked top down on circular needle. Work first a yoke in the round on circular needle. Now divide yoke for body and sleeves. Continue in the round on circular needle until approx. 16 cm remain, then work front and back piece separately (= vent in the side). Work sleeves in the round on double pointed needles. YOKE: Cast on 88-92-96-104-108-112 stitches on circular needle size 3.5 mm with Merino Extra Fine. Work in GARTER STITCH - read explanation above. When piece measures 2 cm, increase 20-20-24-20-24-28 stitches evenly on next round - read INCREASE TIP-1 = 108-112-120-124-132-140 stitches. Purl 1 round. Switch to circular needle size 4.5 mm and work as follows (round begins mid back): Half back piece: Work A.1a (= 17 stitches), 2-2-4-4-6-8 stitches in stocking stitch, 1 yarn over (= 1 stitch increased for raglan). Right sleeve: Work A.2 (= 7 stitches), 1 yarn over (= 1 stitch increased for raglan), 2-4-4-6-6-6 stitches in stocking stitch, 1 yarn over (= 1 stitch increased for raglan), A.2 over the next 7 stitches Front piece: Work 1 yarn over (= 1 stitch increased for raglan), 2-2-4-4-6-8 stitches in stocking stitch, A.3a (= 17 stitches) (= mid front), A.1a over the next 17 stitches, 2-2-4-4-6-8 stitches in stocking stitch, 1 yarn over (= 1 stitch increased for raglan). Left sleeve: Work A.2 over the next 7 stitches, 1 yarn over (= 1 stitch increased for raglan), 2-4-4-6-6-6 stitches in stocking stitch, 1 yarn over (= 1 stitch increased for raglan), A.2 over the next 7 stitches Half back piece: Work 1 yarn over (= 1 stitch increased for raglan), 2-2-4-4-6-8 stitches in stocking stitch and finish with A.3a over the last 17 stitches. REMEMBER THE KNITTING TENSION! Work yarn overs twisted on each side of A.2 to avoid holes! Continue pattern like this and increase for raglan, increase differently on front/back piece and sleeves (first increase as explained above), increase stitches on each side of A.2 as follows: Front/back piece: Increase 1 stitch every other round 18-22-25-29-32-36 times in total (= 2 stitches increase on each front/back piece). Sleeve: Increase 1 stitch every other round 20-23-26-27-28-30 times in total (= 2 stitches increase on each sleeve). When A.1a and A.3a have been worked 1 time vertically, work A.1b (= 32 stitches) over A.1a and A.3b (= 32 stitches) over A.3a. When all increases are done there are 320-352-384-408-432-464 stitches on row. Work until piece measures 21-23-25-27-29-31 cm from cast-on edge. Now divide piece for body and sleeves as follows: Half back piece: Work A.1b (= 32 stitches), work 20-24-29-33-38-44 stitches in stocking stitch. Right sleeve: Slip the next 56-64-70-74-76-80 stitches on a stitch holder for sleeve and cast on 8-8-10-10-12-12 stitches under sleeve. Front piece: Work 20-24-29-33-38-44 stitches in stocking stitch, A.3b (= 32 stitches) (= mid back), A.1b (= 32 stitches), 20-24-29-33-38-44 stitches in stocking stitch. Left sleeve: Slip the next 56-64-70-74-76-80 stitches on a stitch holder for sleeve and cast on 8-8-10-10-12-12 stitches under sleeve. Half back piece: Work 20-24-29-33-38-44 stitches in stocking stitch and finish with A.3b (= 32 stitches). BODY: = 224-240-264-280-304-328 stitches. Work A.3b (= 32 stitches) as before, 17-21-27-31-37-43 stitches in stocking stitch, A.4 (= 14 stitches = mid under sleeve), 17-21-27-31-37-43 stitches in stocking stitch. A.1b and A.3b as before (= 64 stitches in total), 17-21-27-31-37-43 stitches in stocking stitch, A.4 over the next 14 stitches (= mid under sleeve), 17-21-27-31-37-43 stitches in stocking stitch and finish with A.1b (= 32 stitches) as before. Continue pattern like this. When piece measures 2 cm from where body was divided from sleeves, increase 1 stitch on each side of every A.4 (= 4 stitches increased) - read INCREASE TIP-2. Increase like this every 2 cm 10 times in total = 264-280-304-320-344-368 stitches. When piece measures 22 cm from where body was divided from sleeves, divide front and back piece, to make a vent in each side (= approx. 16 cm). Divide the piece in the middle of each A.4 (= 132-140-152-160-172-184 stitches on each front/back piece). BACK PIECE: Now work back and forth. Continue with half pattern A.4 (= 7 stitches), stocking stitch, A.1b and A.3b as before until piece measures 36 cm from where body was divided from sleeves, switch to circular needle size 3.5 mm and work GARTER STITCH – read explanation above, for 2 cm (= 16 cm vent). Cast off by knitting. Piece measures approx. 62-64-66-68-70-72 cm in total from shoulder. FRONT PIECE: Work as back piece. SLEEVE: Work sleeves in the round on double pointed needles. Slip the 56-64-70-74-76-80 stitches from stitch holder in one side of piece on double pointed needles size 4.5 mm and pick up 1 stitch in each of the 8-8-10-10-12-12 stitches under sleeve = 64-72-80-84-88-92 stitches. Insert 1 marker thread in the middle of the 8-8-10-10-12-12 stitches under sleeve. Continue with pattern A.2 (on each side of marker thread) and stocking stitch, but decrease A.2 as follows: Decrease 1 stitch on each side of marker thread – read DECREASE TIP (= 2 stitches decreased) on every other round and increase 1 stitch on every other round by making a yarn over after first A.2 and before last A.2 (= 2 stitches increased), i.e. the stitches under sleeve are decreased and the stitches in stocking stitch are increased. Knit the increased stitches twisted on next round, then work them in stocking stitch. When sleeve measures 2 cm from where sleeve was divided for body, do not increase stitches on next round with increase/decrease, i.e. decrease 2 stitches. Decrease like this every 3-2-1½-1½-1-1 cm 10-13-16-17-18-19 times in total = 44-46-48-50-52-54 stitches (when A.2 has been decreased in both sides, stitches are no longer increased). When sleeve measures 34-33-31-29-28-26 cm from where sleeve was divided from body, increase 1-2-0-1-2-0 stitches evenly on next round = 45-48-48-51-54-54 stitches. Switch to double pointed needles size 3.5 mm and work rib = knit 1/purl 2. When sleeve measures 39-38-36-34-33-31 cm from where sleeve was divided from body, cast off with knit over knit and purl over purl. Work the other sleeve the same way. |
||||||||||||||||
Diagram explanations |
||||||||||||||||
|
||||||||||||||||

|
||||||||||||||||
|
||||||||||||||||
|
||||||||||||||||

|
||||||||||||||||
|
||||||||||||||||
Have you finished this pattern?Tag your pictures with #dropspattern #redtulipsweater or submit them to the #dropsfan gallery. Do you need help with this pattern?You'll find 25 tutorial videos, a Comments/Questions area and more by visiting the pattern on garnstudio.com. © 1982-2025 DROPS Design A/S. We reserve all rights. This document, including all its sub-sections, has copyrights. Read more about what you can do with our patterns at the bottom of each pattern on our site. |
||||||||||||||||


With over 40 years in knitting and crochet design, DROPS Design offers one of the most extensive collections of free patterns on the internet - translated to 17 languages. As of today we count 314 catalogues and 11822 patterns translated into English (UK/cm).
We work hard to bring you the best knitting and crochet have to offer, inspiration and advice as well as great quality yarns at incredible prices! Would you like to use our patterns for other than personal use? You can read what you are allowed to do in the Copyright text at the bottom of all our patterns. Happy crafting!
Post a comment to pattern DROPS 197-9
We would love to hear what you have to say about this pattern!
If you want to leave a question, please make sure you select the correct category in the form below, to speed up the answering process. Required fields are marked *.