
Popular categories
Looking for a yarn?


Comments / Questions (12)
![]() Christel wrote:
Christel wrote:
Jag undrar över formuleringen "1 maska på varje sida av maskan med markör". Markören ska väl inte sitta i maskan utan på stickan. Särskilt som den ska följa med vidare i arbetet? Tack!
26.10.2025 - 11:20DROPS Design answered:
Hei Christel. Du skal minske 1 maske før og 1 maske etter masken med merket i. Så blir det slik: Minska - strikk masken med merket - Minska = 2 masker felt. mvh DROPS Design
03.11.2025 - 14:13
![]() Anett Oulie wrote:
Anett Oulie wrote:
Fint mønster men velger å avslutte prosjektet etter å ha kommet til første tommelkile. Jeg lurer på hvordan passformen blir når det skal legges opp 9 masker på tommelens bakside når den er snurpet sammen og kanten bak, som man skal legge opp i består av 1 maske?
01.10.2023 - 08:40
![]() Audgunn Eie wrote:
Audgunn Eie wrote:
Vottene i denne oppskriften er helt feil, siden tommelen er satt på «kanten» av hånda. Dette er selvsagt gjort for at mønsteret skal stemme, men det er nå engang slik at tommelen går mot innsida av hånda, med det resultat at her blir mønsteret dradd helt skjevt. Denne votten kunne jeg aldri gi bort - og det ble heller ikke strikket vott nr 2.
17.11.2021 - 18:56
![]() Inna Loyko wrote:
Inna Loyko wrote:
Красота! Спасибо за идею! К сожалению, не приходилось вязать пряжей Drops, но очень хочу попробовать. Beautiful! Thanks for the idea!
17.11.2021 - 13:54
![]() Jannie Wouters wrote:
Jannie Wouters wrote:
In het patroon van de sokken staat, na het breien van A9, ga verder tot de gewenste lengte. Dit is me niet duidelijk. Welke gewenste lengte??? Niet voor de teen, want dat komt verderop.
22.02.2021 - 10:45DROPS Design answered:
Dag Jannie,
Er wordt bedoeld dat je het werk verder af breit met grijs, dus doorgaan met grijs tot het werk klaar is en geen telpatroontjes meer. (Natuurlijk wel de minderingen etc, zoals aangegeven)
23.02.2021 - 12:47
![]() Laura wrote:
Laura wrote:
Er staat een fout in de beschrijving van de sokken. Na a7 minder 0_0_8 steken, dit moet zijn 9_9_8
13.06.2019 - 20:56DROPS Design answered:
Dag Laura,
Dankjewel voor het doorgeven, ik heb het even aangepast!
17.06.2019 - 15:05
![]() Lotta wrote:
Lotta wrote:
Jag får inte antalet maskor att stämma efter ökning, minskning från mönstrets början: ”Lägg upp 72-72-80 maskor ..... På sista varvet i A.6 ökas det 9-9-10 maskor = 81-81-90 maskor .... På sista varvet i A.7 (varv med stjärna) minskas det 0-0-8 maskor .... = 72-72-72 maskor”
18.02.2019 - 00:26
![]() Elin wrote:
Elin wrote:
Hej! Diagram A.4 är borta. Kan ni försöka få tillbaka det? Med vänlig hälsning, Elin!
07.01.2019 - 14:47DROPS Design answered:
hei Elin. Vi har nå dobbelsjekket dette, og alle diagrammene (A.1-A.9) ligger nederst på oppskriften. Har du problemer med å se det uansett hva slags enhet du bruker? God fornøyelse.
11.01.2019 - 11:30
![]() Jansje Fafiani Eefting wrote:
Jansje Fafiani Eefting wrote:
Momenteel is het onmogelijk om dit mooie patroon uit te printen??? Bij andere patronen ook niet mogelijk. Is er een fout bij jullie op de site?
01.12.2018 - 11:04
![]() Karin wrote:
Karin wrote:
Wenn ich diese Handschuhe stricke habe ich lange Spannfäden. Was kann ich machen das dieses vermieden wird. Denn beim anziehen des Handschuhs bleibt man ja leicht hängen. Danke Karin
23.08.2018 - 14:42DROPS Design answered:
Am besten ist es, den mitgeführten Faden auf der Rückseite während des Strickens nach ein paar Maschen mit dem Arbeitsfaden auf der Rückseite der Arbeit zu verkreuzen, dann werden die Spannfäden fixiert und hängen nicht durch. Gutes Gelingen!
24.08.2018 - 00:37
|
||||||||||||||||||||||||||||||||||||||||
Winter Daisies#winterdaisiesset |
||||||||||||||||||||||||||||||||||||||||
 |
 |
|||||||||||||||||||||||||||||||||||||||
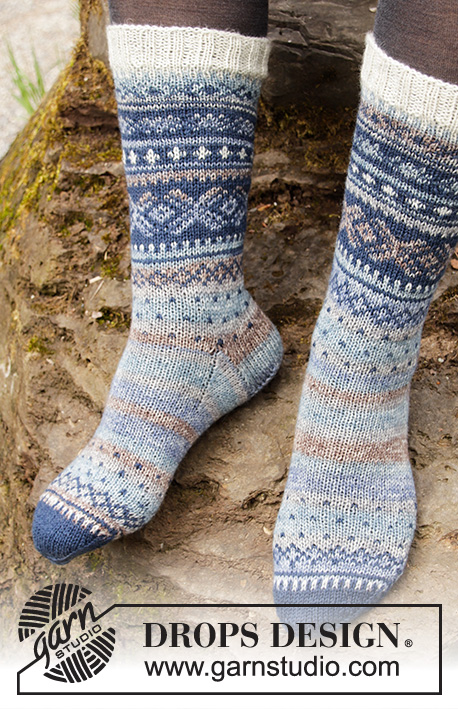
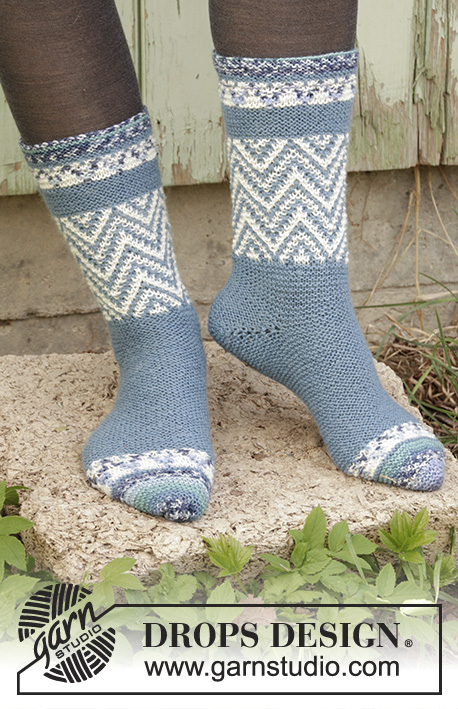
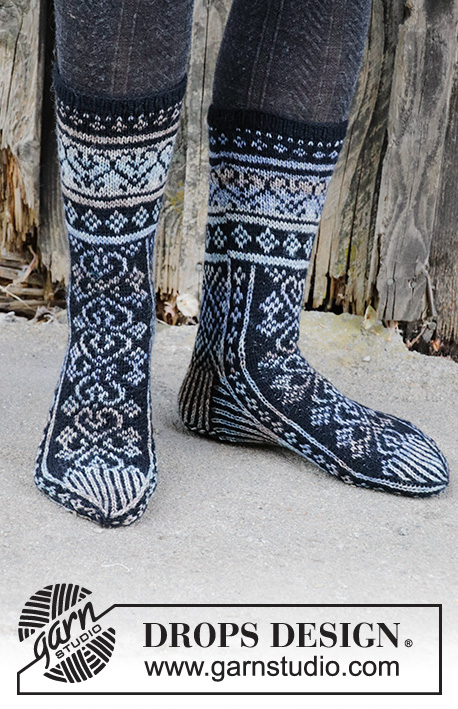
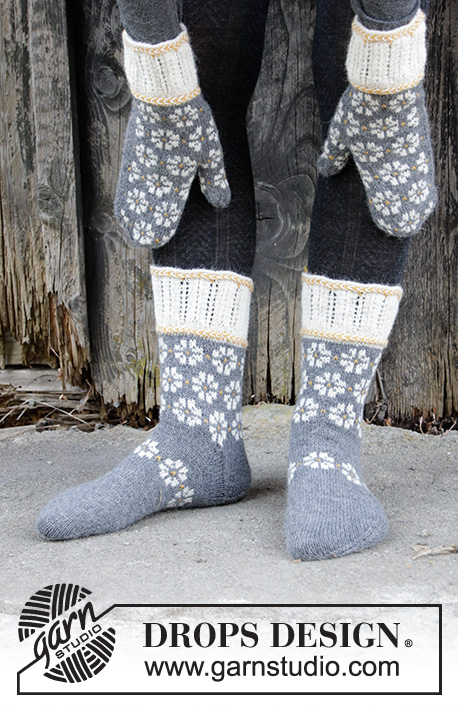
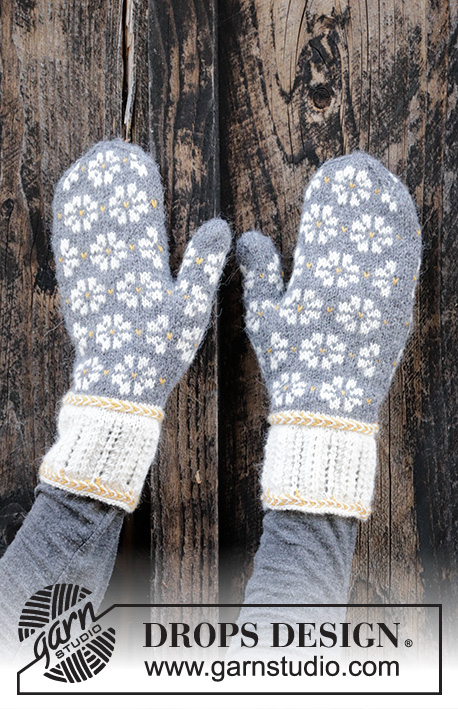
Knitted mittens in DROPS Nord. The piece is worked with Nordic pattern, Latvian cable and lace pattern. Size One-size. Knitted socks in DROPS Nord. The piece is worked with Nordic pattern, Latvian cable and lace pattern. Sizes 35 – 43.
DROPS 193-7 |
||||||||||||||||||||||||||||||||||||||||
|
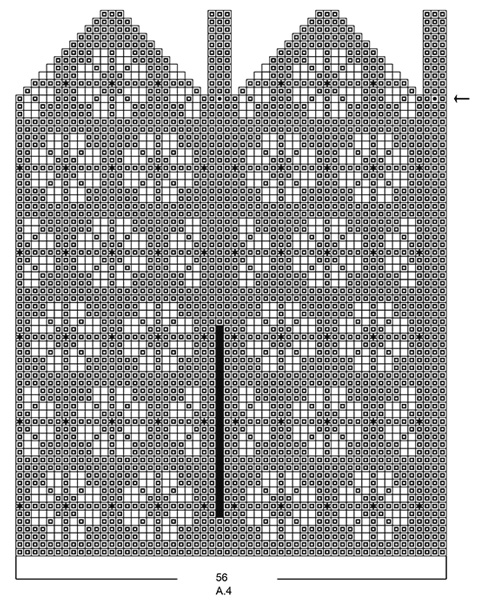
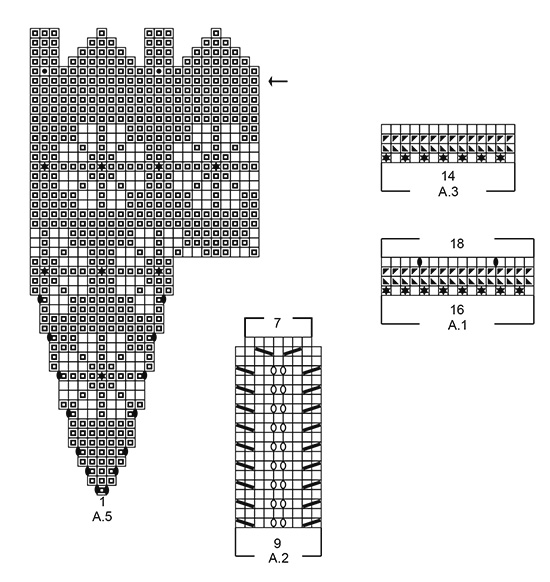
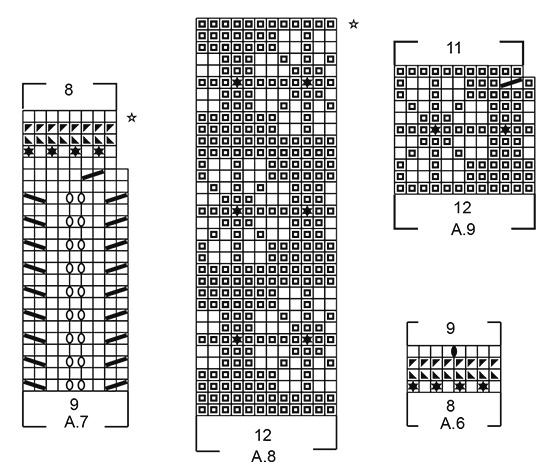
EXPLANATIONS FOR THE PATTERN: ------------------------------------------------------- PATTERN: Mittens: See diagrams A.1 to A.5. Socks: See diagrams A.6 to A.9. LATVIAN CABLE: The cable is made up of 3 rounds – all the rounds are drawn into the diagram and are worked as follows: ROUND 1: * Knit 1 with off white, knit 1 with goldenrod *, work from *-* to end of round. ROUND 2: Lay both strands to the front of the piece (towards you). Take the off white strand to the back of the piece, purl 1 and take the strand to the front again. Take the goldenrod strand under the off white strand and to the back of the piece, purl 1 and take the strand to the front again. Continue like this, purling alternately with off white and golden rod, but always take the strand under the strand from the last stitch worked. ROUND 3: Work as round 2, but now always take the strand OVER the strand from the last stitch worked. DECREASE TIP (evenly spaced): To work out how to decrease evenly, count the total number of stitches on the needles (e.g. 90 stitches), and divide by the number of decreases to be made (e.g. 8) = 11.2. In this example, knit approx. each 10th and 11th stitch together. HEEL DECREASE: ROW 1 (= right side): Knit until there are 9 stitches left in all sizes, slip 1 stitch as if to knit, knit 1, pass the slipped stitch over, turn the piece. ROW 2 (= wrong side): Work until there are 9 stitches left, slip 1 stitch as if to purl, purl 1, pass the slipped stitch over, turn the piece. ROW 3: Work until there are 8 stitches left, slip 1 stitch as if to knit, knit 1, pass the slipped stitch over, turn the piece. ROW 4: Work until there are 8 stitches left, slip 1 stitch as if to purl, purl 1, pass the slipped stitch over, turn the piece. Continue to decrease like this (i.e. work until there is 1 stitch less before slipping 1 stitch) until there are 15 stitches left on the needle for all sizes. ------------------------------------------------------- START THE PIECE HERE: ------------------------------------------------------- MITTENS - SHORT OVERVIEW OF THE PIECE: The piece is worked in the round with double pointed needles, bottom up. LEFT MITTEN: Cast on 64 stitches with double pointed needles size 2.5 mm and off white. Work A.1 (= 16 stitches) a total of 4 times on the round. When A.1 has been worked in height there are 72 stitches on the round. Now work A.2 (= 9 stitches) a total of 8 times on the round. When A.2 has been worked in height there are 56 stitches on the round. Continue with A.3 (= 14 stitches) a total of 4 times on the round. When A.3 has been completed, continue with A.4 (= 56 stitches). REMEMBER THE KNITTING TENSION! When you have worked as far as the black square in A.4, work A.5 (= 1 stitch on the first round) onwards over this square (the other stitches are continued in A.4 as before). When you have increased 7 times on each side of A.5 and there are 15 stitches for the thumb gusset, work 4 rounds without increasing (as shown in A.5), then place the 15 thumb-stitches on a thread. Cast on 1 new stitch behind the stitches on the thread = 56 stitches. Continue working according to A.4. On the round with an arrow insert a marker in each side of the mitten – see diagram, at the same time as you start to decrease on this round: Decrease 1 stitch on each side of the stitches with markers (= 4 stitches decreased on the round): Decrease as follows before the marker: Knit 2 together. Decrease as follows after the marker: Slip 1 stitch as if to knit, knit 1, pass the slipped stitch over. Decrease like this a total of 11 times. After all the decreases there are 12 stitches left on the needles. Cut the strand and pull it through the remaining stitches, tighten and fasten well. THUMB: Place the 15 thumb-stitches back on double pointed needles size 2.5 mm. Knit up 9 stitches in the edge behind the thumb = 24 stitches. Continue in the round according to A.5. On the round with an arrow insert a marker in each side of the thumb – see diagram, at the same time as you begin to decrease on this round: Decrease 1 stitch on each side of the stitches with markers (= 4 stitches decreased on the round): Decrease as follows before the marker: Knit 2 together. Decrease as follows after the marker: Slip 1 stitch as if to knit, knit 1, pass the slipped stitch over. Decrease like this a total of 4 times. After all the decreases there are 8 stitches left on the needles. Cut the strand and pull it through the remaining stitches, tighten and fasten well. RIGHT MITTEN: Cast on and work as for left mitten. ------------------------------------------------------- SOCKS - SHORT OVERVIEW OF THE PIECE: The piece is worked in the round with double pointed needles, from the leg down to toe. Cast on 72-72-80 stitches with double pointed needles size 2.5 mm and off white. Knit 1 round, then work pattern according to diagram A.6 (= 8 stitches) a total of 9-9-10 times on the round. On the last round in A.6 increase 9-9-10 stitches = 81-81-90 stitches. REMEMBER THE KNITTING TENSION! Now work pattern A.7 (= 9 stitches) a total of 9-9-10 times on the round. On the last round in A.7 (the round with a star) decrease 0-0-8 stitches – read DECREASE TIP (evenly spaced) = 72-72-72 stitches. Now work A.8 (= 12 stitches) a total of 6 times on the round. On the last round in A.8 (the round with a star) decrease 2-2-2 stitches evenly on round = 70-70-70 stitches. Then continue with grey. Place the first 39 stitches on a thread (= top of foot) = 31 stitches for heel. Continue back and forth over the heel stitches for 5-5½-6 cm, insert a marker here – THE PIECE IS NOW MEASURED FROM HERE. Then work HEEL DECREASE - read description above. After the heel decrease knit up 12-14-15 stitches on each side of the heel and the 39 stitches from the thread are placed back on the needles = 78-82-84 stitches. Insert a marker on each side of the 39 stitches on top of foot. The markers follow your work onwards. Continue with grey and on the first round decrease on each side of the stitches on top of foot as follows: Knit together the 2 stitches before the stitches on top of foot and knit twisted together the 2 stitches after the stitches on top of foot. Decrease like this every 2nd round a total of 3-5-6 times = 72-72-72 stitches. Continue with 10-6-4 rounds with grey. Work as far as the marker before the stitches on top of foot. Work A.9 (= 12 stitches) a total of 6-6-6 times on the round. When the whole of A.9 has been worked in height, there are 66-66-66 stitches on the round. Now continue with grey to finished length. On the next round decrease 10-6-4 stitches evenly on round = 56-60-62 stitches. Continue until the piece measures 18-19-21 cm measured from the marker on the heel (= 4-5-6 cm left to finished length). Insert 1 marker in each side so that there are 28-30-31 stitches both on top and under the foot. Then work stocking stitch over all stitches AT THE SAME TIME as you decrease to toe on each side of both markers. Decrease as follows: Work to 3 stitches before the marker, knit 2 together (= 1 stitch decrease), knit 2 (the marker sits in the middle of these 2 stitches) and knit 2 twisted together (= 1 stitch decreased). Repeat at the other marker = 4 stitches decreased on round. Decrease like this in each side every 2nd round a total of 4-7-9 times and then every round a total of 6-3-1 times = 16-20-22 stitches left on round. On the next round knit all stitches together 2 and 2 = 8-10-11 stitches. Cut the strand and pull it through the remaining stitches, tighten and fasten well. Work 1 more sock in the same way. |
||||||||||||||||||||||||||||||||||||||||
Diagram explanations |
||||||||||||||||||||||||||||||||||||||||
|
||||||||||||||||||||||||||||||||||||||||
 |
||||||||||||||||||||||||||||||||||||||||
 |
||||||||||||||||||||||||||||||||||||||||
 |
||||||||||||||||||||||||||||||||||||||||
Have you finished this pattern?Tag your pictures with #dropspattern #winterdaisiesset or submit them to the #dropsfan gallery. Do you need help with this pattern?You'll find 26 tutorial videos, a Comments/Questions area and more by visiting the pattern on garnstudio.com. © 1982-2026 DROPS Design A/S. We reserve all rights. This document, including all its sub-sections, has copyrights. Read more about what you can do with our patterns at the bottom of each pattern on our site. |
||||||||||||||||||||||||||||||||||||||||


With over 40 years in knitting and crochet design, DROPS Design offers one of the most extensive collections of free patterns on the internet - translated to 17 languages. As of today we count 324 catalogues and 12290 patterns translated into English (UK/cm). 12290
We work hard to bring you the best knitting and crochet have to offer, inspiration and advice as well as great quality yarns at incredible prices! Would you like to use our patterns for other than personal use? You can read what you are allowed to do in the Copyright text at the bottom of all our patterns. Happy crafting!
Post a comment to pattern DROPS 193-7
We would love to hear what you have to say about this pattern!
If you want to leave a question, please make sure you select the correct category in the form below, to speed up the answering process. Required fields are marked *.