
Popular categories
Looking for a yarn?


Comments / Questions (70)
![]() Tammy wrote:
Tammy wrote:
How many sheep motifs are on the XXL cardigan
10.04.2026 - 05:19DROPS Design answered:
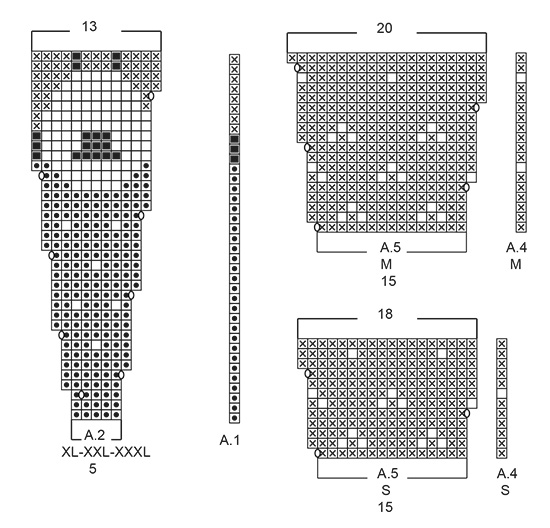
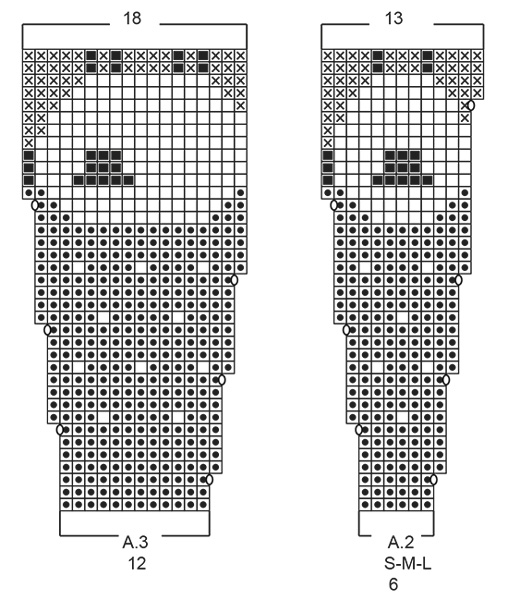
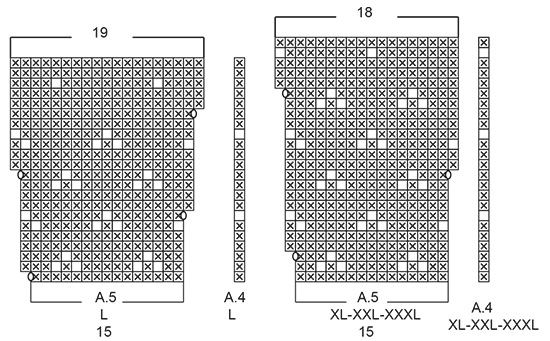
Dear Tammy, there are 26 sheeps in XXL: 5 band stitches , A.1 (= 1 stitch), A.2 (= 5 stitches = 1 sheep) over the next 10 stitches (= 2 times in total = 2 sheeps), A.3 (= 12 stitches = 1 sheep), A.2 over the next 55 stitches (= 11 times in total = 11 sheeps), A.3 over the next 12 stitches = 1 sheep, A.2 over the next 55 stitches (= 11 times in total = 11 sheeps) and finish with 5 band stitches in garter stitch = 2+1+11+1+11=26 sheeps. Happy knitting!
10.04.2026 - 09:26
![]() Tammy wrote:
Tammy wrote:
I am working on the sections. I have 155 on the needles Would you please let me know if I understand this correctly? 5 garter stitches A.1 (1stitch), A.2 (5 stitches ) over 10 stitches., A.3 (12 stitches) A.2 over the next 60stitches (12 times) A.3 (12 stitches) A.2 over the next 60 stitches 5 garter stitches
26.03.2026 - 13:20DROPS Design answered:
Dear Tammy, this applies to larger size and 165 sts, with 155 sts you will work: 5 garter stitches, A.1 (1 st), A.2 (5 sts) 2 times, A.3 (12 sts), A.2 (11 times = 55 sts in total ), A.3 (12 sts), A.2 (11 times = 55 sts in total) and 5 garter sts = 5+1+10+12+55+12+55+5=155 sts. Happy knitting!
26.03.2026 - 16:09
![]() Renate wrote:
Renate wrote:
I think I am not the first person asking this. I started the Sheep Happens pattern, top to bottom with buttons, (cardigan). I am done knitting the neck band but I'm stuck with the yoke. I am also confused with the A1, A2 and A3 charts. I am knitting the size Large. Please explain the yolk, I am good with the divide and rest of the body. If you ever make a video tutorial on the specific pattern, please let me know. Kind regards
19.01.2026 - 15:19DROPS Design answered:
Dear Renate, in size L you will work yoke as follows (over 143 sts): 5 garter stitch, 1 st A.1, then work 2 times the 6 sts A.2 (12 sts), then work the 12 sts A.3, then repeat 8 times the 6 sts A.2 (48 sts), the 12 sts A.3, 8 times the 6 sts A.2 and finish with 5 sts in garter st = 5+1+12+12+48+12+48+5=143. From WS work A.2, A.3, A.2, A.3, A.2, A.1 reading diagrams from the left towards the right - read more about diagrams here. Increase in each diagram as shown/drawn so that you will get 281 sts when diagrams are done. Happy knitting!
20.01.2026 - 09:25
![]() Barbara Brodhead wrote:
Barbara Brodhead wrote:
I’m trying to knit the “Sheep Happens” cardigan and am struggling to understand within the Gauge sequence of the jacket when to do the increases. I made the first one no problem so have 131 stitches but when do I do the next increase row and subsequent rows to get to 255 stitches. Please help. Thanks
07.01.2026 - 11:35DROPS Design answered:
Dear Mrs Brodhead, increases are drawn in the different diagrams you will work, if you look at A.2 to A.5 you will find yarn overs either at the beg or at the end of the diagram, these are the increases you work to get always more stitches in each diagram and then finally get the 255 sts when all diagrams/increases are done. Happy knitting!
08.01.2026 - 09:02
![]() Sabrina wrote:
Sabrina wrote:
Buongiorno, faccio fatica a capire la sequenza dei disegni, quando c è scritto ad es A2 = 6 maglie su 12 per due volte, in pratica sono 4 o 2 pecorelle? I vostri schemi sono sempre chiari e non ho mai avuto difficoltà, stavolta non riesco a capire bene le sequenze , se per favore potete aiutarmi. Grazie
01.10.2025 - 11:41DROPS Design answered:
Buonasera Sabrina, deve lavorare A.2 su 12 maglie, quindi ripeterlo 2 volte. Buon lavoro!
03.10.2025 - 00:45
![]() Anne wrote:
Anne wrote:
Det jeg lige har sendt afsted er et spørgsmål som strikkeforretningen heller ikke kan svare på. Hilsen Anne
05.09.2025 - 12:23DROPS Design answered:
Hei Anne. Hvor har sendt ditt spørsmål? Jeg kan ikke finne det under denne oppskriften (194-1). mvh DROPS Design
22.09.2025 - 09:31
![]() Anne wrote:
Anne wrote:
Hej. Vedr Sheep Happens Cardigan str. XXL. spørgsmål til jeres mønster. Når jeg kommer til 3. Pind i A2 og A3, kan jeg se at jeg skal lave udtagninger. Men skal jeg følge opskriften som under: \"strik mønstret således fra retsiden\"? Hvis jeg gør det hvordan gør jeg så når jeg kommer op i række 4 ? Der øger jeg maske antallet i diagrammet, men ikke i opskriften. Så jeg forstår ikke hvordan jeg skal læse opskriften. Hilsen Anne
05.09.2025 - 12:22
![]() Marinna wrote:
Marinna wrote:
Greetings, in starting to work A1, A2 and A3, the picture of the conpleted sweater implies there is an A3 sheep on both sides of the front, and I do not see how this is achieved when the repeat (for L) is A1, 2x A2, A3, 8x A2, A3 and 8x A2. This puts one A3 on the left side and one A3 in the back and none on the front. What am I misunderstanding?
18.08.2025 - 06:11DROPS Design answered:
Dear martina, that's right there is only one A.3 on the left front piece and one another on back piece but not on the right front piece. Happy knitting!
18.08.2025 - 09:29
![]() Sylvia Henderson wrote:
Sylvia Henderson wrote:
What are the body measurements corresponding to the pattern sizes S M L XL and XXl
25.02.2025 - 01:20
![]() Sylvia Henderson wrote:
Sylvia Henderson wrote:
What are the body measurements corresponding to the pattern sizes S M L XL and XXl
25.02.2025 - 01:18DROPS Design answered:
Dear Mrs Henderson, to find out the matching size measure a similar garment you have and like the shape then compare them to the measurements in the chart (= finished garment measurements). Note that they are given in cm - convert into inches here if needed. Read more here. Happy knitting!
26.02.2025 - 10:23
|
||||||||||||||||
Sheep Happens! Cardigan#sheephappenscardigan |
||||||||||||||||
 |
 |
|||||||||||||||
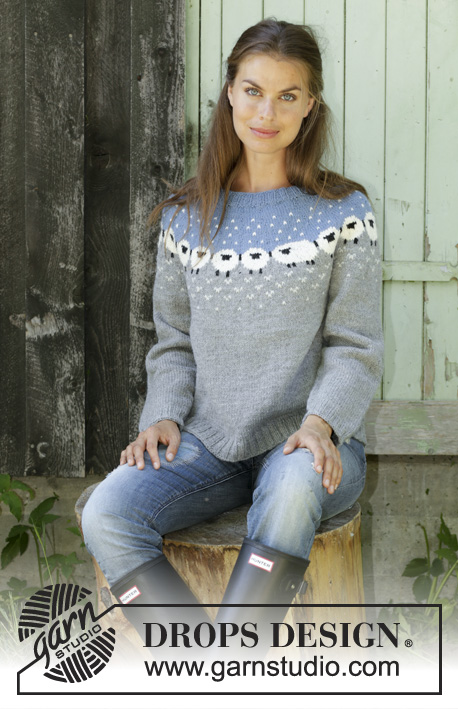
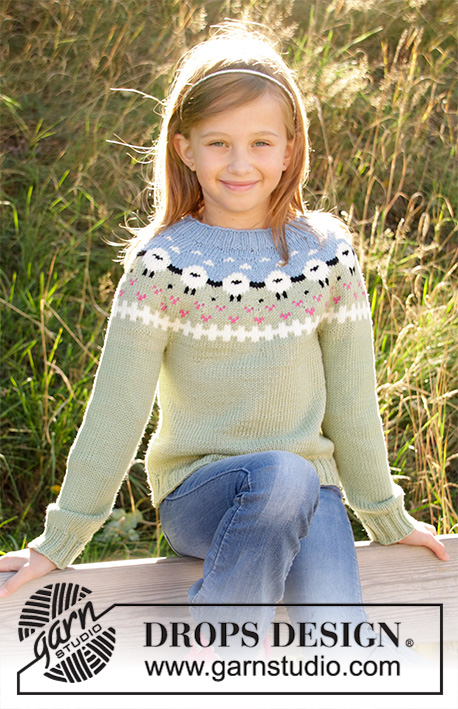
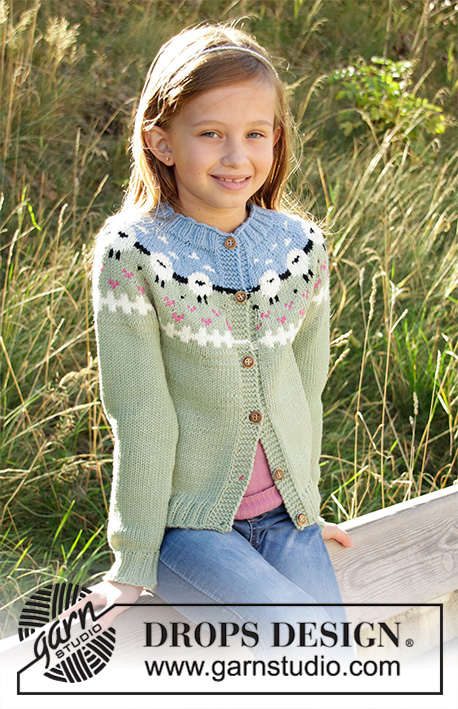
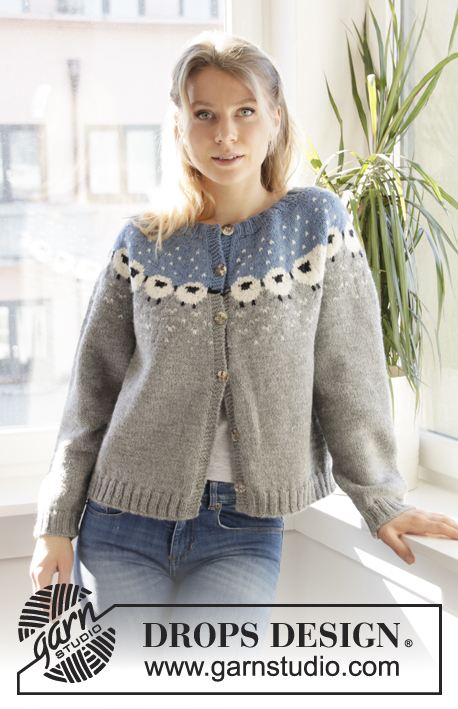
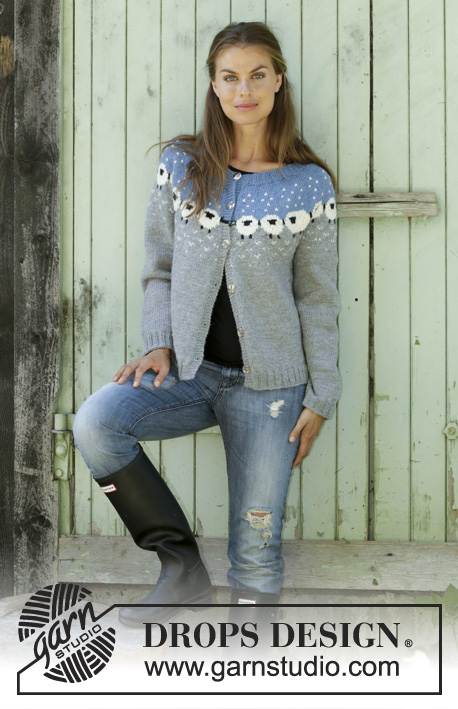
Knitted jacket with round yoke in DROPS Lima. Piece is knitted top down in Norwegian pattern with sheep. Size: S - XXXL
DROPS 194-1 |
||||||||||||||||
|
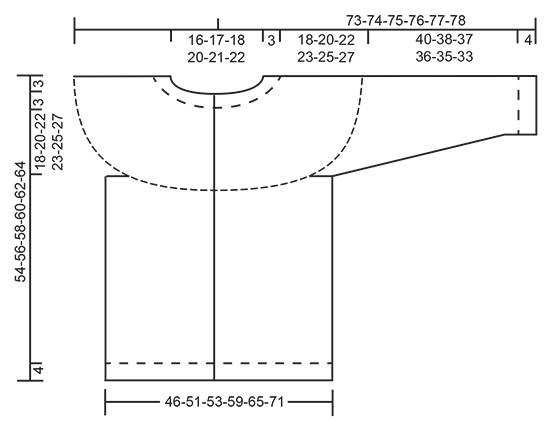
EXPLANATION FOR THE PATTERN: ---------------------------------------------------------- GARTER STITCH (back and forth): 1 ridge = knit 2 rows. PATTERN: See diagrams A.1 to A.5. Choose diagram for your size. Work diagrams in stocking stitch. As the colour changes are far apart, the strands should be twined after approx. every 7th stitch, to avoid long loose strand on the wrong side. INCREASE TIP (evenly): To calculate how to increase evenly, use the total number of stitches on row (e.g. 100 stitches), minus band (= 10 stitches = 90 stitches) and divide stitches by number of increases to be done (e.g. 31) = 2.9. In this example increase by making 1 yarn over after approx. every 3rd stitch. Do not increase over band. On next row work yarn overs twisted to avoid holes. DECREASE TIP (applies to sleeves): Decrease 1 stitch on each side of marker as follows: Work until 3 stitches remain before marker, knit 2 together, knit 2 stitches (marker is between these stitches), slip 1 stitch knitwise, knit 1, pass slipped stitch over stitch worked (= 2 stitches decreased). BUTTONHOLES: Decrease for buttonholes on right band (when garment is worn). Decrease from right side when 3 stitches remain on row as follows: Make 1 yarn over, knit the next 2 stitches together, knit last stitch. On next row knit yarn over to make holes. Decrease first buttonhole when rib in neck measures approx. 1½-2 cm. Then decrease the next 5-5-6-6-7-7 buttonholes, approx. 8½-8½-8-8-7½-7½ cm between each. ---------------------------------------------------------- START THE PIECE HERE: ---------------------------------------------------------- JACKET - SHORT OVERVIEW OF THE GARMENT: Work yoke back and forth on circular needle, top down. Divide the yoke into sleeves and body. Work body back and forth. Sleeves are worked in the round on double pointed needles. YOKE: Cast on 100-104-108-112-120-128 stitches (including 5 band stitches in each side of piece) on circular needle size 3 mm with grey blue. Purl 1 row from wrong side with 5 band stitches in GARTER STITCH - read explanation above, in each side of piece. Work 5 band stitches in garter stitch, rib (= knit 2/purl 2) until 7 stitches remain, knit 2 and finish with 5 band stitches in garter stitch. Decrease for BUTTONHOLES on right band - read explanation above. Work rib for 3 cm, adjust so that last row is from right side. Switch to circular needle size 4 mm. Purl 1 row from wrong side with 5 band stitches in garter stitch in each side and increase 31-27-35-33-35-37 stitches evenly – read INCREASE TIP = 131-131-143-145-155-165 stitches. Work pattern as follows from right side: Work 5 band stitches in garter stitch, A.1 (= 1 stitch), A.2 (= 6-6-6-5-5-5 stitches) over the next 12-12-12-10-10-10 stitches (= 2 times in total), A.3 (= 12 stitches), A.2 over the next 42-42-48-50-55-60 stitches (= 7-7-8-10-11-12 times in total), A.3 over the next 12 stitches, A.2 over the next 42-42-48-50-55-60 stitches (= 7-7-8-10-11-12 times in total) and finish with 5 band stitches in garter stitch. Work band in the same colour as A.1. REMEMBER THE KNITTING TENSION! When A.1 to A.3 have been worked 1 time vertically, there are 255-255-281-333-359-385 stitches on needle. Piece measures approx. 16 cm (including rib). Purl 1 row with grey from wrong side with 5 band stitches in garter stitch in each side and increase 11-11-15-8-12-1 stitches evenly = 266-266-296-341-371-386 stitches. Work next row from right side (work yarn overs twisted to avoid holes): Work 5 band stitches in garter stitch (now work band in grey until finished measurements), A.4 (= 1 stitch), A.5 (= 15 stitches) over the next 255-255-285-330-360-375 stitches (= 17-17-19-22-24-25 times in width) and finish with 5 band stitches in garter stitch. When A.4 and A.5 have been worked 1 time vertically, there are 317-351-372-407-443-461 stitches on needle. Piece now measures 21-23-24-25-25-25 cm (including rib). Work with grey until finished measurements. Work in stocking stitch with 5 band stitches in garter stitch until piece measures 21-23-25-26-28-30 cm (including rib). Now divide the piece for sleeves and body as follows: Work 5 band stitches in garter stitch, 45-49-51-57-63-68 stitches in stocking stitch (= front piece), slip the next 64-72-79-84-90-90 stitches on a stitch holder for sleeve and cast on 8-8-10-10-10-14 stitches under sleeve, work 89-99-102-115-127-135 stitches in stocking stitch (= back piece), slip the next 64-72-79-84-90-90 stitches on a stitch holder for sleeve and cast on 8-8-10-10-10-14 stitches under sleeve, work 45-49-51-57-63-68 stitches in stocking stitch and finish with 5 band stitches in garter stitch (= front piece) = 205-223-234-259-283-309 stitches. BODY: Then work in stocking stitch with 5 band stitches in garter stitch in each side of piece. When piece measures 26-26-26-27-27-27 cm from where body was divided from sleeves, increase 27-33-34-33-41-43 stitches evenly on next row from wrong side = 232-256-268-292-324-352 stitches. Switch to circular needle size 3 mm and work as follows on next row from right side: Work 5 band stitches in garter stitch, rib (= knit 2/purl 2) until 7 stitches remain, knit 2 and finish with 5 band stitches in garter stitch (work yarn overs twisted to avoid holes). Cast off by knitting from right side when rib measures 4 cm (i.e. piece measures approx. 30-30-30-31-31-31 cm from where body was divided from sleeves). Jacket measures 54-56-58-60-62-64 cm in total measured from shoulder. SLEEVE: Slip the 64-72-79-84-90-90 stitches from stitch holder in one side of piece on double pointed needles size 4 mm and pick up 1 stitch in each of the 8-8-10-10-10-14 stitches cast on under sleeve = 72-80-89-94-100-104 stitches. Insert 1 marker in the middle of the 8-8-10-10-10-14 stitches under sleeve. Work in the round in stocking stitch with grey. When piece measures 1 cm from where sleeves was divided from body, decrease 1 stitch on each side of marker - read DECREASE TIP. Decrease like this every 3-2-1½-1½-1½-1 cm 11-15-18-19-22-23 times in total = 50-50-53-56-56-58 stitches. When piece measures 40-38-37-36-35-33 cm from where sleeves were divided from body, increase 2-2-3-0-4-2 stitches evenly on next round = 52-52-56-56-60-60 stitches. Switch to double pointed needles size 3 mm and work rib = knit 2/purl 2. Cast off by knitting when piece measures 44-42-41-40-39-37 cm from where sleeve was divided from body (= approx. 4 cm rib). Work the other sleeve the same way. ASSEMBLY: Sew on buttons on left band. |
||||||||||||||||
Diagram explanations |
||||||||||||||||
|
||||||||||||||||
 |
||||||||||||||||
 |
||||||||||||||||
 |
||||||||||||||||
 |
||||||||||||||||
Have you finished this pattern?Tag your pictures with #dropspattern #sheephappenscardigan or submit them to the #dropsfan gallery. Do you need help with this pattern?You'll find 28 tutorial videos, a Comments/Questions area and more by visiting the pattern on garnstudio.com. © 1982-2026 DROPS Design A/S. We reserve all rights. This document, including all its sub-sections, has copyrights. Read more about what you can do with our patterns at the bottom of each pattern on our site. |
||||||||||||||||


With over 40 years in knitting and crochet design, DROPS Design offers one of the most extensive collections of free patterns on the internet - translated to 17 languages. As of today we count 324 catalogues and 12290 patterns translated into English (UK/cm). 12290
We work hard to bring you the best knitting and crochet have to offer, inspiration and advice as well as great quality yarns at incredible prices! Would you like to use our patterns for other than personal use? You can read what you are allowed to do in the Copyright text at the bottom of all our patterns. Happy crafting!
Post a comment to pattern DROPS 194-1
We would love to hear what you have to say about this pattern!
If you want to leave a question, please make sure you select the correct category in the form below, to speed up the answering process. Required fields are marked *.