
Popular categories
Looking for a yarn?


Comments / Questions (24)
![]() Elżbieta wrote:
Elżbieta wrote:
Dzień dobry Robię opaskę i nie wiem, czy oprócz schematów a2, a4 , a3 powinnam jeszcze robić coś dodatkowo na brzegach aby uzyskać efekt pikotki? Elżbieta
24.03.2026 - 09:56DROPS Design answered:
Witaj Elżbieto, nie, wszystko jest uwzględnione w schematach. Pozdrawiamy!
25.03.2026 - 17:21
![]() Laerke wrote:
Laerke wrote:
Vil det ikke være bedre at sætte de midterste masker fra bagstykket på tråd i stedet for at lukke dem af? De skal jo bruges på halskanten og så er man fri for at trække dem ud fra kanten igen.
04.02.2026 - 21:57DROPS Design answered:
Hej Lærke, det må du gerne, vi foretrækker at få en lille kant i overgangen bagpå i halsen, men det er jo en smagssag :)
05.02.2026 - 11:15
![]() April wrote:
April wrote:
Hello. In this pattern I am on the second row of A2. Would you please explain how knitting one yarn over and then knitting the other yarn over twisted on the next row results in 1 stitch being increased? Thanks.
14.09.2025 - 03:07DROPS Design answered:
Dear April, in this video you can see the difference between knitting 1 yarn over normally or twisted, which usually is the size of the remaining hole. Both types of yarn overs will increase 1 stitch, but one forms a larger hole than the other one. On another note, in the star symbol you knit 1 stitch in both the front loop and back loop of the same stitch, in the same row. So you work 2 knit stitches in the same stitch, which results in 1 increase as well. Happy knitting!
15.09.2025 - 01:49
![]() Evi Tsampra wrote:
Evi Tsampra wrote:
Is this yarn & pattern suitable for blocking? And which is the best method for this? Thank you in advance.
25.04.2025 - 04:50DROPS Design answered:
Dear Mrs Tsampra, some knitters block everything some other never, so it's just a matter of personal experience - blocking should then also respect the care instructions on the yarn label, as this yarn is now discontinued, find alternatives thanks the yarn converter, you'll find care instructions on the yarn page. Feel also free to contact your DROPS Store for any further personal assistance choosing the best matching yarn as well as the best way to block it. Happy knitting!
25.04.2025 - 07:58
![]() Mireille P wrote:
Mireille P wrote:
Je n'arrive pas à lire les diagrammes A2 et A3 de guauche à droite pourriez vous svp me les traduire avec des phrases car je fais un véritable massacre! je vous remercie par avance .
07.06.2024 - 10:55DROPS Design answered:
Bonjour Mireille, sur l'envers, les diagrammes se lisent de gauche à droite, autrement dit, suivez les indications "sur l'envers" des symboles et tricotez par ex. le rang 2 de A.2 ainsi: 2 m end, 2 m env, 2 m ensemble torse à l'end, 1 jeté, tricotez 2 fois à l'endroit la maille suivante = vous avez 8 mailles. Au 4ème rang, vous tricoterez: 2 m end, 2 m env, 3 m end. Bon tricot!
07.06.2024 - 16:12
![]() Iwona wrote:
Iwona wrote:
Witam , robię opaskę. Zaczynam wzór na prawej stronie w kolejności A2, A4, A3. Na lewej stronie zaczynam odwrotnie A3, A4, A2?
09.05.2024 - 19:14DROPS Design answered:
Witaj Iwono, na lewej stronie robótki powinnaś przerabiać schematy w odwrotnej kolejności, czyli A.3, A.4 i A.2. Na lewej stronie robótki będziesz czytać poszczególne schematy od lewej do prawej strony. Więcej informacji znajdziesz w kursie DROPS TUTAJ. Pozdrawiamy!
10.05.2024 - 08:33
![]() Christina wrote:
Christina wrote:
Tack har hittat alla delarna nu!
20.03.2024 - 17:03
![]() Christina wrote:
Christina wrote:
Cherelyn DROPS 191-16: Var hittar jag beskrivningen till picotkanten för topp och pannband? Tack på förhand!
20.03.2024 - 16:47
![]() Britt Mari Knudseth wrote:
Britt Mari Knudseth wrote:
Bakstykket/ forstykket. Skal begynnelsen på pinnen både på rettsiden og vrangsiden starte med A3? Rad 2 og 4 på vr,1 og 3 på r siden. Skal likeså alle pinner slutte med A2?
02.07.2023 - 02:30DROPS Design answered:
Hei Britt Mari Ja, første pinne strikkes fra vrangen (både bakstykket og forstykket) og det startes med diagram A.3 og sluttes med A.2. Tråden ble klippet da bolen var ferdig strikket. Rad 2 + 4 i diagrammene er fra vrangen og leses fra venstre mot høyre, mens rad 1+ 3 er fra retten og leses fra høyre mot venstre. mvh DROPS Design
03.07.2023 - 10:59
![]() Torunn Mikkelsen wrote:
Torunn Mikkelsen wrote:
Hva er forklaring på opp/ned trekanten i sidene på A2 og A3 - jeg strikker pannebånd.
18.01.2023 - 20:32DROPS Design answered:
Hei Torunn, Det symbolet er en 'v' og betyr felle av en maske. God fornøyelse!
22.01.2023 - 12:45
|
||||||||||||||||||||||||||||||||||
Cherelyn#cherelyntop |
||||||||||||||||||||||||||||||||||
 |
 |
|||||||||||||||||||||||||||||||||
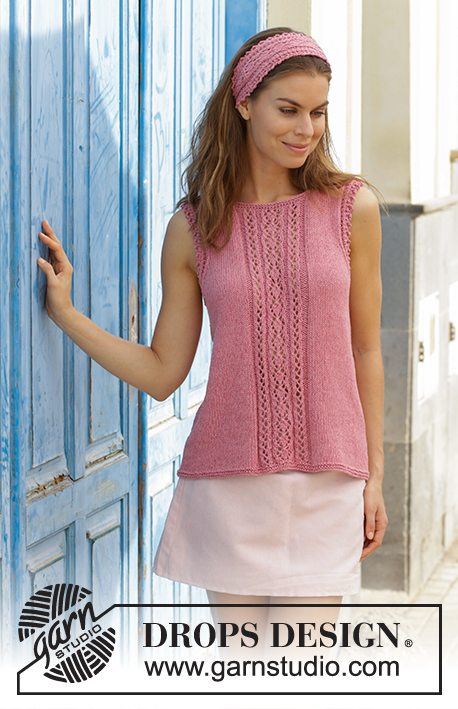
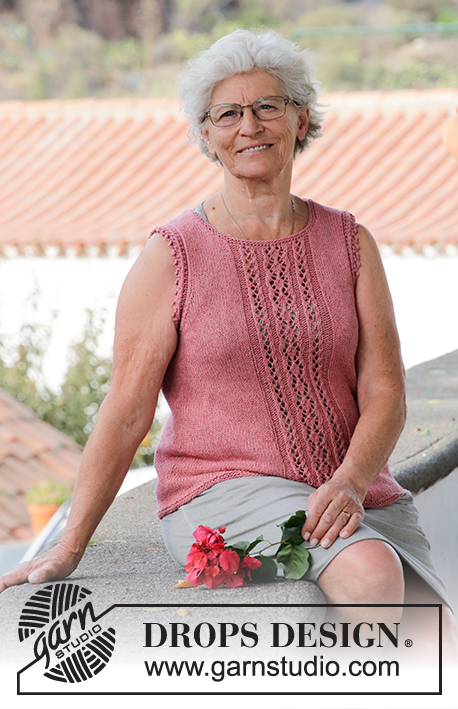
Set consists of: Knitted top with lace pattern, picot edges and A-shape. Size: S - XXXL Knitted head band with lace pattern and picot edges. Set is knitted in DROPS Belle.
DROPS 191-16 |
||||||||||||||||||||||||||||||||||
|
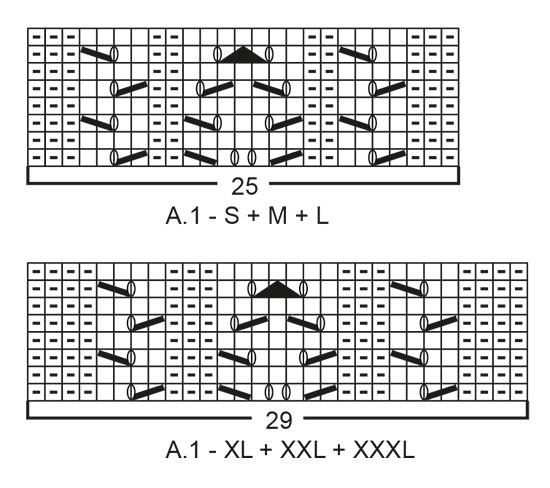
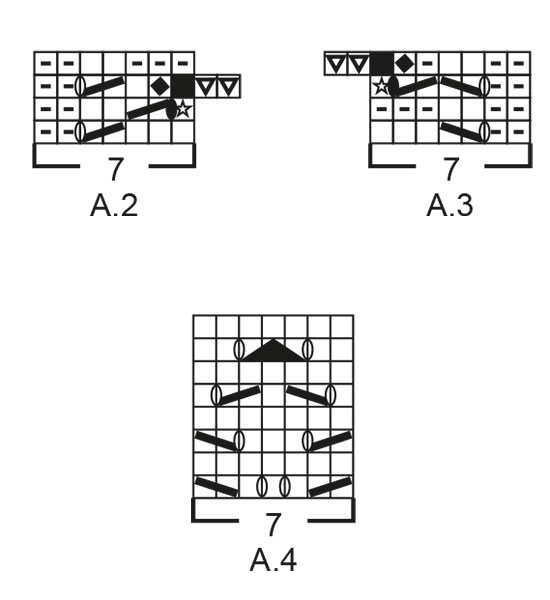
INFORMATION FOR PATTERN: GARTER STITCH (worked in the round): 1 ridge = 2 rounds. Knit 1 round and purl 1 round. PATTERN: Top: See diagrams A.1 to A.3. Choose diagram for your size (applies to A.1). Head band: See diagrams A.2 to A.4. Diagrams show all rows in pattern seen from the right side. DECREASE TIP-1 (applies to sides of body): Begin 3 stitches before marker thread and knit 2 together, knit 2 (marker thread is between these stitches), slip 1 stitch knitwise, knit 1, pass slipped stitch over stitch worked (= 2 stitches decreased). DECREASE TIP-2 (applies to armholes): Decrease inside A.2/A.3 in each side. All decreases are done from the right side. Decrease as follows before A.3: Begin 3 stitches before A.3: Knit 2 together and knit 1. Decrease as follows after A.2: Begin after A.2, knit 1, slip next stitch knitwise, knit next stitch, pass slipped stitch over stitch worked ---------------------------------------------------------- TOP: Worked in the round on circular needle up to armholes, then work front and back piece back and forth separately. BODY: Cast on 194-214-230-250-274-302 stitches on circular needle size 4 mm with Belle. Work 2 ridges in GARTER STITCH - see explanation above. Then knit 1 round. Work next round as follows: Insert 1 marker at the beginning of round (= in the side), * work 36-41-45-48-54-61 stitches in stocking stitch, A.1 (= 25-25-25-29-29-29 stitches), 36-41-45-48-54-61 stitches in stocking stitch *, insert 1 marker thread (= in the side) and work from *-* one more time. Continue pattern in the round like this. REMEMBER THE KNITTING TENSION! When piece measures 6-6-6-8-8-8 cm, decrease 1 stitch on each side of both marker threads - read DECREASE TIP-1 (= 4 stitches decreased). Decrease like this every 6 cm 6 times in total in each side = 170-190-206-226-250-278 stitches. When piece measures 38-39-40-41-42-43 cm, work in garter stitch over 20-22-26-28-30-32 stitches in each side (i.e. 10-11-13-14-15-16 stitches in garter stitch on each side of both marker threads), continue the remaining stitches in stocking stitch and A.1 as before. When 2 ridges have been worked in each side, work next round as follows: Cast off the first 3-4-6-7-8-9 stitches at the beginning of round for armhole, work the next 79-87-91-99-109-121 stitches as before, cast off the next 6-8-12-14-16-18 stitches for armhole, work the next 79-87-91-99-109-121 stitches as before and cast off the last 3-4-6-7-8-9 stitches for armhole. Cut the yarn. Work front and back piece back and forth separately. BACK PIECE: = 79-87-91-99-109-121 stitches. Continue as follows, i.e. work first row from wrong side: Work A.3 (= 7 stitches - NOTE: Begin on 2nd row in diagram and read diagram from left to right), work 20-24-26-28-33-39 stitches in stocking stitch, A.1 (= 25-25-25-29-29-29 stitches), 20-24-26-28-33-39 stitches in stocking stitch and finish with A.2 (= 7 stitches – NB: Begin on 2nd row in diagram and read diagram from left to right). Continue pattern like this. AT THE SAME TIME on first row from right side decrease 1 stitch in each side for armhole inside A.2 and A.3 - read DECREASE TIP-2 (= 2 stitches decreased). Decrease as follows in S, M, L and XL: Every 4th row (i.e. every other row from right side) 2-5-6-9 times in total in each side and in XXL and XXXL: Every other row (i.e. every row from right side) 13-18 times in total in each side = 75-77-79-81-83-85 stitches. When piece measures 53-55-57-59-61-63 cm (decreases for armholes are now done), cast off the middle 35-35-37-37-39-39 stitches for neck and finish each shoulder separately. Continue to cast off for neck at beginning of every row from neck as follows: Cast off 1 stitch 2 times = 18-19-19-20-20-21 stitches remain on shoulder. Continue until piece measures 56-58-60-62-64-66 cm and cast off by knitting from right side. Work the other shoulder the same way. FRONT PIECE: = 79-87-91-99-109-121 stitches. Continue as follows, i.e. work first row from wrong side: Work A.3 (= 7 stitches - NOTE: Begin on 2nd row in diagram and read diagram from left to right), work 20-24-26-28-33-39 stitches in stocking stitch, A.1 (= 25-25-25-29-29-29 stitches), 20-24-26-28-33-39 stitches in stocking stitch and finish with A.2 (= 7 stitches – NB: Begin on 2nd row in diagram and read diagram from left to right). Continue pattern like this. AT THE SAME TIME on first row from right side decrease 1 stitch in each side for armhole inside A.2 and A.3 - read DECREASE TIP-2 (= 2 stitches decreased). Decrease as follows in S, M, L and XL: Every 4th row 2-5-6-9 times in total in each side and in XXL and XXXL: Every other row 13-18 times in total in each side = 75-77-79-81-83-85 stitches. When piece measures 50-52-54-56-56-58 cm, slip the middle 25-25-23-23-23-23 stitches on a stitch holder for neck and finish each shoulder separately. Continue to cast off for neck at beginning of every row from neck as follows: Cast off 2 stitches 2-2-3-3-3-3 times and 1 stitch 3-3-3-3-4-4 times = 18-19-19-20-20-21 stitches remain on shoulder. Continue until piece measures 56-58-60-62-64-66 cm and cast off by knitting from right side. Work the other shoulder the same way. ASSEMBLY: Sew shoulder seams inside cast-off edge in each side. NECK EDGE: Pick up approx. 96 to 114 stitches around the neck (including stitches on stitch holder at front) on a short circular needle size 3 mm. Work 2 ridges in the round and cast off by knitting. ---------------------------------------------------------- HEAD BAND: Worked back and forth on needle to desired length and sew together mid back. Cast on 21 stitches on needle size 3 mm with Belle. Knit 1 row (= wrong side). Work next row as follows from right side: Work A.2 (= 7 stitches), A.4 (= 7 stitches) and A.3 (= 7 stitches). Continue pattern back and forth like this. REMEMBER THE KNITTING TENSION! When piece measures approx. 48 cm (or desired length – subtract approx. 6-8 cm from head circumference), knit 1 row from wrong side. Cast off knitting from right side. ASSEMBLY: Sew seam mid back inside cast-off edge. |
||||||||||||||||||||||||||||||||||
Diagram explanations |
||||||||||||||||||||||||||||||||||
|
||||||||||||||||||||||||||||||||||
 |
||||||||||||||||||||||||||||||||||
 |
||||||||||||||||||||||||||||||||||
 |
||||||||||||||||||||||||||||||||||
Have you finished this pattern?Tag your pictures with #dropspattern #cherelyntop or submit them to the #dropsfan gallery. Do you need help with this pattern?You'll find 30 tutorial videos, a Comments/Questions area and more by visiting the pattern on garnstudio.com. © 1982-2026 DROPS Design A/S. We reserve all rights. This document, including all its sub-sections, has copyrights. Read more about what you can do with our patterns at the bottom of each pattern on our site. |
||||||||||||||||||||||||||||||||||


With over 40 years in knitting and crochet design, DROPS Design offers one of the most extensive collections of free patterns on the internet - translated to 17 languages. As of today we count 324 catalogues and 12290 patterns translated into English (UK/cm). 12290
We work hard to bring you the best knitting and crochet have to offer, inspiration and advice as well as great quality yarns at incredible prices! Would you like to use our patterns for other than personal use? You can read what you are allowed to do in the Copyright text at the bottom of all our patterns. Happy crafting!
Post a comment to pattern DROPS 191-16
We would love to hear what you have to say about this pattern!
If you want to leave a question, please make sure you select the correct category in the form below, to speed up the answering process. Required fields are marked *.