
Popular categories
Looking for a yarn?


Comments / Questions (47)
![]() Françoise Roget wrote:
Françoise Roget wrote:
Bonjour, Concerne : Blueberry Fizz Vous présentez ce pull en jacquard rouge. Où puis-je trouver les références des coloris pour commander ? Merci de votre aide
29.09.2025 - 16:59DROPS Design answered:
Bonjour Mme Roget, dans la dernière photo, la version "rouge" du jacquard utilise les coloris suivants: DROPS Alpaca 607, 618, 2020, 7139, 2915, 2925, 6309, 2923. Bon tricot!
30.09.2025 - 17:15
![]() Françoise Roget wrote:
Françoise Roget wrote:
Merci de votre réponse. Toutefois, vous présentez sur Drops design plusieurs versions du pull "winter carnival". Je souhaiterais réaliser la version Lene Berge, Norway mais comment retrouver les coloris? Merci d avance.
11.09.2025 - 23:36DROPS Design answered:
Bonjour Fransoise, je vous conseille de la contacter personnellement sur Instagram et demander quels coloris elle a utilise dans son projet. Bon tricot!
12.09.2025 - 08:21
![]() Roget Françoise wrote:
Roget Françoise wrote:
Concerne: Blueberry Fizz (xl) J' ai terminé la rehausse que j' ai faite dans la 2eme couleur. Le résultat: 72 mailles de rehausse dans la 2eme couleur. Je suis revenue au milieu du dos comme indiqué. Le reste des mailles sont dans la 1ère couleur. Que dois je faire maintenant? Merci de votre aide, j espère que c est assez clair.
08.09.2025 - 22:46DROPS Design answered:
Bonjour Mme Roget, lorsque vous avez terminé la réhausse, vous devez de nouveau être au milieu dos (après les 72 mailles tricotées sur l'envers, tournez et tricotez jusqu'au milieu dos); et continuez / tricotez le diagramme à partir d'ici, pour éviter un décalage entre les couleurs, vous pouvez utiliser l'astuce des rayures ici, en vidéo. Bon tricot!
11.09.2025 - 11:40
![]() Christina Aspegren wrote:
Christina Aspegren wrote:
Hej! Kan inte hitta färgen blå/lila 6736. Har den ersatts eller bara utgått?? Med vänlig hälsning Christina Aspegren
04.03.2025 - 12:47DROPS Design answered:
Hej Christina. Den färgen har dessvärre utgått, men du kan använda en annan lila färg istället som tex 4400, 4434 eller 9023. Mvh DROPS Design
05.03.2025 - 14:53
![]() Bernike wrote:
Bernike wrote:
Ik heb 2 vragen over de verhoging: Moet die in boordsteek worden gebreid? Zet je de steken op voor de halsboprd en brei je dan eerst de verhoging?
12.01.2025 - 11:00DROPS Design answered:
Dag Bernike,
Je breit eerst de halsboord en daarna brei je de verhoging in tricotsteek.
13.01.2025 - 20:59
![]() Dedré Mellish wrote:
Dedré Mellish wrote:
Is the A1 diagram available in word or a larger pdf version? The dark olive and medium petrol icons are very difficult to distinguish between
21.11.2024 - 11:14DROPS Design answered:
Dear Mrs Mellish, we only have this version - you can try to enlarge it with a copy machine. Hope it can help. Happy knitting!
21.11.2024 - 15:49
![]() Marion Van Der Burg wrote:
Marion Van Der Burg wrote:
Hallo. Ik heb de onderzoom gebreid met ribbels, maar krulde erg om. Daarna geprobeerd met 1 pen ribbels en daarna tricotsteek, omgeslagen en vastgemaakt maar krult nu ook weer om. Heeft u tips?
31.10.2024 - 21:35DROPS Design answered:
Dag Marion,
Dit kun je verhelpen door het werk heel voorzichtig op te persen met een natte doek en een strijkijzer. Leg het werk op de strijkplank, maak een theedoek nat en leg deze op de rand. Dep heel voorzicht met de strijkbout om de natte doek. Let erop dat je dit heel, heel voorzicht doet, om de breistructuur niet te 'vernielen' dus kijk steeds tussendoor even hoe het gaat.
06.11.2024 - 14:02
![]() Susan wrote:
Susan wrote:
Someone is selling this and others of your patterns on Etsy as heritage patterns
01.03.2024 - 11:53
![]() Bernike Pasveer wrote:
Bernike Pasveer wrote:
De ikoontjes in het telpatroon komen niet helemaal overeen met de uitleg ervan, in het bijzonder vind ik het tekentje in o.a. de eerste twee naalden van A1 (maten s.m.l) niet terug in de uitleg. Het lijkt op het sterretje (dat geel-groen moet zijn), maar het is niet hetzelfde. Groet, Bernike
11.12.2023 - 16:06DROPS Design answered:
Dag Bernike,
Het is geel/groen, maar het lijkt inderdaad een beetje anders doordat de symbooltjes in het telpatroon tegen elkaar aan zitten.
13.12.2023 - 21:19
![]() Jackie Harmer wrote:
Jackie Harmer wrote:
I’m disappointed to see that most of the colours stated in the pattern are no longer available and am considering using Baby Merino wool. I have a problem with some wools causing itching to my skin. I know that Merino is usually ok. Is Alpaca as kind to the skin as Merino or might it be slightly more itchy?
01.10.2023 - 12:54DROPS Design answered:
Dear Mrs Harmer, please feel free to contact your DROPS store to check with them all colours - they will be able also to provide you any assistance for choosing the best matching yarn. Happy knitting!
02.10.2023 - 10:29
|
||||||||||||||||||||||||||||||||||
Blueberry Fizz#blueberryfizzsweater |
||||||||||||||||||||||||||||||||||
 |
 |
|||||||||||||||||||||||||||||||||
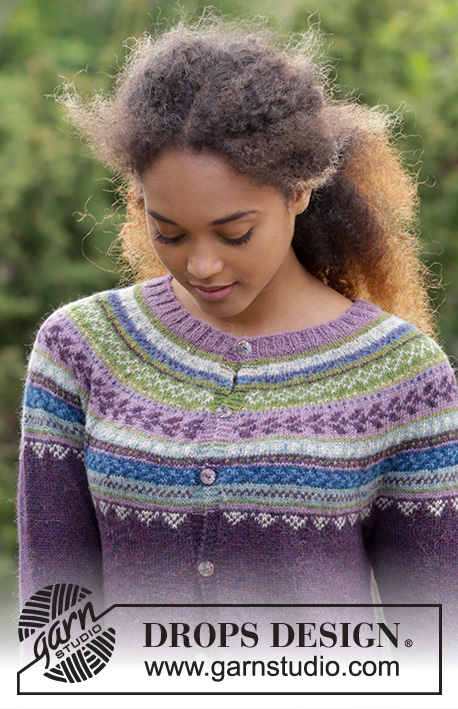
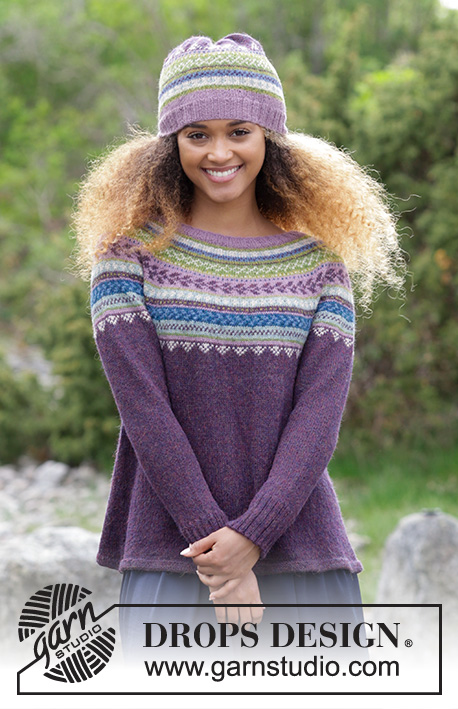
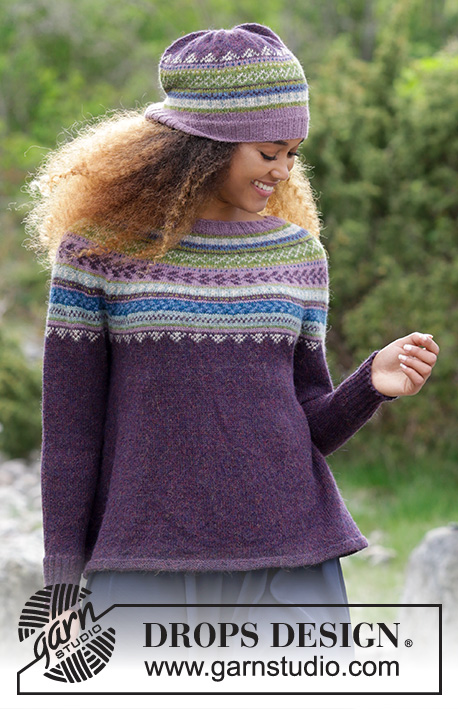
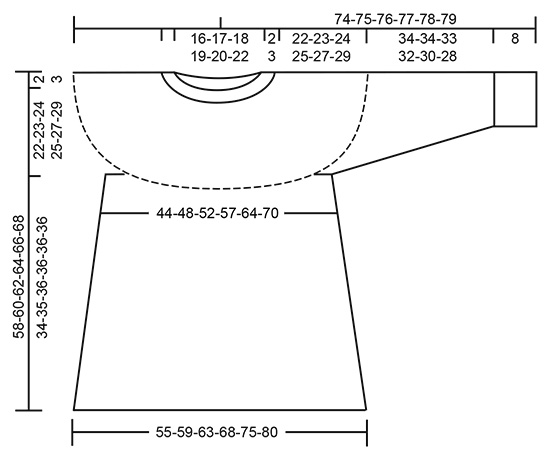
The set consists of knitted jumper with round yoke, multi-coloured Norwegian pattern and A-shape, worked top down. Sizes S - XXXL. Hat with multi-coloured Norwegian pattern. The set is worked in DROPS Alpaca.
DROPS 180-7 |
||||||||||||||||||||||||||||||||||
|
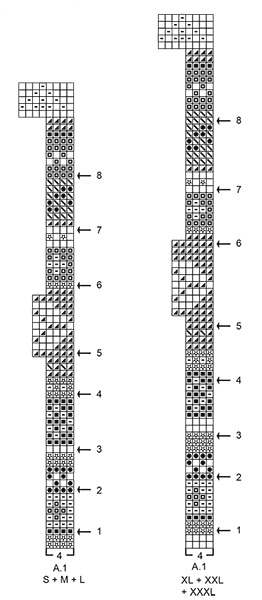
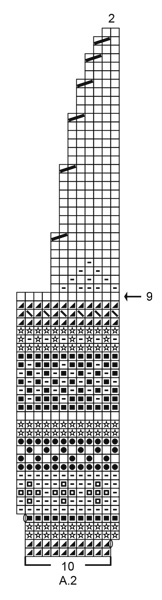
INFORMATION FOR THE PATTERN: RIDGE/GARTER STITCH (worked in the round): 1 ridge = 2 rounds. Knit 1 round and purl 1 round. DECREASE/INCREASE TIP: To work out how to decrease/increase evenly, count the total number of stitches on needle (e.g. 120 stitches) and divide by the number of decreases/increases to be made (e.g. 16) = 7.5. In this example, decrease by alternately knitting together every 6th and 7th stitch and every 7th and 8th stitch. If you are increasing, make 1 yarn over alternately after approx. every 7th and 8th stitch, on the next round work the yarn overs twisted into the pattern so that there are no holes. ELEVATION (for back of neck in jumper): Insert 1 marker at the beginning of the round = mid back. Start from the right side with old pink and knit 8-8-8-9-9-10 stitches past the marker, turn, tighten the strand and purl 16-16-16-18-18-20 stitches. Turn, tighten the strand and knit 24-24-24-27-27-30 stitches, turn, tighten the strand and purl 32-32-32-36-36-40 stitches. Continue back and forth in this way by working 8-8-8-9-9-10 more stitches each time you turn (remember to tighten the strand when you turn) until you have worked back and forth over a total of 64-64-64-72-72-80 stitches and the last row is from the wrong side. Turn, tighten the strand and knit to mid back. PATTERN: Jumper: See diagram A.1. Choose diagram for your size. Hat: See diagram A.2. The whole pattern is worked in stocking stitch. KNITTING TIP: To avoid the knitting tension becoming tighter when you work pattern, it is important that the strands at the back of the piece are not tight. You can increase a needle size when working pattern if this is a problem. INCREASE TIP (for sides of body): Start 1 stitch before the marker thread, make 1 yarn over, knit 2 (the marker thread sits in the middle of these 2 stitches), make 1 yarn over (= 2 stitches increased). On the next round knit the yarn overs twisted to prevent holes. DECREASE TIP (for mid under sleeve): Start 3 stitches before marker thread, knit 2 together, knit 2 (the marker thread sits in the middle of these 2 stitches), slip 1 stitch as if to knit, knit 1, pass the slipped stitch over the knitted stitch (= 2 stitches decreased). ---------------------------------------------------------- JUMPER: The piece is worked in the round with circular needle, top down. The sleeves are worked in the round with short circular needle, top down, change to double pointed needles when necessary. NECKLINE: Cast on 120-124-128-136-140-148 stitches with circular needle size 2.5 mm and old pink. Knit 1 round. Then work rib (= knit 2 / purl 2). When the rib measures 2-2-2-3-3-3 cm knit 1 round where you decrease 16 stitches in all sizes evenly on the round – read DECREASE/INCREASE TIP = 104-108-112-120-124-132 stitches. Continue by working the yoke as described below. YOKE: Read KNITTING TIP! Change to circular needle size 3 mm. Knit 1 round. For a better fit, you can now work an ELEVATION in the back of the neck – see description above. When the elevation has been completed, work A.1 in the round (= 26-27-28-30-31-33 repeats of 4 stitches). Continue the pattern in this way and at the same time increase on each round marked with an arrow in A.1 as described below – remember DECREASE/INCREASE TIP and REMEMBER THE KNITTING TENSION! Arrow-1: Increase 36-40-44-48-52-56 stitches evenly on round = 140-148-156-168-176-188 stitches. Arrow-2: Increase 36-38-40-44-48-50 stitches evenly on round = 176-186-196-212-224-238 stitches. Arrow-3: Increase 28-34-36-40-48-50 stitches evenly on round = 204-220-232-252-272-288 stitches. Arrow-4: Increase 28-34-40-40-44-48 stitches evenly on round = 232-254-272-292-316-336 stitches. Arrow-5: Increase 26-34-34-38-44-48 stitches evenly on round = 258-288-306-330-360-384 stitches. Arrow-6: Increase 26-32-34-38-40-40 stitches evenly on round = 284-320-340-368-400-424 stitches. Arrow-7: Increase 24-28-32-36-40-40 stitches evenly on round = 308-348-372-404-440-464 stitches. Arrow-8: Increase 20-20-28-28-32-32 stitches evenly on round = 328-368-400-432-472-496 stitches. When A.1 has been completed in height, the piece measures approx. 24-24-24-28-28-28 cm from the cast-on edge mid front. Continue with stocking stitch and navy/purple until the piece measures 24-25-26-28-30-32 cm from the cast-on edge mid front (if the knitting tension is right in height, this measurement is reached in S and XL when A.1 has been completed). The next round is worked as follows: Knit 49-54-58-64-71-77 stitches (= ½ back piece), place the next 67-77-85-89-95-95 stitches on a thread for sleeve, cast on 8-8-10-10-12-14 new stitches on the needle (= in side under the sleeve), knit the next 97-107-115-127-141-153 stitches (= front piece), place the next 67-77-85-89-95-95 stitches on a thread for sleeve, cast on 8-8-10-10-12-14 new stitches on the needle (= in side under the sleeve) and knit the remaining 48-53-57-63-70-76 stitches (= ½ back piece). Cut the strand. Body and sleeves are now finished separately. THE PIECE IS NOW MEASURED FROM HERE! BODY: = 210-230-250-274-306-334 stitches. Insert 1 marker thread in the middle of the 8-8-10-10-12-14 stitches cast on under the sleeve in each side. Start the round by one of the marker threads and work stocking stitch in the round with navy/purple. When the piece measures 1-1-2-2-2-2 cm from the separation, increase 2 stitches in each side – read INCREASE TIP (= 4 stitches increased). Increase in this way every 8th round (approx. every 2½ cm) to finished length (if the knitting tension is right in height, increase 13 times in each side). When the piece measures 32-33-34-34-34-34 cm from the separation, there are approx. 262-282-302-326-358-386 stitches on the needle. Work 4 ridges in the round over all stitches. Then cast off with knit, but to avoid the cast-off edge being tight you can make 1 yarn over after approx. every 8th stitch at the same time as you cast off (the yarn overs are cast off as normal stitches). The jumper measures approx. 58-60-62-64-66-68 cm from the shoulder down. SLEEVE: Place the 67-77-85-89-95-95 stitches from the thread in one side of the piece on short circular needle size 3 mm, in addition knit up 1 stitch in each of the 8-8-10-10-12-14 stitches cast on under the sleeve with navy/purple = 75-85-95-99-107-109 stitches. Insert 1 marker thread in the middle of the 8-8-10-10-12-14 stitches under the sleeve. Start the round here and work stocking stitch in the round. When the sleeve measures 2-2-2-2-3-3 cm from the separation, decrease 2 stitches mid under the sleeve – read DECREASE TIP. Decrease in this way every 2½-2-1½-1½-1-1 cm a total of 12-16-19-20-23-23 times = 51-53-57-59-61-63 stitches. Continue working until the sleeve measures 34-34-33-32-30-28 cm from the separation (shorter measurements in larger sizes because of longer yoke). Knit 1 round where you increase 17-19-19-21-19-21 stitches evenly on round = 68-72-76-80-80-84 stitches. Change to double pointed needles size 2.5 mm and work rib in the round (= knit 2 /purl 2). When the rib measures 8 cm (or desired length) cast off with knit over knit and purl over purl, but to avoid the cast-off edge being tight, you can make 1 yarn over after every 4th stitch AT THE SAME TIME as you cast off (yarn overs cast off as normal stitches). The sleeve measures approx. 42-42-41-40-38-36 cm from the separation. Work the other sleeve in the same way. ---------------------------------------------------------- HAT: The piece is worked in the round with short circular needle, bottom up. Change to double pointed needles when necessary. Cast on 128-136 stitches with circular needle size 2.5 and old pink. Knit 1 round. Then work rib (= knit 2 /purl 2). When the rib measures 4 cm change to circular needle size 3 mm. Work 2-4 rounds stocking stitch – AT THE SAME TIME on the first round, increase 2-4 stitches evenly on round = 130-140 stitches. Continue by working A.2 (= 13-14 repeats of 10 stitches). REMEMBER THE KNITTING TENSION! When you have worked 5 rounds in A.2 there are 156-168 stitches on the needle. On the round marked with arrow-9 in A.2 decrease 12-16 stitches evenly on round – read DECREASE/INCREASE TIP = 144-152 stitches. Continue A.2 (= 18-19 repeats of 8 stitches). When A.2 has been completed there are 36-38 stitches on the needle. Knit 1 round with navy/purple where all the stitches are knitted together 2 and 2 = 18-19 stitches. Cut the strand, pull it through the remaining stitches, tighten and fasten well. The hat measures approx. 24-25 cm top down. |
||||||||||||||||||||||||||||||||||
Diagram explanations |
||||||||||||||||||||||||||||||||||
|
||||||||||||||||||||||||||||||||||
 |
||||||||||||||||||||||||||||||||||
 |
||||||||||||||||||||||||||||||||||
 |
||||||||||||||||||||||||||||||||||
Have you finished this pattern?Tag your pictures with #dropspattern #blueberryfizzsweater or submit them to the #dropsfan gallery. Do you need help with this pattern?You'll find 32 tutorial videos, a Comments/Questions area and more by visiting the pattern on garnstudio.com. © 1982-2026 DROPS Design A/S. We reserve all rights. This document, including all its sub-sections, has copyrights. Read more about what you can do with our patterns at the bottom of each pattern on our site. |
||||||||||||||||||||||||||||||||||


With over 40 years in knitting and crochet design, DROPS Design offers one of the most extensive collections of free patterns on the internet - translated to 17 languages. As of today we count 324 catalogues and 12290 patterns translated into English (UK/cm). 12290
We work hard to bring you the best knitting and crochet have to offer, inspiration and advice as well as great quality yarns at incredible prices! Would you like to use our patterns for other than personal use? You can read what you are allowed to do in the Copyright text at the bottom of all our patterns. Happy crafting!
Post a comment to pattern DROPS 180-7
We would love to hear what you have to say about this pattern!
If you want to leave a question, please make sure you select the correct category in the form below, to speed up the answering process. Required fields are marked *.