
Popular categories
Looking for a yarn?


Comments / Questions (33)
![]() Lelletta wrote:
Lelletta wrote:
Buonasera, ho lavorato spesso il baby alpaca silk, mi piaceva tantissimo per la sua morbidezza al tatto, la leggerezza e il tepore che faceva. Vorrei sapere se tornerete ad averlo, perchè tra i filati alternativi che citate e che conosco, purtroppo, a mio avviso, non ce n'è di così belli e morbidi! Grazie e buon lavoro!
15.10.2025 - 22:30DROPS Design answered:
Buonasera Lelletta, al momento non è previsto il ritorno di questo filato. Buon lavoro!
17.10.2025 - 23:40
![]() Brigitte Lambert wrote:
Brigitte Lambert wrote:
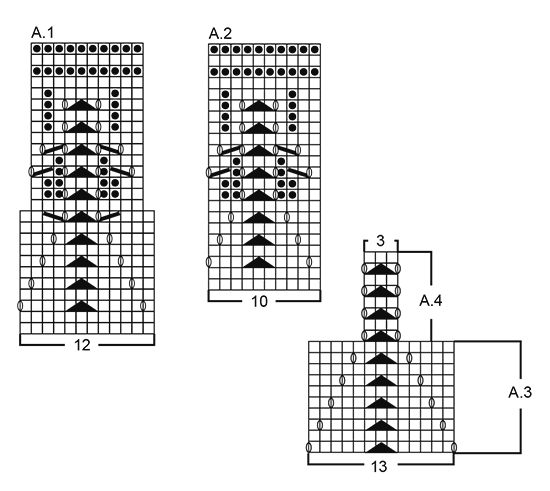
Bonsoir, je suis bloquée au niveau du 14ème rang. En faisant comme indiqué, je n'arrive pas à aligner correctement le motif. Je crois que je ne comprends comment faire car le diagramme passe de 12 mailles à 10 mailles. Merci de votre aide
13.01.2023 - 20:55DROPS Design answered:
Bonjour Mme Lambert, vous en êtes au diagramme A.1, rang 11, correct? Tricotez ce rang ainsi: 3 m end, 2 m ens à l'end, 1 jeté, glissez 1 m à l'end, tricotez 2 m ens à l'end, et passez la m glissée par-dessus la m tricotée, 1 jeté, glissez 1 m à l'end, tricotez 1 m end et passez la m glissée par-dessus la maille tricotée, 2 m end = vous avez diminué 4 m mais vous avez seulement 2 jetés = il reste 10 mailles. Bon tricot!
16.01.2023 - 08:30
![]() Maija Magone wrote:
Maija Magone wrote:
I am now working on the front piece and so far I have hated every minute spent on this jumper. I don't know for what reason rows in the schemes are not numbered to make the work easier and when looked at from my phone, it is impossible to enlarge the picture so I can see what i am doing. Very disappointed that such a big company is not capable of making their patterns user friendly.
01.01.2023 - 20:48
![]() Melanie wrote:
Melanie wrote:
Hallo werden tatsächlich nur Maschen von vorne für die halsblende aufgenommen? Wie Stoll man dann in runden Stricken? Ich werd leider nicht bz schlau bei der halsblende
01.07.2020 - 13:01DROPS Design answered:
Liebe Melanie, die Maschen sollen von der Vorderseite aufgefassen werden, bzw 1 Masche in jede abgekettenen Maschen beim Rückenteil + 1 Masche in den Reihen/Schulter nach Halsausschnitt und die stillgelegten Maschen (Vorderteil) damit stricken. Viel Spaß beim stricken!
01.07.2020 - 15:36
![]() Melanie wrote:
Melanie wrote:
Hallo in der Anleitung steht Halsblende: von der Vorderseite Maschen aufnehmen und dann in runden Stricken Aber wenn ich nur von vorne aufnehmen kann ich doch nicht in runden Stricken ?! Oder nimmt man doch vorne und hinten Maschen auf ?
01.07.2020 - 11:24DROPS Design answered:
Liebe Melanie, die Maschen für die Halsblende werden in rund um den Halsausschnitt (=Vorder- + Rückenteil) aufgefassen und dann in runden gestrickt. Viel Spaß beim stricken!
01.07.2020 - 15:33
![]() Beata wrote:
Beata wrote:
Nie rozumiem opisu zamykania oczek pod rękaw Tył: „ROZMIARY S + M: zamknąć 1 o. z każdej strony co 4 rz. (tj. co 2 rz. na prawej stronie robótki) w sumie 2-6 razy.” Nie rozumiem ile mam tych oczek w końcu zamknąć z każdej strony.
19.03.2019 - 21:37DROPS Design answered:
Witaj Beato! W rozmiarze S zamykasz 2 razy 1 o. z każdej strony tyłu co 4 rzędy: czyli zamykasz 1 o. na początku i na końcu rzędu na prawej stronie robótki (zamknięte 2 o.), przerabiasz 3 rzędy bez zamykania oczek i na prawej stronie robótki ponownie zamykasz 1 o. na początku i na końcu rzędu (łącznie zamknięte 4 o.). W rozmiarze M powtarzasz to samo tylko 6 razy i łącznie zostanie zamkniętych 12 o. Powodzenia!
19.03.2019 - 22:23
![]() Anja Baumann wrote:
Anja Baumann wrote:
Hej. Syntes ikke jeg kan se brystmål på denne opskrift. Ang. Køb af nøgler.
04.03.2019 - 17:54DROPS Design answered:
Hei Anja. Nederst på siden finner du en målskisse med alle plaggets mål i alle størrelser. God fornøyelse
11.03.2019 - 09:07
![]() Valerie wrote:
Valerie wrote:
What kind of ”BabyAlpaca Silk” please? is is thin or thick please advice thank you valerie
11.12.2018 - 00:21DROPS Design answered:
Dear Valerie, this pattern is using our DROPS BabyAlpaca Silk - click here to read more about this yarn. Happy knitting!
11.12.2018 - 08:51
![]() Karina wrote:
Karina wrote:
Vielen Dank für diese tolle Anleitung. Der Pullover ist superschön geworden.
13.11.2018 - 11:11
![]() Turid Nesje Andresen wrote:
Turid Nesje Andresen wrote:
Kan jeg strikke denne genseren med bare riller, ikke hullmønster?
09.07.2018 - 09:48DROPS Design answered:
Hej Turid, Ja men da må du sørge for at få 23 m på 10 cm i bredden og så skal du følge målene i højden som der i opskriften. Med riller vil der gå flere pinde i højden på 10 cm end hvis du strikker hulmønster, det vil siger at du muligvis også skal bruge 2 nøgler mere af DROPS BabyAlpaca Silk. God fornøjelse!
10.07.2018 - 09:35
|
|||||||||||||||||||
Erendis#erendissweater |
|||||||||||||||||||
|
|
|||||||||||||||||||
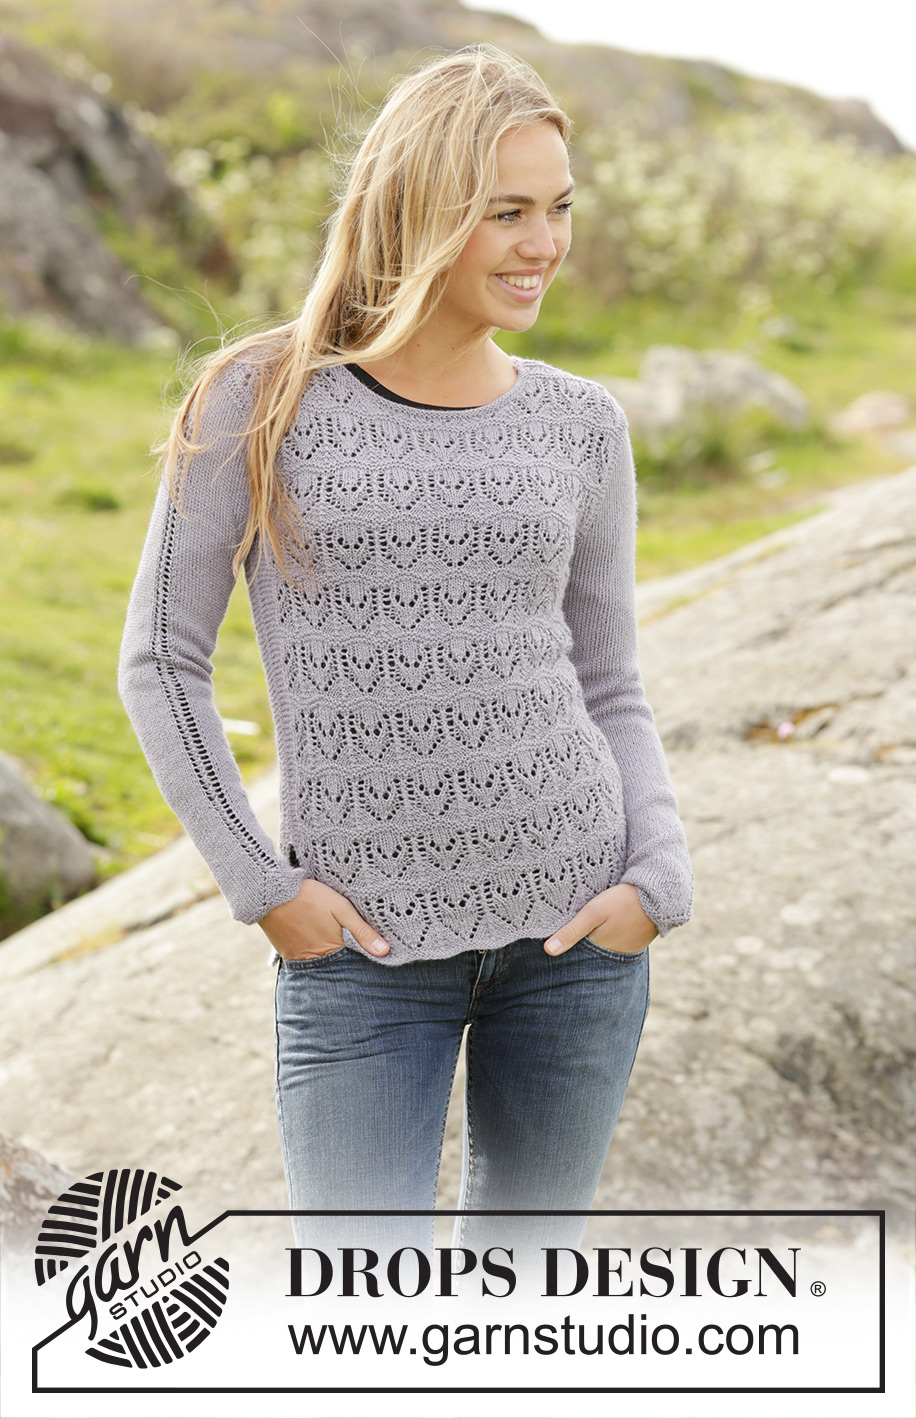
Knitted DROPS jumper in garter st with lace pattern in ”BabyAlpaca Silk”. Size: S - XXXL.
DROPS 172-13 |
|||||||||||||||||||
|
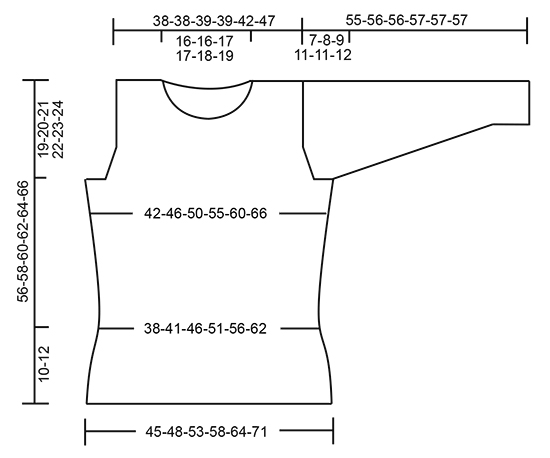
GARTER ST (back and forth): K all rows. 1 ridge = 2 rows K. GARTER ST (worked in the round): 1 ridge = 2 rounds. * K 1 round and P 1 round *, repeat from *-*. PATTERN: See diagrams A.1 to A.4. The diagrams show all rows in pattern seen from RS. INCREASE TIP-1 (applies to sides of body): Inc 1 st inside 3 edge sts in garter st. Inc 1 st by making 1 YO, on next row K YO twisted to avoid holes (work inc sts in garter st). INCREASE TIP-2 (applies to mid under sleeve): Inc 2 sts mid under sleeve as follows: Beg 2 sts before marker, make 1 YO, K 4 (marker is in the middle of these 4 sts), make 1 YO (= 2 sts inc). On next round K YOs twisted to avoid holes. DECREASE TIP: Dec 1 st inside 2 edge sts in garter st. All dec are done from RS! Dec as follows before 2 edge st: Beg 2 sts before the 2 edge sts and K 2 tog. Dec as follows after 2 edge sts: Slip 1 st as if to K, K 1, psso. ---------------------------------------------------------- JUMPER: Work front and back piece back and forth on circular needle in sections. Work sleeves in the round on double pointed needles/short circular needle. BACK PIECE: Cast on 103-111-121-133-147-163 sts on circular needle size 3 mm with BabyAlpaca Silk. Work 2 ridges in GARTER ST - see explanation above. Switch to circular needle size 3.5 mm and work next row from RS as follows: Work 3-7-12-18-19-21 sts in garter st, work pattern according to diagram A.1 over the next 96-96-96-96-108-120 sts (= 8-8-8-8-9-10 repetitions of 12 sts), work first st in A.1 and finish with 3-7-12-18-19-21 sts in garter st. Continue pattern like this. When A.1 has been worked one time vertically, there are 87-95-105-117-129-143 sts on needle. Then work pattern according to diagram A.2 the same way with 3-7-12-18-19-21 sts in garter st in each side (repeat A.2 upwards). REMEMBER THE KNITTING TENSION When piece measures 12 cm, inc 1 st in each side - READ INCREASE TIP-1 (= 2 sts inc). Inc like this every 5-5-5½-6-8-8 cm 5-5-5-5-4-4 times in total = 97-105-115-127-137-151 sts. When piece measures 37-38-39-40-41-42 cm, cast off the first 3-3-4-6-7-9 sts at beg of the next 2 rows for armholes. Now dec for armhole as follows - READ DECREASE TIP: Size S + M: Dec 1 st each side every 4th row (i.e. every other row from RS) a total of 2-6 times. Size L + XL + XXL + XXXL: Dec 1 st each side every other row (i.e. every row from RS) a total of 9-13-13-13 times. When dec for armhole are done, 87-87-89-89-97-107 sts remain on needle. Continue A.2 as before with 3-3-4-4-3-3 sts in garter st in each side. When piece measures 54-56-58-60-62-64 cm, cast off the middle 33-33-35-35-37-39 sts for neck and finish each shoulder separately. Continue to cast off for neck at beg of every row from neck as follows: Cast off 1 st 2 times = 25-25-25-25-28-32 sts remain on shoulder - NOTE: Work sts that do not fit the pattern towards the neck in stocking st when dec. After neck dec continue pattern as before with 1 edge st in garter st towards neck and 3-3-4-4-3-3 sts in garter st towards armhole until 2 rows remain before piece measures approx. 56-58-60-62-64-66 cm. K 1 row from RS and K 1 row from WS before loosely casting off with K from RS. Repeat on the other shoulder. FRONT PIECE: Cast on and work as on back piece until piece measures 50-52-53-55-56-58 cm. Now slip the middle 21-21-23-23-23-25 sts on 1 stitch holder for neck (work them before slipping them on stitch holder to avoid cutting the yarn). Finish each shoulder separately. AT THE SAME TIME continue to cast off for neck at beg of every row from neck as follows: Cast off 2 sts 3 times and 1 st 2-2-2-2-3-3 times = 25-25-25-25-28-32 sts remain on shoulder - NOTE: Work sts that do not fit the pattern towards the neck in stocking st when dec. After neck dec continue pattern as before with 1 edge st in garter st towards neck and 3-3-4-4-3-3 sts in garter st towards armhole until 2 rows remain before piece measures 56-58-60-62-64-66 cm - adjust according to back piece. K 1 row from RS and K 1 row from WS before loosely casting off with K from RS. SLEEVE: Work in the round on double pointed needles, switch to a short circular needle when there are enough sts. Cast on 43-45-47-51-53-55 sts on double pointed needles size 3 mm with BabyAlpaca Silk. Work 2 ridges in GARTER ST - see explanation above. Switch to double pointed needles size 3.5 mm, work next round as follows: 15-16-17-19-20-21 sts in stocking st, A.3 (= 13 sts), 15-16-17-19-20-21 sts in stocking st. Continue pattern like this. When A.3 has been worked 1 time vertically, work A.4 over the middle 3 sts until finished measurements (continue the other sts in stocking st). AT THE SAME TIME when sleeve measures 10-10-10-9-9-9 cm, insert 1 marker at beg of round (= mid under sleeve). On next round inc 2 sts mid under sleeve 16-19-21-22-24-25 times in total – READ INCREASE TIP-2 as follows: In size S: On every 7th round, in size M: On every 6th round, in size L + XL: On every 5th round, in size XXL: Alternately on every 4th and 5th round and size XXXL: On every 4th round = 75-83-89-95-101-105 sts. When piece measures 48-48-47-46-46-45 cm, cast off the middle 6 sts under sleeve and work sleeve cap back and forth until finished measurements on circular needle. Continue in stocking st and with A.4 over the middle 3 sts and cast off for sleeve cap in each side as follows: Cast off 3 sts 0-1-1-1-1-1 time, 2 sts 3-3-3-4-4-5 times and 1 st 3-3-3-5-6-6 times in each side, then cast off 2 sts in each side until piece measures 54-55-55-56-56-56 cm, then cast off 3 sts 1 time in each side. Cast off the remaining sts, sleeve measures approx. 55-56-56-57-57-57 cm. Knit another sleeve the same way. ASSEMBLY: Sew shoulder seams inside cast-off edge with grafting/kitchener stitches so that there are 2 ridges on top of shoulder. Sew side seams – sew edge to edge in outer loops of edge sts from armhole and down but stop when approx. 10-12 cm remain in each side (= vent). Place sleeves in under edge in garter st in each side and fasten neatly with small stitches (edge in garter st in armhole should be on the outside of sleeve). NECK EDGE: Pick up from RS approx. 98 to 120 sts (incl sts on stitch holder at the front) on circular needle size 3 mm. P 1 round, K 1 round and P 1 round. Loosely cast off. |
|||||||||||||||||||
Diagram explanations |
|||||||||||||||||||
|
|||||||||||||||||||
 |
|||||||||||||||||||
 |
|||||||||||||||||||
Have you finished this pattern?Tag your pictures with #dropspattern #erendissweater or submit them to the #dropsfan gallery. Do you need help with this pattern?You'll find 31 tutorial videos, a Comments/Questions area and more by visiting the pattern on garnstudio.com. © 1982-2026 DROPS Design A/S. We reserve all rights. This document, including all its sub-sections, has copyrights. Read more about what you can do with our patterns at the bottom of each pattern on our site. |
|||||||||||||||||||


With over 40 years in knitting and crochet design, DROPS Design offers one of the most extensive collections of free patterns on the internet - translated to 17 languages. As of today we count 324 catalogues and 12290 patterns translated into English (UK/cm). 12290
We work hard to bring you the best knitting and crochet have to offer, inspiration and advice as well as great quality yarns at incredible prices! Would you like to use our patterns for other than personal use? You can read what you are allowed to do in the Copyright text at the bottom of all our patterns. Happy crafting!
Post a comment to pattern DROPS 172-13
We would love to hear what you have to say about this pattern!
If you want to leave a question, please make sure you select the correct category in the form below, to speed up the answering process. Required fields are marked *.