
Popular categories
Looking for a yarn?


Comments / Questions (47)
![]() REBEYROL wrote:
REBEYROL wrote:
Pouvez vous m'expliquez le premier rang pour réaliser le gousset .... ce que je ne comprends pas, c'est de crocheter 1 ms dans chaque bride jusqu'à ce qu'il reste 52 B ???? ..... J' ai 79 B sur mon rang côté 4 et autant de brides sur le côté 2.
16.07.2017 - 16:24
![]() REBEYROL wrote:
REBEYROL wrote:
Mon ouvrage mesure 50 cm du côté 2 au côté 4 MAIS sur l'envers. J'ai donc coupé mon fil pour crocheter le gousset. Je ne comprends pas le début .... il doit me rester 52 brides sur le côté 2 et 52 brides sur le côté 4 ?
16.07.2017 - 11:23DROPS Design answered:
Bonjour Mme Rebeyrol, pour le côté 2, commencez sur l'endroit, dans le coin en haut (celui entre le côté 1 et le 2): 1 ms dans chaque m jusqu'à ce qu'il reste 52 B, puis crochetez les 52 dernières m ainsi: 1 dB dans chacune des 8 B suivantes, 1 B dans chacune des 8 B suivantes, 1 DB dans chacune des 12 B suivantes, 1 triple B dans chacune des 12 B suivantes, 1 quadruple B dans chacune des 12 dernières B, coupez le fil. Pour le côté 4, commencez sur l'envers en bas et crochetez en sens inverse: quadruple B, triple B, double B, B, demi-B sur les 52 premières mailles et en ms sur les mailles restantes. Bon crochet!
17.07.2017 - 09:13
![]() Heidi Höche wrote:
Heidi Höche wrote:
Hallo, Ich habe im runden Teil 196 Maschen. Soll aber danach in der Reihe nur 148 Maschen haben.Was mache ich falsch? Bitte um Hilfe.
28.05.2017 - 19:39DROPS Design answered:
Liebe Frau Höche, bei der letzte Runde in A.1 sollen Sie 49 Stb in jedem A.1 haben, dh 49 x 3 = 147 Stb. Beachten Sie daß bei dieser letzen Runde 3 oder 4 Stb um jedem Lm-Bogen gehäkelt werden. Viel Spaß beim häkeln!
29.05.2017 - 10:19
![]() Starr Backen wrote:
Starr Backen wrote:
I need to make this in a 3X size. Could you tell me an easy way to do this?
16.02.2017 - 18:11DROPS Design answered:
Dear Mrs Backen, we are unfortunately not able to adjust each pattern to every individual request. You are welcome to contact your DROPS store for any personnal assistance. Happy crocheting!
17.02.2017 - 09:28
![]() Roxane wrote:
Roxane wrote:
Bonsoir j'en suis à crocheter le dos les côtés 2,3,4 il faut faire 10 cm je mesure à partir de a2 pour ces 10cm ? Merci d'avance
07.02.2017 - 20:31DROPS Design answered:
Bonjour Roxane, c'est exact, on crochète 10 cm de A.2, ajustez si besoin sur votre tour de poitrine. Bon crochet!
08.02.2017 - 08:51
![]() Lorella wrote:
Lorella wrote:
Grazieeeeee
21.08.2016 - 15:20
![]() Lorella wrote:
Lorella wrote:
Salve ho finito il modello ma vorrei farci delle manichine corte. Secondo voi come potrei farle? grazie mille
20.08.2016 - 22:48DROPS Design answered:
Buongiorno Lorella. Se non ha ancora lavorato il bordo intorno allo scalfo, potrebbe riprendere le m intorno allo scalfo e lavorare lo stesso motivo della parte superiore del top per la lunghezza desiderata. Buon lavoro!
21.08.2016 - 09:30
![]() Ingvill wrote:
Ingvill wrote:
Jeg hekler i srt XL/XXL, men jeg skjønner ikke hvordan jeg skal lage bakstykket. Syns det står litt dårlig forklart. Hvor skal det være 19 cm fra? Og hvor mye av forstykket skal hekles som bakstykke? Skal jeg hekle hele greia inkludert de kilegreiene? Og så er det toppen av ryggen som skal være 19 cm? Jeg er ganske god på å hekle, men dette syns jeg var vanskelig...
14.08.2016 - 00:53DROPS Design answered:
Hej Ingvild. Det er efter min mening til sidst naar du hekler frem og tilbage langs side 1 af firkanten. Paa forstk hekler du til 11 cm (for halsudskaering) og paa rygstk hekler du saa til 19 cm. Resten af rygstk hekler du praecis ligesom forstk.
15.09.2016 - 13:08
![]() Laura wrote:
Laura wrote:
Grazie 1000. Mi scusi sono arrivata a 42 ed ho finito con il giro m.a. e 2 cat. Ora x il bordo inizio con m.b. e poi x calcolare le 52 devo considerare anche le catenelle della angolo i miei faremo alle 3 m.a? Grazie infinite laura
02.07.2016 - 13:59DROPS Design answered:
Buongiorno Laura. Dovrebbe contare fino alle prime 3 m.a lavorate nell'angolo. Quindi non deve contare le 3 cat e il secondo gruppo di 3 m.a lavorate nello spazio di cat dell'angolo. Buon lavoro!
02.07.2016 - 16:03
![]() Laura wrote:
Laura wrote:
Buon giorno. Allora inizio del diagramma a2 inizio subito con 1 m.a. e due cat. O faccio tre m.a. come fosse mezzo angolo? Poi invece gli altri due angoli li faccio nello spazio di cat 3 m.a. 3 cat e poi m a. Grazie laura
02.07.2016 - 11:39DROPS Design answered:
Buongiorno Laura. Sostituisce la prima m.a con 3 cat e poi segue il diag. A2. Deve finire la riga con 1 m.a nell’ultima m.a prima dell’ultimo angolo, e in ognuno dei due angoli lavora 3 m.a + 3 cat + 3 m.a. Buon lavoro!
02.07.2016 - 12:20
|
|||||||||||||||||||||||||||||||||||||
Elvira#elviratop |
|||||||||||||||||||||||||||||||||||||
|
|
|||||||||||||||||||||||||||||||||||||
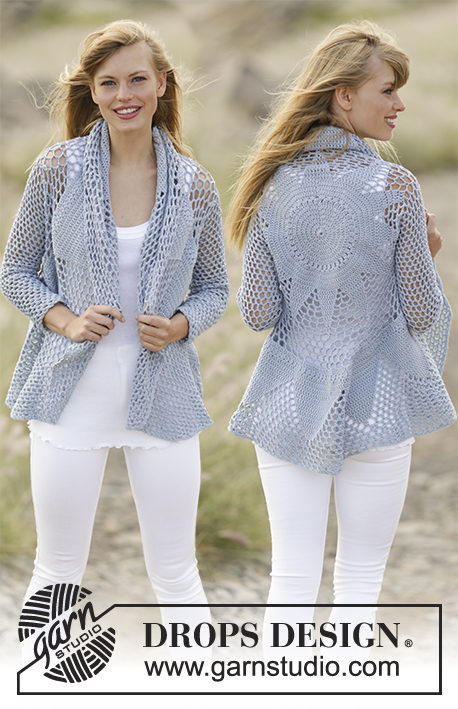
Crochet DROPS top with crochet squares in “Belle”. Size: S - XXL.
DROPS 168-11 |
|||||||||||||||||||||||||||||||||||||
|
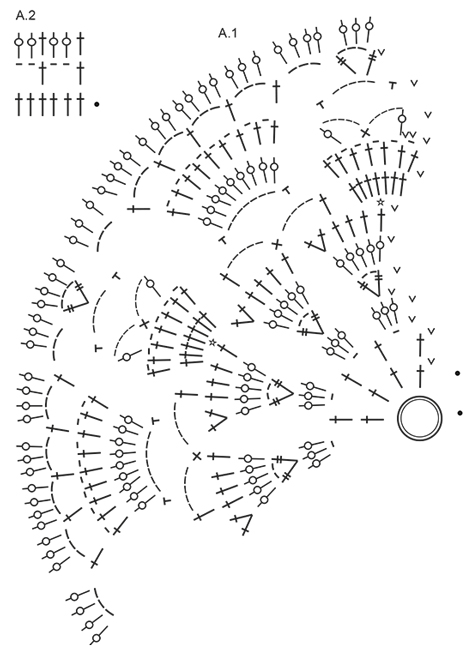
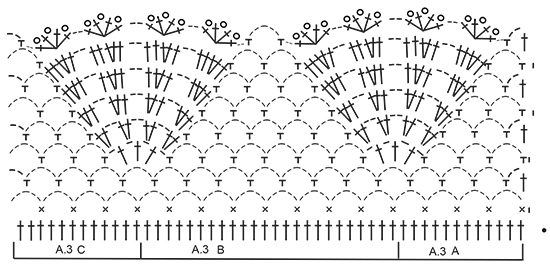
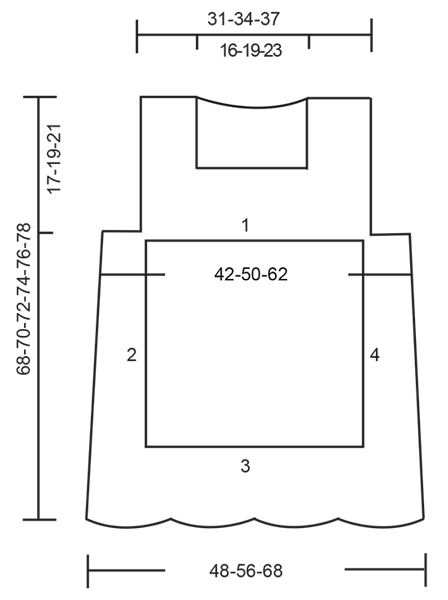
MAGIC CIRCLE: To avoid hole in the middle beg with this technique: Hold yarn end in the left hand and make a loop around left index finger (from left to right). Hold the loop with left thumb and index finger. Insert hook through loop, get the yarn from ball, pull yarn through loop, make 1 YO on hook and pull YO through st on hook = 1 dc, work 3 ch, then work 11 tr around loop, finish with 1 sl st in third ch. Continue as explained in pattern – AT THE SAME TIME pull yarn end so that loop is tighten tog and the hole disappears. CROCHET INFO: Replace first dc on round with 1 ch. Finish round with one sl st in first ch. Replace first tr on round/row with 3 ch. Finish round with one sl st in third ch. Replace first dtr on round with 4 ch. Finish round with one sl st in fourth ch. PATTERN: See diagrams A.1 to A.3. 4-DTR: Make 4 YOs on hook, insert hook in first tr on row and pull yarn through first tr, * 1 YO on hook, pull yarn through the next 2 loops on hook *, repeat from *-* 4 more times = 1 st on hook. ---------------------------------------------------------- CROCHET TOP: Top is worked in 2 parts that are sewn tog in the sides and on shoulders, then work an edge at the bottom. FRONT PIECE: Work front piece in a circle, then as a square from mid front. Work a MAGIC CIRCLE on hook size 4 mm with Belle – see explanation above = 12 tr around circle. Then work according to A.1, work A.1 3 times around the magic circle. NOTE: Sl sts show at beg of A.1 are worked at end of round. READ CROCHET INFO! REMEMBER THE CROCHET TENSION! When A.1 has been worked 1 time vertically, there are 147 tr on circle. Continue to work as follows: ROUND 1: Work 1 tr in every tr AT THE SAME TIME inc 1 tr = 148 tr. ROUND 2: Work *1 dc in each of the first 8 tr, 1 htr in each of the next 2 tr, 1 tr in each of the next 2 tr, 1 dtr in each of the next 3 tr, 1 triple tr in each of the next 3 tr, 1 4-dtr – SEE EXPLANATION ABOVE, in next tr, 5 ch, 1 4-dtr in next tr, 1 triple tr in each of the next 3 tr, 1 dtr in each of the next 3 tr, 1 tr in each of the next 2 tr, 1 htr in each of the next 2 tr, 1 dc in each of the next 7 tr *, repeat from *-* 3 more times. ROUND 3: Work 1 tr in every st, around ch-space in each corner work 3 tr + 3 ch + 3 tr = 172 tr (= 43 tr in each side). SIZE S/M: Finish square here. ROUND 4: Work 1 tr in every st, around ch-space in each corner work 3 tr + 3 ch + 3 tr = 196 tr (= 49 tr in each side). SIZE L/XL: Finish square here. ROUND 5: Work 1 tr in every st, around ch-space in each corner work 3 tr + 3 ch + 3 tr = 220 tr (= 55 tr in each side). SIZE XL/XXL: Finish square here. Square measures approx. 28-30-32 cm. Cut the yarn. Now work along side 2, 3 and 4 from crochet square (see chart). Beg in the second corner on square, work 3 tr around ch-space, work 1 tr in every tr until next corner, work 3 tr + 3 ch + 3 tr, work 1 tr in every tr until next corner, work 3 tr + 3 ch + 3 tr, work 1 tr in every tr until last corner, work 3 tr around ch-space. There are now 49-55-61 tr on each of the 3 sides. Work back and forth, now work according to A.2, finish with 1 tr in last tr before corner, in each of the two corners work 3 tr + 3 ch + 3 tr, work the new sts into A.2. Continue like this for approx. 7-10-15 cm, piece now measures 42-50-62 cm from side 2 to side 4, or adjust according to chest width. Then work a gusset in each side of top as follows: Beg along side 2 as follows (from RS). Work 1 dc in every tr until 52 tr remain, work 1 htr in each of the next 8 tr, 1 tr in each of the next 8 tr, 1 dtr in each of the next 12 tr, 1 triple tr in each of the next 12 tr, 1 4-dtr in each of the last 12 tr. Cut the yarn in size XS/S and M/L. SIZE XL/XXL: Turn and work 1 4-dtr in every 4-dtr, 1 triple tr in every triple tr, 1 dtr in every dtr, 1 tr in every tr, 1 htr in every htr and 1 dc in every dc. Cut the yarn. All sizes: Work a gusset the same way along side 4 (work from the top and down = from WS). Cut the yarn. Then work back and forth from side 1 on square as follows - from RS: Beg one row before square (i.e. in the first row worked over the other 3 sides), work 3 tr around the outermost tr in row, work 3 tr around corner on square, 1 tr in every tr, 3 tr around corner on square, and 3 tr around the outermost tr on next row = 55-61-67 tr. Then work back and forth according to A.2 (finish with 1 tr). When piece measures 7-9-11 cm, work only over the first 13 tr on row (= left shoulder). Work A.2 (finish with 1 tr up towards neck) as before over these sts until piece measures 17-19-21 cm, fasten off. Now work over the last 13 tr on row (= right shoulder), work the same way as on left shoulder. 29-35-41 tr in the middle = neck. BACK PIECE: Work the same way as on front piece. When piece measures 15-17-19 cm, work only over the first 13 tr on row (= right shoulder). Work A.2 as before over these sts until piece measures 17-19-21 cm, fasten off. Now work over the last 13 tr on row (= left shoulder), work the same way as on right shoulder. 29-35-41 tr in the middle = neck. ASSEMBLY: Sew shoulder seams and sew side seams. CROCHET EDGE AT THE BOTTOM OF TOP: Work one sl st in one corner at the bottom of top, work 1 tr in every tr along bottom edge on top, around the 4-dtr in the sides work 4 tr, AT THE SAME TIME adjust no of sts so that it is divisible by 48. Continue to work as follows: Work A.3A, repeat A.3B until 12 tr remain, work A.3C. Fasten off. CROCHET EDGE AROUND ARMHOLE: Beg between armhole and body. Work 1 dc,* skip approx. 2 cm, work 7 tr around next tr, skip approx. 2 cm, work 1 dc around next tr *, repeat from *-* and finish with one sl st at beg of round. Repeat around the other armhole. CROCHET EDGE AROUND NECK: Beg in the side of neck on back piece. Work 1 dc, * 3 ch, skip approx. 1 cm, work 1 dc *, repeat from *-* and finish with 1 sl st at beg of round. |
|||||||||||||||||||||||||||||||||||||
Diagram explanations |
|||||||||||||||||||||||||||||||||||||
|
|||||||||||||||||||||||||||||||||||||
 |
|||||||||||||||||||||||||||||||||||||
 |
|||||||||||||||||||||||||||||||||||||
 |
|||||||||||||||||||||||||||||||||||||
Have you finished this pattern?Tag your pictures with #dropspattern #elviratop or submit them to the #dropsfan gallery. Do you need help with this pattern?You'll find 12 tutorial videos, a Comments/Questions area and more by visiting the pattern on garnstudio.com. © 1982-2026 DROPS Design A/S. We reserve all rights. This document, including all its sub-sections, has copyrights. Read more about what you can do with our patterns at the bottom of each pattern on our site. |
|||||||||||||||||||||||||||||||||||||


With over 40 years in knitting and crochet design, DROPS Design offers one of the most extensive collections of free patterns on the internet - translated to 17 languages. As of today we count 324 catalogues and 12290 patterns translated into English (UK/cm). 12290
We work hard to bring you the best knitting and crochet have to offer, inspiration and advice as well as great quality yarns at incredible prices! Would you like to use our patterns for other than personal use? You can read what you are allowed to do in the Copyright text at the bottom of all our patterns. Happy crafting!
Post a comment to pattern DROPS 168-11
We would love to hear what you have to say about this pattern!
If you want to leave a question, please make sure you select the correct category in the form below, to speed up the answering process. Required fields are marked *.