
Popular categories
Looking for a yarn?


Comments / Questions (297)
![]() Ruth wrote:
Ruth wrote:
Har strikket opp til punktet hvor det skal strikkes forhøyning i nakken. Samtidig skal det fortsetter raglanfelling som før. Betyr dette at to masker felles før og etter A1 eller 1 maske?
11.10.2018 - 12:57DROPS Design answered:
Se svar under
05.11.2018 - 09:22
![]() Ruth wrote:
Ruth wrote:
Har strikket opp til punktet hvor det skal strikkes forhøyning i nakken. Samtidig skal det fortsetter raglanfelling som før. Betyr dette at to masker felles før og etter A1 eller 1 maske?
11.10.2018 - 07:30DROPS Design answered:
Hei Ruth. Fortsett å fell 2 masker før og etter A.1. God fornøyelse.
05.11.2018 - 09:21
![]() Hanna wrote:
Hanna wrote:
Das hilft mir, danke. Das heißt, wenn die Raglanabnahmen nach Anleitung fertig habe, stricke ich noch 5cm für die Schulter? Wie verfahre ich währenddessen mit A1? Das Muster wird noch weitergestrickt aber daneben dann nicht mehr abgenommen?
08.10.2018 - 09:31DROPS Design answered:
Liebe Hanna, nicht genau, diese 5 cm sind die Maschen von Ärmel (= also Schulter/Halsauschnitt). Einfach die Raglanabanhmen, die Halsausschnitt und die verkürtzen Reihen für die Erhöhung wie beschrieben stricken. Viel Spaß beim stricken!
08.10.2018 - 09:55
![]() Hanna wrote:
Hanna wrote:
Hallo! Ich habe eine Frage zur Höhe des Halsausschnitts. Nach Anleitung soll eine Gesamtlänge von 70cm erreicht sein, wenn die Abnahmen am Hals fertig sind. Die Abnahmen werden bei einer Gesamtlänge des Rumpfteils von 44cm gestartet, d.h. es müssen 26cm mit Hals- und Raglanabnahmen gestrickt werden. Da aber dafür nur 40 Runden/Reihen vorgesehen sind, ist das laut Maschenprobe nicht zu schaffen. Jetzt habe ich 6 cm zu wenig, soll ich dann einfach mit den Abnahmen weiter machen?
07.10.2018 - 20:59DROPS Design answered:
Liebe Anna, schauen Sie mal die Skizze, Sie haben 21 cm Armausschnitt und die letzten 5 cm sind von Schulter = 70 cm Gesamthöhe. Nehmen Sie für den Raglan ab, wie in der Anleitung erklärt. Viel Spaß beim stricken!
08.10.2018 - 09:19
![]() Emilie wrote:
Emilie wrote:
Lurer på hvordan størrelsen på denne genseren er, er målene som er oppgitt etter pressing av genseren eller før?
05.10.2018 - 09:49DROPS Design answered:
Hei Emilie. Målene i målskissen er når plagget er ferdig strikket. Når det er sagt så skal ikke Air dampes/presses (se vaskeanvisningen) så vær obs på det om du strikker i denne kvaliteten. Effekten til garnet forsvinner om du presser det. God fornøyelse.
09.10.2018 - 08:37
![]() Christel wrote:
Christel wrote:
Bonjour. J’ai fini la rehausse dos et maintenant il faut rabattre les mailles. Mais comment faire puisqu’il me reste des mailles avant et après l’aiguille. Dois je finir le rang totalement et rabbatre ou tourner et rabattre ainsi.?
04.10.2018 - 20:25DROPS Design answered:
Bonjour Christel, après le dernier des rangs raccourcis, tournez et tricotez le rang jusqu'à la fin, puis tournez à nouveau et rabattez les mailles. Bon tricot!
05.10.2018 - 07:38
![]() Kim wrote:
Kim wrote:
I have arrived at the 13th decrease for neck row and there are no stitches left for the raglan decrease near the neck. What do I do? Should I continue with the neck edge decrease and ignore the raglan increase at the neck side? This means I will only lose 6 stitches per row however rather than 8. Confused help!
29.09.2018 - 03:39DROPS Design answered:
Dear Kim, Neck dec overlaps dec for raglan on front piece. I.e. when there is not enough sts to dec for raglan on front piece, continue dec for neck over A.1. Happy knitting!
01.10.2018 - 08:20
![]() Stefania wrote:
Stefania wrote:
Buongiorno, io sono arrivata all'unione dav./diet./maniche e mi ritrovo 250 maglie su ferri circolari ma non riesco ad andare avanti perchè non ho capito la spiegazione sprone ,reglan, diagramma A1. Quindi per non impazzire è possibile eliminare il diagramma ? Grazie
30.08.2018 - 16:15DROPS Design answered:
Buongiorno Stefania. Il diagramma serve anche come riferimento per le diminuzioni per il raglan. Può esserle di aiuto inserire dei segnapunti per capire meglio dove si trova il diagramma. P.es, per la taglia S, lavora 28 m, mette un segnapunti, lavora A1 (7m), mette un segnapunti e così via. Buon lavoro!
30.08.2018 - 19:19
![]() Jennifer wrote:
Jennifer wrote:
Hi, if I want to do the dubble A version rather than signle C (for the yarn) how should I calculate how much yarn I need?
28.08.2018 - 12:50DROPS Design answered:
Hi Jennifer. You can either use our yarn calculator (located right below the materials section on every pattern) or you can have a look at how to calculate it yourself here. Happy knitting.
28.08.2018 - 14:22
![]() Christé wrote:
Christé wrote:
Bonjour. Pour commencer l’encoluRe. Dès que je rabats mes mailles pour l’encolUre , est ce qtje tourne tout de suite l’ouvRage ou je termine le tour commancer? Merci
27.08.2018 - 21:51DROPS Design answered:
Bonjour Christé, après avoir rabattu les mailles de l'encolure, terminez le rang jusqu'à l'autre côté de l'encolure et tournez, continuez ensuite ainsi en allers et retours en commençant et en terminant par le côté encolure. Bon tricot!
04.09.2018 - 13:29
|
|||||||
Aberdeen |
|||||||
 |
 |
||||||
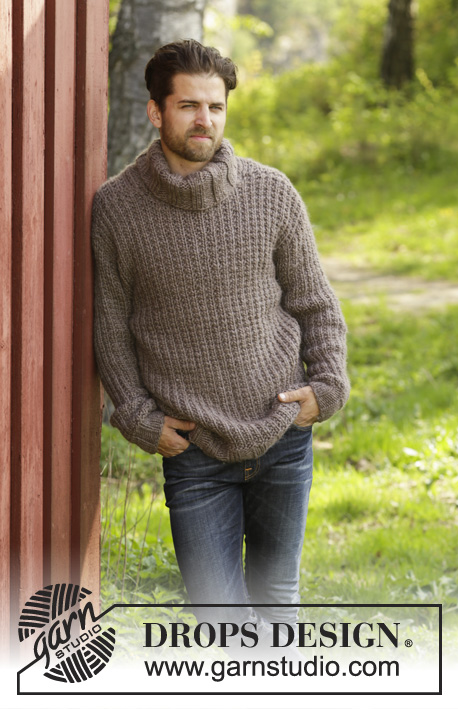
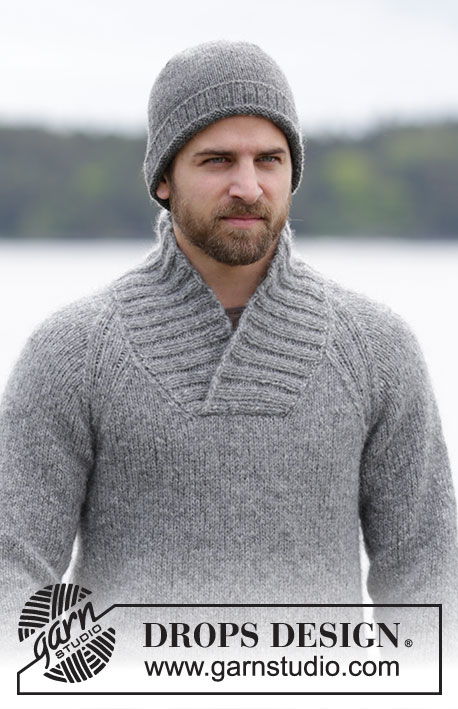
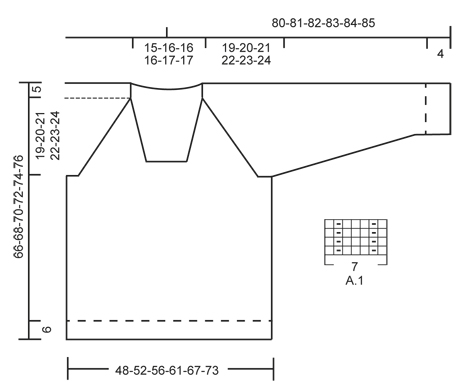
Men's knitted jumper in DROPS Air, with raglan and shawl collar. Size: S - XXXL.
DROPS Extra 0-1159 |
|||||||
|
GARTER ST (back and forth): K all rows. 1 ridge = 2 rows K. PATTERN: See diagram A.1. The diagram shows all rows/rounds in pattern seen from RS. RAGLAN: All dec are done from RS! Dec 1 st on each side of every A.1 (= 8 sts dec on row/round): Dec as follows before A.1: Work until 2 sts before A.1, K 2 tog = 1 st dec. Dec as follows after A.1: Slip 1 st as if to K, K 1, psso = 1 st dec. Dec 2 sts on each side of every A.1 as follows (= 16 sts dec on row): Dec as follows before A.1: Work until 3 sts remain before A.1, slip 1 st as if to K, K 2 tog, psso = 2 sts dec. Dec as follows after A.1: Slip 1 st as if to K, K 2 tog, psso = 2 sts dec. INCREASE TIP: Inc 1 st by making 1 YO, on next round K YO twisted (i.e. work in back loop of st instead front) to avoid holes. DECREASE TIP: Dec inside 1 edge st in garter st. All dec are done from RS! Dec as follows before 1 edge st: K 2 tog. Dec after 1 edge st as follows: Slip 1 st as if to K, K 1, psso. ---------------------------------------------------------- JUMPER: Jumper is worked in the round on circular needle up to neck. When casting off for neck, continue back and forth. Rounds start mid back. BODY: Cast on 176-188-204-224-244-268 sts on circular needle size 5 mm with Air. Work rib = K 2/P 2 in the round for 6 cm. Then continue in stocking st until finished measurements. On next round switch to circular needle size 6 mm and dec 32-32-36-40-44-48 sts evenly = 144-156-168-184-200-220 sts. REMEMBER THE KNITTING TENSION! When piece measures 42-43-44-45-46-47 cm, cast off for armholes in each side as follows: Work 31-34-37-41-45-50 sts in stocking st (= half back piece), cast off 10 sts under sleeve, work 62-68-74-82-90-100 sts in stocking st (= front piece), cast off 10 sts and work the remaining 31-34-37-41-45-50 sts in stocking st (= half back piece). Put piece aside and knit the sleeves. SLEEVES: Worked in the round on double pointed needles/circular needle. Cast on 40-40-44-44-44-48 sts on double pointed needles size 5 mm. Work rib = K 2/P 2 for 4 cm. Then continue in stocking st until finished measurements. On next round switch to double pointed/circular needle size 6 mm and dec 5-3-5-3-3-7 sts evenly = 35-37-39-41-41-41 sts. When sleeve measures 8 cm in all sizes, insert a marker at beg of round (= mid under sleeve). On next round inc 1 st in each side of marker - Read INCREASE TIP! Repeat inc every 6-6-6-6-5-5 round 8-7-3-3-14-7 more times, then every 5-5-5-5-4-4 round a total of 6-7-12-12-2-11 times = 65-67-71-73-75-79 sts. Work the new stitches in stocking stitch. When piece measures 54-53-53-53-53-53, cast off 10 sts mid under sleeve (= 5 sts on each side of marker) = 55-57-61-63-65-69 sts remain on sleeve. YOKE: Slip sleeves on to same circular needle as body where armholes were cast off = 234-250-270-290-310-338 sts. Now continue with stocking st and pattern in every transition between front and back piece and sleeves from beg of round: Continue in stocking st over the first 28-31-34-38-42-47 sts, A.1 (= 7 sts), stocking st over the next 47-49-53-55-57-61 sts, A.1, 56-62-68-76-84-94 sts in stocking sts, A.1, 47-49-53-55-57-61 sts in stocking sts, A.1, 28-31-34-38-42-47 sts in stocking sts. Continue like this, AT THE SAME TIME dec for RAGLAN - see explanation above, and dec for neck as follows: READ ALL OF THE FOLLOWING SECTION BEFORE CONTINUING! RAGLAN: NOTE: Continue in the round until cast off for neck. Then work the rest of yoke back and forth. Repeat dec for raglan every other round/every row from RS 15-16-16-17-18-18 more times (= 8 sts per dec), then dec 2 sts on each side of every raglan(= 16 sts per dec). Repeat dec 1-1-2-2-2-3 more times. NECK DEC: When piece measures 44-45-46-47-48-49 cm, cast off the middle 14-16-16-16-18-20 sts on front piece for neck. Then work piece back and forth and work edge st towards the neck in GARTER ST - see explanation above. Then dec 1 st inside 1 edge st in garter st on each side of neck - Read DECREASE TIP! Repeat dec every other row until finished measurements. NOTE: Neck dec overlaps dec for raglan on front piece. I.e. when there is not enough sts to dec for raglan on front piece, continue dec for neck over A.1. When raglan and neck dec are done, there are approx. 44-48-50-56-62-68 sts on needle. Piece measures approx. 66-68-70-72-74-76 cm from bottom edge to shoulder. Now work an elevation in the neck: Beg from RS and work as before until 7 sts, turn, tighten yarn, work back until 7 sts remain, turn, tighten yarn, work until 10 sts remain, turn, tighten yarn, work until 10 sts remain, turn, tighten yarn, work until 13 sts remain, turn, tighten yarn, work until 13 sts remain, turn, tighten yarn, work until 16 sts remain, turn, tighten yarn, work until 16 sts remain. Cast off. SHAWL COLLAR: Start mid front on the right side of sts dec for neck. Pick up on circular needle size 5 mm with Air: 43-45-46-48-50-52 sts up to shoulder, then pick up 26-27-27-27-29-29 sts in the back of neck, and finally 43-45-46-48-50-52 sts down along left side of neck dec = 112-117-119-123-129-133 sts. (Do not pick up sts at the front of neck where sts were cast off.) K 1 row from WS while AT THE SAME TIME inc 4-7-5-5-7-7 sts evenly = 116-124-124-128-136-140 sts. Then work rib as follows (from RS): 1 edge st in garter st, * K 2, P 2 *, repeat from *-* until 3 sts remain, finish with K 2 and 1 edge st in garter st. Continue rib like this until collar measures approx. 6 cm. Now inc 1 st in each of the middle 14 P-sections, seen from RS (= back of neck) = 130-138-138-142-150-154 sts. Continue to work until collar measures 10-11-11-11-12-13 cm, cast off with K over K and P over P. ASSEMBLY: Place the collar double (left side over right side) at the bottom of neck opening and sew it to the neck line at the front through both layers. Sew the openings under the sleeves. |
|||||||
Diagram explanations |
|||||||
|
|||||||
 |
|||||||
Have you finished this pattern?Tag your pictures with #dropspattern or submit them to the #dropsfan gallery. Do you need help with this pattern?You'll find 26 tutorial videos, a Comments/Questions area and more by visiting the pattern on garnstudio.com. © 1982-2026 DROPS Design A/S. We reserve all rights. This document, including all its sub-sections, has copyrights. Read more about what you can do with our patterns at the bottom of each pattern on our site. |
|||||||


With over 40 years in knitting and crochet design, DROPS Design offers one of the most extensive collections of free patterns on the internet - translated to 17 languages. As of today we count 324 catalogues and 12290 patterns translated into English (UK/cm). 12290
We work hard to bring you the best knitting and crochet have to offer, inspiration and advice as well as great quality yarns at incredible prices! Would you like to use our patterns for other than personal use? You can read what you are allowed to do in the Copyright text at the bottom of all our patterns. Happy crafting!
Post a comment to pattern DROPS Extra 0-1159
We would love to hear what you have to say about this pattern!
If you want to leave a question, please make sure you select the correct category in the form below, to speed up the answering process. Required fields are marked *.