
Popular categories
Looking for a yarn?


Comments / Questions (33)
![]() Rosa Maria Rodriguez Ferreira wrote:
Rosa Maria Rodriguez Ferreira wrote:
Agradezco infinitamente la respuesta que me han enviado espero terminar mi Cardigan para enviarles una foto.
07.07.2025 - 03:22
![]() Rosa Maria Rodriguez Ferreira wrote:
Rosa Maria Rodriguez Ferreira wrote:
Mi pregunta es en este precioso modelo los renos se tejen siguiendo la muestra por el derecho de la labor y por el revés se tejen los puntos como se presentan?
24.06.2025 - 10:07DROPS Design answered:
Hola Rosa, el patrón muestra todas las filas del patrón (las del lado derecho y las del lado revés) como se ven por el lado derecho. Es decir, en las filas por el lado derecho se trabajan como se presentan en el diagrama, mientras que en las filas por el lado revés se trabaja al contrario (se lee de izquierda a derecha). Esto no afecta al patrón de colores, el símbolo representa al mismo color en ambos lados. El diagrama se trabaja por el lado derecho (filas impares, empezando desde abajo) y por el lado revés (las filas pares, empezando desde abajo).
29.06.2025 - 17:55
![]() Rosa Maria Rodriguez Ferreira wrote:
Rosa Maria Rodriguez Ferreira wrote:
Mi pregunta es en este precioso modelo los renos se tejen siguiendo la muestra por el derecho de la labor y por el revés se tejen los puntos como se presentan?
24.06.2025 - 10:04
![]() Rosa Maria Rodriguez wrote:
Rosa Maria Rodriguez wrote:
Donde puedo ver más información sobre el inicio io de esta hermosa prenda
16.03.2025 - 11:39DROPS Design answered:
Hola Rosa Maria Rodriguez, las instrucciones para la chaqueta comienzan en el apartado CHAQUETA, y comienza con el CANESÚ, montando puntos para el canesú (la cenefa del escote se trabaja para terminar). Recomendamos leer los apartados PUNTO MUSGO, PATRÓN, TIP PARA LOS AUMENTOS y TIP PARA LAS DISMINUCIONES antes de empezar o una vez se indiquen en las instrucciones para entender mejor cómo trabajar la labor.
23.03.2025 - 12:58
![]() Vittoria wrote:
Vittoria wrote:
Buongiorno. Potrei sapere, cortesemente mella taglia s quante renne ci sono sullo sperone?
20.11.2023 - 17:33DROPS Design answered:
Buonasera Vittoria, sono 11 renne per la taglia S. Buon lavoro!
22.11.2023 - 18:08
![]() Ina wrote:
Ina wrote:
Hej, diagrammet må være forkert. Jeg ender ikke op med de 362 masker efter jeg har strikket diagram A1. Snare 341 masker. Gør jeg noget galt, og hvordan kan det være at der er lige mange udtag om du strikker S eller XL?
06.09.2023 - 09:59
![]() Dagmar wrote:
Dagmar wrote:
Hallo, ich moechte den Rumpfteil der Jacke ohne abnahmen stricken. Ist das moeglich oder komme ich da mit dem muster nicht klar? Vielen Dank im Vorraus fuer die Antwort.
28.10.2019 - 15:34DROPS Design answered:
Liebe Dagmar, wenn Sie keine Ab- nor Zunahmen beim Rumpfteil möchten, dann beachten Sie, die Maschenanzahl beim Bündchen unten richtig anzupassen, damit es mit 2 M re anfängt und endet. Viel Spaß beim stricken!
04.11.2019 - 13:05
![]() Angela wrote:
Angela wrote:
Hi, I’m knitting the m size, on row 5, after all the pattern repeats are completed, do I work a YO before the final garter stitch edge stitch?
05.07.2019 - 16:58DROPS Design answered:
Dear Angela, no, there is no need to make YO - YO is only at the beggining od pattern repeat. Happy knitting!
07.07.2019 - 09:00
![]() Tania Berardi wrote:
Tania Berardi wrote:
Buon pomeriggio. Sto per iniziare questa giacca e se non sbaglio devo iniziare dall'alto verso il basso non in tondo ma avanti e indietro. Il mio campione e' di 19 maglie per 27 ferri corrispondenti a cm 10 x 10. La taglia che devo fare e' la L. Quante maglie devo avviare per iniziare dallo sprone ? Grazie
22.01.2016 - 16:05DROPS Design answered:
Buongiorno Tania, per poter seguire le istruzioni indicate deve ottenere lo stesso campione: provi a utilizzare un ferro di mezza misura in meno e rifaccia il campione per vedere se corrisponde. E' corretto, il cardigan è lavorato avanti e indietro sui ferri a partire dallo sprone. Buon lavoro!
23.01.2016 - 12:51
![]() Åse Nymann wrote:
Åse Nymann wrote:
Hei skal strikke denne cardigan men lurer på hvordan det gjørs i begynnelsen uten at det ruller seg. kan man strikke denne nedenfra og opp?
06.11.2015 - 14:16DROPS Design answered:
Hej Åse, hvis kanten ruller kan den dampes let bagefter. Man kan strikke den nedenfra og op, men vi kan ikke hjælpe dig med at lave opskriften om og vi kan ikke svare hvis du kører fast. God fornøjelse!
20.11.2015 - 15:04
|
||||||||||
Silver Stag Cardigan#silverstagcardigan |
||||||||||
|
|
||||||||||
Knitted DROPS Christmas jacket with round yoke, reindeer pattern, worked top down in ”Karisma”. Size: S - XXXL.
DROPS 157-24 |
||||||||||
|
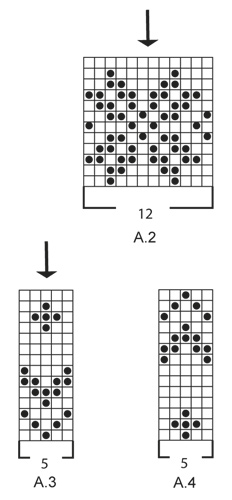
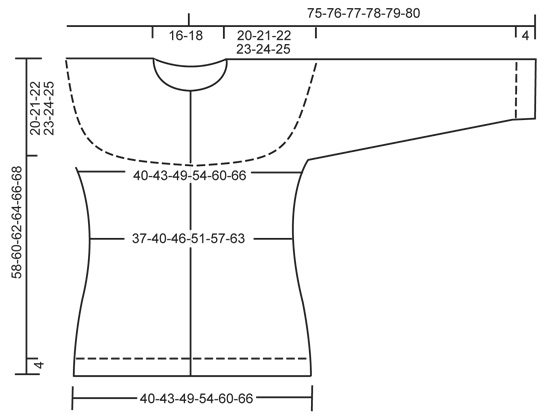
GARTER ST (back and forth on needle): K all rows. 1 ridge = 2 rows K. PATTERN: See diagrams A.1 to A.4. The diagrams show all rows in pattern seen from RS. Work entire pattern in stocking st. DECREASE TIP (applies to sides and sleeves): Dec before marker and 1 st K as follows: K 2 tog. Dec after marker and 1 st K as follows: Slip 1 st as if to K, K 1, psso. INCREASE TIP (applies to sides): All inc are done from RS. Inc 4 sts in total on row. Work until 1 st remains before marker, 1 YO, 2 sts in stocking st, 1 YO = 2 sts inc. On next row P YO twisted (i.e. work in the back loop of YO instead of front) to avoid holes. ---------------------------------------------------------- JACKET: Work back and forth, top down on circular needle. Work sleeves in the round on double pointed needles. YOKE: Cast on 90-98-106-122-130-138 sts on circular needle size 4 mm with medium grey. Work 1st row as follows (= RS): 1 edge st in GARTER ST - see explanation above - A.1 until 1 st remains, 1 edge st in garter st. REMEMBER THE KNITTING TENSION! When A.1 has been worked 1 time vertically, there are 266-290-314-362-386-410 sts on needle. Continue with 3-5-9-5-7-11 rows in stocking st (with 1 edge st in garter st in each side) with medium grey. Work next row from WS as follows: Work the first 38-41-47-53-59-65 sts (incl 1 edge st in garter st), slip the next 58-64-64-76-76-76 sts on a stitch holder (= sleeve), cast on 10 new sts under sleeve, insert a marker in the middle of these 10 sts, work the next 74-80-92-104-116-128 sts, slip the next 58-64-64-76-76-76 sts on a stitch holder (= sleeve), cast on 10 new sts under sleeve, insert a marker in the middle of these 10 sts, work the remaining 38-41-47-53-59-65 sts. BODY: There are now 170-182-206-230-254-278 sts for body. Now work as follows: 1 edge st in garter st, A.2 (= 12 sts) until 1 st remains, 1 edge st in garter st. Continue like this until A.2 has been worked 1 time vertically. Now work piece in stocking st with medium grey. On next row from RS dec 1 st on each side of each marker in the sides - SEE DECREASE TIP. Repeat dec every 2 cm 2 more times = 158-170-194-218-242-266 sts. When piece measures 12-13-14-15-16-17 cm from marker under sleeves, inc 1 st on each side of marker in each side of piece – see INCREASE TIP. Repeat inc every 2 cm 2 more times = 170-182-206-230-254-278 sts. When piece measures 56-58-60-62-64-66 cm, switch to circular needle size 3 mm and inc 22-26-26-30-30-34 sts evenly = 192-208-232-260-284-312 sts. Continue to work rib from RS as follows: 1 edge st in garter st, * K 2, P 2 *, repeat from *-* until 3 sts remain, K 2, 1 edge st in garter st. When rib measures 4 cm, cast off K over K and P over P. SLEEVES: Slip sts from stitch holder back on double pointed needles size 4 mm. There are now 58-64-64-76-76-76 sts for sleeve. Work 1 row in stocking st. Then cast on 10 sts under sleeve = 68-74-74-86-86-86 sts. Insert a marker in the middle of these new sts. Then work the sleeve in the round. Now work A.2. NOTE: Adjust so that the 2 middle sts in diagram (see arrow) are the 2 middle sts on sleeve. When A.2 has been worked, continue with A.3. NOTE: Adjust so that the middle st in diagram (see arrow) is one of the 2 middle sts on sleeve. AT THE SAME TIME on 1st round in A.3 beg dec under sleeve - READ DECREASE TIP. Repeat dec every 3-2½-2½-2½-2½-2½ cm 9-12-12-12-12-12 more times = 48-48-48-60-60-60 sts. When sleeve measures 38 cm, work A.4. NOTE: Adjust so that the middle st in diagram (see arrow) is one of the 2 middle sts on sleeve. When A.4 has been worked vertically, switch to double pointed needles size 3 mm and inc 4-8-8-0-4-4 sts evenly = 52-56-56-60-64-64 sts. Then work rib (= K 2/P 2) for 3 cm. Cast off with K over K and P over P. LEFT BAND: Work band back and forth on circular needle size 3 mm. Pick up approx. 144 to 168 sts (divisible by 4) inside 1 edge st along left band with medium grey. Work rib as follows from WS: 1 st in garter st, * P 2, K 2 *, repeat from *-*, finish with P 2 and 1 st in garter st. Rib beg and ends with K 2 and 1 st in garter st from RS. Work until rib measures 3 cm. Cast off with K over K and P over P. RIGHT BAND: Work as left but after 1 cm, dec for 7 buttonholes evenly (dec for buttonholes in P sections seen from RS). 1 BUTTONHOLE = P 2 tog and make 1 YO – top buttonhole should be approx. 6-7 cm from the top (there should also be 1 buttonhole on neck edge), and bottom approx. 5-6 cm from bottom edge. NECK EDGE: Pick up 96-100-104-108-112-116 sts over bands and cast-on edge on circular needle size 3 mm with medium grey. Work rib as follows: 1 edge st in garter st, * P 2, K 2 *, repeat from *-* until 3 sts remain, P 2, 1 edge st in garter st. When neck edge measures 1 cm, dec for 1 buttonhole over the other holes on right band by K 2 tog and making 1 YO. Continue like this until rib measures 3 cm. Cast off with K over K and P over P. ASSEMBLY: Sew the holes under the sleeves. Sew the buttons on to left band. |
||||||||||
Diagram explanations |
||||||||||
|
||||||||||
 |
||||||||||
 |
||||||||||
 |
||||||||||
Have you finished this pattern?Tag your pictures with #dropspattern #silverstagcardigan or submit them to the #dropsfan gallery. Do you need help with this pattern?You'll find 29 tutorial videos, a Comments/Questions area and more by visiting the pattern on garnstudio.com. © 1982-2026 DROPS Design A/S. We reserve all rights. This document, including all its sub-sections, has copyrights. Read more about what you can do with our patterns at the bottom of each pattern on our site. |
||||||||||


With over 40 years in knitting and crochet design, DROPS Design offers one of the most extensive collections of free patterns on the internet - translated to 17 languages. As of today we count 324 catalogues and 12290 patterns translated into English (UK/cm). 12290
We work hard to bring you the best knitting and crochet have to offer, inspiration and advice as well as great quality yarns at incredible prices! Would you like to use our patterns for other than personal use? You can read what you are allowed to do in the Copyright text at the bottom of all our patterns. Happy crafting!
Post a comment to pattern DROPS 157-24
We would love to hear what you have to say about this pattern!
If you want to leave a question, please make sure you select the correct category in the form below, to speed up the answering process. Required fields are marked *.