
Popular categories
Looking for a yarn?


Comments / Questions (109)
![]() Babel wrote:
Babel wrote:
Bonjour, Est ce que les rangs pairs des M1,M2,M3,M4 sont notés? ou bien se tricotent ils à l'envers?
08.03.2026 - 18:30DROPS Design answered:
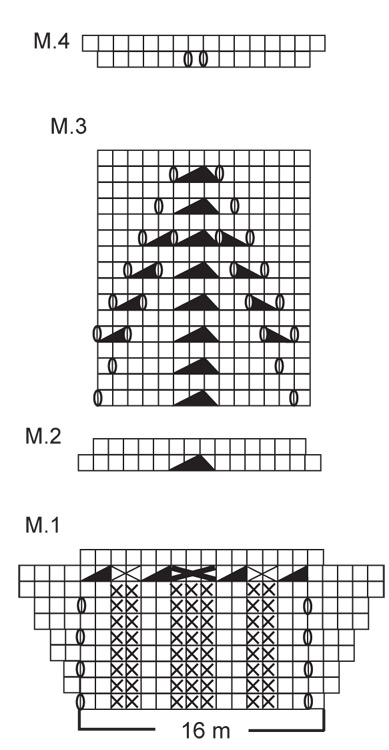
Bonjour Mme Babel, tous les rangs sont représentés dans les diagrammes, lisez les rangs sur l'endroit de droite à gauche en suivant la mention "sur l'endroit" dans la légende des symboles et les rangs sur l'endroit de gauche à droite en suivant la mention "sur l'envers" dans la légende. Autrement dit, 1 case blanche se tricote à l'endroit sur l'endroit mais à l'envers sur l'envers et 1 croix se tricote à l'envers sur l'endroit mais à l'endroit sur l'envers. Bon tricot!
09.03.2026 - 10:18
![]() Bente Andersen wrote:
Bente Andersen wrote:
Jeg strikker cardiganen I størrelse S og er færdig med mønsterdelen. Skal ti, at sætte markører ind både til inddeling af forstykker og rygstykke, men også mht. udtagningerne. Jeg synes blot, at opskriften er lidt svær at få overblik over mht. m-antal på forstykkerne, når der også skal regnes i cm fra afslutning af mønsterdelen og mht. aflukning til ærmegab og oplysninger om interval mellem knaphuller. Med venlig hilsen
03.11.2025 - 02:44
![]() Josiane wrote:
Josiane wrote:
Bonjour, pour l'arrondi de la manche, j'ai bien compris que je devais rabattre de chaque côté tous les rangs en début de rang (M) 5 x 2 mailles. Ensuite c'est indique qu'il faut rabattre 2 m. Est-ce que je dois rabattre 2 à tous les rangs jusqu'à 42 cm et ensuite 1 x 3 m ? ou je continue tout droit jusqu'à 42 cm et ensuite je rabats 1 x 2 m et 1 x 3 mailles. D'avance merci pour votre retour. Josiane
08.10.2025 - 11:10DROPS Design answered:
Bonjour Josiane, vous devez ensuite rabattre 2 mailles de chaque côté jusqu'à ce que la manche mesure 42 cm de hauteur totale, veillez à bien rabattre le même nombre de fois 2 m de chaque côté pour que la manche soit symétrique (le nombre de fois dépendra de votre tension en hauteur, ici, seule la hauteur est importante), puis rabattez 1 x 3 m de chaque côté et rabattez les mailles restantes. Bon tricot!
08.10.2025 - 16:29
![]() Carolina wrote:
Carolina wrote:
Salve non è indicato nel modello come fare gli aumenti, gettato e poi lavorato a rovescio ritorto? Grazie
21.09.2025 - 20:25DROPS Design answered:
Buonasera Carolina, se non diversamente indicato può utilizzare la tecnica che preferisce per gli aumenti. Buon lavoro!
22.09.2025 - 01:02
![]() Carolina wrote:
Carolina wrote:
È possibile fare le maniche in tondo con i ferri circolari?
09.09.2025 - 15:43DROPS Design answered:
Buongiormo Carolina, può apportare le modifiche che preferisce al modello. Buon lavoro!
10.09.2025 - 16:31
![]() Jacqueline Hageman wrote:
Jacqueline Hageman wrote:
In het patroon M1 staat in rij 9 dat van de middelste 3 averechtse steken er 2 recht samen moeten worden gebreid , moet dat niet 2 AVERECHTS samenbreien zijn ?
28.03.2025 - 14:13DROPS Design answered:
Dag Jacqueline,
Nee, deze brei je recht samen.
30.03.2025 - 10:10
![]() Lambert Jacqueline wrote:
Lambert Jacqueline wrote:
Je ne comprend pas les augmentations des manches
25.03.2025 - 08:33DROPS Design answered:
Bonjour Mme Lambert, lorsque la manche mesure 12 à 14 cm (cf taille), vous allez augmenter 2 mailles = 1 maille au début du rang, après la maille lisière + 1 maille à la fin du rang, avant la maille lisière et, selon la taille vous allez tricoter ces augmentations 11-6-8-12-6-9 fois au total tous les 2-3,5-2,5-1,5-3-1,5 cm, soit par ex en taille S, la 1ère augmentation à 12 cm, la 2ème à 14 cm (2 cm plus loin), la 3ème à 16 cm, la 4ème à 18 cm et ainsi de suite. Bon tricot!
25.03.2025 - 10:20
![]() Lambert Jacqueline wrote:
Lambert Jacqueline wrote:
Je ne comprend pas vous dites 53 mailles et après 150 mailles combien pour les côtes et combien pour le dos
18.03.2025 - 17:02DROPS Design answered:
Bonjour Mme Lambert, le dos va se trouver entre ces 2 marqueurs: le 1er après 53 m est pour le devant, le 2ème après 150 mailles est pour le dos = vous avez 97 mailles pour le dos et 53 m pour chaque devant. Bon tricot!
19.03.2025 - 07:09
![]() Nina Wood wrote:
Nina Wood wrote:
Ignore my previous question. I gave worked it out! Think I’m getting a bit daft in my old age 😁
13.03.2025 - 14:19
![]() Nina Wood wrote:
Nina Wood wrote:
Hi again sorry! I have reached the point in the pattern where it says “ inc 1 stitch each side of both markers ( for my size) on every 10cms a total of 2 times. But then says at the same time when piece measures 18 cms start casting off for sleeves but I’m still doing the 2 times increases every 10cms. Can you please explain this one? Complicated to explain what I’m asking.. sorry
12.03.2025 - 18:56DROPS Design answered:
Dear Mrs Wood, you work the first increases 4 cm after the marker, then work the 2nd increase after 14 cm after the marker (4 cm + 10 extra cm), so that you are done with both increases (4th size) when you have to cast off for sleeves. Happy knitting!
13.03.2025 - 15:32
|
|||||||||||||||||||||||||
Salvia#salviacardigan |
|||||||||||||||||||||||||
|
|
|||||||||||||||||||||||||
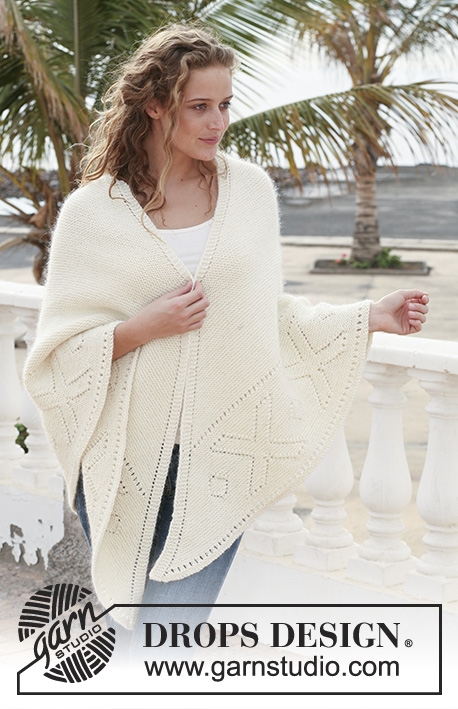
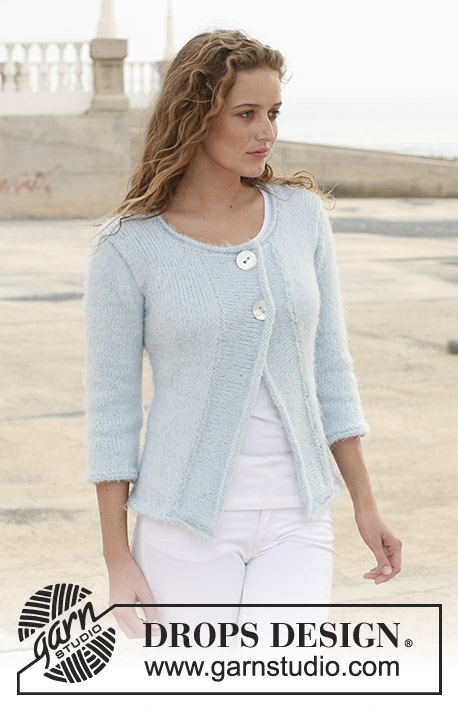
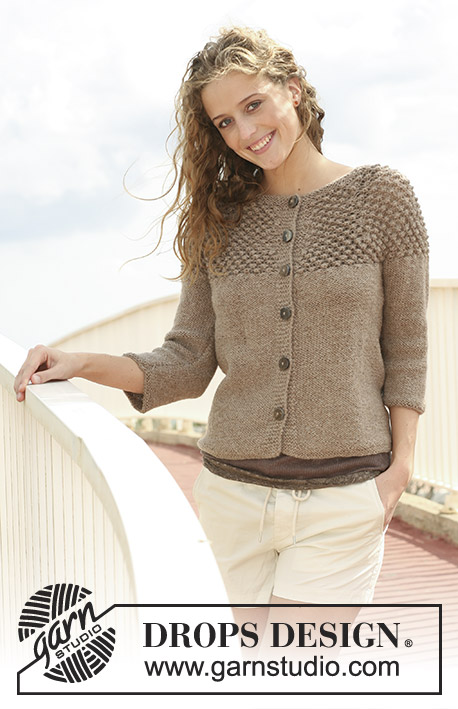
DROPS jacket with lace pattern in ”Muskat”. Size S - XXXL.
DROPS 113-33 |
|||||||||||||||||||||||||
|
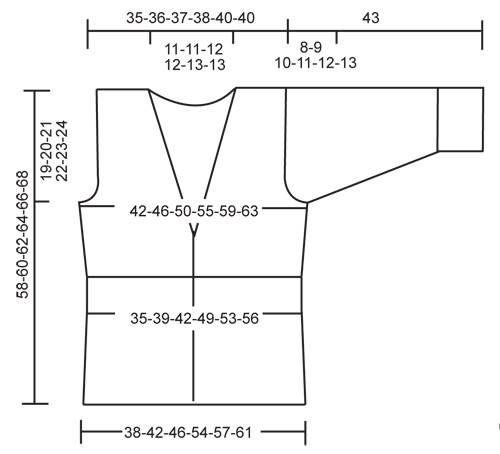
GARTER ST (back and forth on needle): K all rows. PATTERN: See diagram M.1 to M.4. Diagrams show the pattern from the RS. DECREASING TIP-1 (neckline): Dec inside 5 garter sts from RS. Dec as follows after 5 garter sts: slip 1 st as if to K, K1, psso Dec as follows before 5 garter sts: K2 tog. DECREASING TIP-2 (armhole): Dec inside 4 sts from RS. Dec as follows after 4 sts: slip 1 st as if to K, K1, psso Dec as follows before 4 sts: K2 tog. BUTTONHOLE: Make buttonholes on right front band. 1 buttonhole = cast off 3rd st from mid front and cast on 1 new st on return row. Make buttonholes when piece measures: SIZE S: 10, 16, 22, 28 and 34 cm. SIZE M: 11, 17, 23, 29 and 35 cm. SIZE L: 9, 16, 23, 30 and 37 cm. SIZE XL: 8, 14, 20, 26, 32 and 38 cm. SIZE XXL: 10, 16, 22, 28, 34 and 40 cm. SIZE XXXL: 11, 17, 23, 29, 35 and 41 cm. -------------------------------------------------------- BODY PIECE: Worked back and forth on circular needle from mid front. Cast on 171-187-203-235-251-267 sts (includes 5 front band sts each side towards mid front) on circular needle size 4 mm with Muskat. Work first row as follows from RS: 5 front band sts in garter st – see above - M.1 (= 16 sts) across the row until 6 sts remain, K1, 5 front band sts in garter st. Remember BUTTONHOLES on right front band – see above. Work 3 vertical repeats of M.1 like this and now work next row as follows from RS: 5 front band sts in garter st, M.2 (= 16 sts) across the row until 6 sts remain, K1, 5 front band sts in garter st. After 1 vertical repeat of M.2 there are 151-165-179-207-221-235 sts on row. Continue as follows from RS: 5 front band sts in garter st, M.3 (= 14 sts) across the row until 6 sts remain, K1, 5 front band sts in garter st. After 2 vertical repeats of M.3 continue as follows from RS: 5 front band sts in garter st, M.4 (= 14 sts) across the row until 6 sts remain, K1, 5 front band sts in garter st. After 1 vertical repeat of M.4 there are 171-187-203-235-251-267 sts on row. Piece now measures approx 24 cm. Insert a marker after 45-49-53-61-65-69 sts and a marker after 126-138-150-174-186-198 sts (to mark the sides). Now measure piece from here! Continue in stocking st with 5 garter sts each side towards mid front. When piece measures 3-3-3-4-4-4 cm from markers inc 1 st on each side of both markers on every 3-3-4-10-11-12 cm a total of 4-4-4-2-2-2 times. AT THE SAME TIME when piece measures 11-12-14-15-17-18 cm from markers dec 1 st for neckline each side towards mid front – SEE DECREASING TIP-1 – on every other row a total of 10-9-10-9-10-9 times, then on every 4th row 3-4-4-5-5-6 times and then on every 6th row 3 times. AT THE SAME TIME when piece measures 15-16-17-18-19-20 cm from marker (piece measures approx 39-40-41-42-43-44 cm from casting on row) cast off 8-8-8-10-12-12 sts each side for armhole (= 4-4-4-5-6-6 sts on each side of both markers) and now complete front and back pieces separately. LEFT FRONT PIECE: Continue dec for neck, AT THE SAME TIME cast off for armhole at the side – SEE DECREASING TIP-2: 1 st on every other row a total of 4-7-10-14-15-18 times. When all dec are complete there are 25-26-26-27-28-29 sts left on shoulder. When piece measures 34-36-38-40-42-44 cm from marker (piece now measures approx 58-60-62-64-66-68 cm from casting on row), cast off. RIGHT FRONT PIECE: Like left front piece, but mirrored. BACK PIECE: = 81-89-97-107-113-121 sts. Cast off for armhole each side as described for front piece = 73-75-77-79-83-85 sts. When piece measures 31-33-35-37-39-41 cm from markers work 4 rows garter st on the middle 33-33-35-35-37-37 sts (work remaining sts as before). Now cast off the middle 23-23-25-25-27-27 sts for neck = 25-26-26-27-28-29 sts left on each shoulder. Continue in stocking st with 5 garter sts towards neckline until piece measures 34-36-38-40-42-44 cm from marker (piece now measures approx 58-60-62-64-66-68 cm from casting on row). Cast off. SLEEVE: Worked back and forth on needle. Cast on 50-66-66-66-82-82 sts (includes 1 edge st each side) on needle size 4 mm with Muskat. Work M.1 with 1 edge st each side. After 3 vertical repeats of M.1 continue in stocking st. When piece measures 12-13-13-13-13-14 cm inc 1 st each side on every 2-3.5-2.5-1.5-3-1.5 cm a total of 11-6-8-12-6-9 times = 72-78-82-90-94-100 sts. When piece measures 35-34-33-32-31-30 cm (less for the larger sizes because of longer sleeve cap and wider shoulder) cast off 3 sts each side for sleeve cap. Cast off to shape the sleeve cap each side on every other row: 2 sts 4-5-4-4-5-5 times and 1 st 0-0-3-6-5-5 times, then 2 sts each side until piece measures 42 cm, now cast off 3 sts each side 1 time and cast off remaining sts on next row. Piece measures approx 43 cm. ASSEMBLY: Sew shoulder seams and set in sleeves. Sew sleeve seams inside 1 edge st and sew on buttons. |
|||||||||||||||||||||||||
Diagram explanations |
|||||||||||||||||||||||||
|
|||||||||||||||||||||||||
 |
|||||||||||||||||||||||||
 |
|||||||||||||||||||||||||
Have you finished this pattern?Tag your pictures with #dropspattern #salviacardigan or submit them to the #dropsfan gallery. Do you need help with this pattern?You'll find 26 tutorial videos, a Comments/Questions area and more by visiting the pattern on garnstudio.com. © 1982-2026 DROPS Design A/S. We reserve all rights. This document, including all its sub-sections, has copyrights. Read more about what you can do with our patterns at the bottom of each pattern on our site. |
|||||||||||||||||||||||||


With over 40 years in knitting and crochet design, DROPS Design offers one of the most extensive collections of free patterns on the internet - translated to 17 languages. As of today we count 324 catalogues and 12290 patterns translated into English (UK/cm). 12290
We work hard to bring you the best knitting and crochet have to offer, inspiration and advice as well as great quality yarns at incredible prices! Would you like to use our patterns for other than personal use? You can read what you are allowed to do in the Copyright text at the bottom of all our patterns. Happy crafting!
Post a comment to pattern DROPS 113-33
We would love to hear what you have to say about this pattern!
If you want to leave a question, please make sure you select the correct category in the form below, to speed up the answering process. Required fields are marked *.