
Popular categories
Looking for a yarn?


Comments / Questions (37)
![]() Katarzyna wrote:
Katarzyna wrote:
Witaj zrobiłam czapkę i nauszniki i mam problem z przyszyciem. W opisie jest napisane że nauszniki mają być przyszyte w odległości 12 oczek na przodzie czapki ale jak się patrzy na zdjęcie to ta odległość jest dużo większa; czy po złożeniu nauszników na pół należy je zszyć i dopiero potem doszyć do czapki Katarzyna S.
04.01.2026 - 10:10DROPS Design answered:
Witaj Kasiu, powinno być 'powinno być ok. 11-12-12 (13-14) CM między każdym nausznikiem na przodzie czapki...'. Już poprawiam na stronie. Pozdrawiamy!
04.01.2026 - 10:28
![]() France wrote:
France wrote:
Veste 6/9 mois. Je suis rendue à 162 m et me reste 7 diminutions de 8 m à faire. Suis déjà rendue à 24 cm car j’ai utilisée une aiguille plus grosse. Comment peut-on en même temps mettre 10 m en attente chaque côté de l’encolure et faire les diminutions demandées si on a pas encore fini les dim. de 8 mailles? On tricote les 2 côtés séparément?
04.10.2025 - 20:48DROPS Design answered:
Bonjour France, mettez d'abord en attente les 10 m de chaque côté: en commençant sur l'endroit, tricotez 10 m et mettez les en attente, terminez le rang en diminuant comme avant; tournez tricotez 10 m et mettez les en attente, terminez le rang comme avant; continuez ainsi en rabattant au début de chaque rang de chaque côté: 2 x 2 m et 3 x 1 m et, en même temps, continuez les diminutions du raglan comme avant tous les rangs sur l'endroit. Quand toutes les diminutions seront terminées, il doit vous rester 72 m et l'ouvrage doit mesurer 29 cm (si votre tension en hauteur est juste, sinon, ajustez le début de l'encolure sur votre propre tension). Bon tricot!
08.10.2025 - 08:00
![]() Ana wrote:
Ana wrote:
Hola. Quiero tejer el gorro de este patrón, pudo hacerlo con agujas circular? Y Como tejo el punto musgo? una fila del derecho y una fila del revez? o todas las filas del derecho? Gracias.
08.03.2025 - 19:22DROPS Design answered:
Hola Ana, el gorro se trabaja en redondo, por lo que el punto musgo se trabaja como 1 vuelta de derecho y 1 vuelta de revés. Se puede trabajar con agujas circulares. Las orejeras se pueden trabajar con una aguja circular también, pero se trabajan de ida y vuelta.
09.03.2025 - 20:15
![]() Kristina Maria Szalontay Møller wrote:
Kristina Maria Szalontay Møller wrote:
Når jeg er færdig med at tage ud under ærmerne, har jeg 9 vrangmasker under ærmet? Der står, de første 3 strikkes vrang, dernæst 3 ret osv, dvs når der er taget 15 ud, er de sidste 3 vrang i hver side sammen med de 3 vrangmasker under armen. Altså alle tallene passer, men det ser underligt ud. Jeg kan se spørgsmålet
28.10.2024 - 19:42DROPS Design answered:
Hej Kristina, jo det er sådan det kommer til at passe ind i "ribben". Men synes du det er finere hvis alle strikkes vrang, så gør du bare det :)
29.10.2024 - 13:57
![]() Roro wrote:
Roro wrote:
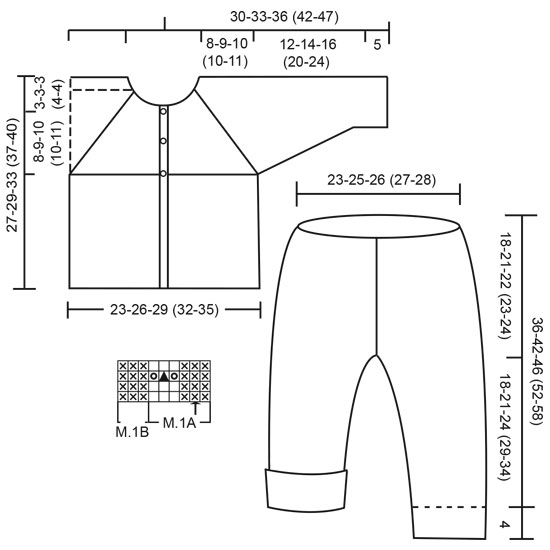
I cannot see the M1 lace pattern for this design, only the garment schematic. The stich key is there, but not the pattern chart.
14.03.2024 - 07:29DROPS Design answered:
Dear Roro, you will find the diagram for M.1A and M.1B) at the bottom of the chart for the jacket, on the left side of the chart for trousers. Happy knitting!
14.03.2024 - 16:42
![]() Strickoma wrote:
Strickoma wrote:
Bei der Jacke heißt es: "Gleichzeitig auf der 2. R. gleich verteilt auf 130-146-160 (176-192) M abk. – nicht über der Blende abk. " - Ich habe nun stundenlang versucht, auszurechnen, bei welchen Maschenzahlen ich abnehmen soll, um eine gleichmäßige Verteilung zu erzielen - ich verstehe es einfach nicht. (Ich stricke das Modell für Größe 2 Jahre mit 223 Machen).
04.10.2021 - 09:58DROPS Design answered:
Liebe Strickoma, in 2 Jahre haben Sie 223 Maschen und Sie sollen bis 176 M abnehmen = 47 Maschen reglemäßig verteilt abnehmen - diese Lektion erklärt, wie man diese Maschen abnehmen soll. Viel Spaß beim stricken!
04.10.2021 - 15:25
![]() BS wrote:
BS wrote:
How do I shape the neck line? How many stitches should there be ? What is 2st 2times and 1st 3times
13.08.2021 - 08:05DROPS Design answered:
Dear BS, neckline will be shaped when piece measures 22-24-28 (31-34) cm from cast on edge: slip on a thread the first 8-15 sts (see size) at the beg of next 2 row (= on each side), then cast off 2 sts at the beg of next 4 rows (2 sts 2 times on each side), then 1 stitch at the beg of next 6 rows (= 1 st 3 times on each side). Happy knitting!
16.08.2021 - 07:25
![]() BS wrote:
BS wrote:
After the piece erasures 22cm, I do 2 rows stocking, what is 1 row with holes? Is it on the right side. After that row 3 rows of garter .
04.08.2021 - 05:06DROPS Design answered:
Dear BS, you should adjust the 22 cm in height so that you have worked 2 rows after a lace row such as row 3 in M.1A, ie you should stop after a row like row 1 in M.1A (= next row will be worked from wrong side). Happy knitting!
04.08.2021 - 07:52
![]() Katarina wrote:
Katarina wrote:
Jag ser inte diagrammet i mönstret??
27.08.2020 - 15:44DROPS Design answered:
Hej Katarina. Du hittar det under tröjan på måttskissen. Mvh DROPS Design
28.08.2020 - 07:45
![]() Anke S wrote:
Anke S wrote:
Und wo finde ich das neue Diagramm ????
16.06.2020 - 18:30DROPS Design answered:
Liebe Anke S, Diagram is online - aktualisieren Sie die Seite wenn Sie den Pfeil noch nicht sehen (= 2. linke Masche in M.1A). Viel Spaß beim stricken!
17.06.2020 - 07:43
|
|||||||||||||
Seaport Baby#seaportbabyset |
|||||||||||||
 |
 |
||||||||||||
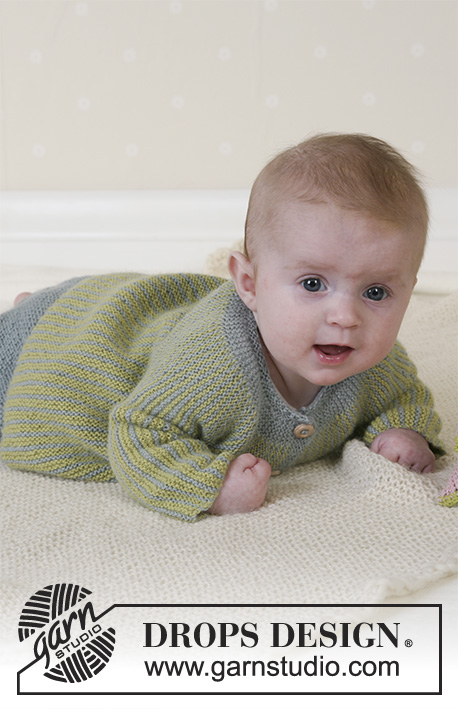
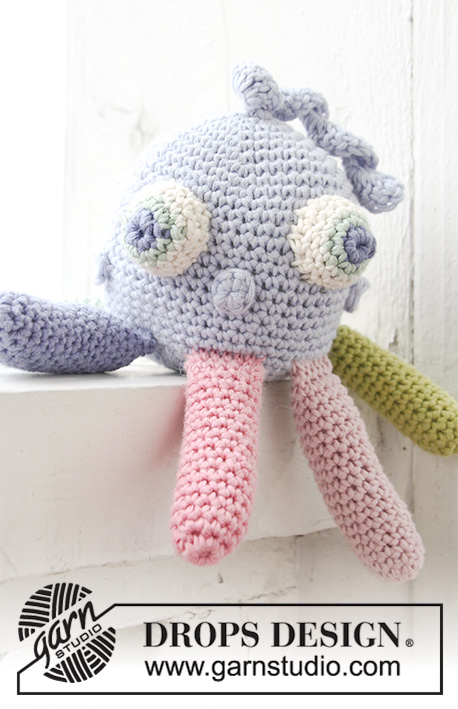
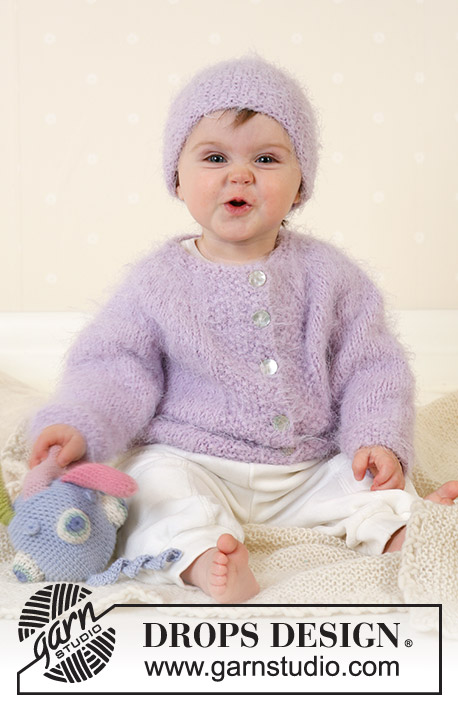
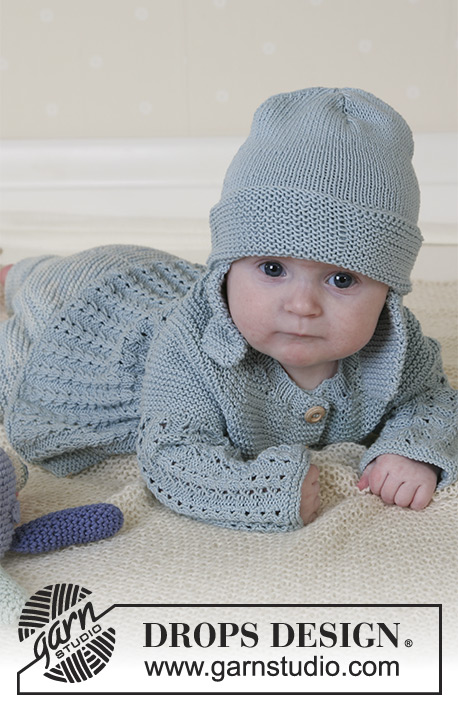
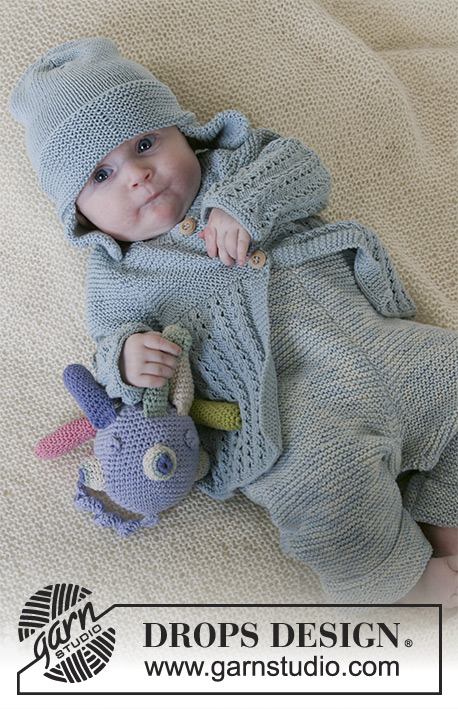
Jacket, trousers, hat, soft toy and blanket in Safran
DROPS Baby 13-2 |
|||||||||||||
|
Knitting tension: 26 sts x 52 rows on needles size 2.5mm in garter sts = 10 x 10 cm. 33 sts x 34 rows on needles size 2.5mm in pattern = 10 x 10 cm. Garter sts: Knit all rows Pattern: See diagram M.1. The diagram shows the pattern from the right side. Button hole: Make button holes on right front band from the right side as follows: Knit tog 2nd and 3rd st from the edge, 1 yo. Knit yo into back of st on next row. Make buttonholes as follows: Size 1/3 months: 15 and 19 cm Size 6/9 months: 16 and 20 cm Size 12/18 months: 19 and 24 cm Size 2 years: 22 and 27 cm Size 3/4 years: 24 and 29 cm Note! The last buttonhole will be on the neck edge. Decreasing tips (applies to raglan): All decreases are done from the right side. Dec as follows in each transition between sleeve and body pieces (begin 3 sts before marking thread): K2 tog, K2 (marking thread is between these 2 sts), slip 1 st as if to knit, K1, psso. JACKET: Back and front piece: knit back and forth on circular needle – read the whole section before knitting it! Cast on 163-181-199 (223-241) sts (incl 5 edge sts each side = mid front, knitted in garter sts throughout) using ice blue and needle size 2.5mm. Knit 4 rows garter sts (1st row = right side). Knit next row as follows from right side: 5 edge sts in garter sts, M.1A over the next 150-168-186 (210-228) sts, M.1B (= 3 sts) and finish with 5 edge sts in garter sts. Continue pattern. When piece measures approx 15-16-19 (22-24) cm – adjust so that next row is from the wrong side and after 2 rows in stocking sts following 1 row with holes – knit 3 rows garter sts over all sts (remember buttonhole on right front piece – see explanation above.). At the same time, on 2nd row of garter sts dec evenly on row to 130-146-160 (176-192) sts – do not dec over the front band sts. Knit next row as follows from the right side: Knit 31-35-38 (41-45) sts (= right front piece), cast off 8-8-8 (10-10) sts for armhole, knit 52-60-68 (74-82) (= back piece), cast off 8-8-8 (10-10) sts for armhole, and knit remaining 31-35-38 (41-45) sts (= left front piece). Put the piece aside and knit the sleeves. Sleeve: knitted round on double pointed needles. Cast on 42-48-48 (54-54) sts with ice blue on needle size 2.5mm. Knit 1 round, purl 1 round, knit 1 round and purl 1 round. Now knit M.1A – begin by the arrow in diagram and insert a marking thread in this st (= mid under arm). When piece measures 5 cm inc 1 st on each side of the middle 3 sts mid under arm a total of 12-12-15 (15-18) times as follows: Size 1/3 months: every 3rd round Size 6/9 months: every 3rd round Size 12/18 months: every 3rd round Size 2 years: every 4th round Size 3/4 years: every 4th round = 66-72-78 (84-90) sts – incorporate new sts in pattern as you go along, i.e. purl the first 3 inc sts, knit the 3 next etc. When piece measures approx 16-18-20 (24-28) cm - adjust to after 2 rows in stocking sts following 1 row with holes – purl 1 round. Now knit 1 round whilst dec evenly to 52-56-62 (68-72) sts. Purl 1 round and knit 1 round, at the same time casting off 8-8-8 (10-10) sts mid under arm = 44-48-54 (58-62) sts left on round. Put the piece aside and knit the other sleeve. Yoke: Put sleeves in on the same circular needle as body pieces where you cast off the armhole = 202-226-252 (272-296) sts. Insert a marking thread in all transitions between sleeves and body pieces = marking 4 threads. Read all of the following section before knitting it! Knit back and forth circular needle over all sts – remember buttonhole on right front band, see explanation above. Raglan decreases: knit 1 row from the wrong side over all sts before starting the decreases. Dec 1 st on each side of all marking threads (= 8 dec per row) – see Decreasing tips! Dec on every 4th row: 9 times and then on every other row: 4-6-9 (9-11) times. Neck: At the same time, when piece measures 22-24-28 (31-34) cm put the 8-10-10 (13-15) sts towards mid front on each side on a thread for neck. Now dec to shape the neckline on every other row: 2 sts 2 times, 1 st 3 times. When all dec for raglan and neck are complete there are 68-72-74 (88-92) sts left on row and piece measures approx 27-29-33 (37-40) cm. Assembly: Sew the openings under the arms. Neck: Pick up approx 96 to 138 sts round the neck (incl sts on thread) with ice blue and needle size 2.5mm. Knit 1 row from the wrong side. Knit 1 row from the right side whilst dec evenly on row to 79-79-85 (91-97) sts (do not inc over the front band sts). At the same time, make buttonhole on right front band above the others. Continue in rib as follows (1st row = wrong side): 5 edge sts in garter sts, *K3, P3*, repeat from *-* and finish with K3 and 5 sts in garter sts. When rib measures 1.5-2 cm cast off in rib. Sew on buttons. _________________________________________ TROUSERS: Right leg: Cast on 52-60-64 (70-74) sts (incl 1 edge st each side) using needle size 2.5mm and ice blue mix and knit garter sts. Insert a marking thread when piece measures 4 cm (= turn-up) and measure piece from here. When piece measures 6-5-5 (6-4) cm inc 1 st each side on every 1.5-2-2.5 (3-4) cm a total of 8 times = 68-76-80 (86-90) sts. When piece measures 18-21-24 (29-34) cm, cast off 2 sts each side. Now dec 1 st on one side of piece (= towards mid front) on every other row a total of 2-4-6 (10-12) times = 62-68-70 (72-74) sts. Continue in garter sts until piece measures 36-42-46 (52-58) cm from marking thread. Now knit 2 cm stocking sts and cast off loosely. Left leg: As right leg, but mirrored. Assembly: Fold right leg double and sew inner leg seam within 1 edge st – Note! On the lower 4 cm (turn-up) sew with seam on the right side so that it doesn’t show when you turn it. Sew left leg in the same way. Sew the opening between legs from mid front to mid back on pants. Turn the 2 cm stocking sts at the top against the wrong side and attach with small, neat sts. – leave a little opening for the elastic band. Turn the turn-ups. _________________________________________ HAT: To fit head circumference: 40/42 – 42/44 – 44/46 – (46/48 – 48/50) cm Garter sts: (on circular needle): knit 1 round, purl 1 round Decreasing tips: Start dec 2 sts before marking thread: Slip 1 st as if to knit, K1, psso, K2 tog. The hat is knitted round on double pointed needles. Loosely cast on 95-100-105 (110-115) sts with ice blue and needles size 2.5mm and knit garter sts – see explanation above. When piece measures 8-10-10 (12-12) cm continue in stocking sts. When piece measures 13-15-16 (18-18) cm insert 5 marking threads with 19-20-21 (22-23) sts between each. Now dec 1 st on each side of all marking threads on every other round – see Decreasing tips - until there are 15-20-15 (20-15) sts left on round. Pull a double thread through remaining sts, pull tight and attach. Fold the lower 4-5-5 (6-6) cm towards right side and attach each side with a couple of sts from the wrong side. The hat measures approx 14-15-16 (17-18) cm. Earflaps: The earflaps are knitted from bottom up. Cast on 13 sts with ice blue and needles size 2.5mm and knit garter sts – insert a marking thread in the middle st. At the same time, after 2nd row inc on every 6th row a total of 7-7-7 (8-8) times as follows: inc 1 st each side within 1 edge st and inc 1 st on both sides of the marking thread (= 4 inc per row) by making a yo and knitting into back of yo on next row (to avoid a hole) = 41-41-41 (45-45) sts. After the last inc cast off loosely – earflap measures approx 8-8-8 (9-9) cm. Make another earflap. Fold earflaps double and sew to side and lower edge, there should be approx 11-12-12 (13-14) cm between earflaps mid front (sew earflaps on the inside of hat, 1-2 cm from lower edge so that the seam doesn’t show). |
|||||||||||||
Diagram explanations |
|||||||||||||
|
|||||||||||||
 |
|||||||||||||
Have you finished this pattern?Tag your pictures with #dropspattern #seaportbabyset or submit them to the #dropsfan gallery. Do you need help with this pattern?You'll find 25 tutorial videos, a Comments/Questions area and more by visiting the pattern on garnstudio.com. © 1982-2026 DROPS Design A/S. We reserve all rights. This document, including all its sub-sections, has copyrights. Read more about what you can do with our patterns at the bottom of each pattern on our site. |
|||||||||||||


With over 40 years in knitting and crochet design, DROPS Design offers one of the most extensive collections of free patterns on the internet - translated to 17 languages. As of today we count 324 catalogues and 12290 patterns translated into English (UK/cm). 12290
We work hard to bring you the best knitting and crochet have to offer, inspiration and advice as well as great quality yarns at incredible prices! Would you like to use our patterns for other than personal use? You can read what you are allowed to do in the Copyright text at the bottom of all our patterns. Happy crafting!
Post a comment to pattern DROPS Baby 13-2
We would love to hear what you have to say about this pattern!
If you want to leave a question, please make sure you select the correct category in the form below, to speed up the answering process. Required fields are marked *.