
Popular categories
Looking for a yarn?


Comments / Questions (7)
![]() Sharin wrote:
Sharin wrote:
Is er een video hoe je de A1 en A2 moet breien in dit patroon? Mij lukt het niet. Is er een andere manier van meerderen die ik eventueel kan gebruiken met hetzelfde resultaat voor het breien van de ‘pas’ voor dit patroon?
14.03.2025 - 18:13DROPS Design answered:
Dag Sharin,
Wellicht heb je wat aan deze twee video's: Hoe u 2 steken naar 3 steken meerdert en Hoe u 2 steken meerdert naar 4 steken als u in de rondte breit..
15.04.2025 - 19:53
![]() Sharin wrote:
Sharin wrote:
Is er een video hoe je de A1 en A2 moet breien in dit patroon? Mij lukt het niet. Is er een andere manier van meerderen die ik eventueel kan gebruiken met hetzelfde resultaat voor het breien van de ‘pas’ voor dit patroon?
13.03.2025 - 09:55
![]() Sharin wrote:
Sharin wrote:
Ik ben bezig met patroon 252-13 en ben bijna klaar met de halsrand. Er staat ‘eindig met een naald op de verkeerde kant ‘ heb ik het goed dat je dan eindigt ‘voordat’ je de averechtse naald gaat breien?
11.03.2025 - 22:54DROPS Design answered:
Dag Sharin,
Als er staat 'eindig met een naald op de verkeerde kant', dan is het de bedoeling dat je de laatste naald aan de verkeerde kant hebt gebreid.
12.03.2025 - 10:03
![]() Sharin wrote:
Sharin wrote:
Voor dit patroon worden 2 soorten garen gebruikt fabel en kid-slik. Waarom van de fabel 350 gram en van de kid-slik maar 175 gram. Voor patroon brei je met 2 draden van elk dus 1. Daarom dacht ik van beiden evenveel garen nodig te hebben. Met vriendelijke groet,
11.02.2025 - 14:22DROPS Design answered:
Dag Sharin,
DROPS Kid-Silk is heel licht in gewicht en heeft een lange looplengte, vandaar dat je er veel minder van nodig hebt.
11.02.2025 - 20:43
![]() Stojanka Strugar-gospavic wrote:
Stojanka Strugar-gospavic wrote:
How many metars require one jumper size 12 to be made of of kids moher- silk yarn?
22.01.2025 - 16:26DROPS Design answered:
Dear Mrs Strugar-gospavic, it will depend on the tension, pattern, shape etc... to help you find all our jumpers worked with a yarn group A - as DROPS Kid-Silk - that you can work either alone or together with another yarn (use yarn converter if needed) here. Happy knitting!
23.01.2025 - 09:52
![]() Ella wrote:
Ella wrote:
Jag får inte fram något stickdiagram. Enbart en överblick över koftan. Eller ör det diagrammet?
09.11.2024 - 17:19DROPS Design answered:
Hej Ella. Precis över måttskissen (överblicken) på koftan så finns 2 små diagram. Mvh DROPS Design
11.11.2024 - 08:02
![]() Marianne De Jonge wrote:
Marianne De Jonge wrote:
Bij het vest winter poem staat 21 steken, bij de winter poem trui 18. Ik denk dat 21 fout is, dit aantal gaat over naald 3, niet over 4,5 waarin het vest, net als de trui, gebreid wordt. Verwarrend...
09.11.2024 - 16:10
|
||||||||||
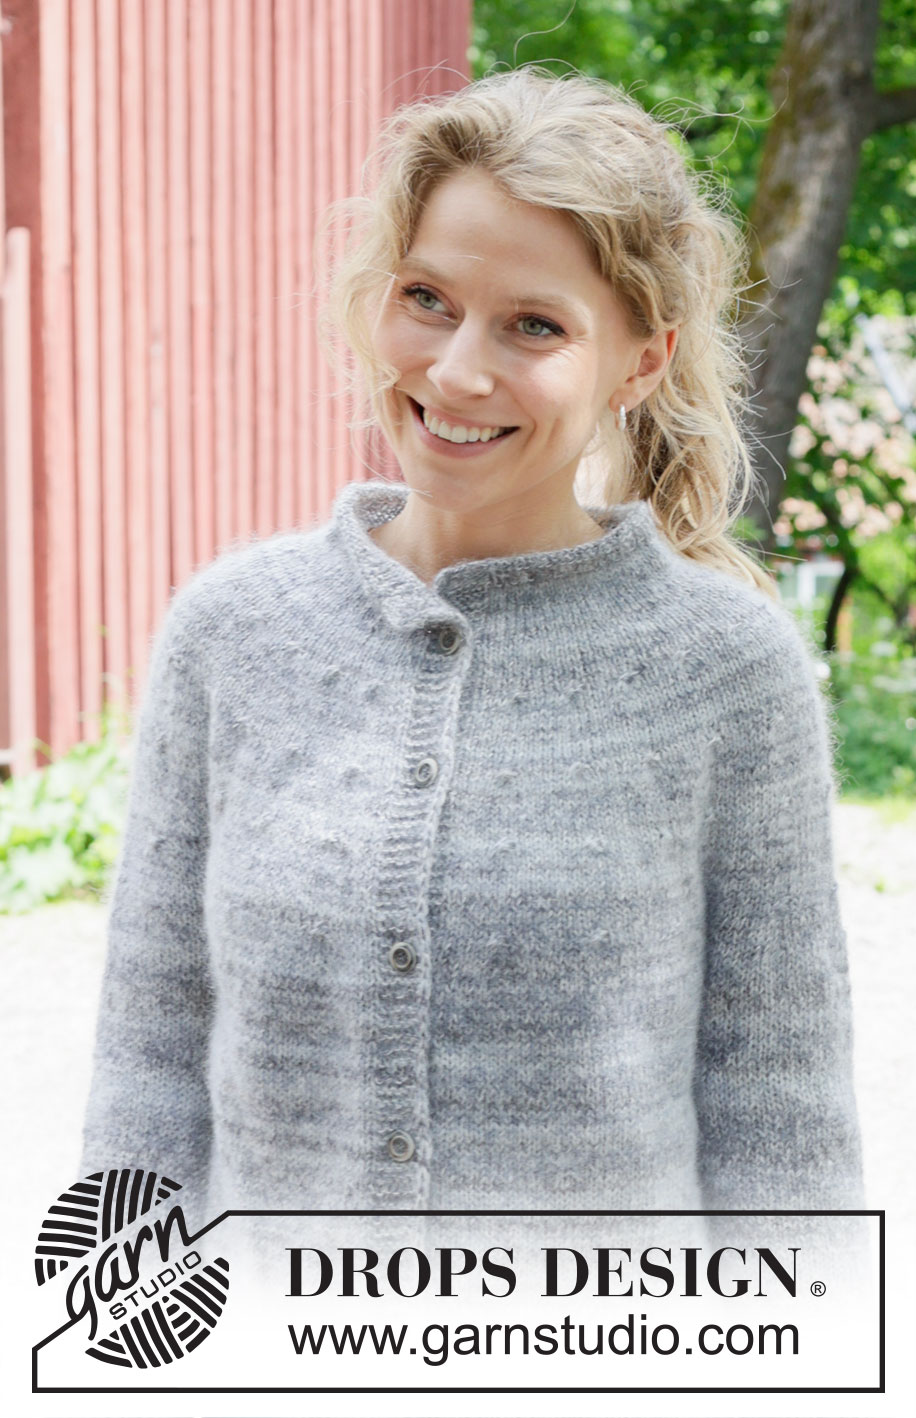
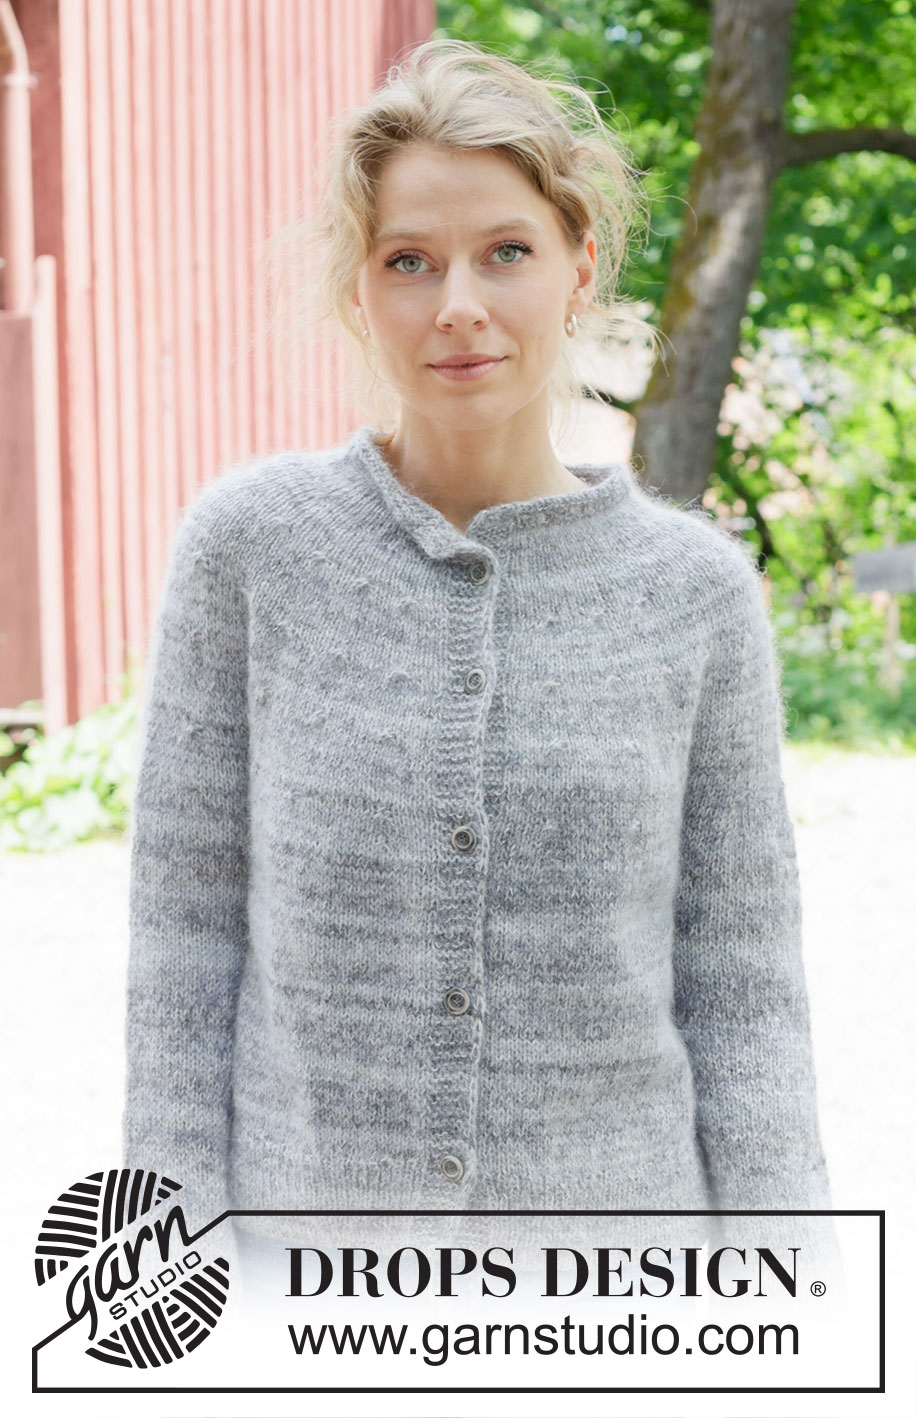
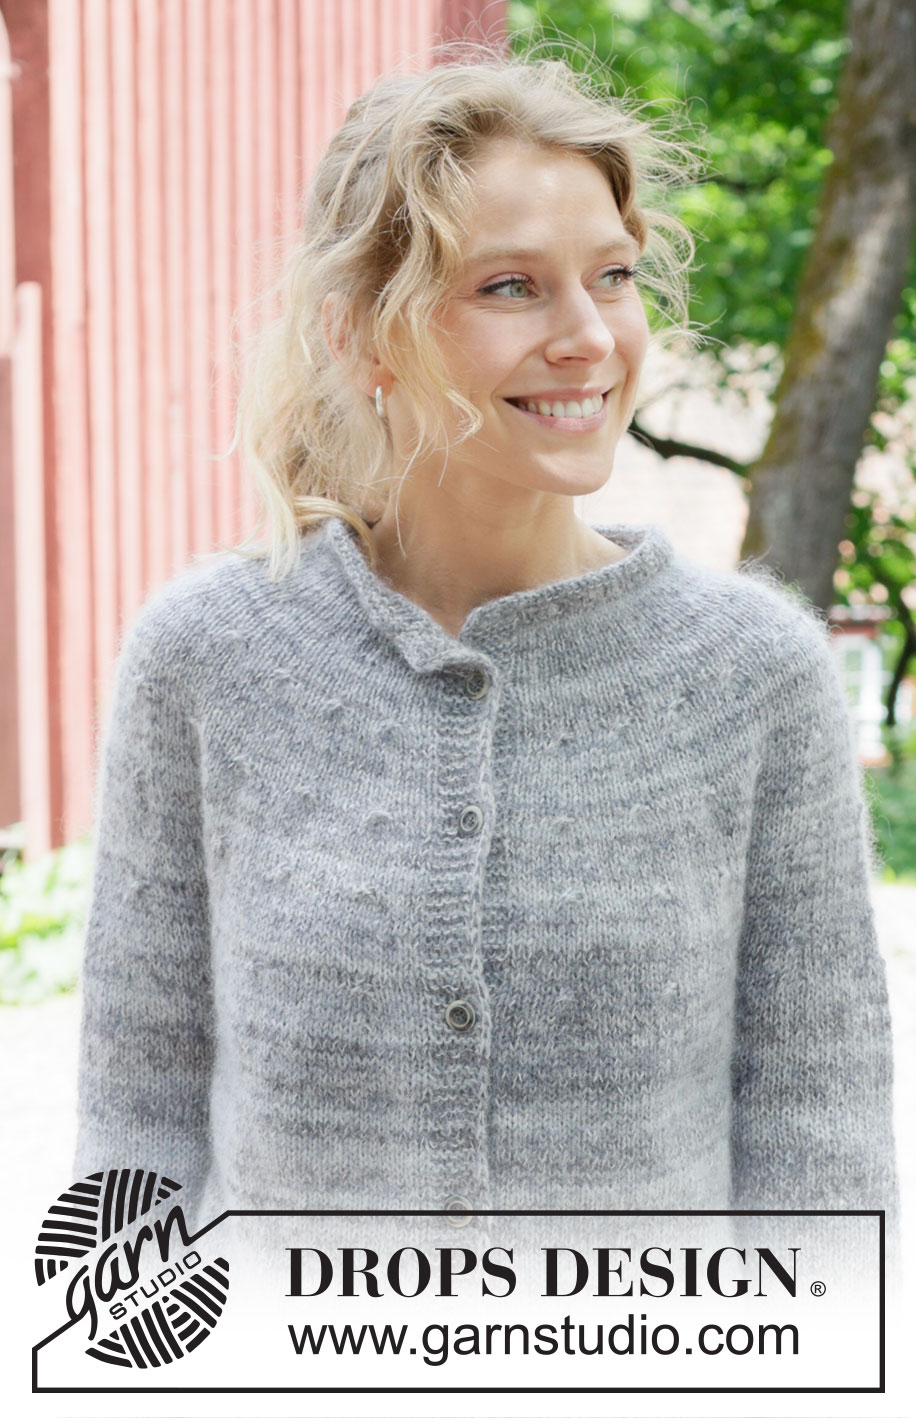
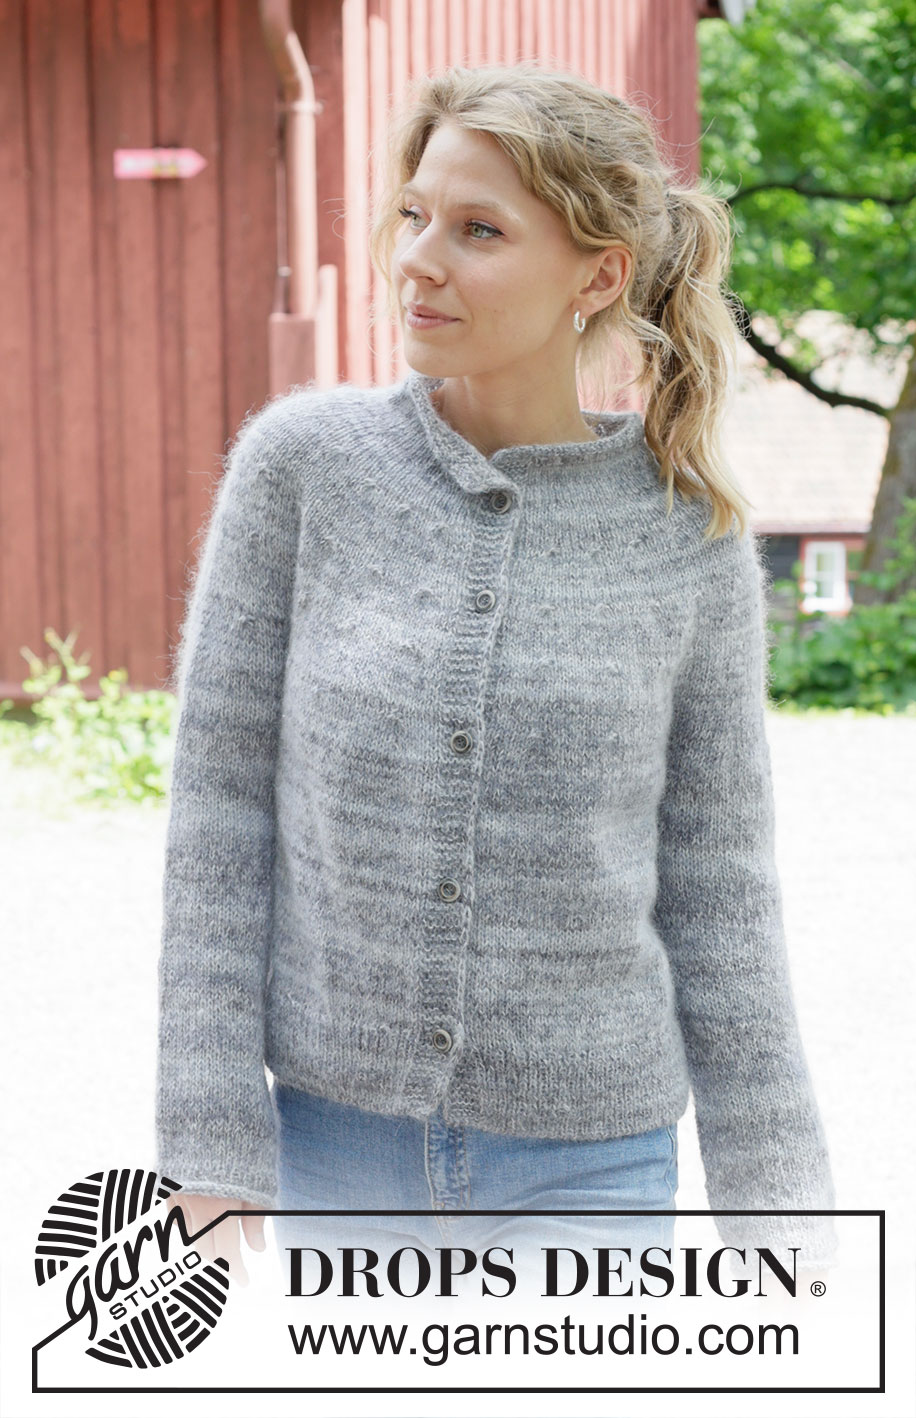
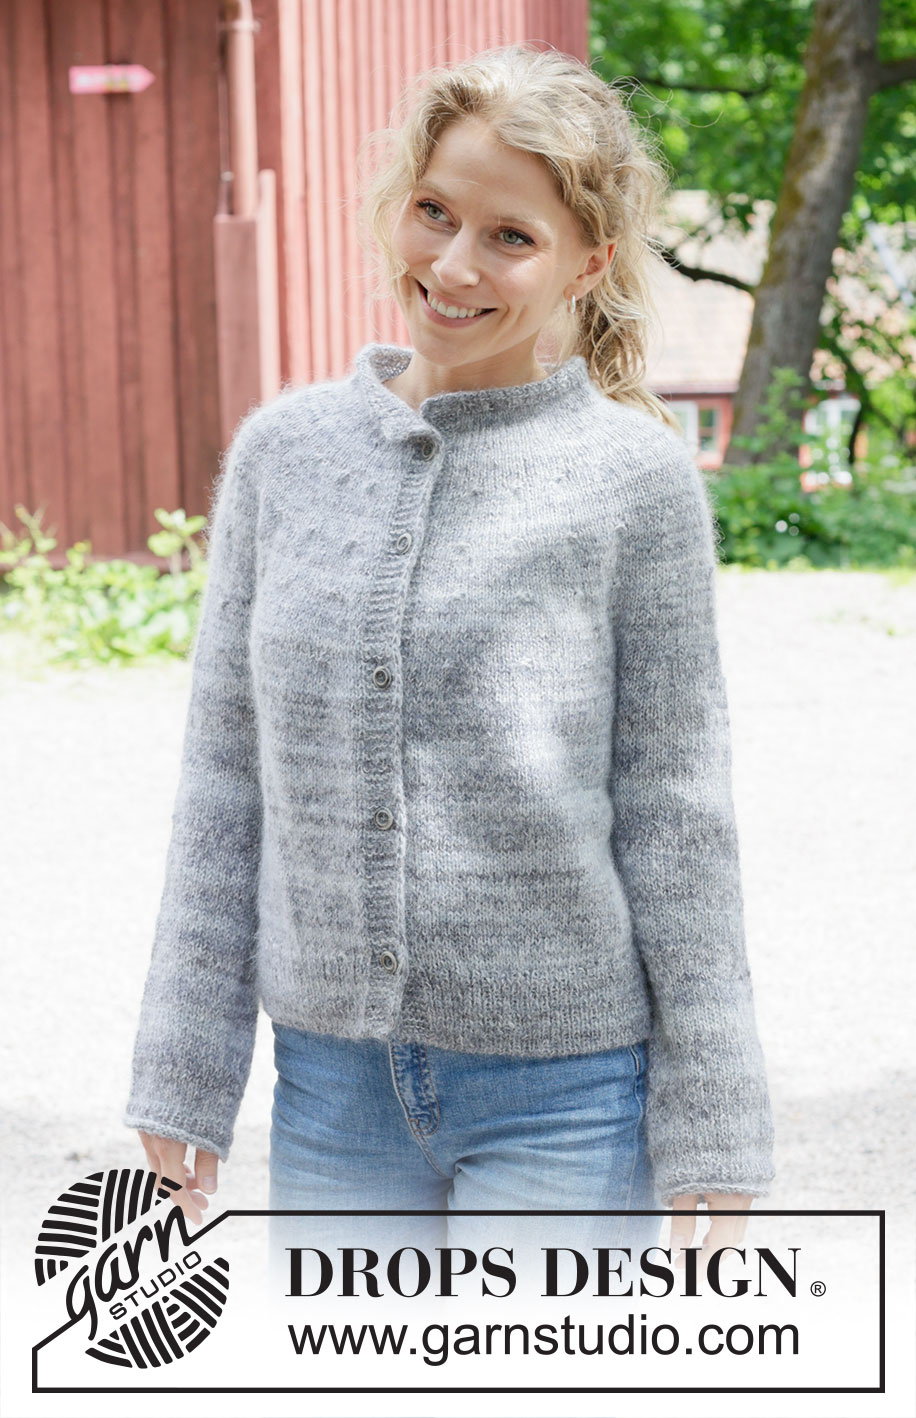
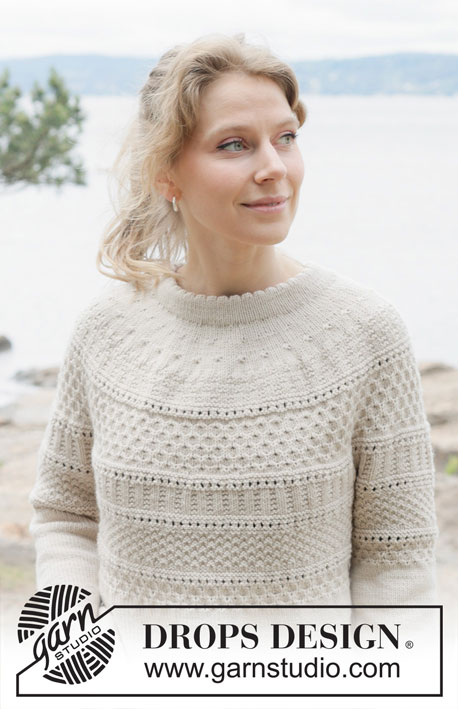
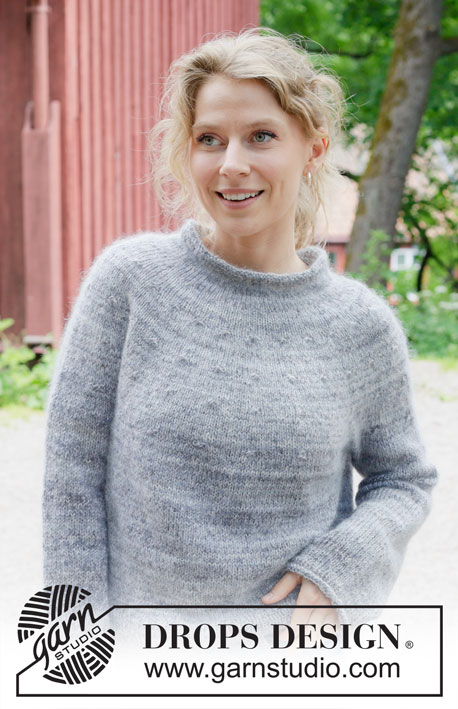
Winter Poem Cardigan#winterpoemcardigan |
||||||||||
 |
 |
|||||||||
Knitted jacket in DROPS Fabel and DROPS Kid-Silk. Piece is knitted top down in stocking stitch with round yoke, rolling edge and i-cord. Size: S - XXXL
DROPS 252-13 |
||||||||||
|
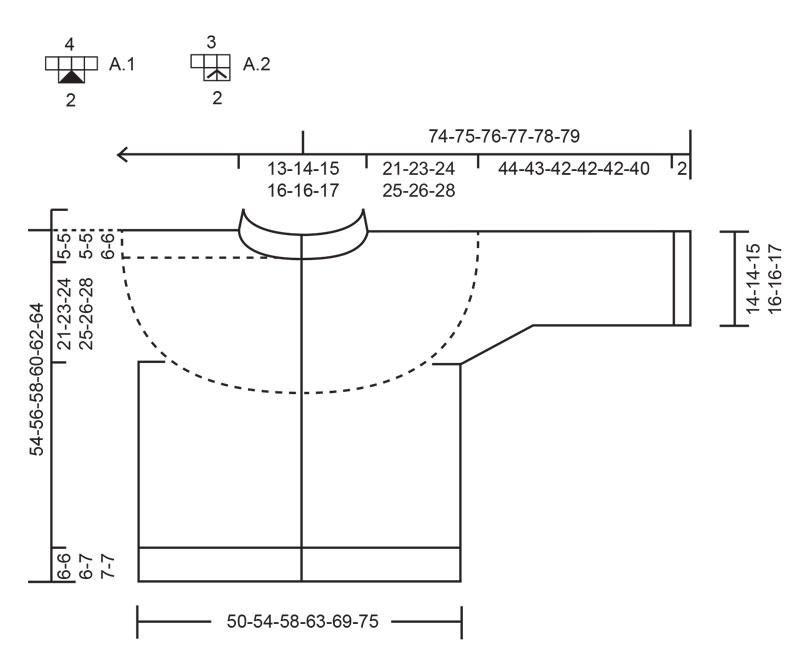
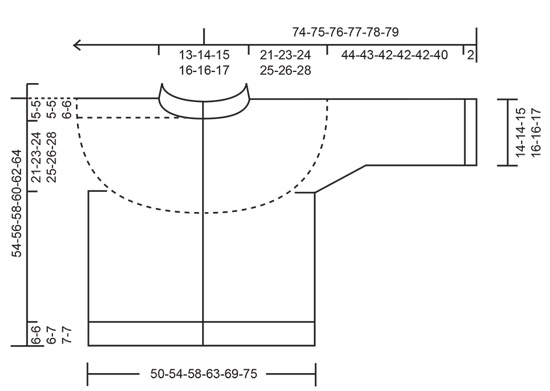
---------------------------------------------------------- EXPLANATION FOR THE PATTERN: ---------------------------------------------------------- GARTER STITCH (when working back and forth): Knit on all rows, i.e. knit from right side and knit from wrong side. 1 ridge vertically = knit 2 rows. BAND WITH I-CORD: BEGINNING OF ROW: Work band as follows: Slip 1 stitch purlwise with strand in front of piece, knit 1 and work 5 stitches in garter stitch. END OF ROW: Work band as follows: Work until 7 stitches remain on row, work 5 stitches in garter stitch, slip 1 stitch purlwise with strand in front of piece, knit 1. Work the same way both from right side and wrong side. BUTTONHOLES: Decrease for buttonholes on right band (when garment is worn). Decrease from right side when 5 stitches remain on row as follows: ROW 1 (= right side): Make 1 yarn over, knit 2 together, knit 1, slip 1 stitch purlwise with strand in front of piece, knit 1. ROW 2 (= wrong side): Work band as before and knit yarn over to make a buttonhole. Decrease for first buttonhole on first row from right side after neck edge has been worked. Then decrease the next 4-4-5-5-5-5 buttonholes approx. 10½-11-9½-9½-10-10 cm apart. Place bottom buttonhole in the transition between stocking stitch and rib. PATTERN: See diagram A.1 (= 2 stitches increased) and A.2 (= 1 stitch increased). Diagrams show all rows in pattern seen from the right side. INCREASE TIP (evenly): To calculate how to increase evenly, use the total number of stitches on row (e.g. 121 stitches), minus bands (e.g. 14 stitches) and divide the remaining stitches by number of increases to be done (e.g. 29) = 3.7. In this example increase by making 1 yarn over after approx. every 4th stitch (do not increase over bands). On next row work yarn overs twisted to avoid holes. DECREASE TIP: Decrease 1 stitch on each side of marker thread as follows: Work until 3 stitches remain before marker thread and knit 2 together, knit 2 (marker thread is in the middle of these 2 stitches), slip 1 stitch knitwise, knit 1, pass slipped stitch over stitch worked (= 2 stitches decreased). ---------------------------------------------------------- START THE PIECE HERE: ---------------------------------------------------------- JACKET - SHORT OVERVIEW OF THE PIECE: In this pattern needles of different length have been used, begin with fitting length for number of stitches and switch as needed. Work neck edge and yoke back and forth on circular needle from mid front, work top down. When yoke is done, divide piece for body and sleeves. Work body downwards back and forth on circular needle while putting the sleeves aside. Then work sleeves downwards in the round on needle. If 0 is given for the chosen size, it means that you skip the information until next information. NECK EDGE: Cast on 111-115-121-125-131-137 stitches on circular needle size 4.5 mm with 1 strand DROPS Fabel and 1 strand DROPS Kid-Silk (= 2 strands). Switch to circular needle size 3 mm (cast on on a larger needle to get an elastic cast on edge) and work as follows: ROW 1 (= wrong side): 7 stitches BAND WITH I-CORD - read explanation above, purl until 7 stitches remain, work 7 stitches band with i-cord. ROW 2 (= right side): 7 stitches band as before, knit until 7 stitches remain, work 7 stitches band as before. ROW 3 (= wrong side): 7 stitches band as before, purl until 7 stitches remain, work 7 stitches band as before. ROW 4 (= right side): 7 stitches band as before, knit until 7 stitches remain, work 7 stitches band as before. ROW 5 (= wrong side): 7 stitches band, work rib (= purl 1/knit 1), work from **-* until 8 stitches remain, purl 1 and 7 stitches band. ROW 6 (= right side): 7 stitches band, work (knit 1/purl 1), until 8 stitches remain, knit 1 and 7 stitches band. ROW 7 (= wrong side): 7 stitches band, work rib (= purl 1/knit 1), work from **-* until 8 stitches remain, purl 1 and 7 stitches band. AFTER 7TH ROW: Then work in stocking stitch and band as before until neck edge measures 4-4-4-5-5-5 cm measured after rib - finish with a row from wrong side. Insert a maker on the inside of band in one side of piece, measure piece from this marker. YOKE: Switch to circular needle size 4.5 mm and work first row from the right side and from mid front as follows: Work band as before, work 97-101-107-111-117-123 stitches in stocking stitch while AT THE SAME TIME increasing 24-25-29-30-34-38 stitches evenly over these stitches – read INCREASE TIP, work band as before and remember BUTTONHOLES – read explanation above = 135-140-150-155-165-175 stitches on needle. Then work in stocking stitch and band. Remember to follow the knitting tension! When yoke measures 4-4-4-5-5-5 cm from marker, increase stitches by working PATTERN – read explanation above and work as follows: Work band as before, * 2 stitches in stocking stitch, A.1, 1 stitch in stocking stitch *, work from *-* 24-25-27-28-30-32 times in total, work 1 stitch in stocking stitch and band as before = 183-190-204-211-225-239 stitches. Continue with stocking stitch and band until yoke measures 8-8-8-10-10-10 cm from marker. Work next row as follows from right side: Work band as before, * 3 stitches in stocking stitch, A.1, 2 stitches in stocking stitch *, work from *-* 24-25-27-28-30-32 times in total, work 1 stitch in stocking stitch and band as before = 231-240-258-267-285-303 stitches. Continue with stocking stitch and band until yoke measures 12-13-13-15-15-16 cm from marker. FIND YOUR SIZE: Then work pattern and increase differently in the different sizes, work according to your size below. SIZE S, M and L: Work next row as follows from right side: Work band as before, * 4 stitches in stocking stitch, A.2, 3 stitches in stocking stitch *, work from *-* 24-25-27 times in total, work 1 stitch in stocking stitch and band as before = 255-265-285 stitches. Continue with stocking stitch and band until yoke measures 16-18-18 cm from marker. Work next row as follows from right side: Work band as before, * 4 stitches in stocking stitch, A.2, 4 stitches in stocking stitch *, work from *-* 24-25-27 times in total, work 1 stitch in stocking stitch and band as before = 279-290-312 stitches. Then work from ALLE SIZES. SIZE XL, XXL and XXXL: Work next row as follows from right side: Work band as before, * 4 stitches in stocking stitch, A.1, 3 stitches in stocking stitch *, work from *-* 28-30-32 times in total, work 1 stitch in stocking stitch and band as before = 323-345-367 stitches. Continue with stocking stitch and band until yoke measures 20-20-22 cm from marker. Work next row as follows from right side: Work band as before, * 4 stitches in stocking stitch, A.2, 5 stitches in stocking stitch *, work from *-* 28-30-32 times in total, work 1 stitch in stocking stitch and band as before = 351-375-399 stitches. Then work from ALLE SIZES. ALL SIZES: = 279-290-312-351-375-399 stitches. Continue with stocking stitch and bands. When yoke measures 18-20-20-22-22-24 cm from marker increase 0-9-7-0-0-0 stitches evenly – read INCREASE TIP (do not increase over band) = 279-299-319-351-375-399 stitches. When yoke measures 21-23-24-25-26-28 cm from marker divide piece for body and sleeves. DIVIDING FOR BODY AND SLEEVES: AT THE SAME TIME as next row is worked divide yoke for body and sleeves as follows: Work 48-51-54-58-63-68 stitches as before (= front piece), slip the next 50-54-58-66-68-70 stitches on a thread for sleeve, cast on 8-8-10-10-12-12 new stitches on row (= in the side mid under sleeve), work 83-89-95-103-113-123 stitches in stocking stitch (= back piece), slip the next 50-54-58-66-68-70 stitches on a thread for sleeve, cast on 8-8-10-10-12-12 new stitches on row (= in the side mid under sleeve) and work the last 48-51-54-58-63-68 stitches as before (= front piece). Finish body and sleeves separately. BODY: = 195-207-223-239-263-283 stitches. Work in stocking stitch and band as before until piece measures 43-45-47-48-49-51 cm from marker mid front. On next row from right side begin rib while AT THE SAME TIME increasing 30-34-34-40-40-46 stitches evenly on row (do not increase over bands) = 225-241-257-279-303-329 stitches, work as follows: Switch to circular needle size 3 mm, work band as before, work rib (= knit 1/purl 1 - remember increase) until 8 stitches remain, knit 1 and band as before. When rib measures 6-6-6-7-7-7 cm cast off all stitches with Italian cast off or cast off somewhat loosely with knit over knit and purl over purl. Jacket measures 49-51-53-55-56-58 cm from marker mid front and approx. 54-56-58-60-62-64 cm from the top of shoulder. SLEEVES: Slip 50-54-58-66-68-70 sleeve stitches from one thread on to circular needle size 4.5 mm and pick in addition up 1 stitch in each of the 8-8-10-10-12-12 stitches cast on under sleeve = 58-62-68-76-80-82 stitches. Insert 1 marker thread in the middle of the 8-8-10-10-12-12 new stitches under sleeve - round begins at the marker thread. Work in stocking stitch in the round on needle - AT THE SAME TIME when sleeve measures 3-3-3-2-2-2 cm from division, decrease mid under sleeve – read DECREASE TIP and decrease as follows: Decrease 2 stitches every 3-2½-2-1½-1½-1½ cm 4-5-7-10-11-11 times in total = 50-52-54-56-58-60 stitches. Work until sleeve measures 44-43-42-42-42-40 cm from division. Switch to double pointed needles size 3 mm and work 3 rounds rib (= knit 1/purl 1). Then work 3 rounds in stocking stitch. Switch to double pointed needles size 4.5 mm and loosely cast off. Sleeve measures approx. 46-45-44-44-44-42 cm from division. ASSEMBLY: Sew the buttons on to the left band. |
||||||||||
Diagram explanations |
||||||||||
|
||||||||||
 |
||||||||||
 |
||||||||||
Have you finished this pattern?Tag your pictures with #dropspattern #winterpoemcardigan or submit them to the #dropsfan gallery. Do you need help with this pattern?You'll find 33 tutorial videos, a Comments/Questions area and more by visiting the pattern on garnstudio.com. © 1982-2026 DROPS Design A/S. We reserve all rights. This document, including all its sub-sections, has copyrights. Read more about what you can do with our patterns at the bottom of each pattern on our site. |
||||||||||


With over 40 years in knitting and crochet design, DROPS Design offers one of the most extensive collections of free patterns on the internet - translated to 17 languages. As of today we count 324 catalogues and 12290 patterns translated into English (UK/cm). 12290
We work hard to bring you the best knitting and crochet have to offer, inspiration and advice as well as great quality yarns at incredible prices! Would you like to use our patterns for other than personal use? You can read what you are allowed to do in the Copyright text at the bottom of all our patterns. Happy crafting!
Post a comment to pattern DROPS 252-13
We would love to hear what you have to say about this pattern!
If you want to leave a question, please make sure you select the correct category in the form below, to speed up the answering process. Required fields are marked *.