
Popular categories
Looking for a yarn?


Comments / Questions (10)
![]() Linda wrote:
Linda wrote:
Hallo, ich möchte die Jacke gerne aus Soft Tweed stricken. Welches Garn würden Sie dazu empfehlen, um auf eine ähnliche Maschenprobe zu kommen? Danke! Linda
08.02.2026 - 17:59DROPS Design answered:
Liebe Linda, schauen Sie sich am besten Beispiele bei unseren Garnkombinationen an. Diese finden Sie unter "Garne & Nadeln", dann rechts "Garnkombinationen", dort können Sie Soft-Tweed als Garn auswählen und sich verschiedene Möglichkeiten anzeigen lassen (sehr oft ist es eine Kombination mit Garngruppe A, dann kommen Sie insgesamt auf Garngruppe C, die Sie für die Anleitung benötigen), dann haben Sie auch direkt vor Augen, wie eine Mischung zweier Garne farblich aussehen kann. Viel Spaß beim Auswählen!
24.02.2026 - 16:52
![]() Katja wrote:
Katja wrote:
Hallo! Ich möchte die Jacke gern in einer Farbe stricken, ohne Muster. Bei Größe L komme ich auf 950g Garn wenn ich das angegebene Garn zusammenrechne. Könnten das aber bei nur einer Farbe eventuell weniger sein, weil man bei manchen Farben ja nur ganz wenig von den einzelnen 50g benutzt? Können Sie mir weiterhelfen? Vielen Dank.
06.10.2025 - 23:18
![]() Kirsten wrote:
Kirsten wrote:
Jeg venter stadig på svar fra spørgsmål om 246-3. Spørgsmålene har jeg uddybet d 23/2. Håber i vil hjælpe mig videre.
26.02.2025 - 15:50DROPS Design answered:
Hei Kirsten. Vi svarer fortløpende på spørsmål (daglig), men om det er veldig mange spørsmål kan det ta litt tid. Men husk du kan alltid kontakte en DROPS forhandler om hjelp. mvh DROPS Design
03.03.2025 - 14:29
![]() Kirsten wrote:
Kirsten wrote:
Jeg strikker i str L og har nu 145 m i bærestykket, er nået til udtagningen i mønsterdiagrammet, men kan ikke komme videre da jeg ikke forstår udtagningen. På sidste pind i A1 tages der (i str L ) 2 m ud jævnt fordelt = 275, I mønsterdiagrammet er der markeret 4 pinde med udtagninger, hvor mange masker tages ud på henholdsvis 1-2-3-4 de 4 pinde markeringer til jeg når de 275 m og hvad betyder de omtalte 2m jævnt fordelt, mønsteret skal jo passe sammen.
23.02.2025 - 12:03DROPS Design answered:
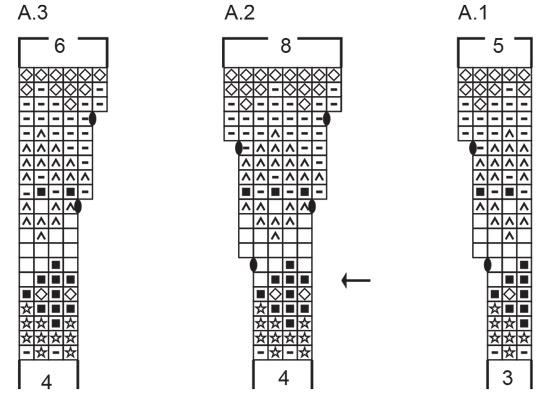
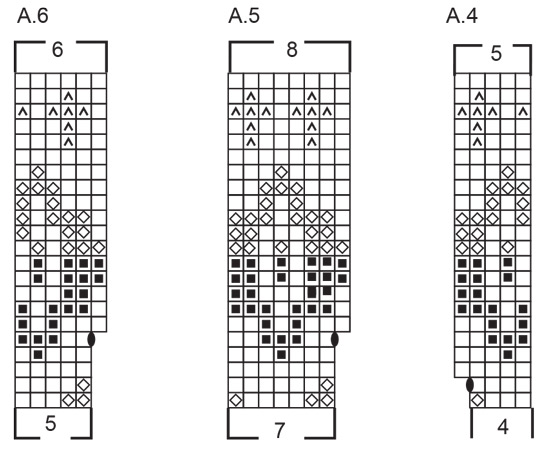
Hei Kirsten. Oval sort prikk = økninger. Forklaring på hvordan du øker står over diag (siste ikonet). I str. L har du 145 masker når du starter på diag. Strikk 7 stolpemasker som før, deretter strikker du A.1 (3 masker), så strikker du A.2 til det gjenstår 11 masker på pinnen (du har da strikket A.2 31 ganger), så strikkes A.3 før du avslutter pinnen med 7 stolpemasker. Så strikker du A.1+A.2+A.3 1 gang i høyden og da øker du på pinne 7-11-15-17 = 273. Når du skal strikke siste pinne av diag øker du 2 masker jevnt fordelt på pinnen, mønstret kan forskyve seg litt, men du får riktig maskeantall når du skal strikke etter diag A.4+A.5+A.6. mvh DROPS Design
03.03.2025 - 10:33
![]() Lucia wrote:
Lucia wrote:
Buona sera, vorrei fare questo cardigan ma solo di colore cammello...come posso fare? Grazie della risposta
19.01.2025 - 19:06DROPS Design answered:
Buonasera Lucia, per un'assistenza così personalizzata si può rivolgere al suo rivenditore DROPS di fiducia. Buon lavoro!
21.01.2025 - 23:06
![]() Barbara wrote:
Barbara wrote:
U heeft mijn vraag van 9 januari nog niet beantwoord en dat hoeft niet meer. Ik heb mijn fout ontdekt en opgelost door toch maar 30 steken in de laatste naald te meerderen.
11.01.2025 - 11:26
![]() Barbara wrote:
Barbara wrote:
Ik heb een probleem met het aantal steken dat ik moet meerderen in de laatste naald van A1. Er staat: Op de laatste naald in A.1 meerdert u 0-4-2-6-4-2 steken verdeeld = 233-261-275-303-317-331 steken. Ik zou dan met 6 steken op 303 steken uit moeten komen. Maar ik heb er 30 nodig? Ik heb volgens mij netjes de meerderingen van A1-A3 gedaan want de figuurtjes kloppen wel. Moet ik nu dan maar 30 steken meerderen om goed uit te komen?
09.01.2025 - 16:27DROPS Design answered:
Dag Barbara,
In totaal moet je na die 6 steken meerderen 303 steken op de naald hebben, dus ook de biessteken e.d. meegerekend. Dus niet alleen de steken van A.1 maar alle steken.
11.01.2025 - 13:48
![]() Sandra wrote:
Sandra wrote:
How much wool would be needed if knitting in one colour only?
06.01.2025 - 18:35DROPS Design answered:
Dear Sandra, as we worked it with pattern, we don't have the matching amount for one-color cardigan and we unfortunately do not have it anymore, but you can add all colors together, you might require somewhat less. Your DROPS Store might help you - even per mail or telephone. Happy knitting!
07.01.2025 - 09:25
![]() Ben Gilmartin wrote:
Ben Gilmartin wrote:
On the photo the buttons and button holes seem to be on the wrong way round for a men's cardigan, or am I just confused!
05.03.2024 - 14:58
![]() Manuela Rohrssen wrote:
Manuela Rohrssen wrote:
Die Musteranleitung entspricht nicht dem Bild. Bild entspricht der Musteranleitung vom Pullover.bittr melden Sie sich Danke
13.01.2024 - 17:11
|
||||||||||||||||||||||
Autumn Reflections Cardigan#autumnreflectionscardigan |
||||||||||||||||||||||
 |
 |
|||||||||||||||||||||
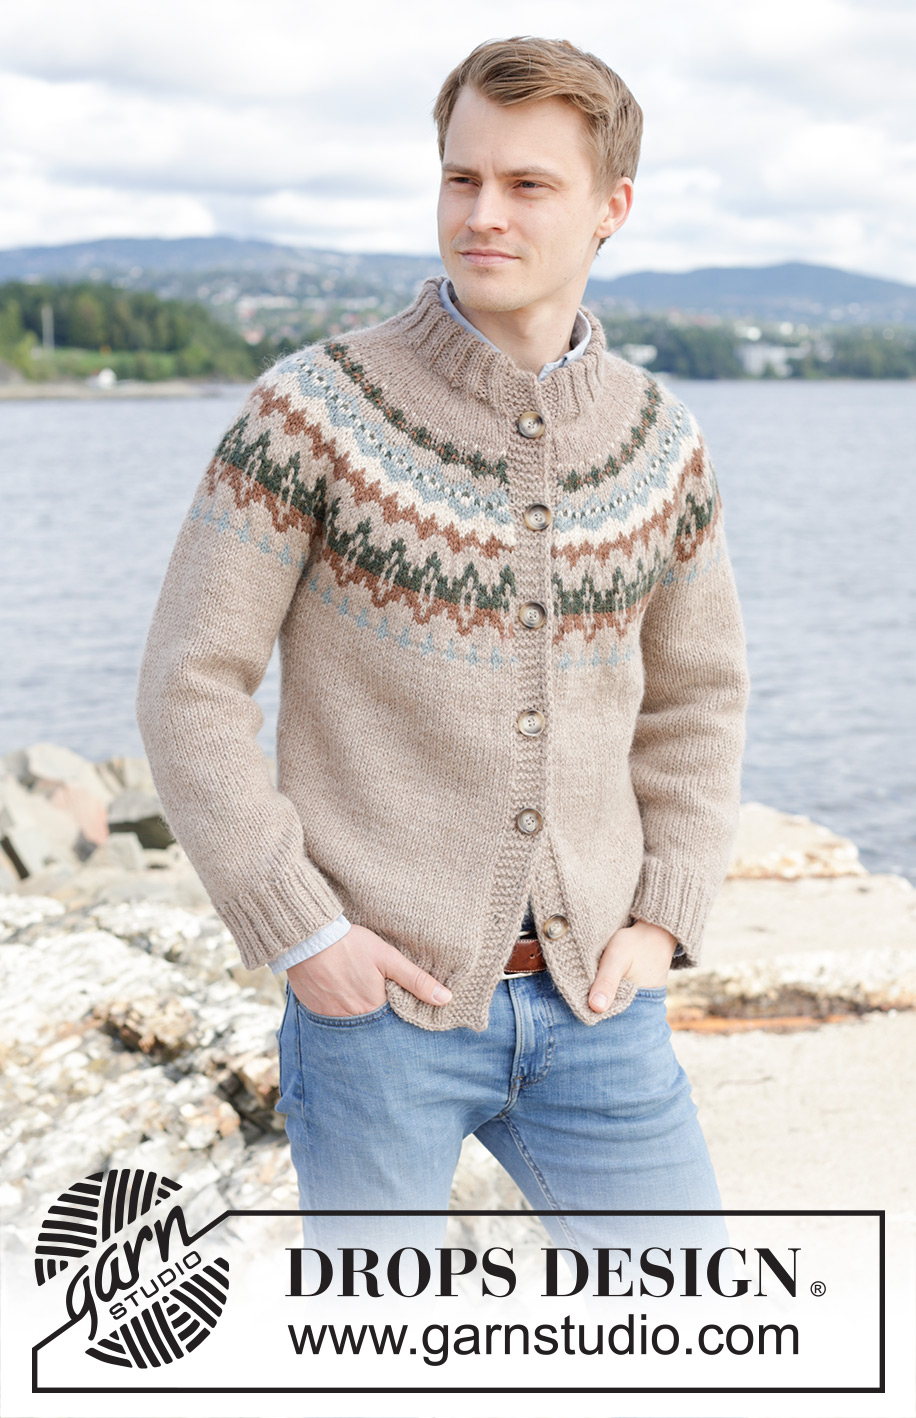
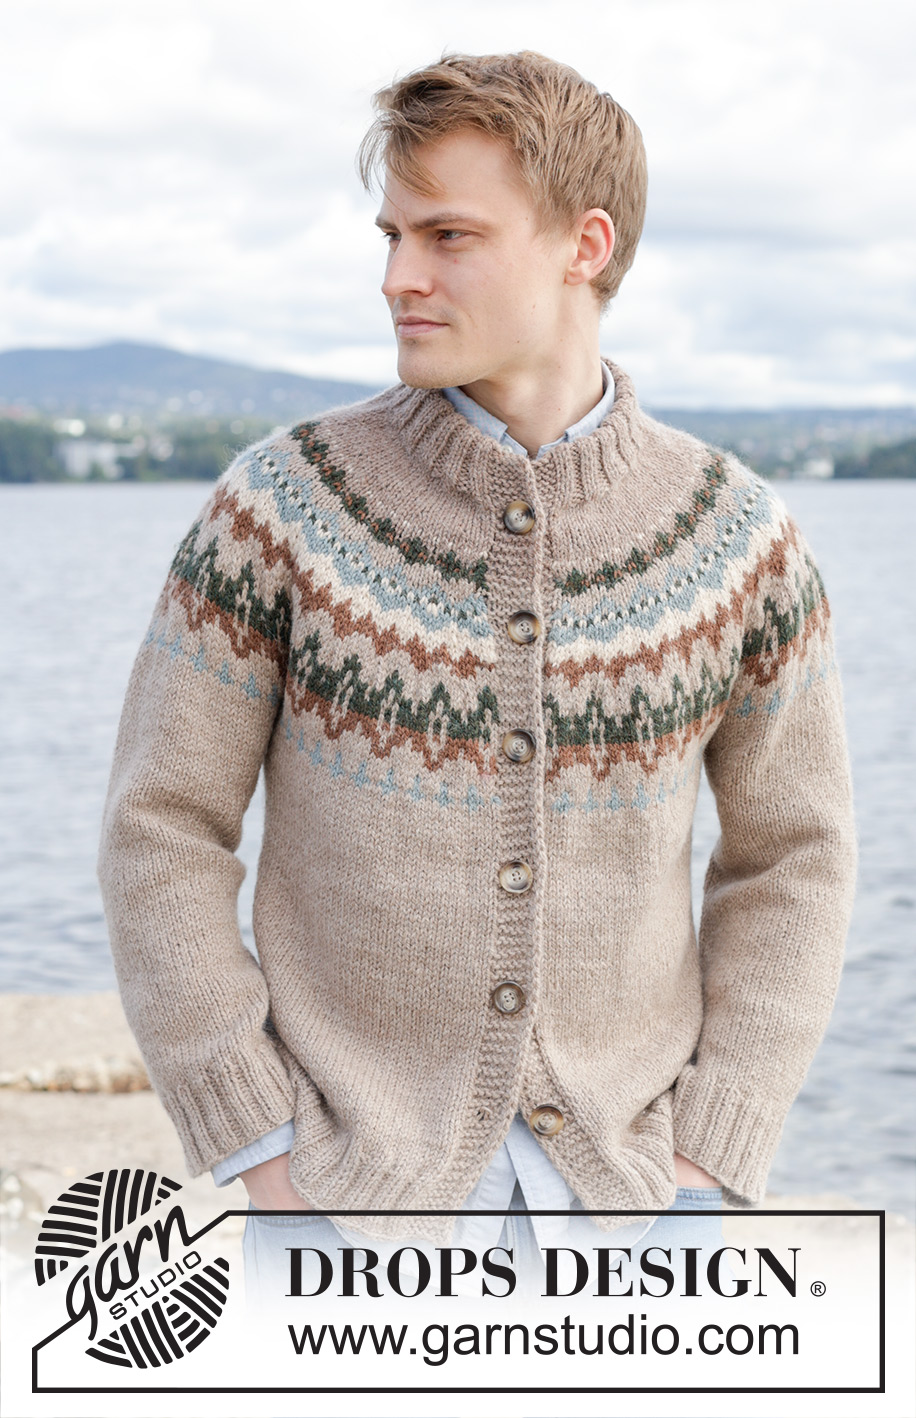
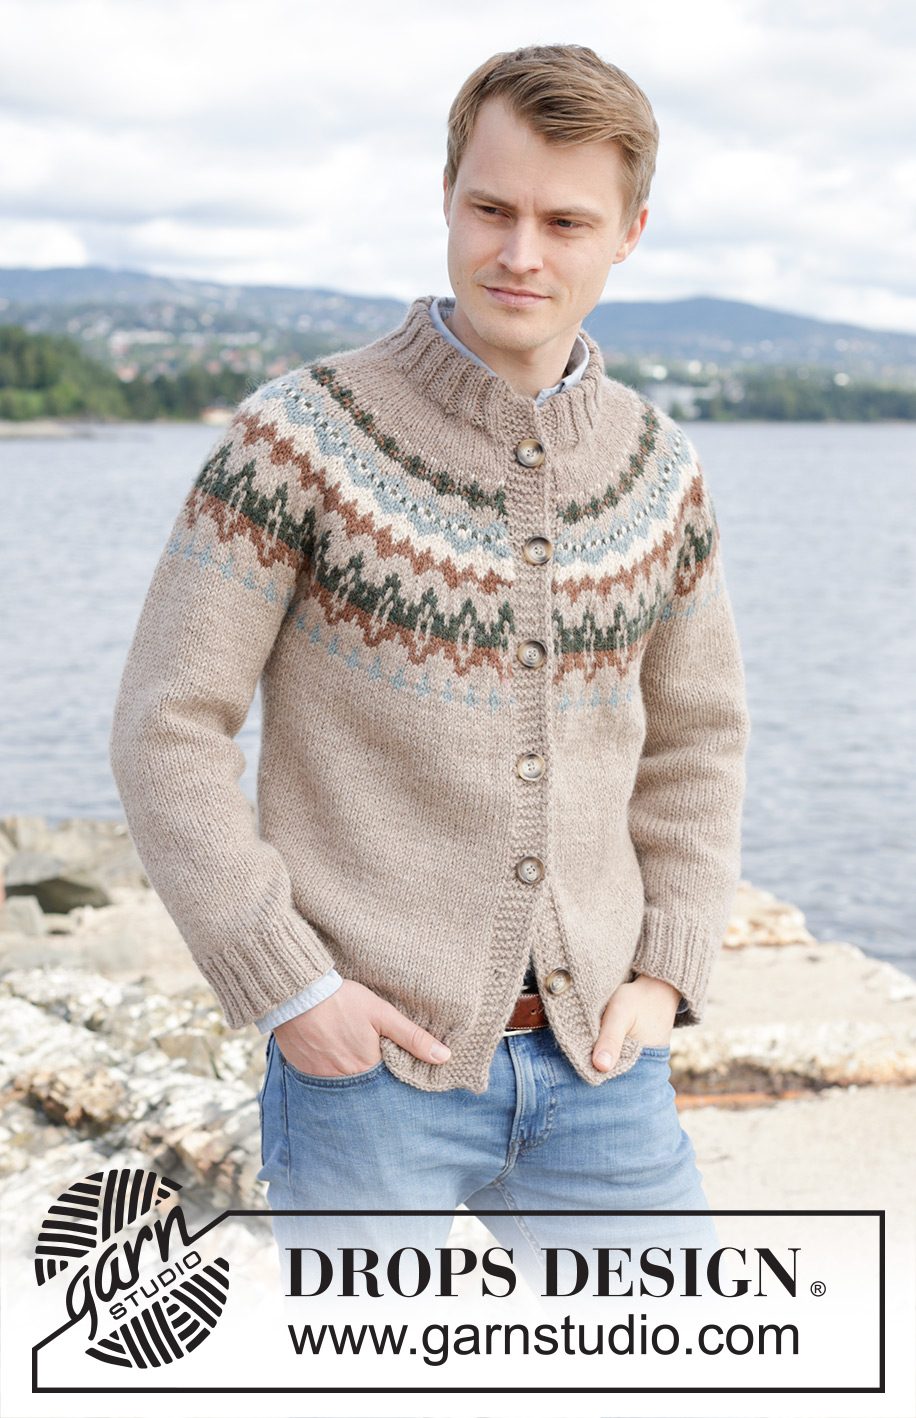
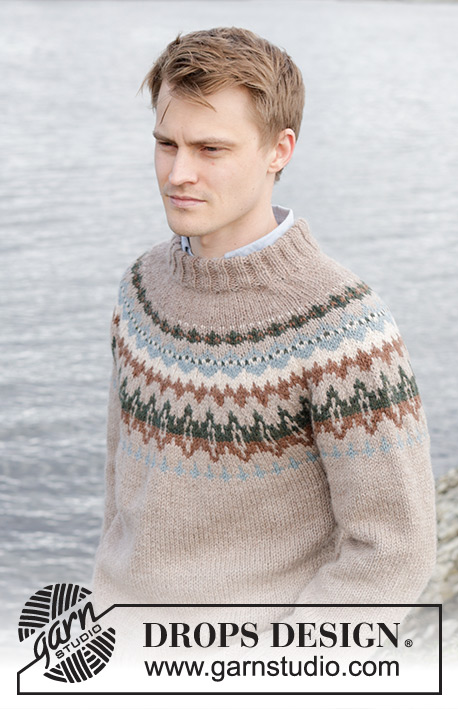
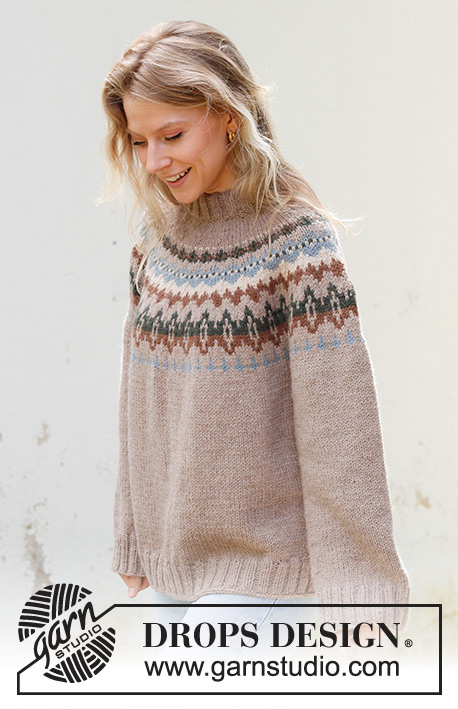
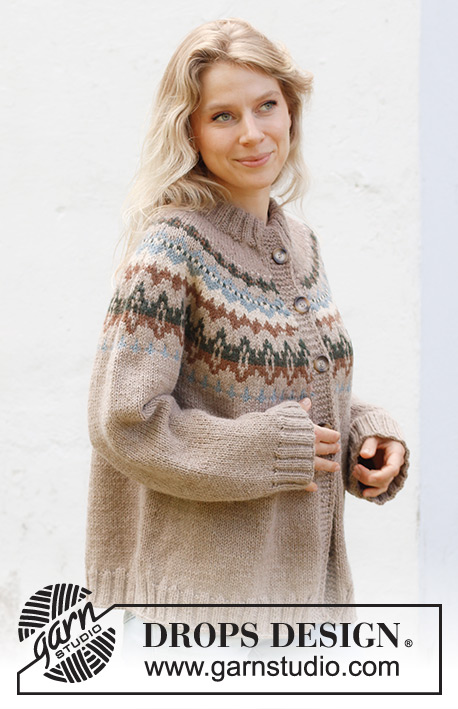
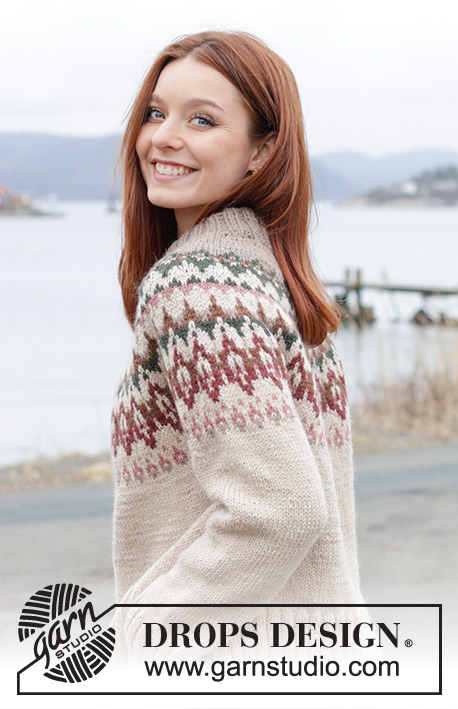
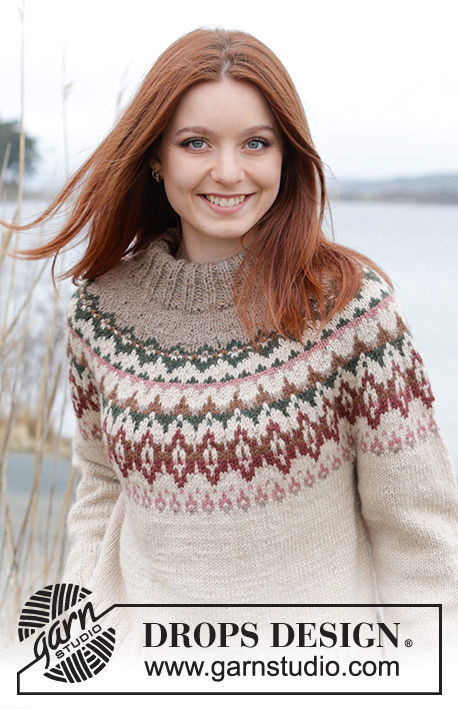
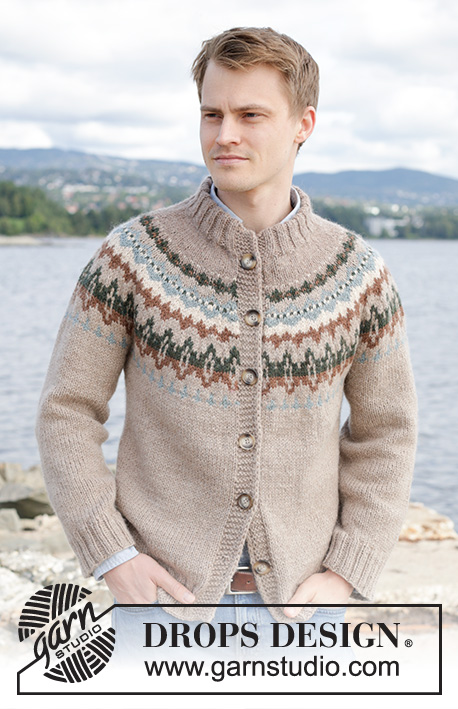
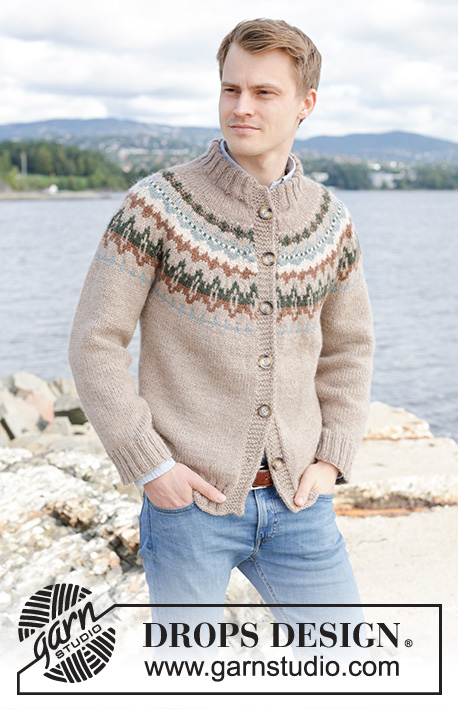
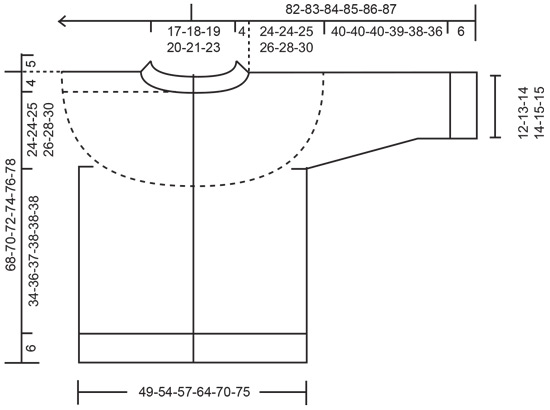
Knitted jacket for men in DROPS Nepal. The piece is worked top down with round yoke, multi-coloured pattern and double neck. Sizes S - XXXL.
DROPS 246-3 |
||||||||||||||||||||||
|
------------------------------------------------------- EXPLANATIONS FOR THE PATTERN: ------------------------------------------------------- GARTER STITCH (worked back and forth): Knit all rows. 1 ridge = knit 2 rows. PATTERN: See diagrams A.1 to A.6. The diagrams show all rows in the pattern from the right side. The whole pattern is worked in stocking stitch. INCREASE TIP (evenly spaced): To work out how to increase evenly, count the total number of stitches on the needle (e.g., 96 stitches) minus the bands (e.g., 14 stitches) and divide the remaining stitches by the number of increases to be made (e.g., 14) = 5.8. In this example, increase by making 1 yarn over after alternately each 5th and 6th stitch. Do not increase over the bands. On the next row work the yarn overs twisted to avoid holes. EDGE STITCHES: Work 2 edge stitches at the beginning of the row as follows: Slip 1 stitch purl-wise with the strand in front, knit 1. Work 2 edge stitches at the end of the row as follows: Work until there are 2 stitches left on the row, slip 1 stitch purl-wise with the strand in front, knit 1. Repeat at the beginning and end of each row. BUTTONHOLES: Work buttonholes on the right band (when the garment is worn). Work from the right side when there are 5 stitches left on the row as follows: Make 1 yarn over, knit 2 together and knit 3. On the next row (wrong side), knit the yarn over to leave a hole. The first buttonhole is worked after the neck is finished. Then work the other 5-5-6-6-6-6 buttonholes with approx. 10-11-10-10-10-11 cm between each one. KNITTING TIP: To avoid the knitting tension losing its elasticity when working pattern, it is important that the strands at the back are not tight. Use a size larger needle when working pattern if the piece becomes tight. DECREASE TIP (for sleeves): Decrease 1 stitch on each side of the marker-thread as follows: Work until there are 3 stitches left before the marker-thread, knit 2 together, knit 2 (marker-thread sits between these 2 stitches), slip 1 stitch knit-wise, knit 1 and pass the slipped stitch over the knitted stitch. ------------------------------------------------------- START THE PIECE HERE: ------------------------------------------------------- JACKET – SHORT OVERVIEW OF THE PIECE. The neck and yoke are worked back and forth with circular needle, from mid front and top down. The yoke is divided for body and sleeves and the body continued back and forth with circular needle. The sleeves are worked in the round with double pointed needles/short circular needle, top down. DOUBLE NECK: Cast on 84-88-92-96-100-104 stitches with circular needle size 4 mm and colour camel DROPS Nepal. Purl 1 row (= wrong side). Work as follows from the right side: 1 GARTER STITCH – read description above, * knit 2, purl 2 *, work from *-* until there are 3 stitches left, knit 2 and 1 garter stitch. Continue this rib for 5 cm. Cast on 6 stitches at the end of the next 2 rows = 96-100-104-108-112-116 stitches. Work as follows from the right side: 2 EDGE STITCHES – read description above, 5 garter stitches (= 7 band stitches), * knit 2, purl 2 *, work from *-* until there are 9 stitches left, knit 2, 5 garter stitches and 2 EDGE STITCHES (= 7 band stitches). Continue this rib for 5 cm (10 cm of rib in total). Work as follows from the right side: 7 band stitches as before, knit 82-86-90-94-98-102 and increase 14-18-20-24-26-28 stitches evenly over these stitches – read INCREASE TIP, work 7 band stitches as before = 110-118-124-132-138-144 stitches. Work yoke as explained below. YOKE: Change to circular needle size 5 mm. Work stocking stitch with 7 band stitches on each side with colour camel for 4 cm - remember the BUTTONHOLES on the right band. On the next row from the right side increase 15-19-21-25-27-29 stitches evenly spaced = 125-137-145-157-165-173 stitches. Work back from the wrong side. Read KNITTING TIP and work as follows from the right side: 7 band stitches as before, work A.1, A.2 until there are 11 stitches left, work A.3 and 7 band stitches as before. The band stitches are always worked with colour camel until you reach the arrow in A.2, then continue with colour beige (if the colour beige is not used in the pattern, twist the strand between the band stitches and the pattern stitches to avoid a hole. To avoid carrying the strand along the whole row you can use a small ball on each side for the band stitches). On the last row in A.1, A.2 and A.3, increase 0-4-2-6-4-2 stitches evenly spaced = 233-261-275-303-317-331 stitches. Continue as follows: 7 band stitches as before, work A.4, A.5 until there are 12 stitches left, A.6 and 7 band stitches as before. When A.4, A.5 and A.6 are finished in height there are 265-297-313-345-361-377 stitches Continue with stocking stitch and band stitches in colour beige. When the piece measures 24-24-25-26-28-30 cm, divide for the body and sleeves on the next row as follows: Work 46-50-52-58-62-65 stitches as before (front piece), place the next 48-56-60-64-64-66 stitches on 1 thread for the sleeve, cast on 6-6-8-8-10-12 stitches (in side under sleeve), work 77-85-89-101-109-115 stitches (back piece), place the next 48-56-60-64-64-66 stitches on 1 thread for the sleeve, cast on 6-6-8-8-10-12 stitches (in side under sleeve), work the remaining 46-50-52-58-62-65 stitches as before (front piece). The body and sleeves are continued separately. THE PIECE IS NOW MEASURED FROM HERE! BODY: = 181-197-209-233-253-269 stitches. Work stocking stitch and 7 band stitches on each side with colour beige for a further 34-36-37-38-38-38 cm. Knit 1 row from the right side and increase 19-19-19-23-27-27 stitches evenly spaced (do not increase over the bands) = 200-216-228-256-280-296 stitches. Change to circular needle size 4 mm and work as follows from the wrong side: 7 band stitches as before, * purl 2, knit 2 *, work from *-* until there are 9 stitches left, purl 2 and 7 band stitches as before. Continue this rib for 6 cm. Cast off a little loosely with knit from the right side. The jacket measures approx. 68-70-72-74-76-78 cm from the shoulder. SLEEVES: Place the 48-56-60-64-64-66 stitches from the thread on the one side of the piece on short circular needle/double pointed needles size 5 mm and knit up 1 stitch in each of the 6-6-8-8-10-12 stitches cast on under the sleeve = 54-62-68-72-74-78 stitches. Insert a marker-thread in the middle of the new stitches under the sleeve. Start at the marker-thread and work stocking stitch in the round with colour beige. When the sleeve measures 3 cm, decrease 2 stitches mid under the sleeve – read DECREASE TIP. Decrease like this every 5-4-3½-3-3-2½ cm a total of 7-9-10-12-11-13 times = 40-44-48-48-52-52 stitches. Continue working until the sleeve measures 40-40-40-39-38-36 cm from the division (or to desired length. There is approx. 6 cm left). Knit 1 round and increase 8-8-8-8-8-8-8 stitches evenly spaced = 48-52-56-56-60-60 stitches. Change to double pointed needles size 4 mm and work rib (knit 2, purl 2) for 6 cm. Loosely cast off with knit. The sleeve measures approx. 46-46-46-45-44-42 cm. Work the other sleeve in the same way. ASSEMBLY: Fold the neck double to the inside and sew down. To avoid the neck being tight and rolling outwards, it is important that the seam is elastic. Sew together the openings on the bands with small stitches. Sew the buttons onto the left band. |
||||||||||||||||||||||
Diagram explanations |
||||||||||||||||||||||
|
||||||||||||||||||||||
 |
||||||||||||||||||||||
 |
||||||||||||||||||||||
 |
||||||||||||||||||||||
Have you finished this pattern?Tag your pictures with #dropspattern #autumnreflectionscardigan or submit them to the #dropsfan gallery. Do you need help with this pattern?You'll find 34 tutorial videos, a Comments/Questions area and more by visiting the pattern on garnstudio.com. © 1982-2026 DROPS Design A/S. We reserve all rights. This document, including all its sub-sections, has copyrights. Read more about what you can do with our patterns at the bottom of each pattern on our site. |
||||||||||||||||||||||


With over 40 years in knitting and crochet design, DROPS Design offers one of the most extensive collections of free patterns on the internet - translated to 17 languages. As of today we count 324 catalogues and 12290 patterns translated into English (UK/cm). 12290
We work hard to bring you the best knitting and crochet have to offer, inspiration and advice as well as great quality yarns at incredible prices! Would you like to use our patterns for other than personal use? You can read what you are allowed to do in the Copyright text at the bottom of all our patterns. Happy crafting!
Post a comment to pattern DROPS 246-3
We would love to hear what you have to say about this pattern!
If you want to leave a question, please make sure you select the correct category in the form below, to speed up the answering process. Required fields are marked *.