
Popular categories
Looking for a yarn?


Comments / Questions (34)
![]() Marinella wrote:
Marinella wrote:
Buona sera .Ieri ho scritto quello che scrivero ' adesso perche ' mi e' sparita la pagina prima di essere sicura dell'invio. Quindi scusate se mi ripeto . Non capisco perche' lavorare in piano i primi 13 ferri e poi lavorare in tondo . Rimarra' un pezzo aperto ? que significa Raglan 1 e Raglan 2? si potrebbe nel diagramma scrivere raglan 1 e 2. Grazie .
09.03.2026 - 23:11DROPS Design answered:
Buongiorno Marinella, se guarda la foto c'è uno spacco in fondo. Raglan-1 e 2 sono indicati nelle spiegazioni. Buon lavoro!
14.03.2026 - 11:17
![]() Anais wrote:
Anais wrote:
Bonjour, pour l'empiècement, je ne comprends quand vous dites "augmenter 3 fois tous les deux tours le raglan1" est ce que je fais 1 tour sans augmenter 1 tour raglan 1 puis à nouveau sans augmenter? ou l'augmentation correspond à trois mailles? merci beaucoup
10.02.2026 - 22:38DROPS Design answered:
Bonjour Anaïs, il y a 2 types d'augmentations raglan: le raglan-1 et le raglan-2 (cf au début des explications). Quand vous devez augmenter 3 fois tous les 2 tours pour le raglan-1, vous tricotez ainsi (1 tour avec augmentations raglan-1, 1 tour sans augmentations), en même temps, dès le 1er tour, vous augmentez pour le raglan-2 2 fois au total tous les 12 tours (donc 1 seule fois quand on augmente 3 fois tous les 2 tours, ces augmentations continuent après). Bon tricot!
11.02.2026 - 17:13
![]() Wil wrote:
Wil wrote:
Hoi, De pas :raglan1/raglan2 kom er niet uit welke voor de panden is welke voor de mouwen om steken bij te maken.Paniek GroetjesWil
22.10.2025 - 12:18DROPS Design answered:
Dag Wil,
Je meerdert eerst steeds zowel voor als na iedere raglanlijn volgens RAGLAN 1. Dus je maakt dan voor en na de raglansteek een omslag, welke je op de volgende naald breit zoals beschreven onder RAGLAN 1. Het maakt niet uit of je op de mouw of op het pand zit; voor en na de raglanlijnen brei je de meerderingen zoals beschreven. Op een gegeven moment maak je daarnaast (dus bovenop de meerderingen van RAGLAN 1) meerderingen alleen op de voor- en achterpand. Het aantal meerderingen staat beschreven voor iedere maat in de beschrijving en hoe je steken meerdert staat bovenaan beschreven bij RAGLAN 2).
22.10.2025 - 19:31
![]() Linda Gilkes wrote:
Linda Gilkes wrote:
I am confused with the increase on the front/back pieces every 2nd round and on the sleeves every 4th round. Can raglan-1 and raglan -2 be done in the same round? Do they over lap each other?
18.09.2025 - 02:33DROPS Design answered:
Hi Linda, raglan-1 and 2 overlap in rounds 1 and 13 (12 sts increased in each of these rounds). When you have increased for raglan-1 3-5-8-13-13-11 times after the neckline, continue to increase for raglan-1 every 2nd round but every second increase is only worked on the front and back pieces: it means in round 1 you increase 8 sts (front, back and sleeves), in round 3 you increase only 4 sts (only for front and back), etc. Happy knitting!
22.10.2025 - 14:53
![]() Mari wrote:
Mari wrote:
Hei! Hva regnes som starten av omgangen når en starter på bærestykket etter man har strikken halsringningen? Det er jo fremdeles to økninger/kast fra første del av pinne 7 som ikke er strikket inn i arbeidet etter det ble samlet på rundpinne. Hvis omgangen starter midt bak; skal disse strikkes inn samtidig som det lages nye kast? Eller skal omgangen starte på fremstykket før høyre erme, og kastene fra pinne 7 strikkes som tidligere på halsringningen? Takk for hjelp! :)
03.02.2025 - 15:23DROPS Design answered:
Hei Mari. Omgangen starter nå midt bak og de 2 kastene fra pinne 7 strikkes samtidig som det lages nye kast. mvh DROPS Design
10.02.2025 - 15:14
![]() Marjolein wrote:
Marjolein wrote:
Je zet 62 steken op en moet voor je nog 1 steek gebreid hebt al meerderingen gaan doen? Dus je moet 2x omslagen gaan doen bij markers terwijl je nog geen steek gebreid hebt? Waarom is hier geen instructievideo van want dit is heel onduidelijk voor een beginnende breier. Alle video's tonen raglanmeerderingen op gebreide naalden, niet direkt op opzetnaald.
29.01.2025 - 14:41DROPS Design answered:
Dag Marjolein,
Eerst zet je steken op en daarna plaats je direct markeerdraden in het werk. Dan begin je met het breien van naald 1 en meerder je voor de raglan aan beide kanten van de steken met de markeerdraden.
19.02.2025 - 09:52
![]() Helena Axestål wrote:
Helena Axestål wrote:
Det står att raglan -2 ska stickas i tillägg till raglan -1. Och raglan 1 varannat varv men raglan 2 på första varvet. Ska jag sticka raglan 1+2 på första varvet eller först 2 och sedan 1 på andra varvet?
17.11.2024 - 10:09DROPS Design answered:
Hej Helena, du strikker raglan 1 helt ned til du kommer til bærestykket, så strikker du i tillæg raglan 2 på hver 12.varv (i de mindste størrelser)
22.11.2024 - 14:37
![]() Hilda wrote:
Hilda wrote:
Im a little confused after Row 7. When i finish row 7 of shaping the neck, do i join the work in the round and knit until the thread marker. And do I then after that start immidiatley doing the next increases (raglan 1 & 2)? Because there is still 4 unworked yarn-overs. Do I keep increasing next to them while i work them twisted on the same row?
15.11.2024 - 11:29DROPS Design answered:
Dear Hilda, after finishing row 7, cast on as many stitches as indicated. Now, join the piece and knit all stitches (no increases, only work the yarn overs twisted) until the marker in the mid-back. This will be the new beginning of the round. Now, start working the raglan-2 increases in this first round, while also working the row 7 yarn overs twisted; both increases are in different locations so they won't interfere with one another, In the next round you will work the raglan-1 increases, when the yarn overs have already been worked twisted. Happy knitting!
17.11.2024 - 20:11
![]() Marleen STAELEN wrote:
Marleen STAELEN wrote:
N'est-ce pas le contraire ? "ÉCHANTILLON: 16 mailles en largeur et 20 rangs en hauteur, en jersey, avec 1 fil de chaque qualité = 10 x 10 cm. NOTE: ... Si vous avez trop de mailles pour 10 cm, essayez avec des aiguilles plus (grosses). Si vous n'avez pas assez de mailles pour 10 cm, essayez avec des aiguilles plus (fines)."
04.11.2024 - 18:24DROPS Design answered:
Bonjour Mme Staelen, si vous avez trop de mailles pour 10 cm, vos mailles sont plus petites que dans notre échantillon, vous devez alors utiliser des aiguilles plus grosses pour vous rapprocher de l'échantillon, si en revanche vous n'avez pas assez de mailles pour 10 cm, c'est que vos mailles sont trop grosses et qu'il vous faut les diminuer à l'aide d'aiguilles plus petites. Retrouvez plus d'infos ici. Bon tricot!
05.11.2024 - 10:04
![]() Zahra wrote:
Zahra wrote:
Good day, On the 7th row. Do I knit the full 7th row with increases then cast on 8 stitches at the end or do I knit the 7th row with increases till the middle marker then cast on the 8 stitches then knit the rest of the row with the rest of the increases then join in the round. Please may you explain in detail for me. Thank you
05.05.2024 - 14:01DROPS Design answered:
Dear Zahra, you knit the full 7th row and then cast on 8 sts at the end of the row (which should be at the mid front). Then you knit straight (in stocking stitch) until the marker in the mid back. Now you should have everything together to be able to work the yoke in the round. Happy knitting!
05.05.2024 - 23:05
|
|
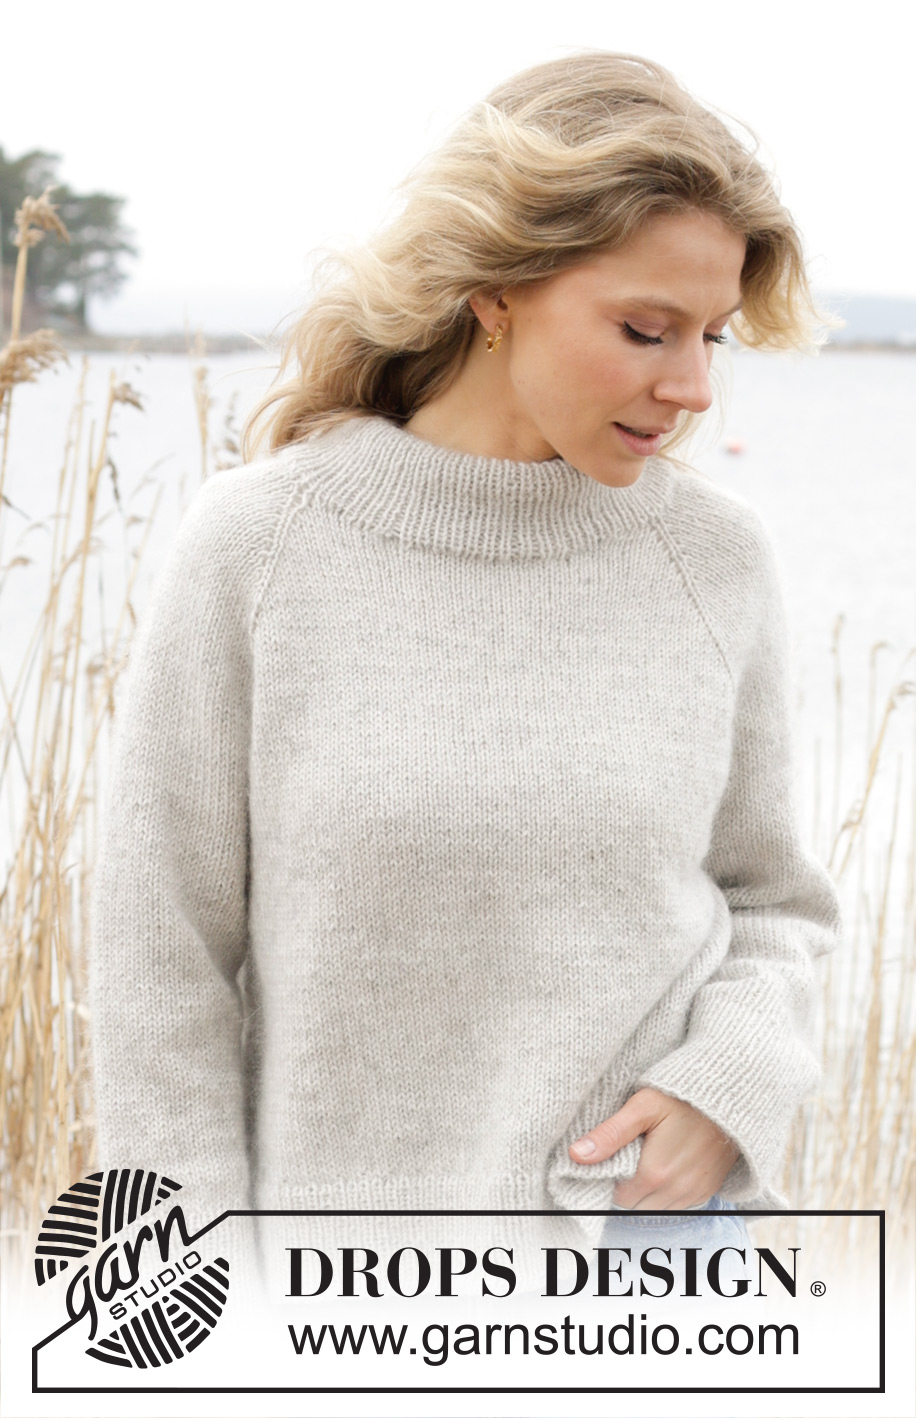
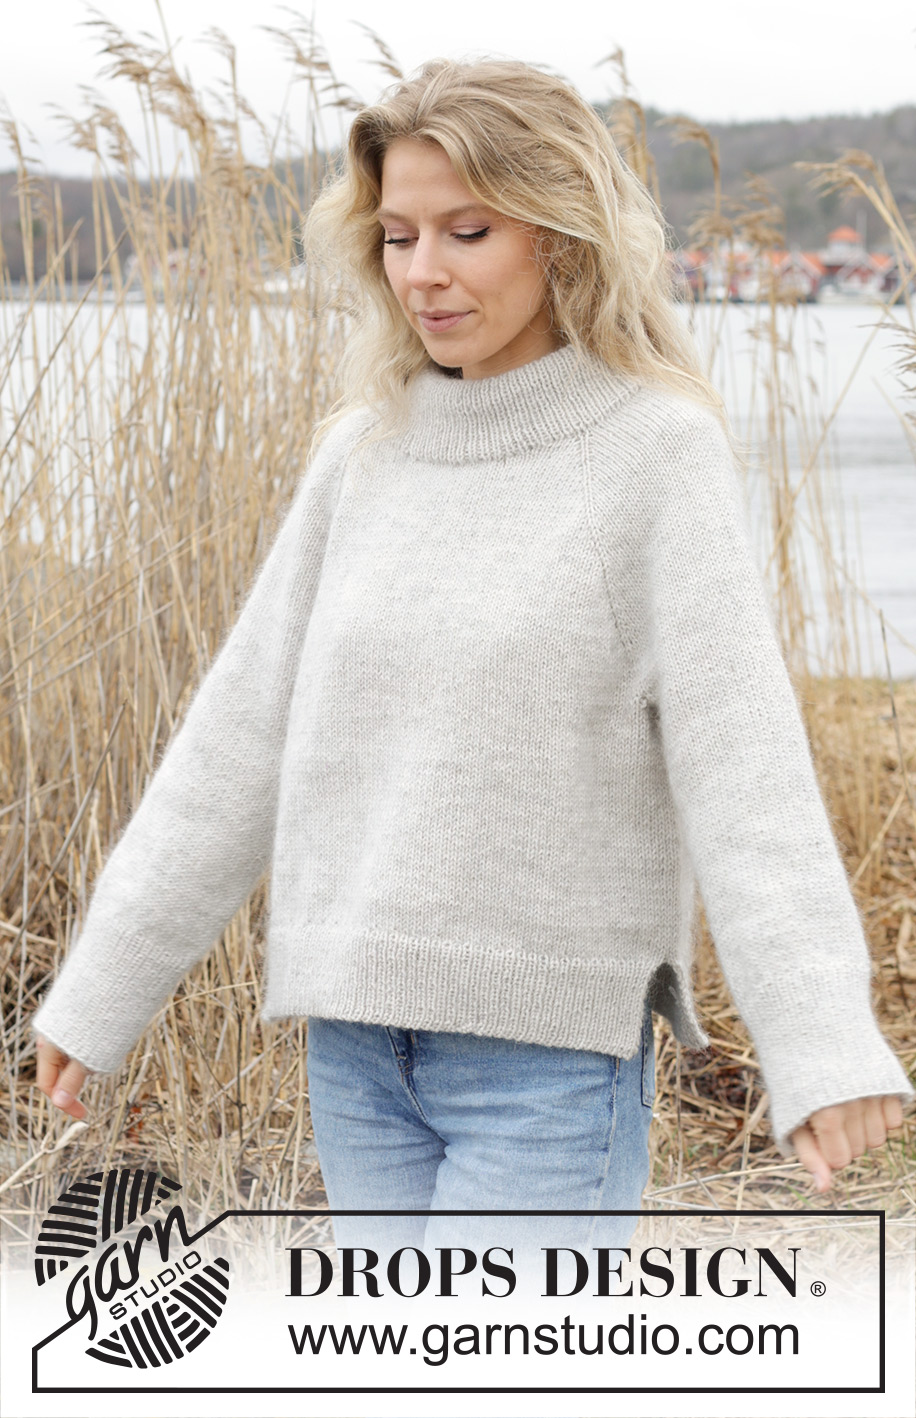
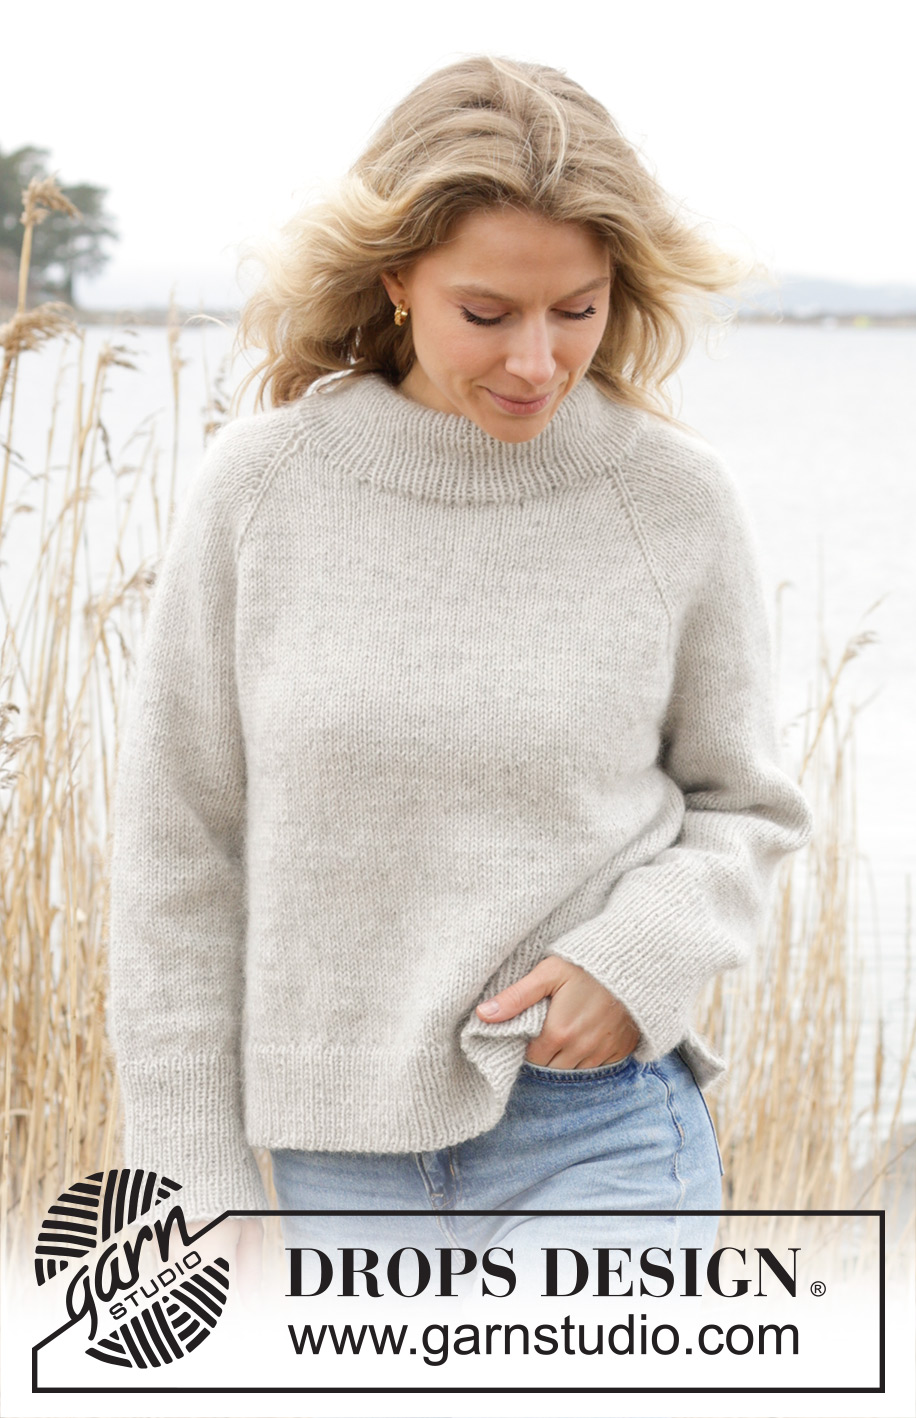
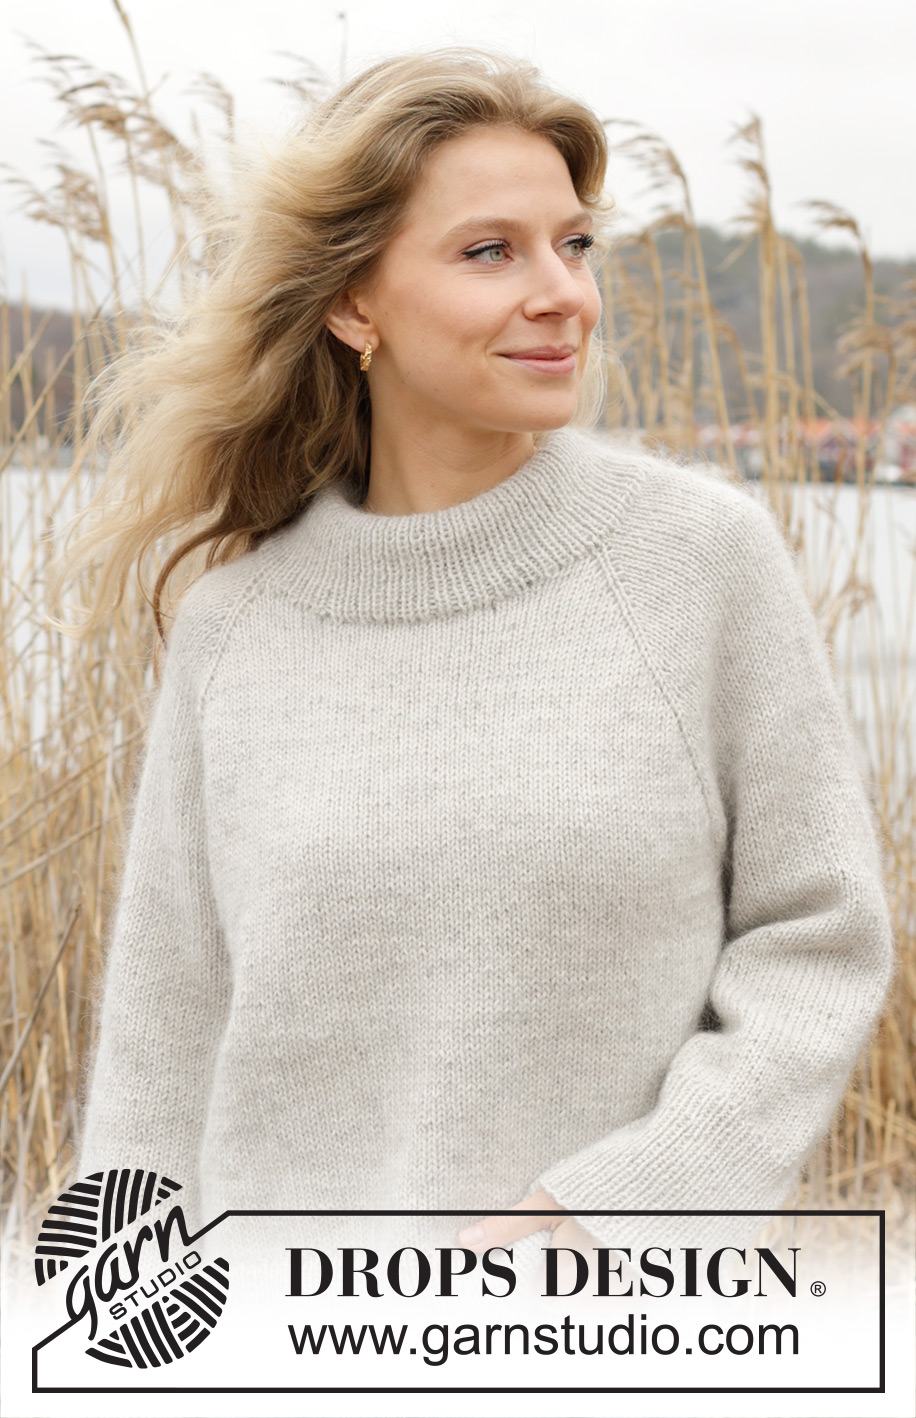
Moon Mist#moonmistsweater |
|
 |
 |
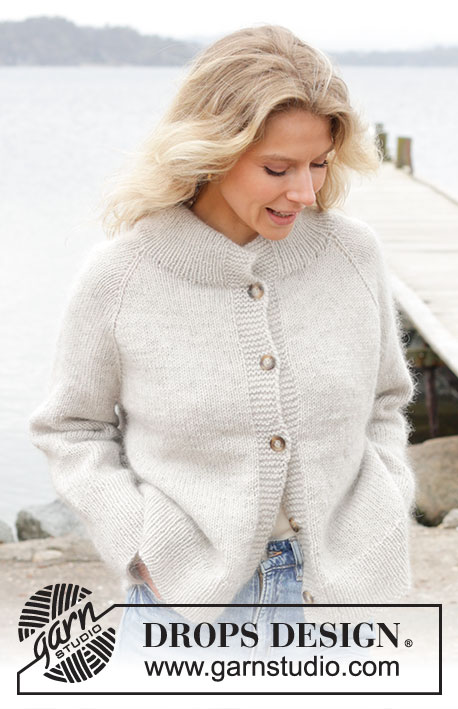
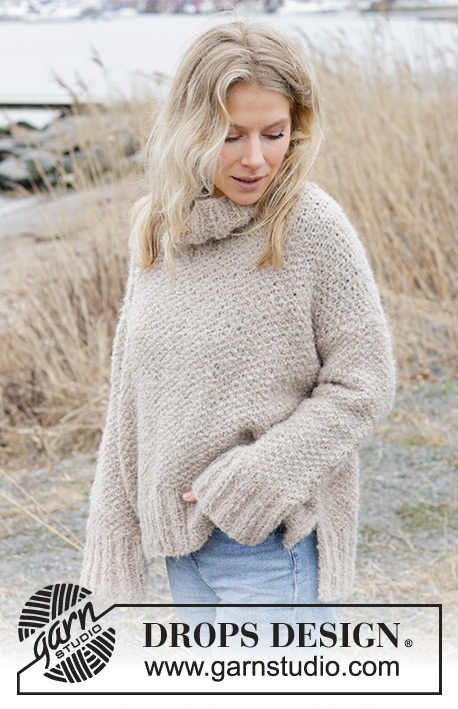
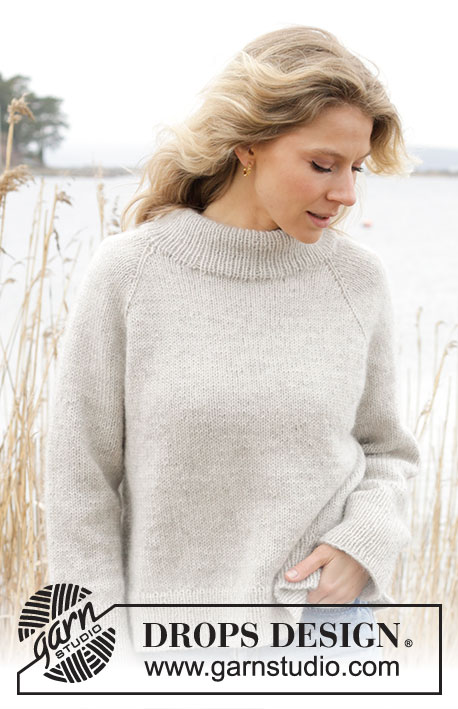
Knitted jumper in DROPS Lima and DROPS Kid-Silk. The piece is worked top down with raglan, double neck and split in sides. Sizes S - XXXL.
DROPS 245-7 |
|
|
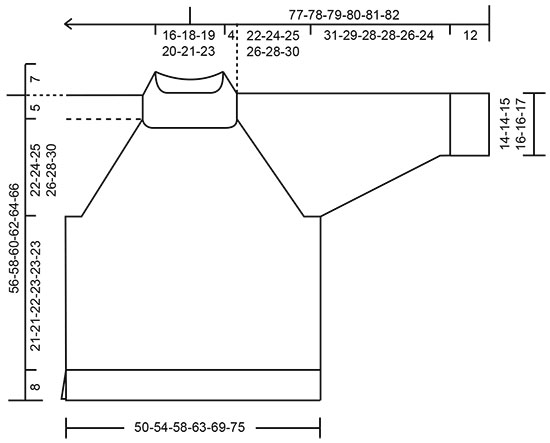
------------------------------------------------------- EXPLANATIONS FOR THE PATTERN: ------------------------------------------------------- GARTER STITCH (worked back and forth): Knit all rows. 1 ridge = knit 2 rows. RAGLAN-1: All increases are worked from the right side! Increase 1 stitch before/after the 4 marker-stitches – hereafter called raglan-stitches. The raglan-stitches are always worked in stocking stitch. Increase 1 stitch by making 1 yarn over, which is worked twisted as described below, then worked in stocking stitch. From the wrong side: BEFORE raglan-stitches: Purl the back loop – no hole. AFTER raglan-stitches: Slip the yarn over off the left needle and replace it the other way round (insert the left needle in the back when replacing it). Purl the front loop – no hole. From the right side: BEFORE raglan-stitches: Slip the yarn over off the left needle and replace it the other way round (insert the left needle in the back when replacing it). Knit the front loop (the stitch twists to the right) – no hole. AFTER raglan-stitches: Knit the back loop (the stitch twists to the left) – no hole. RAGLAN-2: Increase 1 stitch before/after the raglan-stitches on the front/back pieces (not on the sleeves). Raglan-2 is worked in addition to Raglan-1. Work as follows: BEFORE raglan-stitches: Work until there are 3 stitches left before the raglan-stitches, use left needle to pick up thread between 2 stitches from round below, pick up thread from behind and knit stitch in front loop – no hole. AFTER raglan-stitches: Work 3 stitches past the raglan-stitches (if there are yarn overs, they are not counted as stitches), use left needle to pick up thread between 2 stitches from round below, pick up thread from front and knit stitch in back loop – no hole. INCREASE TIP: Increase 1 stitch by making 1 yarn over, which is worked twisted on the next row/round to avoid a hole. DECREASE TIP (for sleeves): Decrease 1 stitch on either side of the marker-thread as follows: Work until there are 3 stitches left before the marker-thread, knit 2 together, knit 2 (marker-thread sits between these 2 stitches), slip 1 stitch knit-wise, knit 1 and pass the slipped stitch over the knitted stitch. ------------------------------------------------------- START THE PIECE HERE: ------------------------------------------------------- JUMPER – SHORT OVERVIEW OF THE PIECE. The neckline is worked first back and forth with circular needle and top down, and new stitches are cast on for neckline; then the yoke is continued in the round with circular needle from mid-back. The yoke is divided for body and sleeves and the body continued in the round with circular needle as far as the split in each side. The front and back pieces are finished back and forth with circular needle. The sleeves are worked in the round with double pointed needles/short circular needle. The neck is worked to finish. NECKLINE: Cast on 62-64-66-68-70-72 stitches with circular needle size 5 mm and 1 strand of each quality (2 strands). Insert 4 markers and 1 marker thread as follows: Count 1 stitch, insert 1 marker in the next stitch, count 16 stitches (sleeve), insert 1 marker in the next stitch, count 12-13-14-15-16-17 stitches, insert 1 marker thread (mid-back), count 12-13-14-15-16-17 stitches insert 1 marker in the next stitch, count 16 stitches (sleeve), insert 1 marker in the next stitch, = 1 stitch left after the last marker. These marker stitches are now called raglan-stitches. Work back and forth as follows: ROW 1 (right side): Knit and increase for RAGLAN-1 on each side of the 4 raglan-stitches – read description above (8 increased stitches), cast on 2 stitches at the end of the row = 72-74-76-78-80-82 stitches. ROW 2 (wrong side): Purl (yarn overs worked as described under Raglan-1), cast on 2 stitches at the end of the row = 74-76-78-80-82-84 stitches. ROW 3 (right side): Knit and increase for raglan-1 on each side of the 4 raglan-stitches (8 increased stitches), cast on 2 stitches at the end of the row = 84-86-88-90-92-94 stitches. ROW 4 (wrong side): Purl, cast on 2 stitches at the end of the row = 86-88-90-92-94-96 stitches. ROW 5 (right side): Knit, increase for raglan-1 on each side of the 4 raglan-stitches (8 stitches increased), cast on 3 stitches at the end of the row = 97-99-101-103-105-107 stitches. ROW 6 (wrong side): Purl, cast on 3 stitches at the end of the row = 100-102-104-106-108-110 stitches. ROW 7 (right side): Knit, increase for raglan-1 on each side of the 4 raglan-stitches (8 stitches increased), cast on 8-10-12-14-16-18 stitches at the end of the row = 116-120-124-128-132-136 stitches. Work to the marker-thread mid-back. The neckline is finished and you have increased 4 times for raglan-1 on each side of the 4 raglan-stitches. YOKE: Continue with stocking stitch in the round from mid-back. REMEMBER THE KNITTING TENSION. NOTE: You will now increase more stitches on the front/back pieces than on the sleeves, so you will now work raglan-2 regularly in addition to raglan-1. Read the next 3 paragraphs before continuing. Increase for raglan-1 on each side of the 4 raglan-stitches every 2nd round 3-5-8-13-13-11 times (i.e., 7-9-12-17-17-15 times including the 4 increases on the neckline). AT THE SAME TIME on the first round, increase for RAGLAN-2 on the front and back pieces – read description above (raglan-2 is worked in addition to raglan-1). Increase for raglan-2 every 12th-12th-14th-10th-8th-8th round a total of 2-2-2-4-5-6 times. You have increased for raglan-1 3-5-8-13-13-11 times after the neckline. Continue to increase for raglan-1 every 2nd round but every second increase is only worked on the front and back pieces (i.e., increase on the front/back pieces every 2nd round and on the sleeves every 4th round). Increase like this 14-14-12-8-10-14 times on the front/back pieces (7-7-6-4-5-7 times on the sleeves) – remember raglan-2. You have now increased a total of 23-25-26-29-32-35 times on the front/back pieces (including raglan-2) and 14-16-18-21-22-22 times on the sleeves. After all the increases for raglan-1 and raglan-2 there are 232-252-268-296-316-332 stitches (70-76-80-88-96-104 stitches on the front and back pieces between the raglan-stitches and 44-48-52-58-60-60 stitches on the sleeves). Continue with stocking stitch, without further increases until the piece measures 22-24-25-26-28-30 cm, measured mid-back from cast-on edge. Divide for the body and sleeves as follows: Knit 36-39-41-45-49-53 (half back piece), place the next 44-48-52-58-60-60 stitches on a thread for the sleeve, cast on 8-8-10-10-12-14 stitches (in side under sleeve), knit 72-78-82-90-98-106 (front piece), place the next 44-48-52-58-60-60 stitches on a thread for the sleeve, cast on 8-8-10-10-12-14 stitches (in side under sleeve), knit the last 36-39-41-45-49-53 stitches (half back piece). The body and sleeves are finished separately. The piece is now measured from here! BODY: = 160-172-184-200-220-240 stitches. Insert 1 marker-thread in the middle of the 8-8-10-10-12-14 cast-on stitches under each sleeve. Allow the threads to follow your work onwards – they are used when working the split in each side. Continue stocking stitch in the round until the body measures 21-21-22-23-23-23 cm from the division. Now divide at both marker-threads and finish each piece separately. Place the front piece on circular needle size 3.5 mm and leave the back piece on the needle. FRONT PIECE: = 80-86-92-100-110-120 stitches. Knit 1 row from the right side and increase 25-27-29-31-35-37 stitches evenly spaced – read INCREASE TIP = 105-113-121-131-145-157 stitches. Work first row as follows from the wrong side: 1 GARTER STITCH – read description above, * purl 1, knit 1 *, work from *-* until there are 2 stitches left, purl 1 and 1 garter stitch. Continue this rib back and forth for 8 cm. Cast off. You can use Italian cast-off. The jumper measures approx. 56-58-60-62-64-66 cm from the shoulder. BACK PIECE: Place the 80-86-92-100-110-120 stitches on circular needle size 3.5 mm and work in the same way as the front piece. SLEEVES: Place the 44-48-52-58-60-60 stitches from the thread on the one side of the piece on short circular needle/double pointed needles size 5 mm and knit up 1 stitch in each of the 8-8-10-10-12-14 stitches cast on under the sleeve = 52-56-62-68-72-74 stitches. Insert a marker-thread in the middle of the new stitches under the sleeve. Start at the marker-thread and work stocking stitch in the round. When the sleeve measures 4-4-4-2-2-3 cm, decrease 2 stitches mid under sleeve – read DECREASE TIP. Decrease like this every 7-5-3½-3-2½-2 cm a total of 4-5-7-9-10-10 times = 44-46-48-50-52-54 stitches. Continue working until the sleeve measures 31-29-28-28-26-24 cm from the division (or to desired length before the rib. There is 12 cm left). Change to double pointed needles size 3.5 mm. Knit 1 round and increase 20-20-20-20-24-24 stitches evenly spaced = 64-66-68-70-76-78 stitches. Work rib (knit 1, purl 1) for 12 cm. Cast off in the same way as on the front/back pieces. The sleeve measures approx. 43-41-40-40-38-36 cm from the division. Work the other sleeve in the same way. DOUBLE NECK: Start mid-back and knit up from the right side 100-104-108-112-116-120 stitches round the neck, with short circular needle size 3.5 mm and 1 strand of each quality (2 strands) – stitch number must be divisible by 4 – match the rib to the raglan-stitches so they continue to be knitted (seen from the right side) and you have an odd number of stitches between each raglan-stitch so the rib fits. Work rib in the round (knit 1, purl 1) for 15 cm. Cast off. Fold the neck double to the inside and fasten with a couple of stitches in each raglan-line. |
|
 |
|
Have you finished this pattern?Tag your pictures with #dropspattern #moonmistsweater or submit them to the #dropsfan gallery. Do you need help with this pattern?You'll find 33 tutorial videos, a Comments/Questions area and more by visiting the pattern on garnstudio.com. © 1982-2026 DROPS Design A/S. We reserve all rights. This document, including all its sub-sections, has copyrights. Read more about what you can do with our patterns at the bottom of each pattern on our site. |
|


With over 40 years in knitting and crochet design, DROPS Design offers one of the most extensive collections of free patterns on the internet - translated to 17 languages. As of today we count 324 catalogues and 12290 patterns translated into English (UK/cm). 12290
We work hard to bring you the best knitting and crochet have to offer, inspiration and advice as well as great quality yarns at incredible prices! Would you like to use our patterns for other than personal use? You can read what you are allowed to do in the Copyright text at the bottom of all our patterns. Happy crafting!
Post a comment to pattern DROPS 245-7
We would love to hear what you have to say about this pattern!
If you want to leave a question, please make sure you select the correct category in the form below, to speed up the answering process. Required fields are marked *.